5.11 Bluetooth Control
Note: Motor speed is affected by battery power. For this course, when the battery power is high (the power value is above 26000), if the battery power is not enough, we need to charge battery in time or modify the motor speed in the code.
1. Learning Objectives
In this course, we will learn how to control the car via APP by Bluetooth.
We will integrate the previously learned tracking, ultrasonic obstacle avoidance, voice control, OLED control, buzzer control, programmable RGB lights, etc. All can be controlled via Bluetooth.
2. About Hardware
We need use all components on Pico robot.
Note: Please put the cart on the ground. It is normal for sound sensor and battery level to fluctuate when running motors, programmable RGB lights. When running the line inspection mode, it must be performed in an indoor environment without sunlight to reduce the interference of sunlight on the line inspection sensor, and the indoor light must be sufficient when the line inspection is performed, otherwise the program needs to be modified according to the method in section 5.4. When running the ultrasonic obstacle avoidance mode, you need to ensure that the obstacles are not too dense. If the obstacles are too dense, you can modify the program according to the method in Section 5.6. When running the voice control mode, it needs to run in a quieter environment. OLED can display up to 16 characters in one line, and only supports numbers and English display. Please make sure the battery power (the power value is above 26000) before use, otherwise it may run abnormally.
About tracking function:
Note: The tracking sensor will be affected by light, please run the program in an indoor environment without sunlight to reduce the interference of sunlight on the tracking sensor. And keep the indoor light enough when tacking.
About avoid function:
Note: The car can be placed on the ground, and the obstacles on the ground should not be too dense.
3. Download code and Bluetooth connection
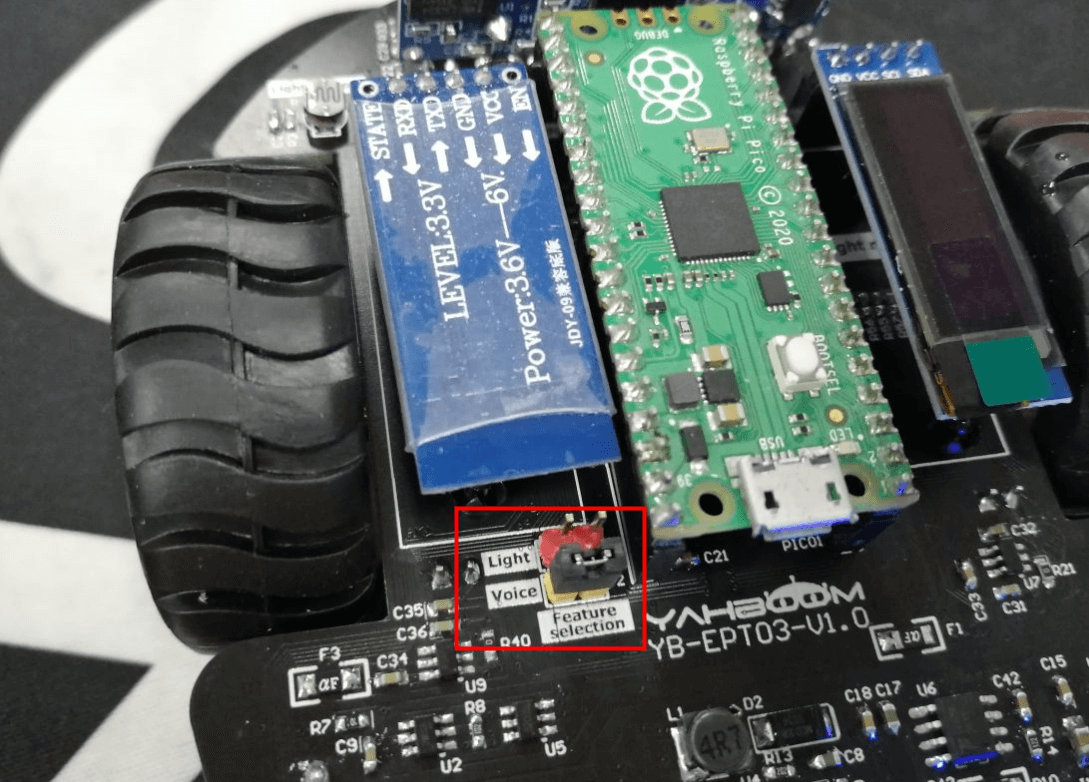
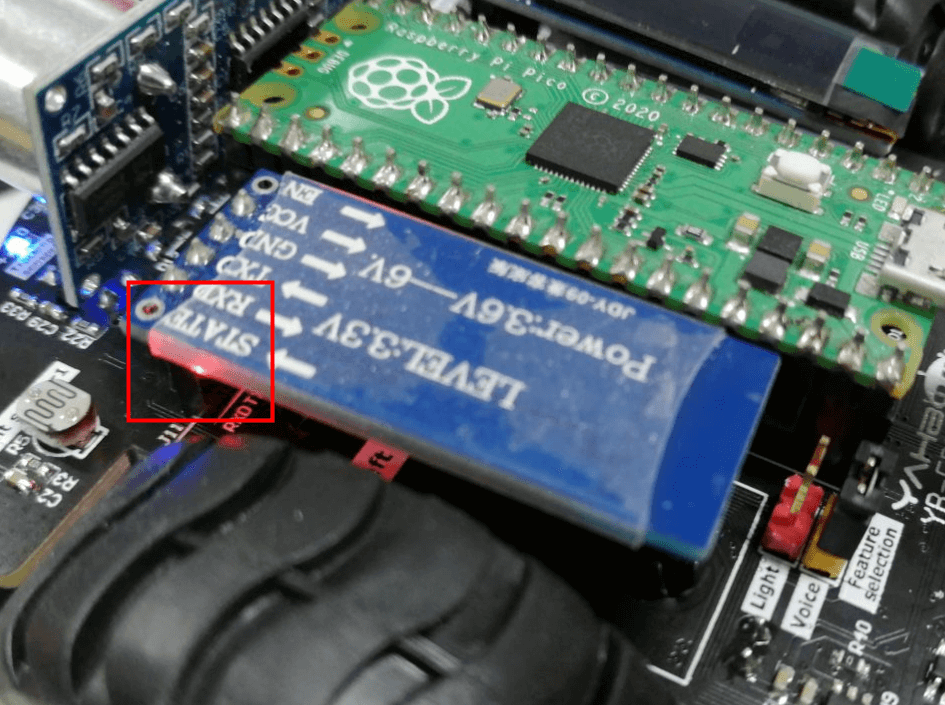
3.1 Follow the assembly steps or our video to assemble the car, and connect the Bluetooth module and the OLED module, insert the jumper cap to the Voice pin header. As shown below.
3.2 According to [Development Environment Setup]---[Import library file], import the library file of the robot into the Raspberry Pi Pico board.
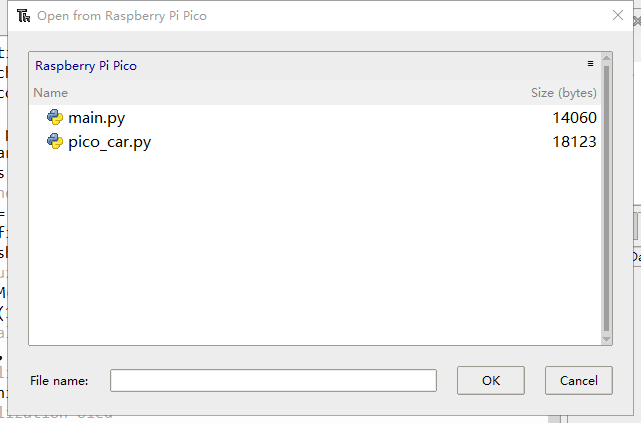
3.3 Download the corresponding code to the Raspberry Pi Pico board.
Note: If you want the robot to automatically start the Bluetooth remote control function, please refer to [Development Environment Construction] --- [Download code/Startup automatically] to set the Bluetooth remote control code to start automatically when robot is turned on.
(Note: The Bluetooth control file name should be set to main.py)
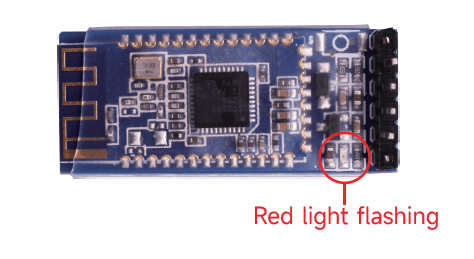
3.4 Unplug the Micro USB cable on the robot and restart the robot. At this point, we can see that the red light of the Bluetooth module is flashing.
3.5 Android users search "YahboomRobot" inPlay Store to download APP. iOS users search "YahboomRobot”in AppStore to download APP.
3.6 After downloading the Bluetooth remote control APP, we need to install it.
During installation, if the phone prompts you to obtain location permission, you need to click "ALLOW" to obtain location permission.
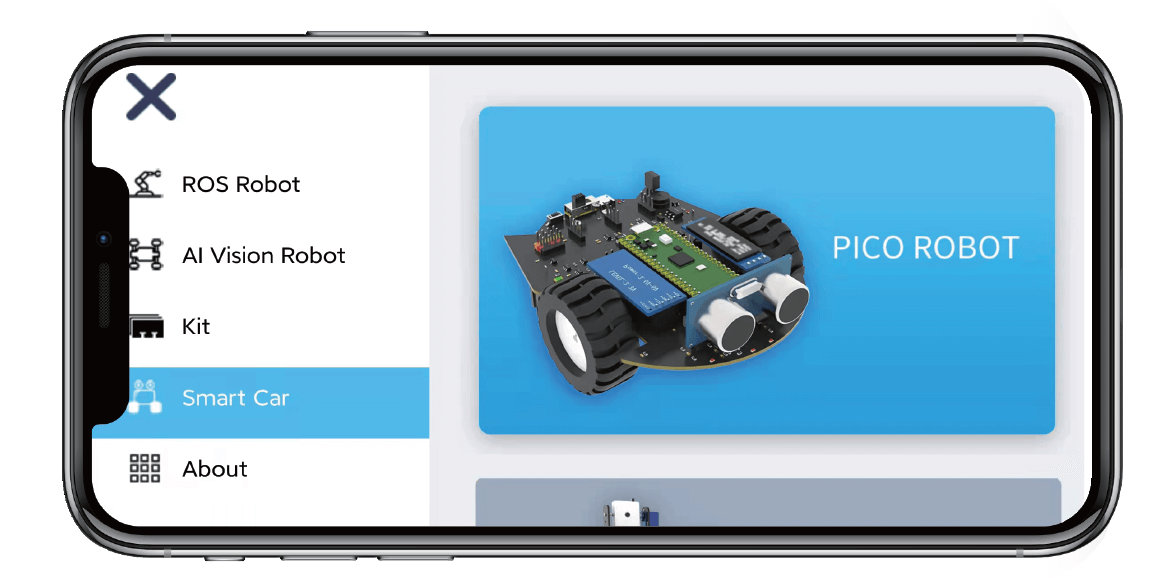
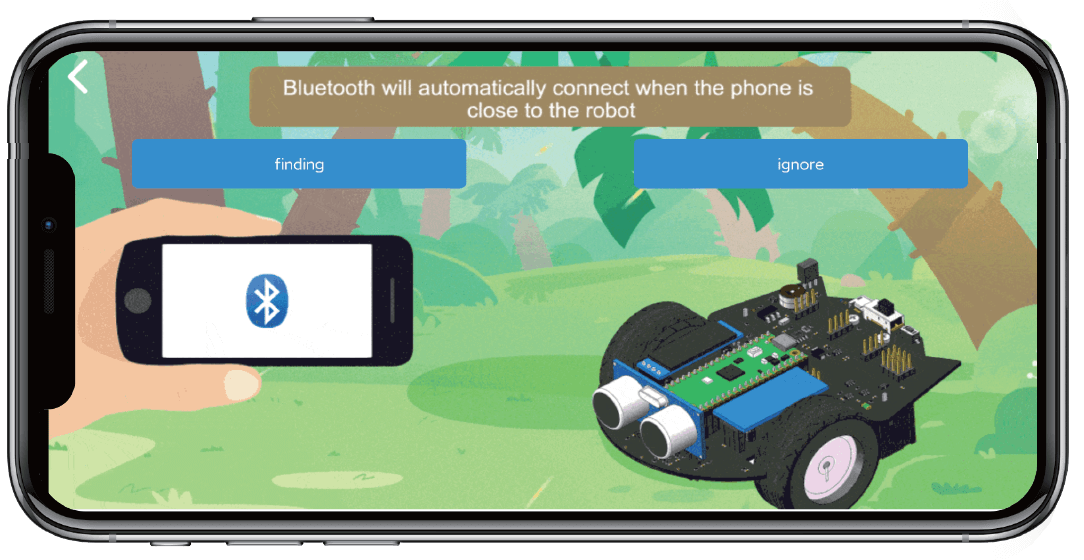
3.7 Open the mobile phone Bluetooth and YahboomRobot APP, select the [smart car] --[PICO ROBOT], enter the Bluetooth connection interface, the Bluetooth will automatically connect when the phone is close to the robot.
If it didn’ t connect automatically, we need to click [Search for Bluetooth], after successful connection, The APP will jump to the control interface.
4.8 After the connection is successful, the red light of the Bluetooth module will keep on, and the APP interface will prompt “Bluetooth connect successful!” .
We can control the robot through APP. If the Bluetooth is disconnected, the red light will keep flashing again.

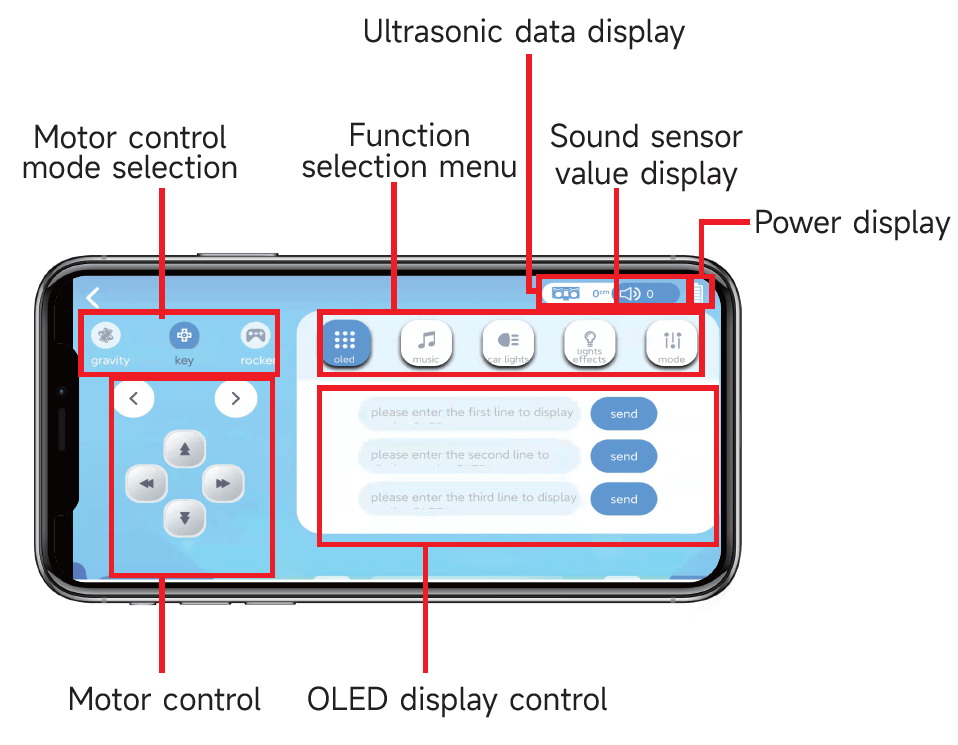
App function introduction:
1. Basic functions
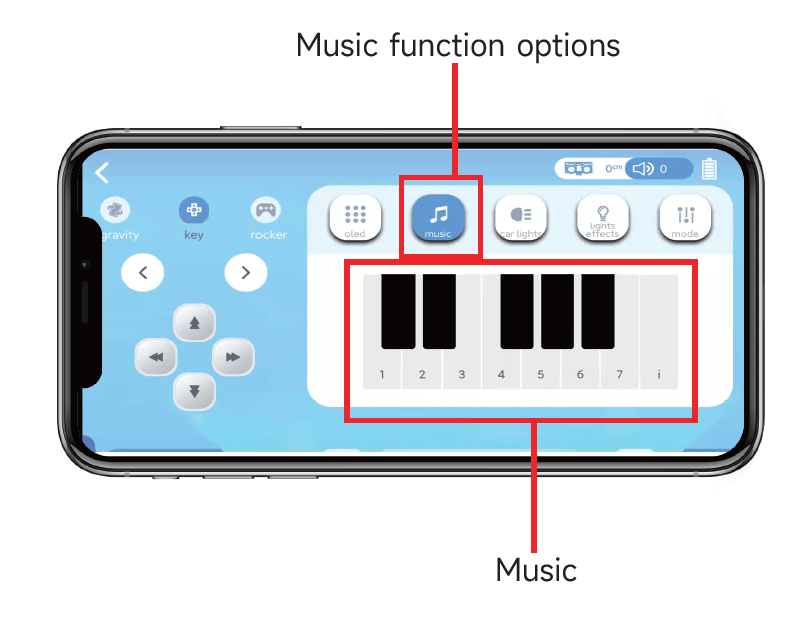
2. Music options
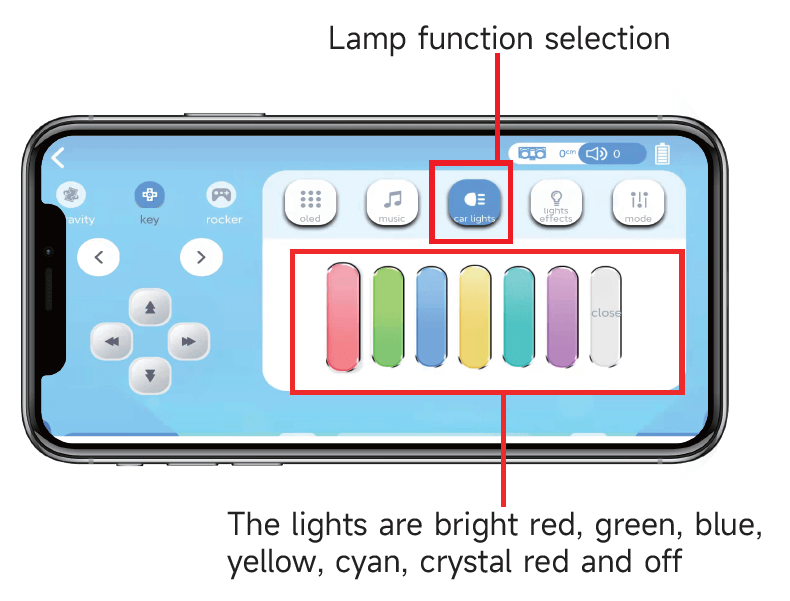
3. Lamp options
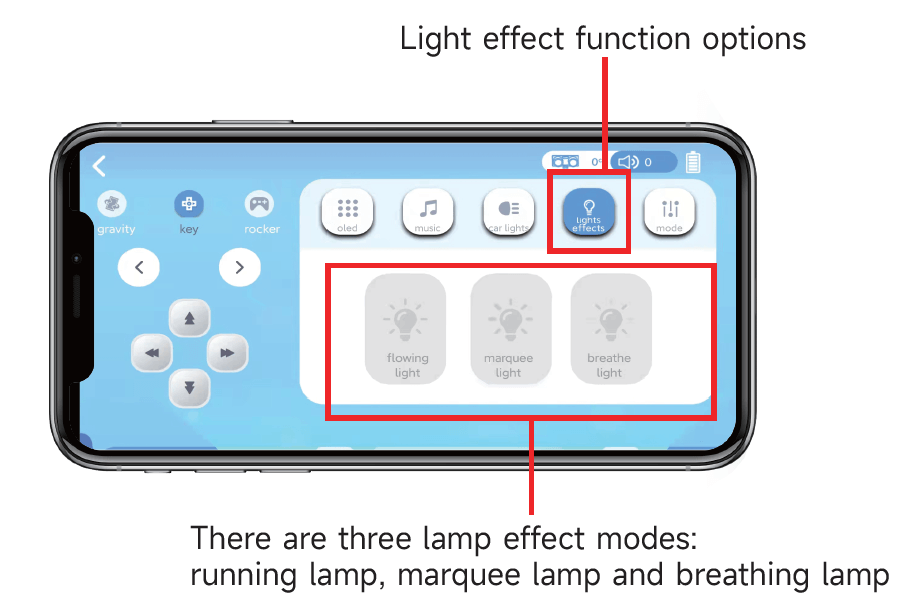
4. Lamp efficiency
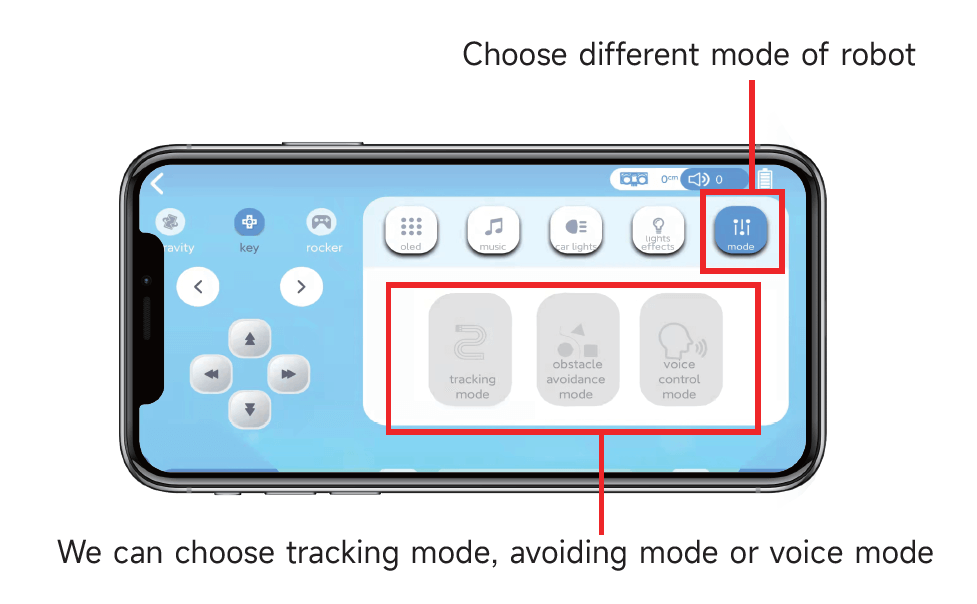
5. Mode selection
5. About code
Code path: Code -> 3.Robotics course -> 11.Bluetooth control.py
ximport timefrom machine import Pin, I2C, PWM, Timer, UART, ADCfrom pico_car import SSD1306_I2C, pico_car, ws2812b, ultrasonic
Motor = pico_car()Motor.Car_Stop()num_leds = 8 # Number of NeoPixels# Pin where NeoPixels are connectedpixels = ws2812b(num_leds, 0)pixels.fill(0,0,0)pixels.show()# set buzzer pinBZ = PWM(Pin(22))BZ.freq(1000)# Initialize musicCM = [0, 330, 350, 393, 441, 495, 556, 624]#initialization ultrasonicultrasonic = ultrasonic()#initialization oledi2c=I2C(1, scl=Pin(15),sda=Pin(14), freq=100000)oled = SSD1306_I2C(128, 32, i2c)#initialization Bluetoothuart = UART(0, 9600, bits=8, parity=None, stop=1, tx=Pin(16), rx=Pin(17))dat = 0#initialization ADCQuantity_of_electricity = machine.ADC(28)Sound = machine.ADC(27)#define Timertim = Timer()def tick(timer): w_power = int(Quantity_of_electricity.read_u16()/65535*240) if w_power > 100: w_power = 100 w_distance = ultrasonic.Distance_accurate() w_sounds = int(Sound.read_u16()/65535*200) uart.write('$DAT') uart.write(str(w_distance)) uart.write(',') uart.write(str(w_sounds)) uart.write(',') uart.write(str(w_power)) uart.write('#')#set timer frequency 0.5tim.init(freq = 0.5,mode = Timer.PERIODIC,callback = tick)
#define water lampdef water(): global i,dat i = 0 while dat != b'M#': while uart.any() > 0: dat = uart.read(2) if i == 0: pixels.set_pixel(7,0,0,0) pixels.set_pixel(0,150,0,150) i = i + 1 else: pixels.set_pixel(i-1,0,0,0) pixels.set_pixel(i,150,0,150) i = i + 1 if i == 8: i = 0 pixels.show() time.sleep(0.1) i = 0
#define breathing lampdef breathing(): global i,dat i = 0 brightness = 0 fadeAmount = 1 while dat != b'M#': while uart.any() > 0: dat = uart.read(2) for i in range(num_leds): pixels.set_pixel(i,0,brightness,brightness) pixels.show() brightness = brightness + fadeAmount if brightness <= 0 or brightness >= 200: fadeAmount = -fadeAmount time.sleep(0.005) i = 0
#define horse lampdef horse(): global dat while dat != b'M#': while uart.any() > 0: dat = uart.read(2) for i in range(num_leds): for j in range(num_leds): #pixel_num, red, green, blue pixels.set_pixel(j,abs(i+j)%10,abs(i-(j+3))%10,abs(i-(j+6))%10) pixels.show() time.sleep(0.05)
#Define the tracking sensor, 1-4 from left to right#recognize that black is 0 and white is 1#Tracing_1 Tracing_2 Tracing_3 Tracing_4# 2 3 4 5 Tracing_1 = machine.Pin(2, machine.Pin.IN)Tracing_2 = machine.Pin(3, machine.Pin.IN)Tracing_3 = machine.Pin(4, machine.Pin.IN)Tracing_4 = machine.Pin(5, machine.Pin.IN)#define linedef line(): global dat oled.fill(0) while dat != b'V#': while uart.any() > 0: dat = uart.read(2) #Four channel tracking pin level status # 0 0 X 0 # 1 0 X 0 # 0 1 X 0 #Handle the rotation of right acute angle and right right right angle if (Tracing_1.value() == 0 or Tracing_2.value() == 0) and Tracing_4.value() == 0: Motor.Car_Right(120,120) for i in range(num_leds): pixels.set_pixel(i,0,255,0) oled.text('Turn Right', 0, 0) #time.sleep(0.08) #Four channel tracking pin level status # 0 X 0 0 # 0 X 0 1 # 0 X 1 0 #Handle the rotation of left sharp angle and left right angle elif Tracing_1.value() == 0 and (Tracing_3.value() == 0 or Tracing_4.value() == 0): Motor.Car_Left(120,120) for i in range(num_leds): pixels.set_pixel(i,0,0,255) oled.text('Turn Left', 0, 0) #time.sleep(0.08) # 0 X X X #Leftmost detected elif Tracing_1.value() == 0: Motor.Car_Left(100,100) for i in range(num_leds): pixels.set_pixel(i,0,0,255) oled.text('Turn Left', 0, 0) # X X X 0 #Rightmost detected elif Tracing_4.value() == 0: Motor.Car_Right(100,100) for i in range(num_leds): pixels.set_pixel(i,0,255,0) oled.text('Turn Right', 0, 0)
# X 0 1 X #Deal with small left bend elif Tracing_2.value() == 0 and Tracing_3.value() == 1: Motor.Car_Run(0,100) for i in range(num_leds): pixels.set_pixel(i,0,0,255) oled.text('Left', 0, 0)
# X 1 0 X #Handle small right bend elif Tracing_2.value() == 1 and Tracing_3.value() == 0: Motor.Car_Run(100,0) for i in range(num_leds): pixels.set_pixel(i,0,255,0) oled.text('Right', 0, 0)
# X 0 0 X #Processing line elif Tracing_2.value() == 0 and Tracing_3.value() == 0: Motor.Car_Run(200,200) for i in range(num_leds): pixels.set_pixel(i,255,255,255) oled.text('Run', 0, 0) pixels.show() oled.show() oled.fill(0) #In other cases, the trolley keeps the previous trolley running pixels.fill(0,0,0) Motor.Car_Stop() BZ.duty_u16(0)
#define ultrasonic avoid def avoid(): global dat oled.fill(0) while dat != b'V#': while uart.any() > 0: dat = uart.read(2) #get distance distance = ultrasonic.Distance_accurate() print("distance is %d cm"%(distance) ) #display distance oled.text('distance:', 0, 0) oled.text(str(distance), 75, 0) oled.show() oled.fill(0) #Control action if distance < 10: for i in range(num_leds): pixels.set_pixel(i,255,0,0) pixels.show() Motor.Car_Back(150,150) BZ.duty_u16(500) BZ.freq(CM[7]) time.sleep(0.2) Motor.Car_Right(150,150) BZ.duty_u16(500) BZ.freq(CM[5]) time.sleep(0.2) BZ.duty_u16(0) elif distance >= 10 and distance < 30: for i in range(num_leds): pixels.set_pixel(i,255,255,0) pixels.show() Motor.Car_Run(100,100) else: for i in range(num_leds): pixels.set_pixel(i,0,255,0) pixels.show() Motor.Car_Run(100,100) time.sleep(0.1) pixels.fill(0,0,0) Motor.Car_Stop() BZ.duty_u16(0)
#define ultrasonic voice def voice(): global dat oled.fill(0) while dat != b'V#': while uart.any() > 0: dat = uart.read(2) #get value sounds = Sound.read_u16() print(sounds) oled.text('Sound:', 0, 0) oled.text(str(sounds), 50, 0) #Control action if sounds > 20000: while sounds > 10000: Motor.Car_Stop() sounds = Sound.read_u16() print(sounds) time.sleep(0.001) Motor.Car_Run(255,255) BZ.duty_u16(500) BZ.freq(CM[1]) pixels.set_pixel(2,150,0,150) pixels.set_pixel(3,150,0,150) pixels.show() time.sleep(0.03) BZ.duty_u16(500) BZ.freq(CM[2]) pixels.set_pixel(2,0,0,0) pixels.set_pixel(3,0,0,0) pixels.set_pixel(1,150,0,150) pixels.set_pixel(4,150,0,150) pixels.show() time.sleep(0.03) BZ.duty_u16(500) BZ.freq(CM[3]) pixels.set_pixel(1,0,0,0) pixels.set_pixel(4,0,0,0) pixels.set_pixel(0,150,0,150) pixels.set_pixel(5,150,0,150) pixels.show() time.sleep(0.03) BZ.duty_u16(500) BZ.freq(CM[4]) pixels.set_pixel(0,0,0,0) pixels.set_pixel(5,0,0,0) pixels.set_pixel(6,150,0,150) pixels.set_pixel(7,150,0,150) pixels.show() time.sleep(0.03) BZ.duty_u16(500) BZ.freq(CM[5]) pixels.set_pixel(0,0,0,0) pixels.set_pixel(5,0,0,0) pixels.set_pixel(6,150,0,150) pixels.set_pixel(7,150,0,150) pixels.show() time.sleep(0.03) BZ.duty_u16(500) BZ.freq(CM[6]) pixels.set_pixel(6,0,0,0) pixels.set_pixel(7,0,0,0) pixels.show() BZ.duty_u16(0) sounds = 0 oled.show() oled.fill(0) else: Motor.Car_Stop() oled.show() oled.fill(0) time.sleep(0.01) pixels.fill(0,0,0) Motor.Car_Stop() BZ.duty_u16(0)
while True: #receive data while uart.any() > 0: dat = uart.read(2) #OLED display if dat == b'X#': for oledi in range(128): for oledj in range(10): oled.pixel(oledi, oledj,0) datoled_1 = uart.read(16) stroled_1 = str(datoled_1) stroled_1 = stroled_1.replace("b'", "") stroled_1 = stroled_1.replace("'", "") stroled_1 = stroled_1.replace("$", "") oled.text(stroled_1, 0, 0) oled.show() print(stroled_1) elif dat == b'Y#': for oledi in range(128): for oledj in range(10,20): oled.pixel(oledi, oledj,0) datoled_2 = uart.read(16) stroled_2 = str(datoled_2) stroled_2 = stroled_2.replace("b'", "") stroled_2 = stroled_2.replace("'", "") stroled_2 = stroled_2.replace("$", "") oled.text(stroled_2, 0, 10) oled.show() print(stroled_2) elif dat == b'Z#': for oledi in range(128): for oledj in range(20,30): oled.pixel(oledi, oledj,0) datoled_3 = uart.read(16) stroled_3 = str(datoled_3) stroled_3 = stroled_3.replace("b'", "") stroled_3 = stroled_3.replace("'", "") stroled_3 = stroled_3.replace("$", "") oled.text(stroled_3, 0, 20) oled.show() print(stroled_3) elif dat == b'W#': BBuzzer = uart.read(1) if BBuzzer == b'1': BZ.duty_u16(500) BZ.freq(277) elif BBuzzer == b'2': BZ.duty_u16(500) BZ.freq(311) elif BBuzzer == b'3': BZ.duty_u16(500) BZ.freq(370) elif BBuzzer == b'4': BZ.duty_u16(500) BZ.freq(415) elif BBuzzer == b'5': BZ.duty_u16(500) BZ.freq(466)
#car control if dat == b'A#': Motor.Car_Run(255,255) elif dat == b'B#': Motor.Car_Back(255,255) elif dat == b'C#': Motor.Car_Run(0,255) elif dat == b'D#': Motor.Car_Run(255,0) elif dat == b'E#': Motor.Car_Left(255,255) elif dat == b'F#': Motor.Car_Right(255,255) elif dat == b'0#': Motor.Car_Stop() #music control elif dat == b'1#': BZ.duty_u16(500) BZ.freq(262) elif dat == b'2#': BZ.duty_u16(500) BZ.freq(294) elif dat == b'3#': BZ.duty_u16(500) BZ.freq(330) elif dat == b'4#': BZ.duty_u16(500) BZ.freq(349) elif dat == b'5#': BZ.duty_u16(500) BZ.freq(392) elif dat == b'6#': BZ.duty_u16(500) BZ.freq(440) elif dat == b'7#': BZ.duty_u16(500) BZ.freq(494) elif dat == b'8#': BZ.duty_u16(500) BZ.freq(523) elif dat == b'O#': BZ.duty_u16(0) #car light elif dat == b'G#': pixels.fill(255,0,0) pixels.show() elif dat == b'H#': pixels.fill(0,255,0) pixels.show() elif dat == b'I#': pixels.fill(0,0,255) pixels.show() elif dat == b'J#': pixels.fill(255,255,0) pixels.show() elif dat == b'K#': pixels.fill(0,255,255) pixels.show() elif dat == b'L#': pixels.fill(255,0,255) pixels.show() elif dat == b'N#': water() elif dat == b'P#': horse() elif dat == b'Q#': breathing() elif dat == b'M#': pixels.fill(0,0,0) pixels.show() i = 0 brightness = 0 fadeAmount = 1 #mode elif dat == b'S#': line() elif dat == b'T#': avoid() elif dat == b'U#': voice() elif dat == b'V#': oled.fill(0) oled.show() pixels.fill(0,0,0) pixels.show() Motor.Car_Stop() BZ.duty_u16(0) time.sleep(0.01)
In this program, the procedures of the previous courses are integrated, for example, the breathing light part is the procedure of Section 3.4, and the ultrasonic obstacle avoidance part is the procedure of Section 5.6. In this program, the timer interrupt Timer is also used to regularly report ultrasonic, sound, and battery data to the APP for display.
from pico_car import SSD1306_I2C, pico_car, ws2812b, ultrasonic
Using pico_car's SSD1306_I2C, ultrasonic, pico_car, ws2812b, encapsulates motor driver and RGB lights, OLED, and ultrasonic libraries.
import time
The "time" library. This library handles everything time related, from measuring it to inserting delays into programs. The unit is seconds.
from machine import Pin, I2C, PWM, Timer, UART, ADC
The machine library contains all the instructions that MicroPython needs to communicate with Pico and other MicroPython-compatible devices, extending the language of physical computing, using the Pin, PWM, Timer, UART, ADC and I2C libraries here.
Motor = pico_car()
Initialize the motor drive.
Motor.Car_Run(255,255)
Control the car to move forward, the speed is set to 255, the parameters are (left motor speed, right motor speed), and the speed range is 0-255.
Motor.Car_Stop()
Control the car to stop.
Motor.Car_Back(255,255)
Control the car to back up.
Motor.Car_Run(0,255)
Control the car to turn left.
Motor.Car_Run(255,0)
Control the car to turn right.
Motor.Car_Left(255,255)
Control the car to turn left.
Motor.Car_Right(255,255)
Control the car to rotate right.
pixels = ws2812b(num_leds, 0)
Initialize RGB lights, we have 8 RGB lights, here num_leds is set to 8.
pixels.fill(0,0,0)
Set all lights to 0,0,0, that is, turn off all lights, the parameters are (red, green, blue), and the color brightness is 0-255.
pixels.set_pixel(1,150,0,150)
Set the first light to purple.
pixels.show()
Display the set lights.
BZ = PWM(Pin(22))
Set IO22 as a PWM output pin to control the buzzer.
BZ.freq(1000)
Set the PWM frequency to 1000.
BZ.duty_u16(0)
When the value is 0, the sound is turned off, and when the value is 500, the sound is turned on.
ultrasonic = ultrasonic()
Initialize ultrasonic ranging.
distance = ultrasonic.Distance_accurate()
Assign the value returned by ultrasonic ranging to the variable distance .
i2c=I2C(1, scl=Pin(15),sda=Pin(14), freq=100000)
Set the IIC 1 pin to SCL 15, SDA 14, and the frequency to 100000.
oled = SSD1306_I2C (128, 32, i2c)
Initialize the size of the OLED to 128*32, and pass in the IIC parameters set earlier.
oled.show ()
Display the set OLED content.
oled.fill (0)
Clear the settings and prepare for the next display.
oled.text ('Run', 0, 0)
Display 'Run' at the 0,0 position of the OLED.
tim = Timer ()
Initialize timer interrupt.
tick(timer)
The timing interrupt function uses the variable times_ for time control in the function to control the switching speed of RGB, etc.
tim.init(freq = 0.5,mode = Timer.PERIODIC,callback = tick)
Set the timer interrupt function and frequency.
machine.ADC(28)
Initialize ADC port 28.
Sound.read_u16()/65535*200
Read the sound sensor value and convert it into a range of 0-100.
Quantity_of_electricity.read_u16()/65535*240
Read the power value and convert it into a range of 0-100.
uart = UART(0, 9600, bits=8, parity=None, stop=1, tx=Pin(16), rx=Pin(17))
Initialize Bluetooth serial port UART 0, pins TX 16, RX 17, baud rate 9600, data bits 8, stop bit 1, no parity bit.
uart.write('$DAT')
Send $DAT to APP via Bluetooth.
uart.any()
Read serial port data and return data when any data is received.
dat = uart.read(2)
Read two data and assign them to the variable dat, and make different actions by judging the value of this variable.
Tracing_1 = machine.Pin(2, machine.Pin.IN)
Initialize pin 2 as the pin of line tracking sensor 1 and set it as input.
Tracing_1.value()
The Tracing_1.value() function is used to detect the level of the corresponding port.
stroled_1 = stroled_1.replace("b'", "")
Replace the b' string in the variable stroled_1 with nothing, that is, remove the b' string.
6. Communication protocol
After the program download is complete, run the car according to the following protocol.
| Trolley movement | Agreement content |
|---|---|
| Forward | A# |
| Back | B# |
| Turn Left | C# |
| Turn Right | D# |
| Left-handed | E# |
| Right Rotation | F# |
| stop | 0# |
| Music Play | Agreement Content |
| do | 1# |
| ri | 2# |
| mi | 3# |
| fa | 4# |
| his | 5# |
| the | 6# |
| xi | 7# |
| None | O# |
| DO HIGH | 8# |
| do# | W#1 |
| ri# | W#2 |
| fa# | W#3 |
| su# | W#4 |
| la# | W#5 |
| Colorful lights | Agreement content |
| Red | G# |
| Green | H# |
| Blue | I# |
| Yellow | J# |
| Green | K# |
| Magenta | L# |
| Close | M# |
| Colorful lighting effect | Agreement content |
| Water Lamp | N# |
| Marquee | P# |
| Breathing Light | Q# |
| Close | M# |
| Mode selection | Protocol content |
| Line Follower Mode | S# |
| Ultrasonic Obstacle Avoidance | T# |
| Voice Control Car | U# |
| Exit mode | V# |
| OLED display (no more than 16 characters per line of data) | Protocol content |
| first row | X#data |
| Second row | Y#data |
| Third row | Z#data |
| Proactively report data | Protocol content |
| $DAT120,99,98# | Ultrasonic distance: 120 |
| Sound value: 99 | |
| Power: 98 |