4、Multi-machine communication
4、Multi-machine communication4.1、Login remotely4.1.1、SSH4.1.2、jupyter lab4.1.3、VNC4.2、ROS multi-machine communication4.2.1、Universal version4.2.2、Smiple version4.3、Webpage real-time monitoring
Note: You must know the IP of the robot before remote login. You can view the current IP address of the robot through an external display or OLED
.jpg)
4.1、Login remotely
4.1.1、SSH
Note: The system graphical interface cannot be displayed in this way.
- PuTTY Login

Input IP address, then click【open】;
.jpg)
For Yahoom image, user name is pi password is yahboom
- ubuntu system
.png)
1)Input following command in terminal
ssh pi@192.168.2.103
2)Then, input yes
3)Next, input yahboom
4.1.2、jupyter lab
Note: The system graphical interface cannot be displayed in this way.

Input following URL on browser, pree 【Enter】
Then, input password yahboom
Click【Log in】
xxxxxxxxxxhttp://192.168.2.103:8888
After login, you can see following interface.

You can enter these folder, and modify content in file, click 【Terminal】 to enter command terminal.
4.1.3、VNC
Note: The system graphical interface can be displayed in this way.
Login steps, as shown below.


4.2、ROS multi-machine communication
4.2.1、Universal version
All ros masters are under the same network; if multiple devices have similar processes, choose one as the master, and the others are all slaves; the following two devices are taken as an example.
Install the ssh server on two devices; install the chrony package for synchronization:
xxxxxxxxxxsudo apt-get install chrony openssh-server
Input following command to view the IP information and host name of the two devices:
xxxxxxxxxxCommand: ifconfig 和 hostname

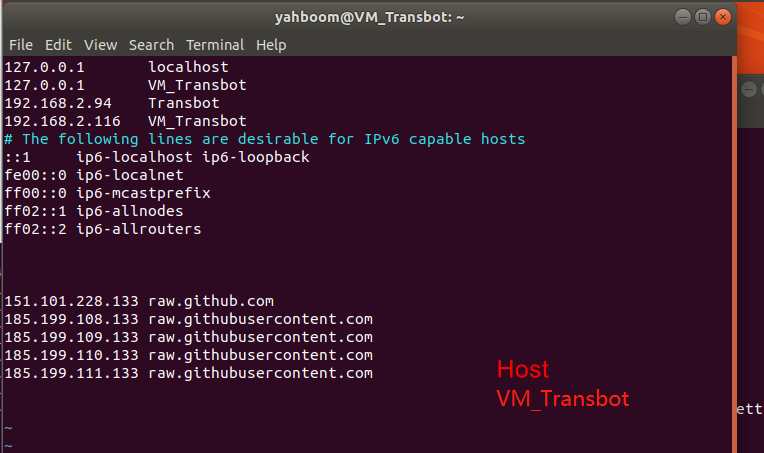
修改/etc文件夹下的hosts文件:
xxxxxxxxxxsudo chmod a+w /etc/hostssudo vim /etc/hosts
将两台设备的IP和主机名分别添加到两台设备的hosts文件下,绑定用户;前面的IP,后面的是名字,尽量对齐 ;

After the modification, enter the following commands on both devices to restart the following network to realize the communication between the two devices::
xxxxxxxxxxsudo /etc/init.d/networking restart
After installation, input following command confirm whether the server has been started:
xxxxxxxxxxps -e|grep ssh


Input following command to check if the communication is normal:
xxxxxxxxxxping hostname of the device


Modify~/.bashrc file
xxxxxxxxxxsudo vim ~/.bashrc
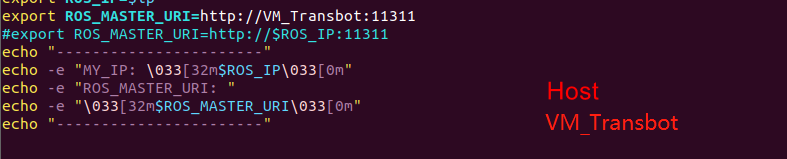
Add following content to ~/.bashrc file of master
xxxxxxxxxxexport ROS_MASTER_URI=http://Host username:11311
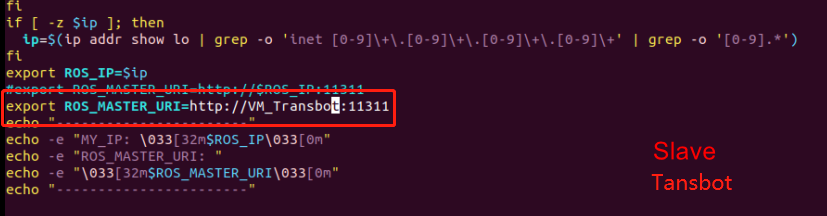
Add following content to ~/.bashrc file of slave
xxxxxxxxxxexport ROS_MASTER_URI=http://Host username:11311
For example, jetson nano as a master
After setting the IP, we need to refresh it, and then we can communicate.
xxxxxxxxxxsource ~/.bashrc
- Phenomenon show
Note: we need to start up ROS Master on ROS Master
ubuntu(virtual machine VM_Transbot)
xxxxxxxxxxroscorerosrun turtlesim turtle_teleop_key
Raspberry Pi (Transbot)
xxxxxxxxxxrosrun turtlesim turtlesim_node
4.2.2、Smiple version
If jetson nano is the host and the IP address is known, you only need to modify the .bashrc file of the slave.
xxxxxxxxxxsudo vim ~/.bashrc
Add following content file at the bottom.
xxxxxxxxxxexport ROS_MASTER_URI=http://主机IP:11311
The effect is the same as [4.2.1]
4.3、Webpage real-time monitoring
Environment setup
xxxxxxxxxxsudo apt-get install ros-melodic-async-web-server-cpp ros-melodic-web-video-server ros-melodic-usb-cam
Ensure that the USB camera be insert correctly, input following command to check if the USB device exists ( it is video0)
xxxxxxxxxxll /dev
If the system prompts that the execution authority is not enough, you need to input the following command to add the execution authority.
xxxxxxxxxxsudo chmod 777 /dev/video*
Modify usb_cam-test.launch file
xxxxxxxxxxsudo vim /opt/ros/melodic/share/usb_cam/launch/usb_cam-test.launch
xxxxxxxxxx<launch> <node name="usb_cam" pkg="usb_cam" type="usb_cam_node" output="screen" > <param name="video_device" value="/dev/video0" /> <param name="image_width" value="640" /> <param name="image_height" value="480" /> <param name="pixel_format" value="yuyv" /> <param name="camera_frame_id" value="usb_cam" /> <param name="io_method" value="mmap"/> </node> <node name="image_view" pkg="image_view" type="image_view" respawn="false" output="screen"> <remap from="image" to="/usb_cam/image_raw"/> <param name="autosize" value="true" /> </node></launch>change
xxxxxxxxxx<launch> <arg name="open_view" default="false"/> <node name="usb_cam" pkg="usb_cam" type="usb_cam_node" output="screen"> <param name="video_device" value="/dev/video0"/> <param name="image_width" value="640"/> <param name="image_height" value="480"/> <param name="pixel_format" value="yuyv"/> <param name="camera_frame_id" value="usb_cam"/> <param name="io_method" value="mmap"/> </node> <!-- 启动web_video_server --> <node pkg="web_video_server" type="web_video_server" name="web_video_server" output="screen"/> <!-- 是否启动image_view --> <group if="$(arg open_view)"> <node name="image_view" pkg="image_view" type="image_view" respawn="false" output="screen"> <remap from="image" to="/usb_cam/image_raw"/> <param name="autosize" value="true"/> </node> </group></launch>Open terminal, input following command to start it.
xxxxxxxxxxroslaunch usb_cam usb_cam-test.launch View pictures
xxxxxxxxxxView on local web browserhttp://localhost:8080/If you want to view by other devices, you must ensure they at the same local area networkhttp://192.168.2.103:8080/(192.168.2.103 is the IP address of the master)Note: It is recommended to use Google browser, other browsers may not be able to open the image