7. Connect Wi-Fi
Pico W comes with CYW43439 wireless chip, supports WiFi 4 (802.11n), single frequency (2.4 GHz).
At present, only wireless LAN is supported for the time being, and the official Raspberry Pi may release firmware that supports Bluetooth in the future.
Program Analysis The following program scans wifi in two ways, one is blocking type, and the other is using system clock interrupt to scan. This routine mainly explains the blocking type.
C programming
x
char ssid[] = "me"; //wifi名称char pass[] = "abcabcabc"; //密码 使用纯英文的,带有数字的可能连不上去
int main(){ stdio_init_all(); if(cyw43_arch_init_with_country(CYW43_COUNTRY_UK)) { printf("failed to initialise\n"); return 1; } printf("initialised\n");
cyw43_arch_enable_sta_mode(); if (cyw43_arch_wifi_connect_timeout_ms(ssid, pass, CYW43_AUTH_WPA2_MIXED_PSK, 10000)) //CYW43_AUTH_WPA2_AES_PSK { printf("failed to connect\nretry\n"); return 1; }
printf("connected\n");}#include <stdio.h>
C language standard header files
#include "pico/cyw43_arch.h"
This header file is the wifi network card module on the driver board
#include "pico/stdlib.h"
This header file is a standard header file for the pico W series. The library includes common hardware and high-level libraries like hardware_gpio and pico_time, and it also introduces components like pico_standard_link.
cyw43_arch_init_with_country()
This function indicates which country the connected wifi is in. If the WiFi has a Chinese name, replace the parameter CYW43_COUNTRY_UK with CYW43_COUNTRY_CHINA
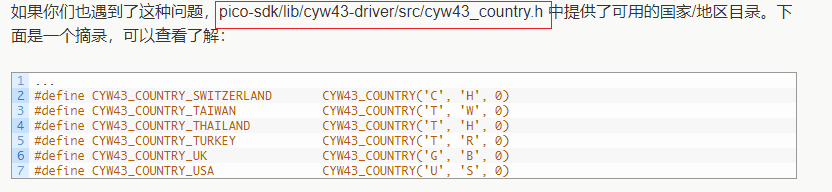
For the text of other countries, please refer to the path in the figure below and go to the file to see it. Because the WiFi connected to this routine is in pure English, CYW43_COUNTRY_UK can also be used successfully.
cyw43_arch_enable_sta_mode(); Set the wifi network card to STA mode, which is the connection mode
cyw43_arch_wifi_connect_timeout_ms()
This function scans for wifi
Parameter Description:
Parameter 1: wifi name
Parameter 2: WiFi password
Parameter 3: There are four optional parameters for wifi configuration
They are:CYW43_AUTH_OPEN 、CYW43_AUTH_WPA_TKIP_PSK 、 CYW43_AUTH_WPA2_AES_PSK 、 CYW43_AUTH_WPA2_MIXED_PSK
 Parameter 4: Time to wait for a timeout connection
4. Program creation and burning To create a project, please refer to the previous tutorial on creating a project, which will not be repeated here. After writing the program, you need to add the standard library to the build according to the program you wrote before compiling, open CMakeLists.txt in the project, and check target_link_libraries(blink pico_stdlib pico_cyw43_arch_lwip_threadsafe_background), It can be seen that pico_stdlib and pico_cyw43_arch_lwip_threadsafe_background are added because the pico_stdlib and pico_cyw43_arch_lwip_threadsafe_background libraries are used in the previous program.If other libraries are added to the functions used, the corresponding libraries need to be added. If you do not know where to add the libraries, you can go to the official pico-examples case downloaded earlier, which contains the cases of each function and the corresponding CMakeLists.txt file for reference. After modifying CMakeLists.txt, save and exit, and then enter the bulid path of the project Enter the command to compile
xxxxxxxxxxcmake -DPICO_BOARD=pico_w .. && nmakeExplain the main part of the command
-DPICO_BOARD=pico_w :It is declared that the board is the model of Pico W. If it is not declared, the default is the model of PICO, and the driver of the wifi network card will not be linked in. It can pass in cmake, but nmake will report an error that the header file cannot be found.
&& :The latter part will be executed only after the previous part is successfully executed.
Need attention This routine only provides source code. If you want to compile, please create a new project by yourself, and put the source code files into the new project.
Burning After compiling, you can generate files in formats such as .bin .hex .elf .uf2 in the build directory. Drag the .u2f in the above file to the disk recognized by Pico W to burn. (Note: When programming for the first time, it is an empty code. Connect Pico W to the USB to directly identify the disk. When there is an executable program in it, you need to press and hold the BOOTSEL button before connecting to the USB)
5. Experimental phenomenon
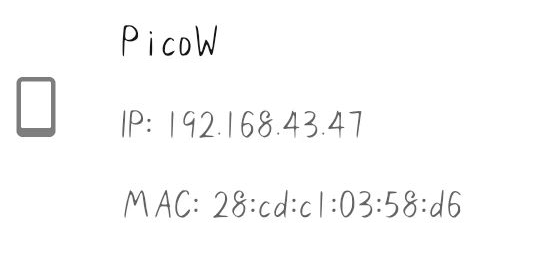
Use a mobile phone or a computer that can turn on wifi to turn on the hotspot, then run the program, wait a few seconds, you can see the phenomenon as shown below: