8. WiFi data transmission
PicoW is equipped with CYW43439 wireless chip, supports WiFi 4 (802.11n), single frequency (2.4 GHz).
At present, only wireless LAN is supported for the time being, and the official Raspberry Pi may release firmware that supports Bluetooth in the future.
There are related routine descriptions in the pico-examples example of the C language. The following is the official routine path provided by the wifi network card:
pico-examples\pico_w
This routine explains the use of the TCP protocol, PICO_W as the client, and a mobile phone or a computer that can open a wifi hotspot as the server.
1. First understanding of TCP protocol Full name for TCP:Transmission Control Protocol It is a transmission control protocol, a connection-oriented, reliable, byte stream-based transport layer communication protocol.
Main features: (1) Stream-based approach; (2) Connection oriented; (3) Reliable communication methods; (4) Try to reduce the bandwidth overhead of the system due to retransmission when the network condition is not good; (5) Communication connection maintenance is oriented to the two endpoints of communication, regardless of intermediate network segments and nodes.
The way works:
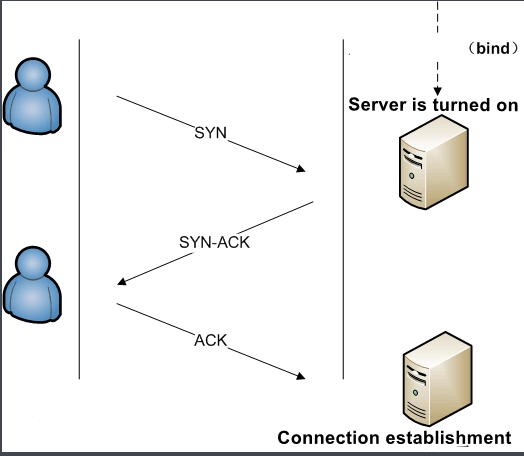
The process of the TCP three-way handshake is as follows:
The client sends SYN (SEQ=x) data to the server and enters the SYN_SEND state.
The server receives the SYN data, responds with a SYN (SEQ=y) ACK (ACK=x+1) data, and enters the SYN_RECV state.
The client receives the SYN data from the server, responds with an ACK (ACK=y+1) data, and enters the Established state.
After the three-way handshake is completed, the TCP client and the server successfully establish a connection, and data transmission can begin.
Other references: 1.https://baike.baidu.com/item/TCP/33012?fromtitle=TCP%E5%8D%8F%E8%AE%AE&fromid=8988699&fr=aladdin 2.https://blog.csdn.net/m0_61925333/article/details/125977338
2. Main program analysis
//need to be changed according to your own environmentchar ssid[] = "me";//wifi namechar pass[] = "aaabbbccc";//password pure English//IP address of the server//port numberThese definitions need to be changed according to their own environment. The value range of the port number is: one between 1024-65535 (except 8080) How to get the IP address of the server? Mobile phone: directly connect to the hotspot with another mobile phone, see the IP address of the wifi connection, such as: 192.168.43.157, then the server address is 192.168.43.1 Computer: Open the command prompt, enter ipconfig, and find the IP address corresponding to the network segment you are connecting to, which is the address of the server. Other methods reference URL:https://www.51dongshi.com/ebzdsrebghb.html
xint main() { stdio_init_all();
if (cyw43_arch_init()) { DEBUG_printf("failed to initialise\n"); return 1; } cyw43_arch_enable_sta_mode();//设置wifi为STA模式
printf("Connecting to WiFi...\n"); if (cyw43_arch_wifi_connect_timeout_ms(ssid, pass, CYW43_AUTH_WPA2_MIXED_PSK, 30000)) { printf("failed to connect.\n"); return 1; } else { printf("Connected.\n"); } run_tcp_client_test(); cyw43_arch_deinit(); return 0;}This part is mainly connected to wifi. After the wifi connection is successful, it Will enter run_tcp_client_test(); this function handles, and the specific function will be introduced below.
cyw43_arch_wifi_connect_timeout_ms() This function scans for wifi Parameter Description: Parameter 1: wifi name Parameter 2: WiFi password Parameter 3: There are four optional parameters for wifi configuration They are: CYW43_AUTH_OPEN ---(open type) CYW43_AUTH_WPA_TKIP_PSK ---(WPA type) CYW43_AUTH_WPA2_AES_PSK ---(WPA2 type) CYW43_AUTH_WPA2_MIXED_PSK ---(WPA/WPA2 type) Parameter 4: Time to wait for a timeout connection
xxxxxxxxxxvoid run_tcp_client_test(void) { TCP_CLIENT_T *state = tcp_client_init(); if (!state) { return; } if (!tcp_client_open(state)) { tcp_result(state, -1); return; } while(!state->complete) { sleep_ms(1000); } free(state);}This function is to create a client of the TCP protocol. If the creation is successful, the communication will be established. If it is unsuccessful, the memory will be released, and the program will end.
This function of the source code can be regarded as this part, because this routine does not use the PICO_CYW43_ARCH_POLL method (interrupt mode)
tcp_client_init() This function is a client function that creates a TCP protocol. Inside is to initialize the structure of the TCP protocol, and then connect to the server.
tcp_client_open() This function is to establish communication with the server. If it is successfully established, it can communicate. If it is unsuccessful, the program ends.
xxxxxxxxxxerr_t tcp_client_recv(void *arg, struct tcp_pcb *tpcb, struct pbuf *p, err_t err) {    TCP_CLIENT_T *state = (TCP_CLIENT_T*)arg;    if (!p) {        return tcp_result(arg, -1);    }    cyw43_arch_lwip_check();    if (p->tot_len > 0) {        DEBUG_printf("recv %d err %d\n", p->tot_len, err);        for (struct pbuf *q = p; q != NULL; q = q->next) {            DUMP_BYTES(q->payload, q->len);        }        // Receive the buffer        const uint16_t buffer_left = BUF_SIZE - state->buffer_len;        state->buffer_len += pbuf_copy_partial(p, state->buffer + state->buffer_len,                                               p->tot_len > buffer_left ? buffer_left : p->tot_len, 0);        tcp_recved(tpcb, p->tot_len);    }    pbuf_free(p);
    if (state->buffer_len <= BUF_SIZE) {        DEBUG_printf("Writing %d bytes to server\n", state->buffer_len);        err_t err = tcp_write(tpcb, state->buffer, state->buffer_len, TCP_WRITE_FLAG_COPY);//TCP_WRITE_FLAG_MODE        state->buffer_len = 0;        memset(state->buffer, 0, BUF_SIZE);                if (err != ERR_OK) {            DEBUG_printf("Failed to write data %d\n", err);            return tcp_result(arg, -1);        }    }    return ERR_OK;}
This function is to receive information from the server and send the received information back to the server, which is the main function of this routine.
tcp_recved() Processing of received information Parameter 1: Control block structure of TCP For details, see the source code pico-sdk\lib\lwip\src\include\lwip\tcp.h Parameter 2: The number of bytes read For details, see the source code pico-sdk\lib\lwip\src\core\tcp.c
tcp_write() Parameter Description:
TCP control block structure
The header address of the information to send
Length of information
- There are two options (1)TCP_WRITE_FLAG_COPY --- Data will be copied into memory belonging to the stack (2)TCP_WRITE_FLAG_MORE --- Will not set the PSH flag on the last segment sent
For specific parameters, see the source code pico-sdk\lib\lwip\src\core\tcp_out.c
xxxxxxxxxxstatic err_t tcp_client_close(void *arg) { TCP_CLIENT_T *state = (TCP_CLIENT_T*)arg; err_t err = ERR_OK; if (state->tcp_pcb != NULL) { tcp_arg(state->tcp_pcb, NULL); tcp_poll(state->tcp_pcb, NULL, 0); tcp_sent(state->tcp_pcb, NULL); tcp_recv(state->tcp_pcb, NULL); tcp_err(state->tcp_pcb, NULL); err = tcp_close(state->tcp_pcb); if (err != ERR_OK) { DEBUG_printf("close failed %d, calling abort\n", err); tcp_abort(state->tcp_pcb); err = ERR_ABRT; } state->tcp_pcb = NULL; } return err;}The function of this function is to disconnect from the server.
3. Program creation and burning To create a project, please refer to the previous tutorial on creating a project, which will not be repeated here. After writing the program, you need to add the standard library to the build according to the program you wrote before compiling, open CMakeLists.txt in the project, and check target_link_libraries(blink pico_stdlib pico_cyw43_arch_lwip_threadsafe_background), It can be seen that pico_stdlib and pico_cyw43_arch_lwip_threadsafe_background are added because the pico_stdlib and pico_cyw43_arch_lwip_threadsafe_background libraries are used in the previous program.If other libraries are added to the functions used, the corresponding libraries need to be added. If you do not know where to add the libraries, you can go to the official pico-examples case downloaded earlier, which contains the cases of each function and the corresponding CMakeLists.txt file for reference. . After modifying CMakeLists.txt, save and exit, and then enter the bulid path of the project Enter the command to compile
xxxxxxxxxxcmake -DPICO_BOARD=pico_w .. && nmakeExplain the main part of the command
-DPICO_BOARD=pico_w :It is declared that the board is the model of Pico W. If it is not declared, the default is the model of PICO, and the driver of the wifi network card will not be linked in. It can pass in cmake, but nmake will have an error that the header file cannot be found.
&& :The latter part will be executed only after the previous part is successfully executed.
Need attention This routine only provides source code. If you want to compile, please create a new project by yourself, and put the source code files into the new project.
Burning After compiling, you can generate files in formats such as .bin .hex .elf .uf2 in the build directory. Drag the .u2f in the above file to the disk recognized by Pico W to burn. (Note: When programming for the first time, it is an empty code. Connect Pico W to the USB to directly identify the disk. When there is an executable program in it, you need to hold down the BOOTSEL button and then connect to the USB)
4. Operation steps and program phenomenon
- First open the WiFi hotspot of the computer, then go to the next network debugging assistant on the Internet, or use the one provided by this routine, open it and enter the correct port number and IP address, click the connect button after the configuration is complete
- The connected button will change back to this
- Connect the PICO_W line, and then power on, you can see that the wifi of the computer has been connected by a device
- The serial port will also print out the relevant information about the successful connection (you can open the serial port debugging assistant to see it), and then send any information to PICO_W through the network debugging assistant. After receiving the information, PICO_W will return the information to the network debugging assistant. Every time PICO_W receives a new message, it will print the relevant output to the serial port
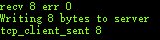 This is the information received by the serial port.
Finally, it can be found that the IP address of the page where the network debugging assistant receives the information is the same as the IP address to which the computer is connected. It means that PICO_W has successfully communicated with the computer.
Notice
If you use a mobile phone to perform the experiment, you need to download a network debugging assistant APP yourself.