2 Multi-machine navigation
2 Multi-machine navigation 2.1 Introduction 2.2 use 1.2.1 Turn on the robot 1.2.2 Enable multi-machine navigation 1.2.3 Set the communication topic 1.2.4 Set the initial pose 2.3 launch file 2.4 frame analysis
2.1 Introduction
For the problem of how to configure multi-machine communication and synchronization time, please refer to the lesson [Multi-machine handle control] for details; if there is a network, the network system time can be directly synchronized without setting.
When using multi-machine handle control, it is first necessary to ensure that the robot is under the same local area network and configured with the same [ROS_MASTER_URI]; for multiple robots to control motion, there can only be one host. The example in this section sets the virtual machine as the host, and other robots as the slaves. There are several slaves. Of course, you can also set one robot as the master and others as the slaves.
According to different models, you only need to set the purchased model in [.bashrc], X1(ordinary four-wheel drive) X3(Mike wheel) X3plus(Mike wheel mechanical arm) R2(Ackerman differential) and so on. Section takes X3 as an example
Open the [.bashrc] file
sudo vim .bashrc
Find the [ROBOT_TYPE] parameter and modify the corresponding model
xxxxxxxxxxexport ROBOT_TYPE=X3 # ROBOT_TYPE: X1 X3 X3plus R2 X7
2.2 use
Take the virtual machine as the host and the three robots as slaves as an example; a map must be available before use.
1.2.1 Turn on the robot
virtual machine side
xxxxxxxxxxroscore
Start the command(robot1 side), for the convenience of operation, this section takes [mono + laser + yahboomcar] as an example.
roslaunch yahboomcar_multi laser_bringup_multi.launch ns := robot1 # laser + yahboomcar roslaunch yahboomcar_multi laser_usb_bringup_multi.launch ns := robot1 # mono + laser + yahboomcar roslaunch yahboomcar_multi laser_astrapro_bringup_multi.launch ns := robot1 # Astra + laser + yahboomcar Start command(robot2 side), for the convenience of operation, this section takes [mono + laser + yahboomcar] as an example.
xxxxxxxxxxroslaunch yahboomcar_multi laser_bringup_multi.launch ns := robot2 # laser + yahboomcar roslaunch yahboomcar_multi laser_usb_bringup_multi.launch ns := robot2 # mono + laser + yahboomcar roslaunch yahboomcar_multi laser_astrapro_bringup_multi.launch ns := robot2 # Astra + laser + yahboomcar More bots and so on.
1.2.2 Enable multi-machine navigation
For the process of opening the handle control, please refer to the lesson [Multi-machine handle control].
virtual machine side
xxxxxxxxxxroslaunch yahboomcar_multi yahboomcar_nav_multi.launch use_rviz:=true map:=my_map - [use_rviz] parameter: whether to open rviz.
- [map] Parameters: map name, the map to be loaded.
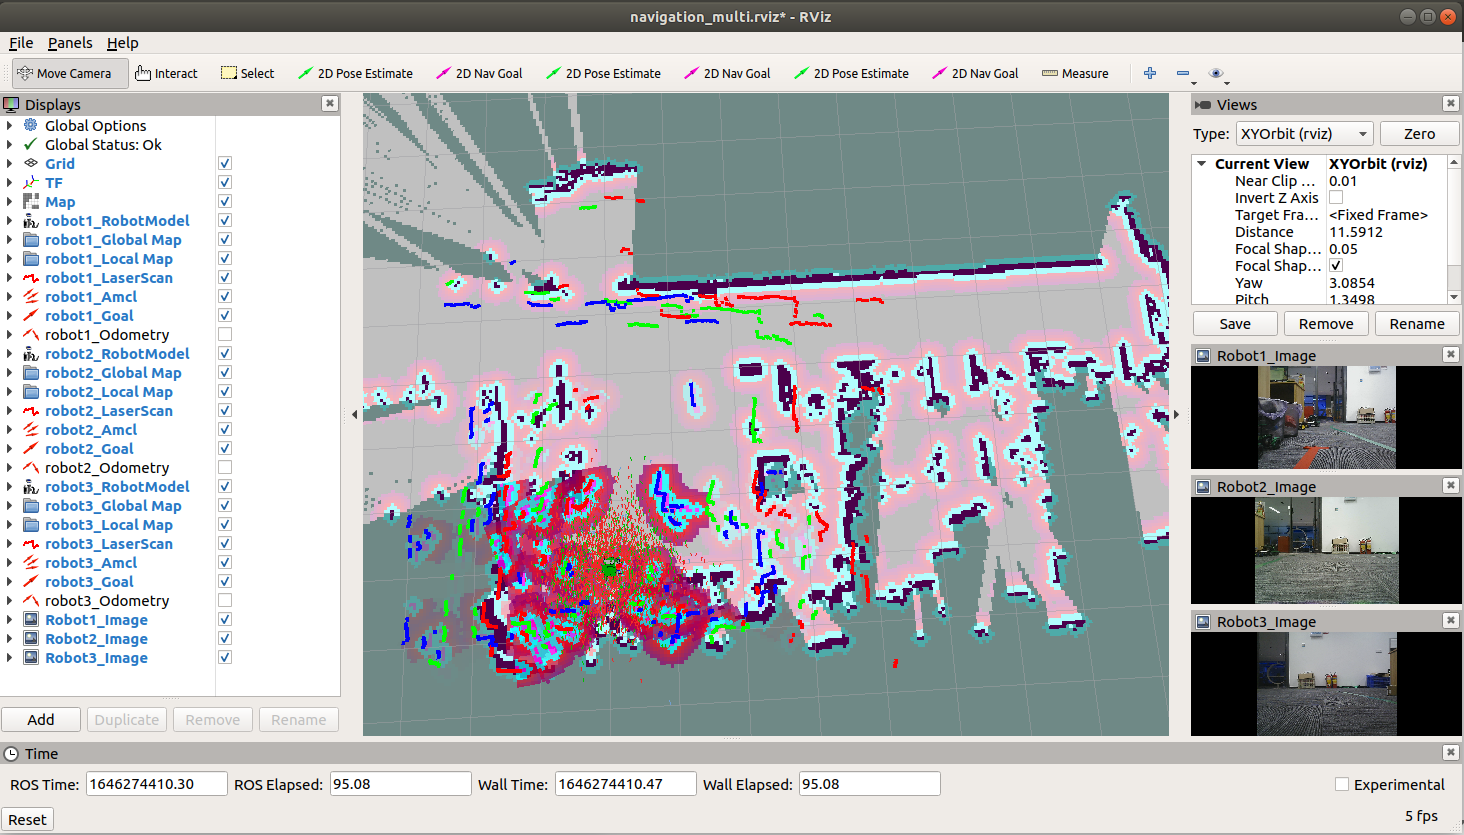
After the multi-machine navigation is turned on, it is densely packed, and the pose of each robot is incorrect. First, set the initial pose for each robot.
1.2.3 Set the communication topic
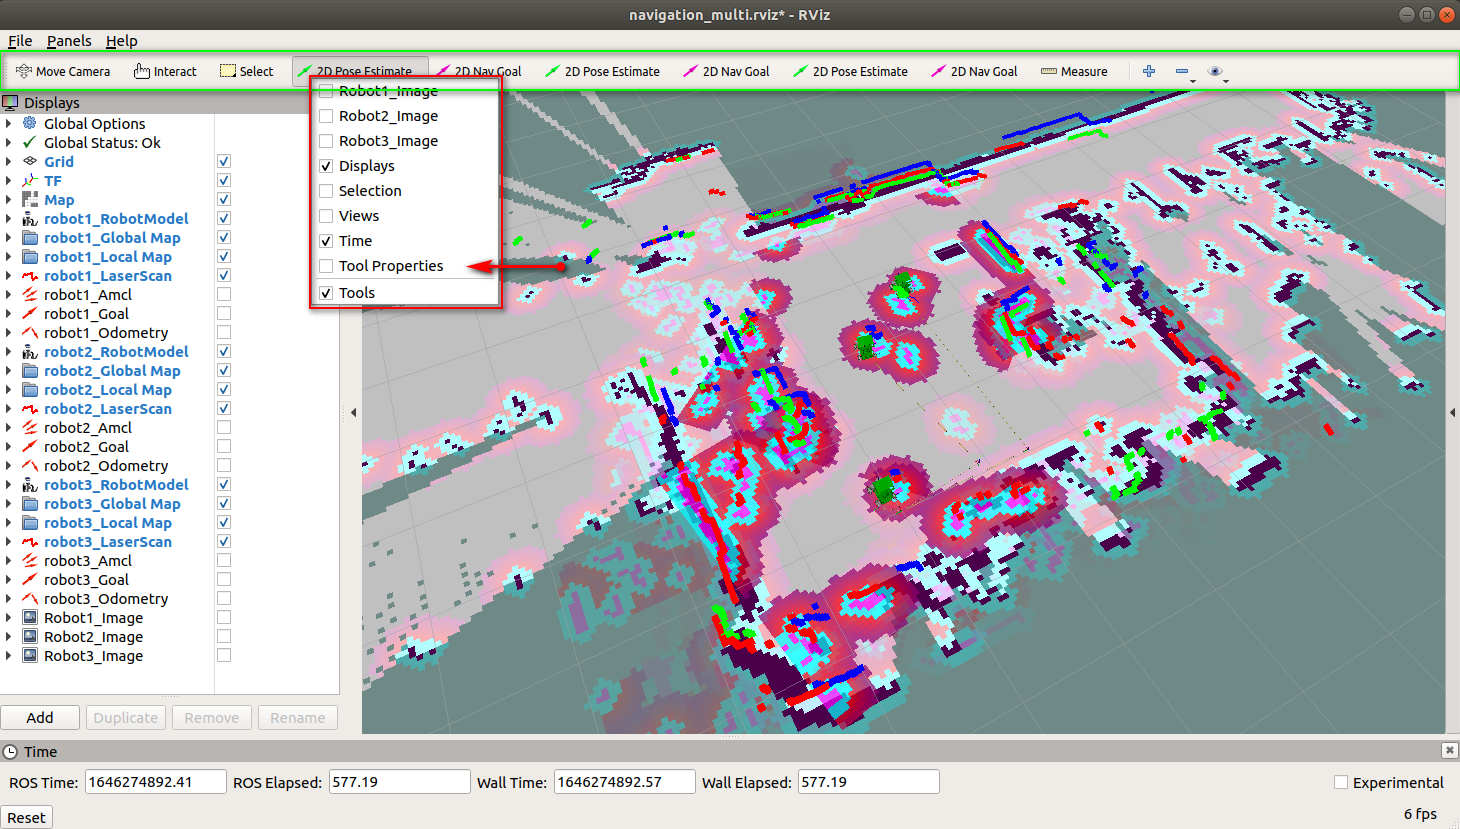
Right-click on the toolbar(green box) and a dialog box(red box) will pop up, as shown in the figure above, right-click at [2D Pose Estimate], and then select [Tool Properties], as shown in the figure below, a dialog box will pop up.
From top to bottom [2D Pose Estimate], [2D Nav Goal] and [rviz] toolbar correspond one by one from left to right. Set the topic name pointed by the red arrow, this method is quick and convenient.
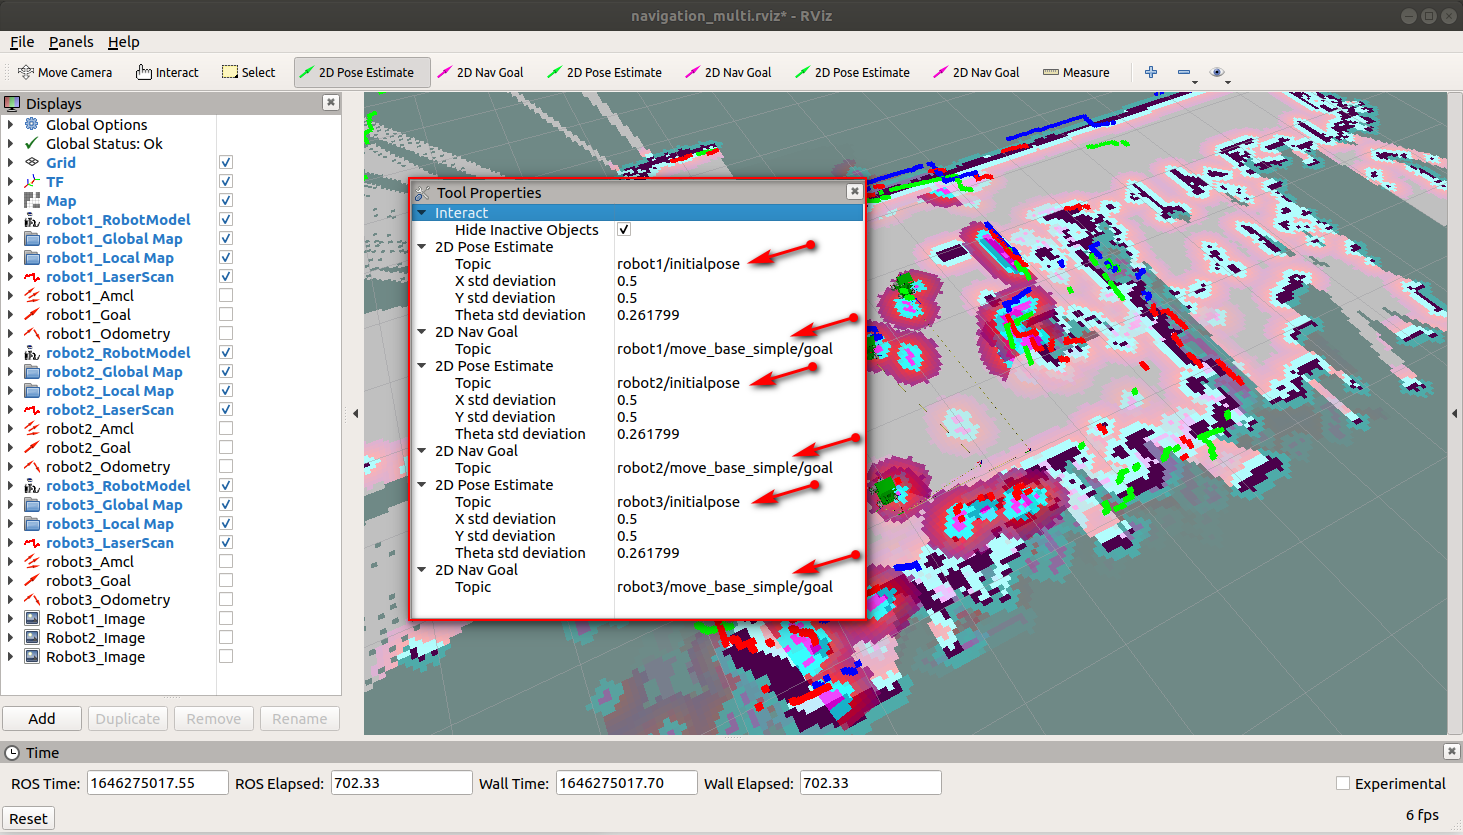
What if there are 4 or more robots and the initial pose and navigation icons seem to be insufficient?
At this time, you need to open the [navigation_multi.rviz] file(whichever rviz is used, take [navigation_multi.rviz] as an example), and find the following content. These contents correspond to the icons of the rviz toolbar one by one. If you want to add which icon, copy the entire [Class] content of which icon, you must not miss anything, and the format must be correct.
xxxxxxxxxxTools :- Class : rviz/MoveCamera- Class : rviz/InteractHide Inactive Objects : true- Class : rviz/Select- Class : rviz/SetInitialPoseTheta std deviation : 0.2617993950843811Topic : robot1/initialposeX std deviation : 0.5Y std deviation : 0.5- Class : rviz/SetGoalTopic : robot1/move_base_simple/goal- Class : rviz/SetInitialPoseTheta std deviation : 0.2617993950843811Topic : robot2/initialposeX std deviation : 0.5Y std deviation : 0.5- Class : rviz/SetGoalTopic : robot2/move_base_simple/goal- Class : rviz/SetInitialPoseTheta std deviation : 0.2617993950843811Topic : robot3/initialposeX std deviation : 0.5Y std deviation : 0.5- Class : rviz/SetGoalTopic : robot3/move_base_simple/goal- Class : rviz/Measure
1.2.4 Set the initial pose
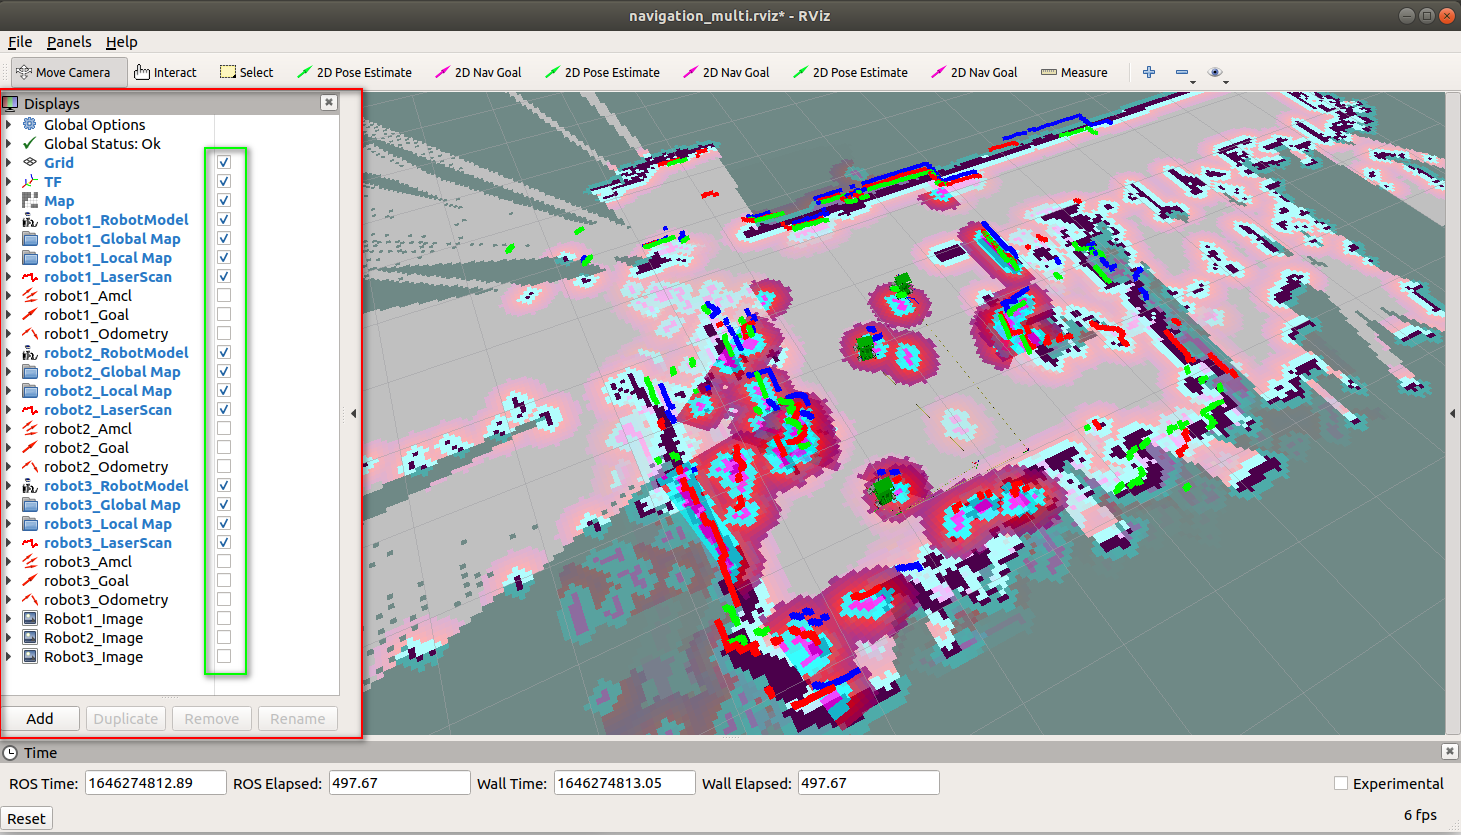
There are too many robots on the map, and the information on the map is particularly complicated. In this case, you can tick the check mark behind the robot in the [Displays] display item list on the left, and set the pose for each robot in turn. The effect after setting is as follows. Once set up you can navigate.
- Use the [2D Pose Estimate] of the [rviz] tool to set the initial pose until the position of the car in the simulation is consistent with the position of the actual car.
- Click the [2D Nav Goal] of the [rviz] tool, and then select the target point on the map where there are no obstacles, release the mouse to start the navigation, only one target point can be selected, and it will stop when it arrives.
2.3 launch file
xxxxxxxxxx< launch > < arg name = "first_robot1" default = "robot1" /> < arg name = "second_robot2" default = "robot2" /> < arg name = "third_robot3" default = "robot3" /> <!-- Whether to open rviz || Whether to open rviz --> < arg name = "use_rviz" default = "true" /> <!-- map name|| Map name --> < arg name = "map" default = "my_map" /> <!-- Load map || Load map --> < node name = "map_server" pkg = "map_server" type = "map_server" args = "$(find yahboomcar_nav)/maps/$(arg map).yaml" /> < node pkg = "rviz" type = "rviz" name = "rviz" required = "true" args = "-d $(find yahboomcar_multi)/rviz/navigation_multi.rviz" if = "$(arg use_rviz)" /> <!-- Multi machine handle control|| Multi machine handle control--> < include file = "$(find yahboomcar_multi)/launch/joy_multi.launch" /> <!-- Mobile app node|| Mobile app node--> < include file = "$(find yahboomcar_nav)/launch/library/app.launch" /> <!-- ############################# first_robot1 ############################# --> < include file = "$(find yahboomcar_multi)/launch/library/move_base_multi.launch" > < arg name = "ns" value = "$(arg first_robot1)" /> </ include > <!-- ############################# second_robot2 ############################# --> < include file = "$(find yahboomcar_multi)/launch/library/move_base_multi.launch" > < arg name = "ns" value = "$(arg second_robot2)" /> </ include > <!-- ############################# third_robot3 ############################# --> < include file = "$(find yahboomcar_multi)/launch/library/move_base_multi.launch" > < arg name = "ns" value = "$(arg third_robot3)" /> </ include > </ launch > You can modify it according to your own needs. If there are 4 or more robots, you can add relevant content following the cases of the first 3 robots.
2.4 frame analysis
- Node view
xxxxxxxxxxrqt_graph
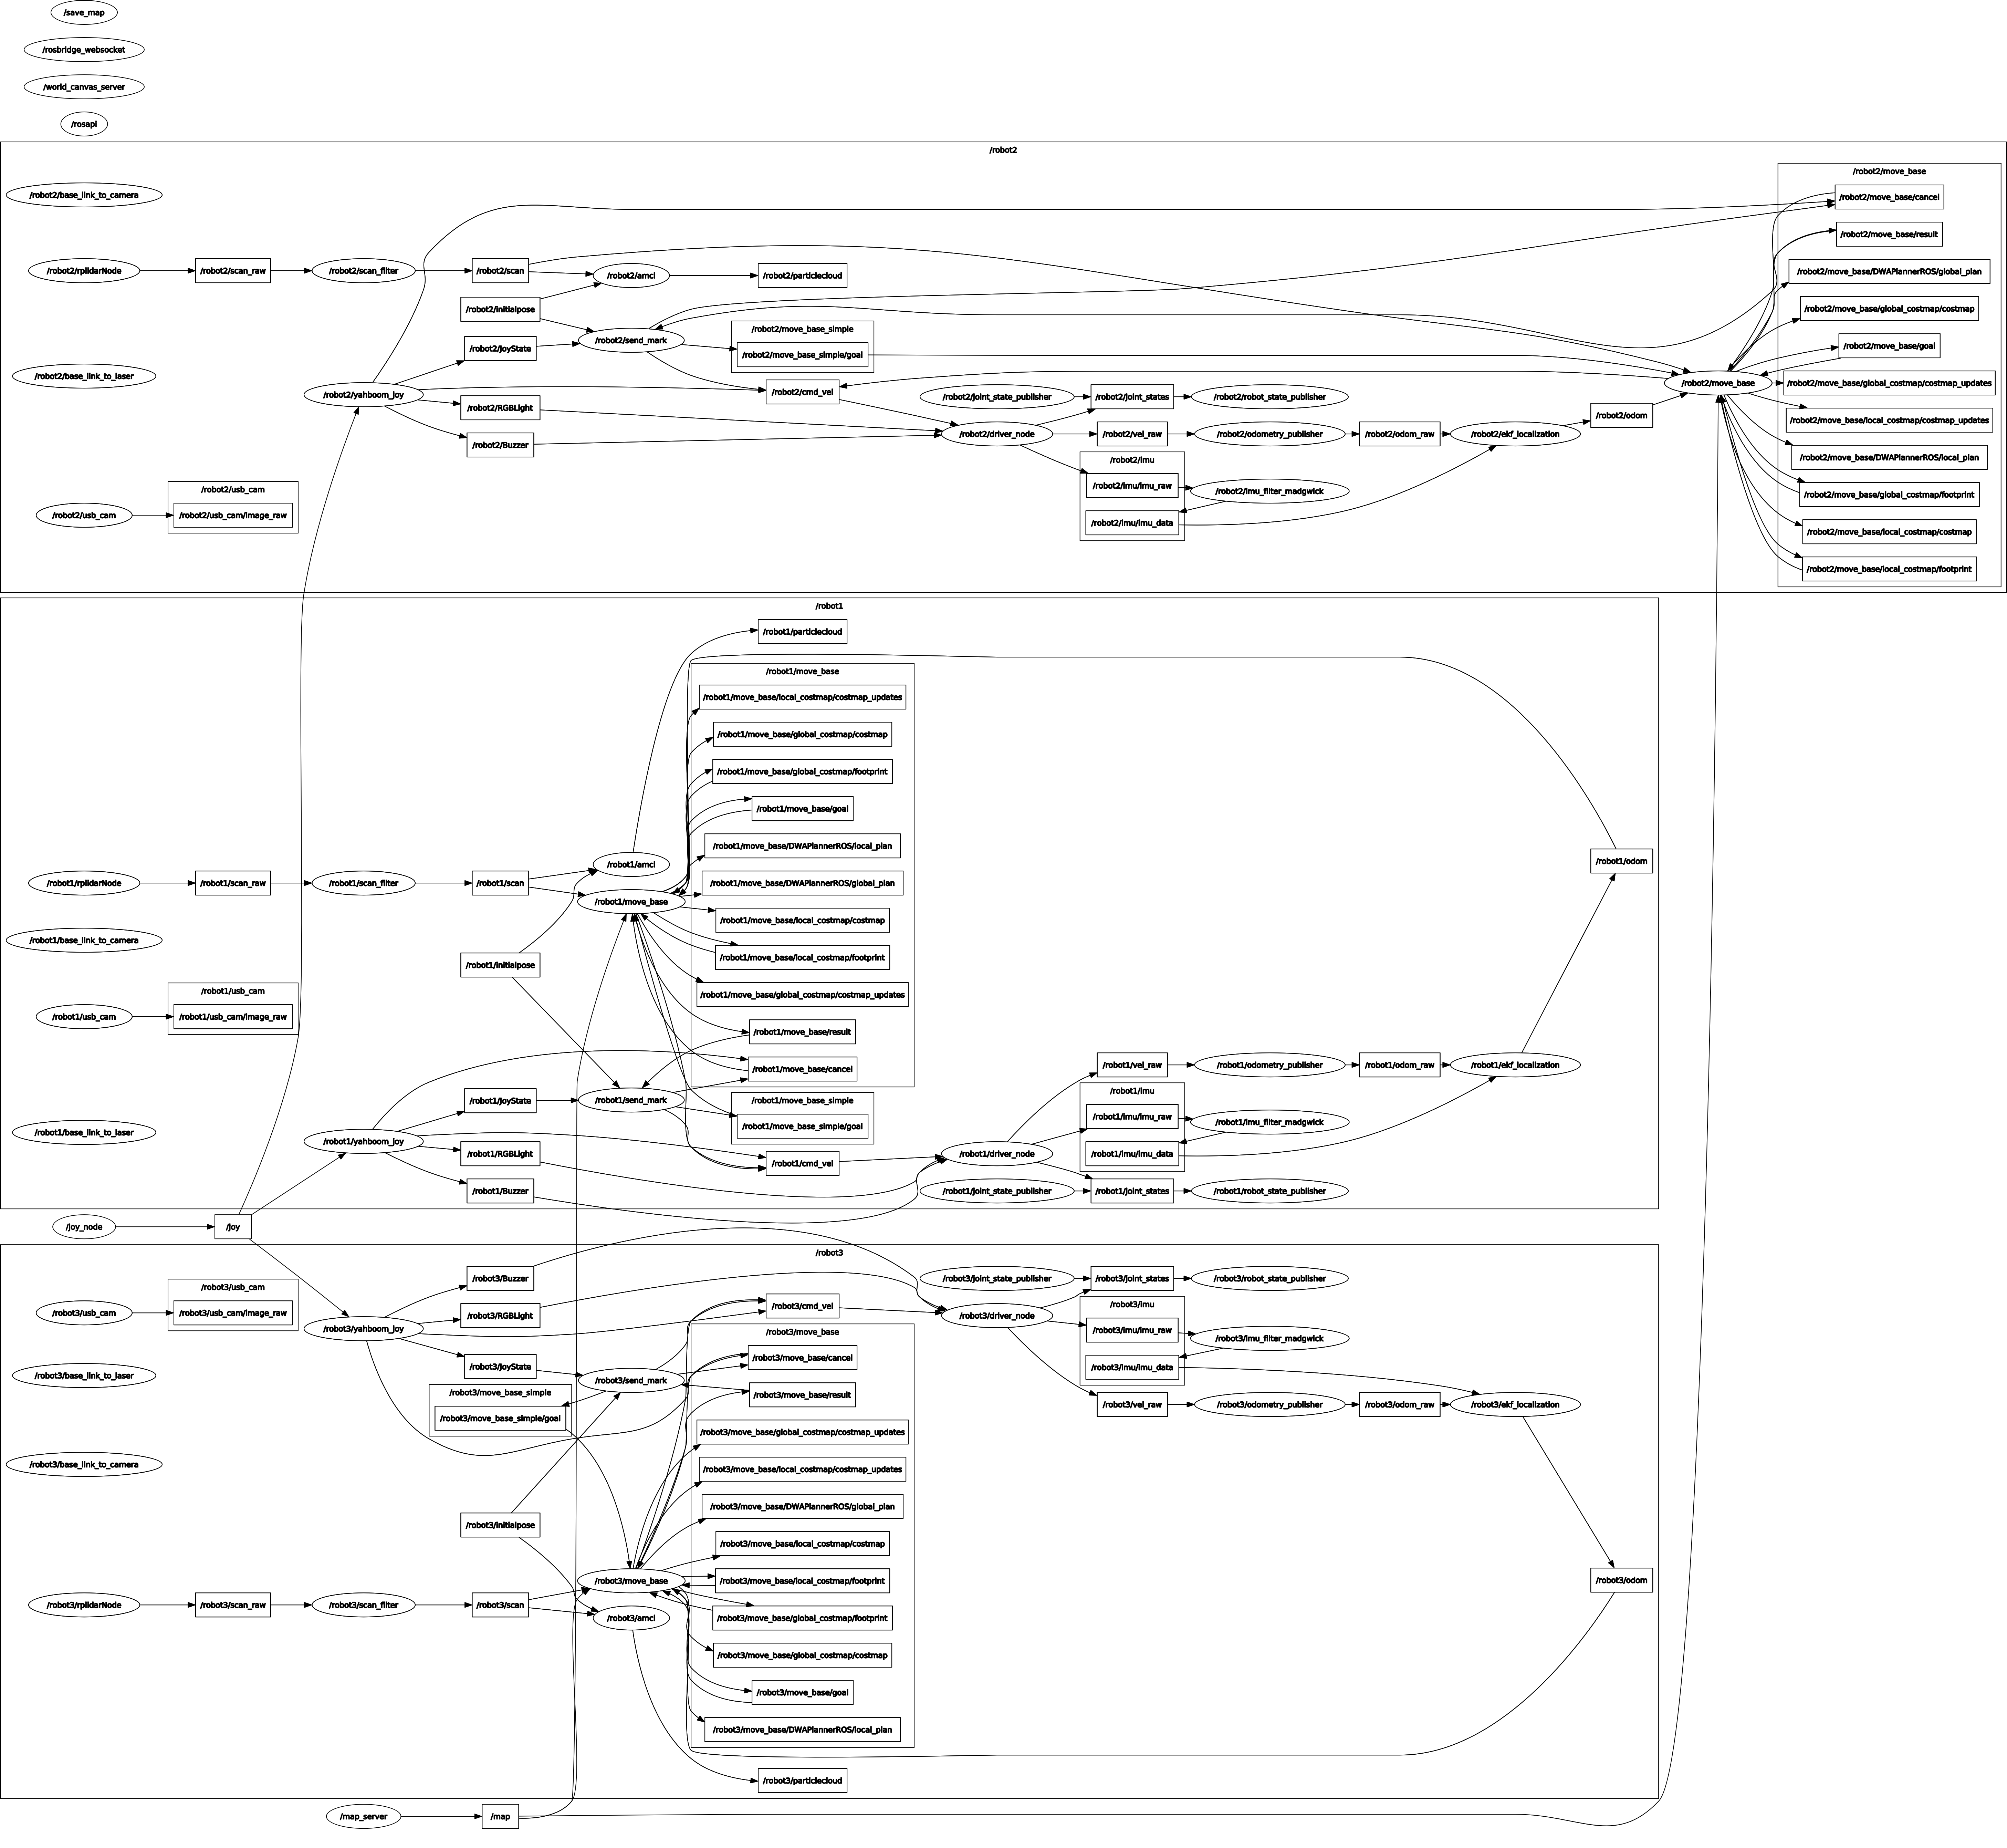
There are a lot of node graphs, which look complicated, but are actually very organized. The internal nodes are almost the same for each robot, as is the navigation for a single robot. It should be noted here that the map loading only needs to be loaded once, and every robot does not need to be loaded. At the same time, I also opened the node controlled by the handle. One handle controls multiple robots at the same time, and only needs to start the [joy_node] node once.
- View tf tree
xxxxxxxxxxrosrun rqt_tf_tree rqt_tf_tree

There are also a lot of tf coordinate systems, which need to be enlarged. There is only one [map] in the whole world, and each [amcl] locates each robot separately, and then it is the same as the navigation of a single robot.