9、ROS_ APP mapping navigation
Note: This course takes Rosmaster-X3 as an example. Users need to modify according to their own motion model, which is different from the content of handheld laser radar mapping. This mapping adds odom data, so users need to have odom data in their own motion model.
Function package path: ~/oradar_ws/src/yahboomcar_nav
9.1、Mapping
9.1.1、Start
Input terminal
roslaunch yahboomcar_nav laser_bringup.launchroslaunch yahboomcar_nav yahboomcar_map.launch map_type:=gmapping
9.1.2、Usage
After the robot is started, click APP,
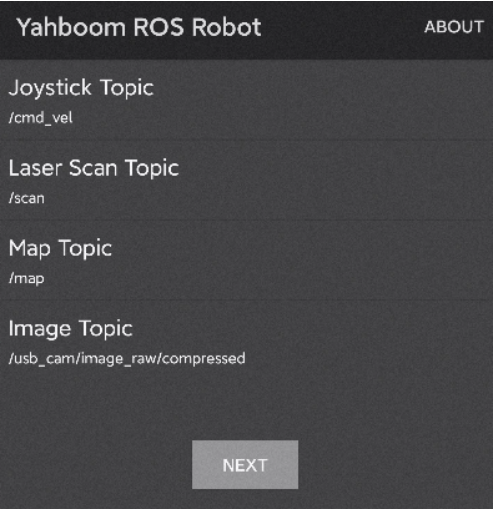
Modify the corresponding topic name.
At this time, you can enter the map creation function without modifying it. Do not modify it during the presentation.

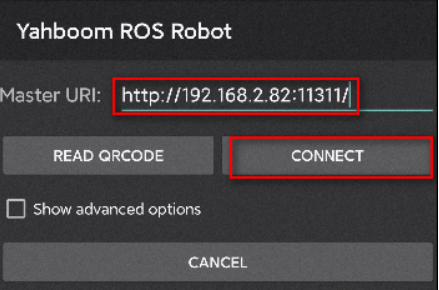
Need ensure that the mobile phone and the robot are in the same network, enter the robot's [IP] in the [Master URI], and click [CONNECT] to log in.
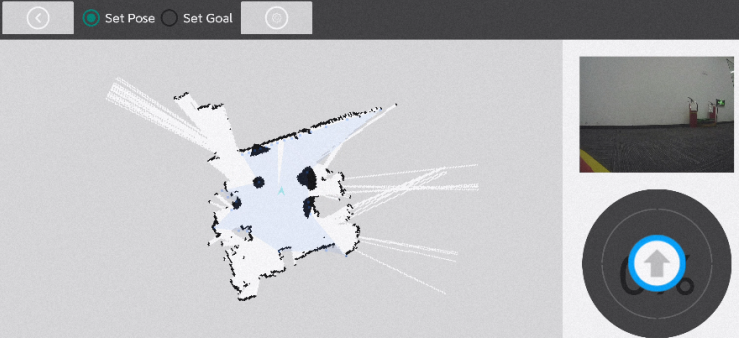
The drawing creation interface, as shown below.
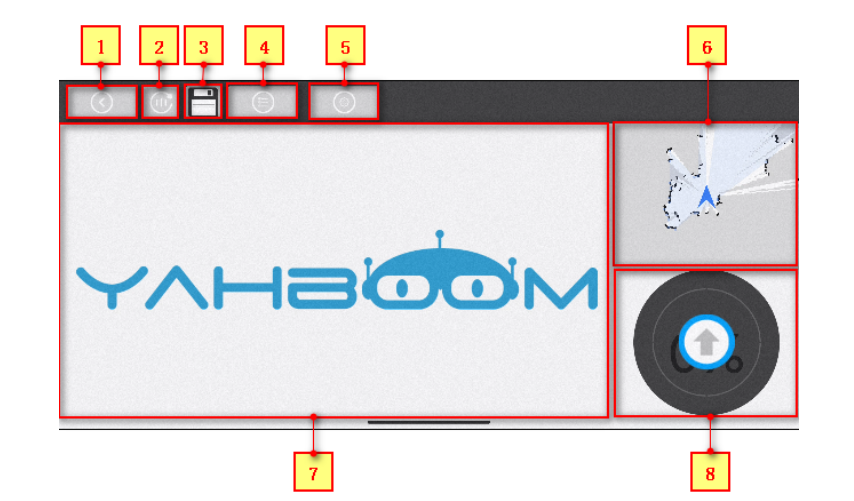
- 1:Return to the previous step
- 2:Refresh the map
- 3:Save the map
- 4:Navigation function
- 5:Settings
- 6:Mapping area
- 7:Camera screen display area
- 8:Rocker
Click area【6】to switch with area【7】 interface.
Since there is no subscription topic for image, only YAHBOOM logo is displayed. If the camera node is enabled, view the image topic.
xxxxxxxxxxrostopic list
Select an image topic and fill it in.
At this point, there is an image in the interface.
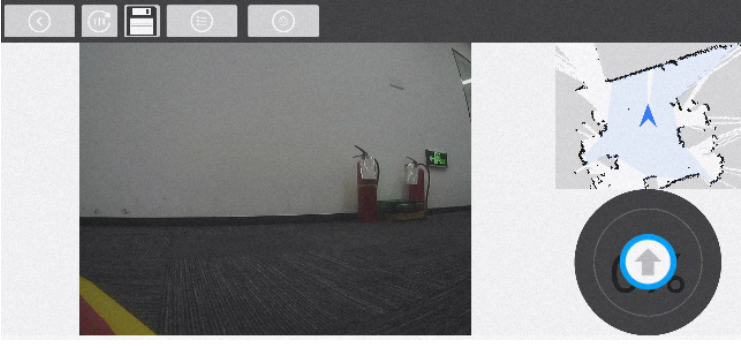
Slide the rocker of part 【8】.
When sliding the rocker, the slower the speed, the better the effect (especially the rotation speed).
Control the robot to move until the map is created.
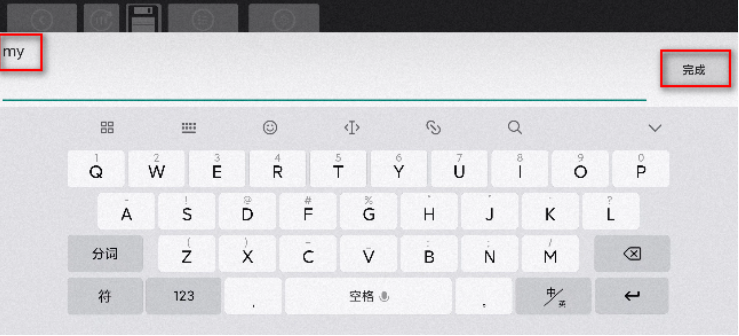
9.1.3、Save Map
After the map is created, click [3] to save the map.

Click above the horizontal line, enter the name of the saved map 【my】, and click [Finish] (English only, no symbol).
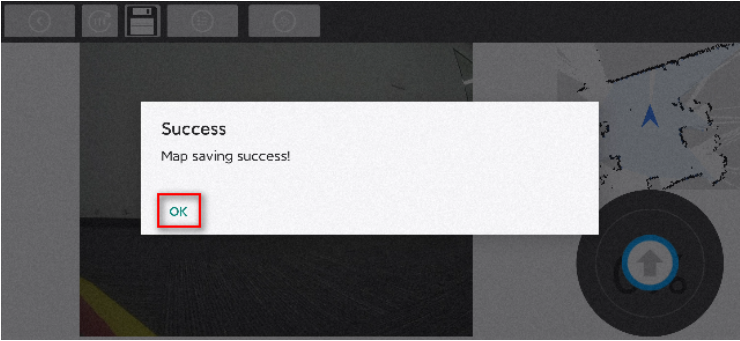
The map saved successfully dialog box pops up, and click [OK] to finish.
9.2、Navigation avoid
9.2.1、Start
Input following command.
xxxxxxxxxxroslaunch yahboomcar_nav laser_bringup.launchroslaunch yahboomcar_nav yahboomcar_navigation.launch use_rviz:=false map:=my- use_ Rviz parameter: whether to open rviz.
- Map: map name, load the map file named 【my】.
9.2.2 Usage
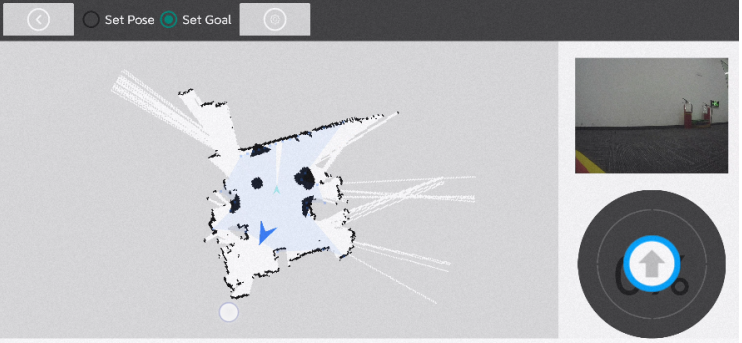
The login method is the same as that above. After login, you can directly enter the map creation interface. At this time, you need to click 【4】to enter the navigation interface and switch the screen.

Enter the navigation interface.
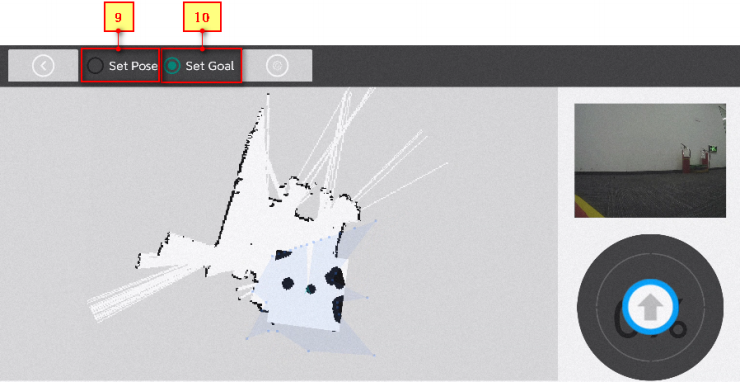
- 9:设置机器人初始位姿Set the initial pose of the robot
- 10:Set target pose
As can be seen in the above figure, the robot is at the origin when building the map, but we do not put the robot at the origin position, so the scanned point does not coincide with the map. At this time, we need to set the initial position and posture of the robot. First, click【9】, select the approximate position of the robot in the map, do not release, and continue to slide to the approximate position of the robot. Make the scanned points coincide with the map as much as possible.
Click【10】, select the target position of the robot in the map, do not loosen it, continue to slide to the position that the robot wants to maintain, and after loosening, the robot will drive to the target position.
9.3、APP related startup files
app.launch
x<launch> <!-- 启动APP相关接口服务 || Start APP related interface services --> <include file="$(find rosbridge_server)/launch/rosbridge_websocket.launch"/> <node pkg="world_canvas_server" type="world_canvas_server" name="world_canvas_server"> <param name="start_map_manager" value="true"/> <param name="auto_save_map" value="false"/> </node> <node pkg="world_canvas_server" type="map_manager.py" name="map_manager"/> <node pkg="yahboomcar_nav" type="save" name="save_map"/></launch>
Code path:
~/oradar_ws/src/yahboomcar_nav/launch/library