8.10、Classification of self-directed learning
8.10、Classification of self-directed learning8.10.1、Experimental goal8.10.2、Preparation before experiment8.10.3、The process of the experiment8.10.4、Experimental effect8.10.5、Experiment summary
8.10.1、Experimental goal
This lesson mainly learns the self-learning classification function of K210. Take out three different objects and take pictures from different angles, and K210 will classify them.
The reference code path for this experiment is:K210_Broad\05-AI\self_learning.py
8.10.2、Preparation before experiment
Please import the model file to the memory card first, and then insert the memory card into the memory card slot of the K210 development board. For specific steps, please refer to:
Appendix: Import model files to memory card
8.10.3、The process of the experiment
The factory firmware of the module has integrated the AI vision algorithm module. If you have downloaded other firmware, please burn it back to the factory firmware and then conduct experiments.
Import the relevant library, initialize the camera and LCD display, and load the model file: /sd/KPU/self_learn_classifier/mb-0.25.kmodel.
kpu = KPU()print("ready load model")kpu.load_kmodel("/sd/KPU/self_learn_classifier/mb-0.25.kmodel")
The whole routine is divided into three states, the first state (INIT) is the initialization state, the second state (CLASSIFY) is the classification state, and the third state (TRAIN) is the training state, each state corresponds to a loop function operation program content.
xxxxxxxxxxif state_machine.current_state == STATE.INIT:loop_init()elif state_machine.current_state == STATE.CLASSIFY:loop_classify()elif state_machine.current_state == STATE.TRAIN_CLASS_1 \or state_machine.current_state == STATE.TRAIN_CLASS_2 \or state_machine.current_state == STATE.TRAIN_CLASS_3:loop_capture()
The content of the loop function in the initialization state, the main function is to display prompt information, short press BOOT to proceed to the next step, and long press BOOT to restart.
xdef loop_init():if state_machine.current_state != STATE.INIT:returnimg_init.draw_rectangle(0, 0, lcd.width(), lcd.height(), color=(0, 0, 255), fill=True, thickness=2)img_init.draw_string(65, 90, "Self Learning Demo", color=(255, 255, 255), scale=2)img_init.draw_string(5, 210, "Short press: next", color=(255, 255, 255), scale=1)img_init.draw_string(5, 225, "Long press: restart", color=(255, 255, 255), scale=1)lcd.display(img_init)
The content of the loop function in the training state, the main function is to display the training category and the progress of the operation. In the training state, you need to press the BOOT button several times to proceed to the next step. By default, a total of three categories are trained, and each category needs to take 5 pictures.
xxxxxxxxxxdef loop_capture():global central_msg, bottom_msgimg = sensor.snapshot()if central_msg:img.draw_rectangle(0, 90, lcd.width(), 22, color=(0, 0, 255), fill=True, thickness=2)img.draw_string(55, 90, central_msg, color=(255, 255, 255), scale=2)if bottom_msg:img.draw_string(5, 208, bottom_msg, color=(0, 0, 255), scale=1)lcd.display(img)
The content of the loop function in the classification state, the main function is to analyze and compare, classify which category the current camera screen belongs to, and display the corresponding category and recognition score.
xxxxxxxxxxdef loop_classify():global central_msg, bottom_msgimg = sensor.snapshot()scores = []feature = kpu.run_with_output(img, get_feature=True)high = 0index = 0for j in range(len(features)):for f in features[j]:score = kpu.feature_compare(f, feature)if score > high:high = scoreindex = jif high > THRESHOLD:bottom_msg = "class:{},score:{:2.1f}".format(index + 1, high)else:bottom_msg = None# display infoif central_msg:print("central_msg:{}".format(central_msg))img.draw_rectangle(0, 90, lcd.width(), 22, color=(0, 255, 0), fill=True, thickness=2)img.draw_string(55, 90, central_msg, color=(255, 255, 255), scale=2)if bottom_msg:print("bottom_msg:{}".format(bottom_msg))img.draw_string(5, 208, bottom_msg, color=(0, 255, 0), scale=1)lcd.display(img)
8.10.4、Experimental effect
Since the BOOT button is needed, do not run it directly in CanMV IDE. CanMV IDE cannot detect the BOOT button at present. Please download the code as main.py to the K210 development board and run it.
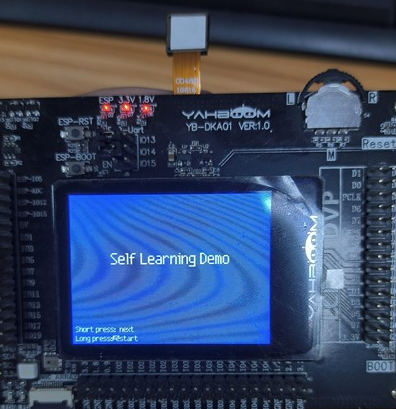
Wait for the boot to complete, the LCD screen will display Self Learning Demo, prompting to press to enter the next state, long press to start again. At this time, press the BOOT button to enter the next state.
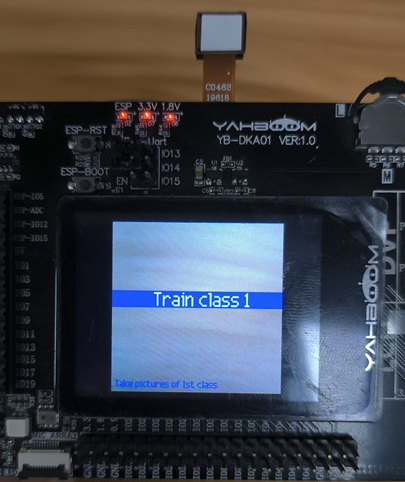
Start training the first object. Press the BOOT button to enter the next step and start collecting object picture materials.
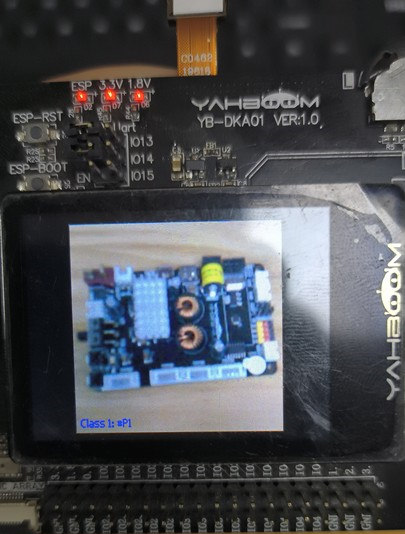
Put the first object to be recognized within the visible range of the camera, you can see Class 1: #P1 displayed in the lower left corner of the screen, press the BOOT button, and the first material picture of category 1 will be recorded. Among them, Class represents the category number, and P represents the picture number
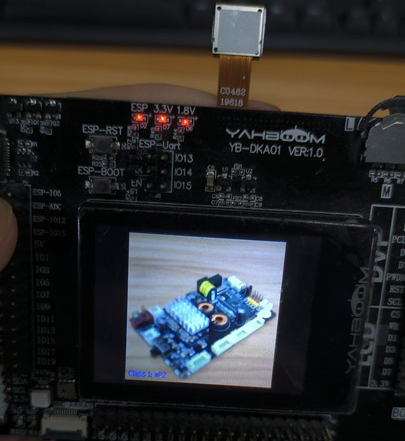
Slightly change the shooting angle, and then press the BOOT button to collect the second material picture. After collecting five pictures, the collection of category 1 ends.
Next, enter the collection process of category 2, press the BOOT button to start collecting material pictures of category 2, and the steps are the same as those of category 1.
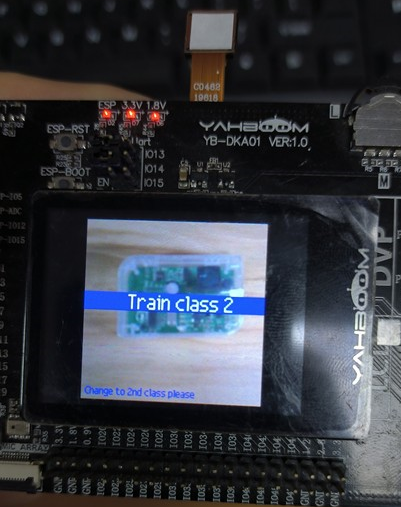
After collecting five material pictures in category 2, enter category 3 to collect five material pictures.

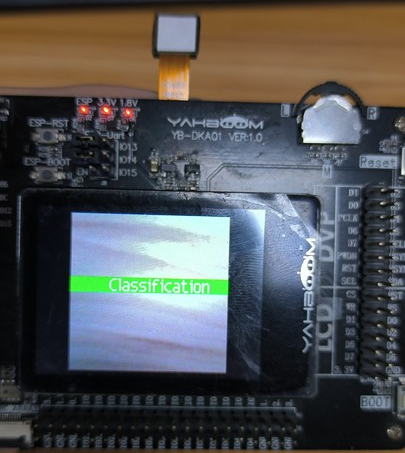
After the collection is finished, it will automatically enter the classification state. Classificatiion is displayed in the middle of the screen, indicating that it has entered the classification state. Press the BOOT button again and the prompt will disappear automatically.
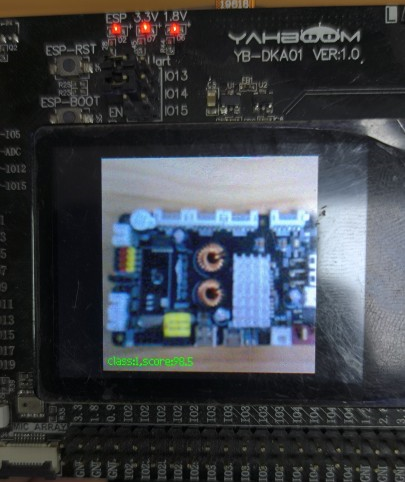
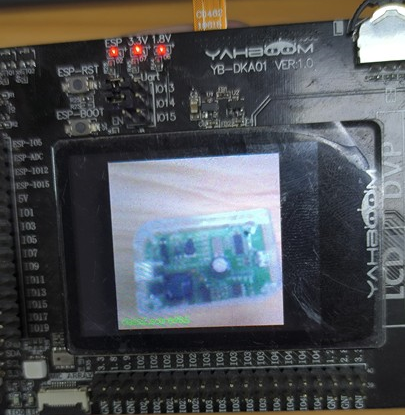
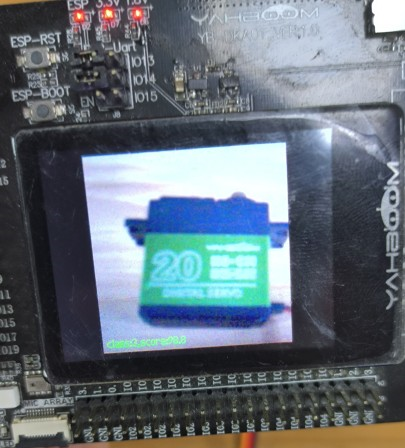
At this point, the camera will shoot one of the three categories just trained, and the corresponding category number and score will be displayed in the lower left corner of the screen.
If the recognition effect is not good, or the image acquisition is wrong, you can press reset, or press and hold the BOOT button to start again.
8.10.5、Experiment summary
Face recognition needs to use the memory card to load the model file, so you need to import the model file into the memory card in advance, and then insert the memory card into the memory card slot of the K210 development board. If the model file in the memory card cannot be read, then will report an error.
Since the face recognition needs to use the BOOT button, do not run the face recognition code in CanMV IDE, please download the code as main.py to the K210 chip, and then press the reset button to start running.
During object classification training, it is better to train objects with a different color from the background, so that the accuracy rate will be better. Due to the limited number of pictures collected, the front side of classified products is generally taken as an example, and the reverse side may not be recognized.