6. Bind the device ID
6. Bind the device ID 6.1. Device view command 6.2. Establish port mapping relationship 6.2.1. Device binding 6.2.2. Introduction to rule file syntax 6.3. Verify View 6.4. Binding the USB port
When the robot uses two or more USB serial devices, the corresponding relationship between the device name and the device is not fixed, but is allocated according to the order in which the devices are connected to the system. Inserting one device first and then another device can determine the relationship between the device and the device name, but it is very troublesome to plug and unplug the device every time the system starts. The serial port can be mapped to a fixed device name. No matter what the insertion order is, the device will be mapped to the new device name. We only need to use the new device name to read and write the device.
6.1. Device view command
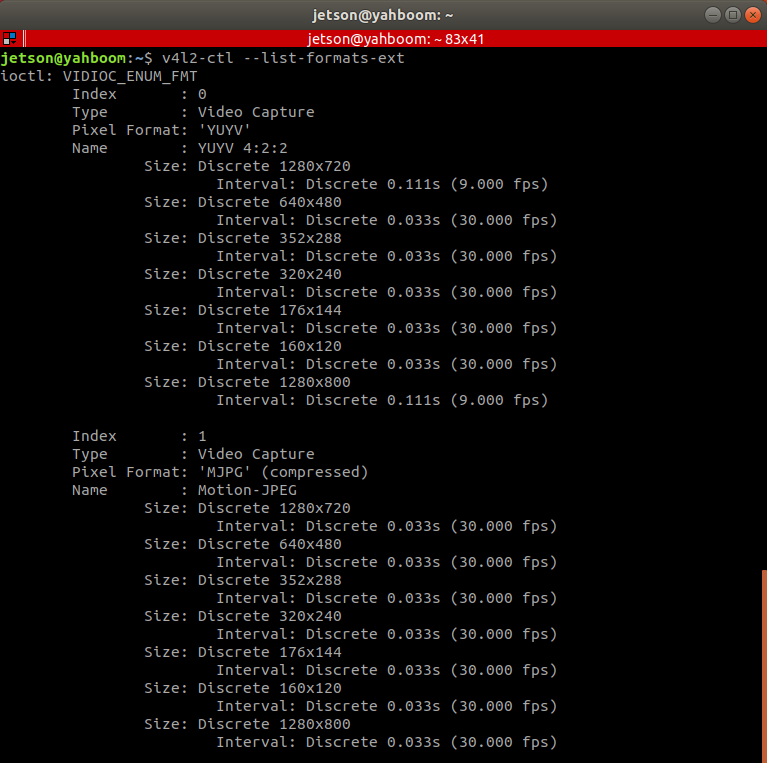
View camera device parameters
Enter the following command in the terminal to check the correspondence between the pixel size of the camera and the frame rate.
v4l2-ctl --list-formats-ext
Device ID view
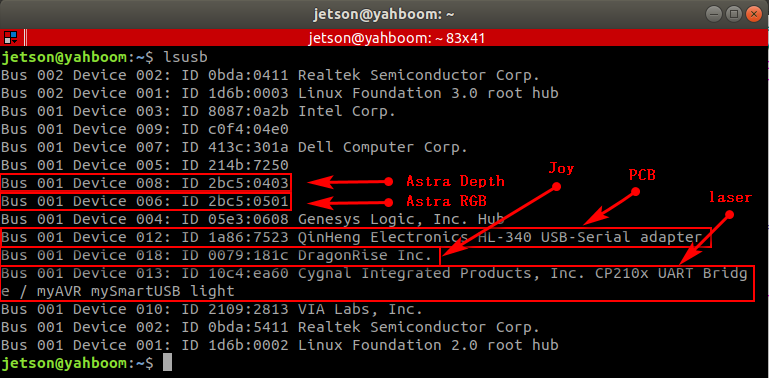
xxxxxxxxxxlsusb
As can be seen from the figure below, the ID number of each device, Astra has the official file for binding the device, the handle generally does not need to be bound, and the main binding is PCB and radar.
Device number view
xxxxxxxxxxll /dev/

6.2. Establish port mapping relationship
6.2.1. Device binding
- Astra binding
There is a create_udev_rules file in the scripts folder under the astra_camera function package, which is automatically bound by running the file. Run the command as follows
xxxxxxxxxx./create_udev_rules
Go to the rules.d directory
xxxxxxxxxxcd /etc/udev/rules.d/
You can find the 56-orbbec-usb.rules file, which is the Astra camera device binding file.
- PCB and Radar Bonding
Go to the rules.d directory
xxxxxxxxxxcd /etc/udev/rules.d/
Create a new rplidar.rules file
xxxxxxxxxxsudo touch rplidar.rulessudo chmod 777 rplidar.rules
Open the rplidar.rules file
xxxxxxxxxxsudo vim rplidar.rules
write the following
xxxxxxxxxxKERNEL=="ttyUSB*", ATTRS{idVendor}=="1a86", ATTRS{idProduct}=="7523", MODE:="0777", SYMLINK+="myserial"KERNEL=="ttyUSB*", ATTRS{idVendor}=="10c4", ATTRS{idProduct}=="ea60", MODE:="0777", SYMLINK+="rplidar"
Exit to make the rules take effect
xxxxxxxxxxsudo udevadm triggersudo service udev reloadsudo service udev restart
Replug the USB device and you're done.
6.2.2. Introduction to rule file syntax
xxxxxxxxxxKERNEL=="ttyUSB*", ATTRS{idVendor}=="1a86", ATTRS{idProduct}=="7523", MODE:="0777", SYMLINK+="myserial"KERNEL=="ttyUSB*", ATTRS{idVendor}=="10c4", ATTRS{idProduct}=="ea60", MODE:="0777", SYMLINK+="rplidar"
Parse
xxxxxxxxxxKERNEL # The device name that matches the eventATTR{filename} # Match the sysfs attribute of the event device.idVendor # Vendor IDidProduct # product numberSYMLINK # Generate symbolic links for device files under /dev/. Just give this device an alias.MODE # Set permissions for the device.
From [6.1], it is easy to see that the device number of the PCB is [ttyUSB0], and the ID number is [1a86, 7523], which is fixed. 0, 1, 2, 3, 4, ...] are all bound to [myserial]; the same is true for radar device [ttyUSB1]; the same is true for other devices that need to be bound.
Note: When taking an alias, do not take some device names that already exist in the system, otherwise it will fail.
6.3. Verify View
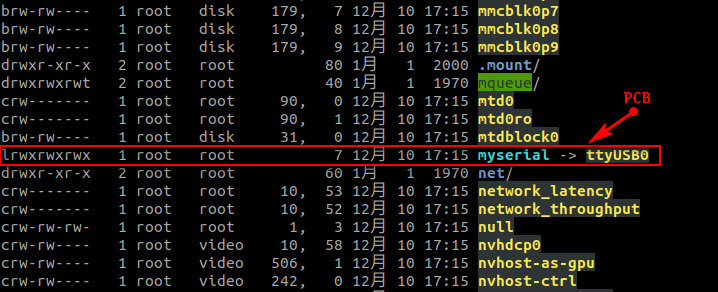
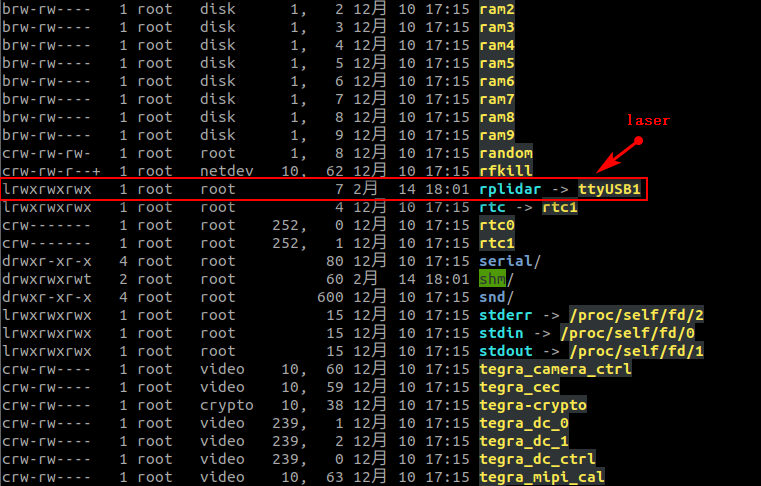
Device number view
xxxxxxxxxxll /dev/
PCB
laser
6.4. Binding the USB port
The above situations are all different ID numbers. If the ID numbers of the radar and the PCB are the same, or there are two or more PCBs (radars) with the same ID, the above binding will be confused.
Then, we need to bind the USB port. After binding, the cannot be changed at will , and each device can only be linked to a fixed USB port.
Binding method, take [ttyUSB0] as an example, check the port of the device at this time
xxxxxxxxxxudevadm info --attribute-walk --name=/dev/ttyUSB0 |grep KERNELS
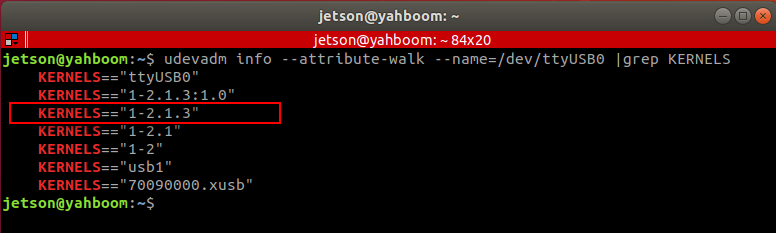
What we need is to modify in the rules file
xxxxxxxxxx# KERNEL=="ttyUSB*", ATTRS{idVendor}=="1a86", ATTRS{idProduct}=="7523", MODE:="0777", SYMLINK+="myserial" # before modificationKERNELS == "1-2.1.3" , ATTRS { idVendor }== "1a86" , ATTRS { idProduct }== "7523" , MODE := "0777" , SYMLINK += "myserial" # After modification