3 Common commands and tools
3 Common commands and tools 3.1 Start node mode 3.1.1 launch file 3.1.2 rosrun 3.1.3 python 3.1.4 start a small turtle 3.1.5 Start two little turtles 3.2 launch file 3.2.1 Overview 3.2.1 the format of the file 1. Label [node] 2. Label [remap] 3. Label [include] 4. Label [arg] 5. Variable substitution 6. Label [param] 7. Label [rosparam] 8. Label [group] 3.3 TF coordinate transformation 3.3.1 Common tools of tf 1. view_frames tool 2. rqt_tf_tree tool 3. tf_echo tool 4.static_transform_publisher 5.roswtf plugin 3.3.2 Commonly used coordinate systems 3.4 rqt (QT tool) 1. rqt_graph calculation graph visualization 2. rqt_topic View topic 3. rqt_publisher 4. rqt_plot data drawing 6. rqt_console log output 7. rqt_reconfigure dynamic parameter configuration 3.5 Rviz 3.6 ROS common commands
3.1 Start node mode
3.1.1 launch file
There are at least two ways to start a launch file with the roslaunch command:
- start with the ros package path
The format is as follows:
xroslaunch <pkg_name> <launchfile_name.launch> - directly give the absolute path of the launch file
The format is as follows:
xxxxxxxxxxroslaunch <path_to_launchfile>No matter which of the above methods is used to start the launch file, parameters can be added later. The more common parameters are
--screen: Make the ros node information (if any) output to the screen instead of saving it in a log file, which is more convenient for debuggingarg:=value: If there are variables to be assigned in the launch file, they can be assigned in this way, for example:
xxxxxxxxxxroslaunch <pkg_name> <launchfile_name> model:=urdf/myfile.urdf # There is a parameter "model" in the launch file that needs to be assigned or
xxxxxxxxxxroslaunch <pkg_name> <launchfile_name> model: = '$(find urdf_pkg)/urdf/myfile.urdf' # use the find command to provide the path When the roslaunch command runs, it will first detect the system's rosmasterWhether to run, if already started, use the existing rosmaster; if not started, it will start first rosmaster, and then execute the settings in the launch file to start multiple nodes at one time according to our pre-configured configuration.
It should be noted that the launch file does not need to be compiled, and it can be run directly in the above manner after setting it up.
3.1.2 rosrun
The node manager (master) must be started first. The master is used to manage many processes in the system. When each node starts, it must register with the master to manage the communication between nodes. After the master starts, register each node through the master. Enter the command in the Ubuntu terminal:
xxxxxxxxxxroscore
To start a node, rosrun + package name + node name; the rosrun method can only run one node at a time.
xxxxxxxxxxrosrun [--prefix cmd] [--debug] <pkg_name> <node_name> [ARGS] rosrun will look for a package's executable program named executable, passing in the optional parameter ARGS.
3.1.3 python
If it is python code, you can directly start it in the directory where the py file is located, pay attention to distinguish between python2 and python3.
3.1.4 start a small turtle
xxxxxxxxxxroscore rosrun turtlesim turtlesim_node # Start the turtle simulator node rosrun turtlesim turtle_teleop_key # Start the small turtle keyboard controller node After the startup is completed, you can control the movement of the turtle through keyboard input. When operating the keyboard, the cursor must be under the command line [rosrun turtlesim turtle_teleop_key], and click the keyboard [up], [down], [left], [right] to control the small Turtles move.
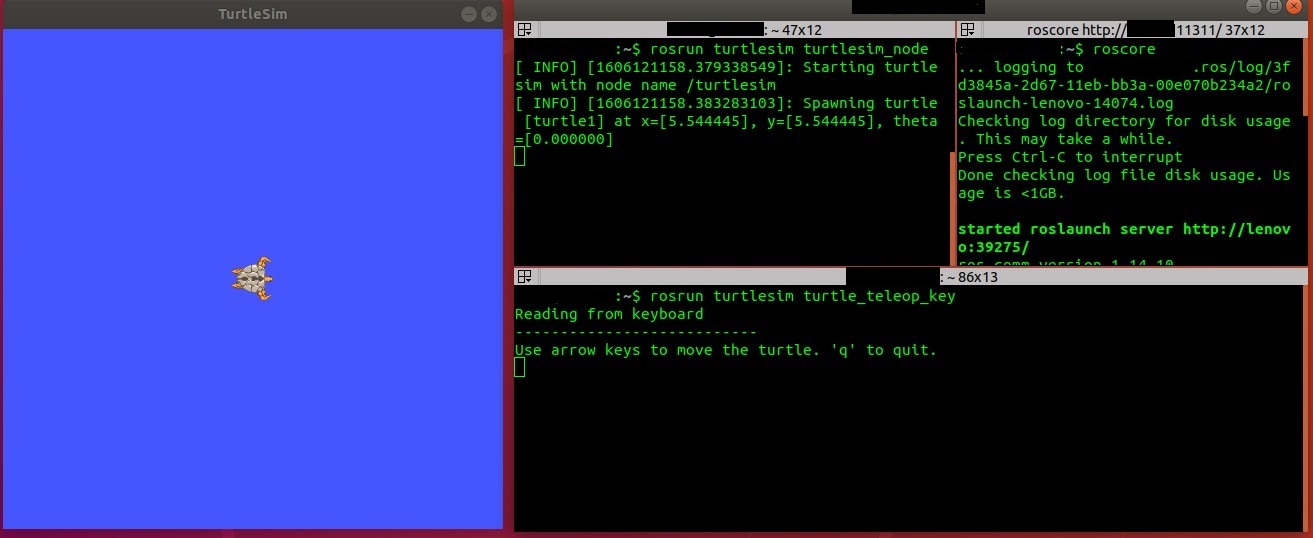
And in the rosrun turtlesim turtlesim_node terminal will print some log information of the small turtle
xxxxxxxxxx[ INFO] [1607648666.226328691]: Starting turtlesim with node name /turtlesim [ INFO] [1607648666.229275030]: Spawning turtle [turtle1] at x=[5.544445], y=[5.544445], theta=[0.000000] 3.1.5 Start two little turtles
Install feature pack
xxxxxxxxxxsudo apt install ros-melodic-turtle-tf
start up
xxxxxxxxxxroslaunch turtle_tf turtle_tf_demo.launch
keyboard control node
xxxxxxxxxxrosrun turtlesim turtle_teleop_key
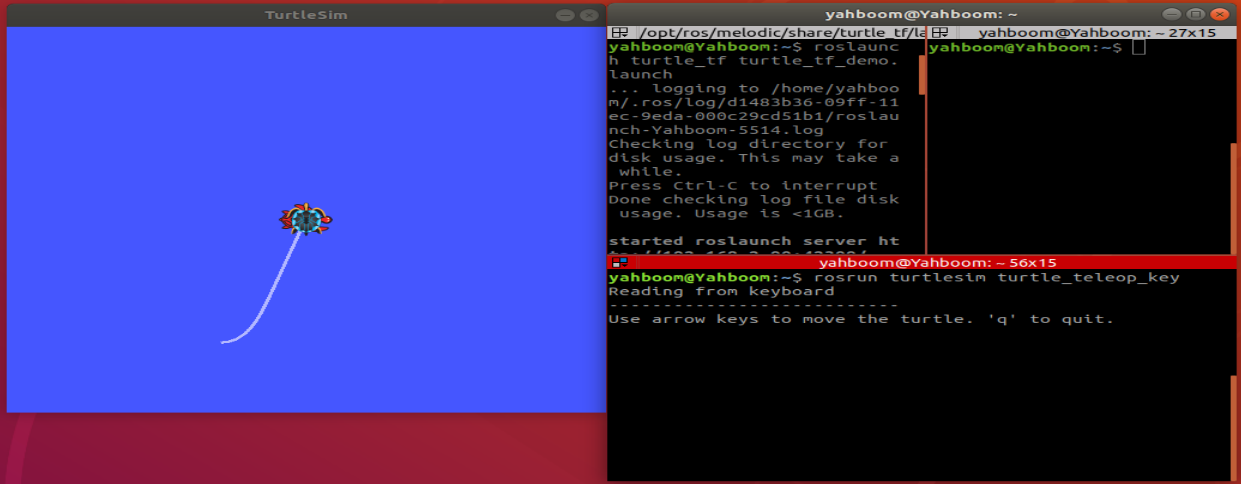
At this time, press the keyboard [Up], [Down], [Left], [Right] to drive the little turtle to move; it can be observed that one little turtle follows the movement of the other.
3.2 launch file
3.2.1 Overview
In ROS, a node program can generally only complete a single task with a single function, but a complete ROS robot generally requires many node programs to run at the same time and cooperate with each other to complete complex tasks. Therefore, it is required to start the robot when starting the robot. For many node programs, it is more troublesome if one node is started one by one. Through the launch file and the roslaunch command, multiple nodes can be started at one time, which is convenient for "one-click start", and can set rich parameters.
3.2.1 the format of the file
The launch file is essentially an xml file. In some editors, keywords can be highlighted for easy reading. It can be added in the header or not.
xxxxxxxxxx<?xml version="1.0"?>
Similar to other xml format files, launch files are also tags written in the form of tags. The main are as follows:
xxxxxxxxxx<launch> <!-- root tag --><node> <!-- The node that needs to be started and its parameters --><include> <!-- Include other launch --><machine> <!-- Specify the machine to run on --><env-loader> <!-- Set environment variables --><param> <!-- Define parameters to parameter server --><rosparam> <!-- Load the parameters in the yaml file to the parameter server --><arg> <!-- Define variable --><remap> <!-- Set topic mapping --><group> <!-- Set group --></launch> <!-- root tag -->
1. Label [node]
The label [node] is the core part of the launch file.
xxxxxxxxxx<launch> <node pkg = "package_name" type = "executable_file" name = "node_name"/> <node pkg = "another_package" type = "another_executable" name = "another_node"></node> ... </launch> in
pkgis the name of the package where the node is locatedtypeIt is the executable file in the package. If it is written in python, it may be a .py file. If it is written in c++, it is the name of the executable file after the source file is compiled.nameIt is the name of the node after startup, and each node must have its own unique name.
Note: roslaunch does not guarantee the startup order of nodes, so all nodes in the launch file should be robust to startup order.
You can also set more parameters, as follows:
xxxxxxxxxx<launch> <node pkg = "" type = "" name = "" respawn = "true" required = "true" launch-prefix = "xterm -e" output = "screen" ns = "namespace" /> </launch> In the above command,
respawn: Whether to restart automatically if the node is shut downrequired: If the node is shut down, whether to shut down all other nodeslaunch-prefix: Whether to open a new window to execute. For example, when you need to control the robot movement through the window, you should open a new window for the control node; or when the node has some information output, you don't want to mix it with other node information.output: By default, the information of launching the node will be stored in the log file below. You can set the parameters here to display the information on the screen.xxxxxxxxxx/.ros/log/ns: Put the node into a different namespace, that is, add the node name in front of itnsthe specified prefix. In order to achieve this kind of operation, the relative name should be used when defining the node name and topic name in the node source file, that is, no symbol is added./.
The names of the computational graph sources are divided into:
- Base name, for example: topic
- Global name, for example: /A/topic
- Relative name, for example: A/topic
- Private name, for example: ~topic
When publishing or subscribing, there is such a line of code
xxxxxxxxxxros::init (argc, argv, "publish_node");ros::NodeHandle nh;ros::Publisher pub = nh.advertise<std_msgs::string> ("topic", 1000);
2. Label [remap]
Often appears as a subtag of the node tag and can be used to modify the topic. In many rosnode source files, the received or sent topics may not be specified, but only the input_topic and output_topicInstead, it is necessary to replace the abstract topic name with the topic name in the specific scene in use.
Simply put, the role of remap is to facilitate the application of the same node file to different environments. You can use remap to modify the topic from the outside without changing the source file.
The common usage format of remap is as follows:
xxxxxxxxxx<node pkg = "some" type = "some" name = "some"> <remap from = "origin" to = "new" /> </node> 3. Label [include]
The role of this tag is to add another launch file to this launch file, similar to the nesting of launch files. Basic format:
xxxxxxxxxx<include file = "path-to-launch-file" /> The file path above can give a specific path, but in general, for the portability of the program, it is best to use the findThe command gives the file path:
xxxxxxxxxx<include file = "$(find package-name)/launch-file-name" /> In the above command, $(find package-name)Equivalent to the path of the corresponding package in this machine. In this way, even if other masters are changed, as long as the same package is installed, the corresponding path can be found.
Sometimes, the node introduced by another launch may need to be named uniformly, or the node name with similar characteristics, such as /my/gps, /my/lidar, /my/imu, that is, the node has a uniform prefix, which is easy to find. This can be done by setting ns(namespace) attribute to achieve, the command is as follows:
xxxxxxxxxx<include file = " $(find package-name) /launch-file-name " ns = "my" /> 4. Label [arg]
Through [arg], the parameters can be reused, and it is also convenient to modify multiple places at the same time. [arg] Three common methods:
<arg name="foo">: declares an [arg], but does not assign a value. It can be assigned later on the command line, or through the [include] tag.<arg name="foo" default="1">: assign the default value.<arg name="foo" value="1">: Assign a fixed value.
Assignment via command line
xxxxxxxxxxroslaunch package_name file_name.launch arg1: = value1 arg2: = value2
5. Variable substitution
There are two forms of variable substitution commonly used in launch files
$(find pkg): E.g$(find rospy)/manifest.xml. This package-based path setting is strongly recommended if possible$(arg arg_name): Set the default value first, if there is no additional assignment, use this default value
E.g:
xxxxxxxxxx<arg name = "gui" default = "true" /> <!-- Set the default value first, if there is no additional assignment, use the default value --> <param name = "use_gui" value = "$(arg gui)" /> another example:
xxxxxxxxxx<node pkg = "package_name" type = "executable_file" name = "node_name" args = "$(arg a) $(arg b)" /> After this setting, when starting roslaunch, you can assign values to the args parameter
xxxxxxxxxxroslaunch package_name file_name.launch a : = 1 b : = 5
6. Label [param]
Unlike [arg], [param] is shared, and its value is not limited to value, but can also be a file or even a line of commands.
Format
xxxxxxxxxx<param name = "param_name" type = "type1" value = "val" /> # type can be omitted, the system will automatically determine<param name = "param_name" textfile = "$(find pkg)/path/file" /> # Read file and save as string<param name = "param_name" command = "$(find pkg)/exe '$(find pkg)/arg.txt'" />Example:
xxxxxxxxxx<param name = "param" type = "yaml" command = "cat '$(find pkg)/*.yaml'" /> # The result of command is stored in param
[param] can be in the global scope, and its name is the original name, or it can be in a smaller scope, such as node, then its global name is in the form of node/param.
For example, define the following param in the global scope
xxxxxxxxxx<param name="publish_frequency" type="double" value="10.0" /> Then define the following param in the node scope
xxxxxxxxxx <node name = "node1" pkg = "pkg1" type = "exe1"> <param name = "param1" value = "False" /> </node> If you use rosparam listList the [param] in the server, then there are
xxxxxxxxxx/publish_frequency /node1/param1 # automatically prefixed with namespace Note: Although the [param] name is prefixed with namespace, it is still in the global scope
7. Label [rosparam]
[param] can only operate on a single [param], and there are only three forms: value, textfile, and command, and the content of a single [param] is returned. [rosparam] can be operated in batches, and also includes some commands for parameter settings, such as dump, delete, etc.
load : Load a batch of params from a YAML file in the following format:
xxxxxxxxxx<rosparam command = "load" file = "$(find rosparam)/example.yaml" />delete: delete a param
xxxxxxxxxx<rosparam command = "delete" param = "my_param" />Assignment operations similar to [param]
xxxxxxxxxx<rosparam param = "my_param"> [1,2,3,4] </rosparam>or
xxxxxxxxxx<rosparam>a: 1b: 2</rosparam>
[rosparam] can also be placed in [node], in this case, node namespace is added before the name of [param].
8. Label [group]
If you want to make the same settings for multiple nodes, such as all in the same specific namespace, remap the same topic, etc., you can use [group]. All common tags can be used in [group] to set, for example
xxxxxxxxxx<group ns = "rosbot"> <remap from = "chatter" to = "talker" /> # Valid for all subsequent nodes in the group <node ... /> <node ... > <remap from = "chatter" to = "talker1" /> # Remap can be reset in each node </node> </group> 3.3 TF coordinate transformation
tf is a package of functions that allows users to keep track of multiple coordinate systems at any time. tf maintains the relationship between coordinate frames in a real-time buffered tree structure and allows the user to convert points, vectors, etc. at any point in time between any two coordinate frames.
The Tf package is to convert the coordinates of a point in a certain coordinate system into the coordinates of another coordinate system. The sensor can be regarded as a coordinate system, the machine can be regarded as a coordinate system, and the obstacle can be regarded as a point.
After starting two small turtles in [3.1.5], perform the following operations.
3.3.1 Common tools of tf
1. view_frames tool
It can monitor all the tf coordinate systems broadcasted by ROS at the current moment, and draw a tree diagram to represent the connection relationship between the coordinate systems, generate a file named frame.pdf, and save it to the local current location.
xxxxxxxxxxrosrun tf view_frames
2. rqt_tf_tree tool
Although view_frames can save the current coordinate system relationship in an offline file, it cannot reflect the coordinate relationship in real time, so you can use rqt_tf_tree to refresh the display coordinate system relationship in real time
xxxxxxxxxxrosrun rqt_tf_tree rqt_tf_tree
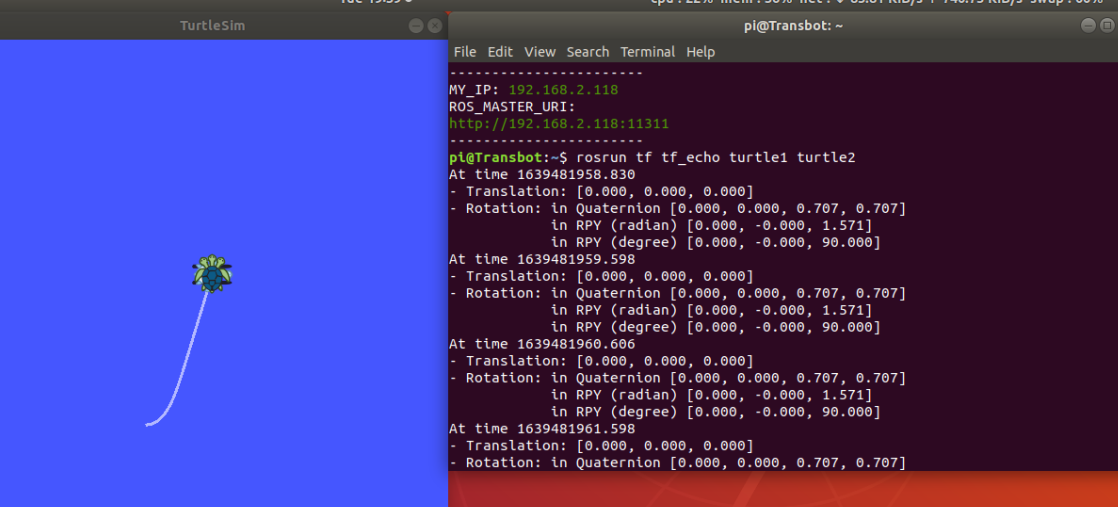
3. tf_echo tool
Use the tf_echo tool to view the relationship between the two broadcast reference frames.
xxxxxxxxxxrosrun tf tf_echo <source_frame> <target_frame>
Print the rotation-translation transformation from source_frame to target_frame; for example:
xxxxxxxxxxrosrun tf tf_echo turtle1 turtle2
4.static_transform_publisher
Publishes a static coordinate transformation between two coordinate systems that do not change their relative positions. Command format:
xxxxxxxxxxstatic_transform_publisher x y z yaw pitch roll frame_id child_frame_id period_in_msstatic_transform_publisher x y z qx qy qz qw frame_id child_frame_id period_in_ms
Use in launch:
xxxxxxxxxx<launch><node pkg="tf" type="static_transform_publisher" name="link1_broadcaster" args="1 0 0 0 0 0 1 link1_parent link1 100" /></launch>
5.roswtf plugin
A plugin that analyzes your current tf configuration and tries to find common problems.
xxxxxxxxxxroswtf
3.3.2 Commonly used coordinate systems
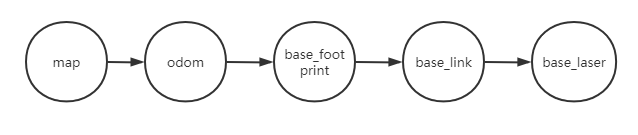
The commonly used coordinate system is frame_id, including map, odom, base_link, base_footprint, base_laser, etc.
- world coordinates (map)
The map coordinate system is a world-fixed coordinate system with its Z axis pointing up. The pose of the moving platform relative to the map coordinate system should not move significantly over time. The map coordinates are discontinuous, which means that the attitude of the moving platform in the map coordinate system can change discretely at any time. In a typical setup, the localization module continuously recalculates the robot's pose in world coordinates based on sensor monitoring, thereby eliminating bias, but may jump when new sensor information arrives. The map coordinate system is useful as a long-term global reference, but jumps make it a bad reference for local sensing and actuators.
- Odometer coordinate system (odom)
odom is a global coordinate system, which records the current motion posture of the robot through the odometer. The pose of the mobile platform in the odom coordinate system can be moved arbitrarily without any boundaries, so that the odom coordinate system cannot be used as a long-term global reference. The odom topic should be distinguished here, which are two concepts, one is the coordinate system, and the other is the odometer calculated based on the encoder (or vision, etc.). But the two are also related. The pose matrix converted by odom topic is the tf relationship of odom–>base_link. The odom and map coordinate systems are coincident at the beginning of the robot motion. However, they do not coincide over time, and the deviation that occurs is the cumulative error of the odometer. In some packages that calibrate the sensor cooperatively, such as amcl, a position estimation (localization) will be given, which can get the tf of map->base_link, so the deviation between the estimated position and the odometer position is also the coordinate system deviation between odom and map. If your odom calculation is correct, then the tf of map->odom is 0. The odom coordinate system is useful as a short-term local reference, but the offset makes it unusable as a long-term reference.
- base link (base_link)
The coordinate system of the robot body (base) coincides with the center of the robot, and the origin of the coordinate system is generally the center of rotation of the robot.
base_footprint: The origin is the projection of the origin of the base_link on the ground, with a slight difference (different z values).
- relationship between coordinates
In the robot system, we use a tree to associate all coordinate systems, so each coordinate system has a parent coordinate system and any child coordinate system, as follows: map --> odom --> base_link The world coordinate system is odom The parent of the coordinate system, the odom coordinate system is the parent of the base_link. While intuitively map and odom should be connected to base_link, this is not allowed because there can only be one parent per coordinate system.
- Coordinate system permissions
The conversion of odom to base_link is computed and published by the odometry source. However, the location module does not publish map-to-base_link transforms. Instead, the location module first receives the transform from odom to base_link, and uses this information to publish the transform from map to odom.
3.4 rqt (QT tool)
Open a command line window and enter rosrun rqtthen double click Tabkey, you can view the content contained in the QT tool in ROS, as shown in the following figure:

Next, let's take a small turtle as an example to briefly introduce several commonly used QT tools:
1. rqt_graph calculation graph visualization
Open the command line window and enter the following command to pop up a dialog window.
xxxxxxxxxxrosrun rqt_graph rqt_graph 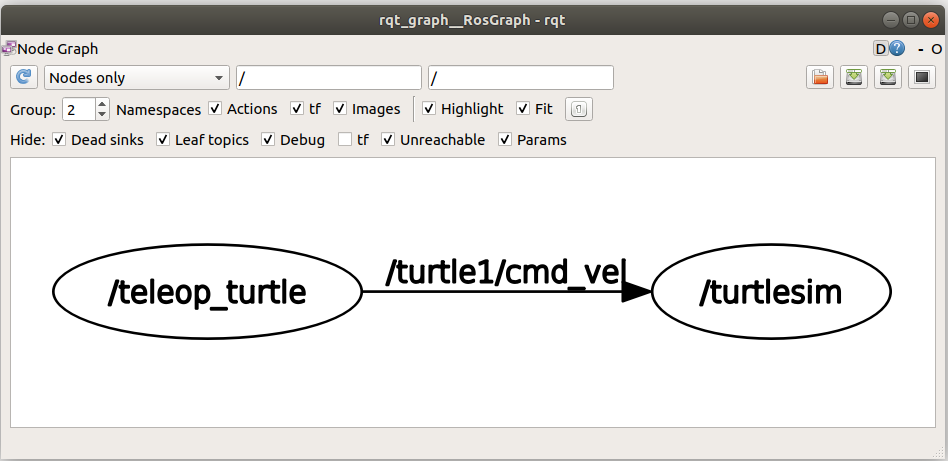
From the image we can clearly see that /teleop_turtlenode pass /turtle1/cmd_veltopic to /turtlesimnode for data transfer.
/teleop_turtleIt is a node with Publisher function.
/turtlesimIt is a node with Subscriber (subscription) function.
/turtle1/cmd_velA topic for publishers and subscribers to communicate.
2. rqt_topic View topic
xxxxxxxxxxrosrun rqt_topic rqt_topic
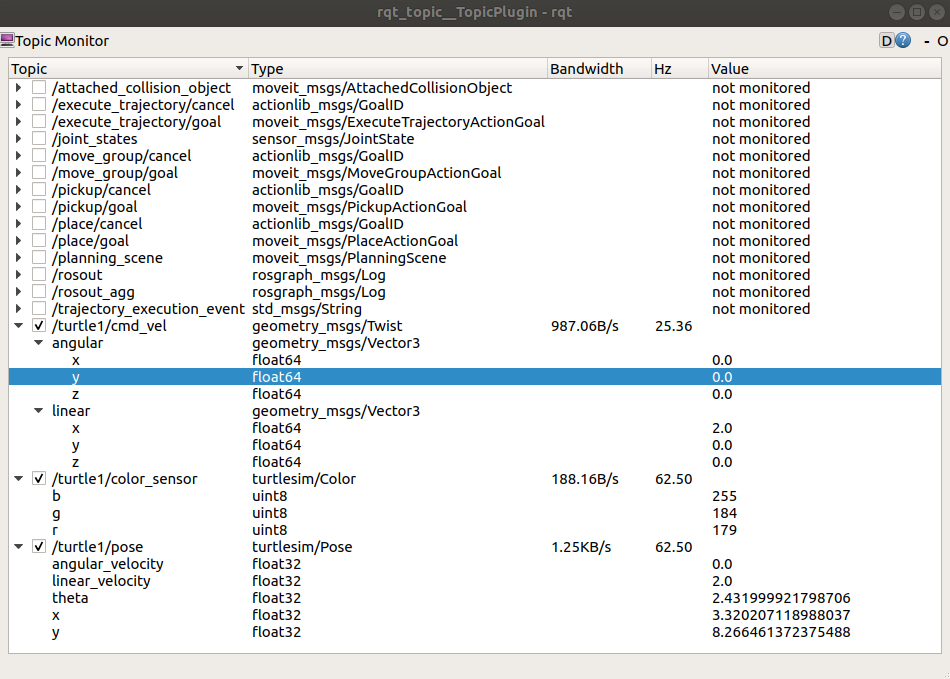
Through this tool, we can clearly see some real-time changing information of the baby turtles.
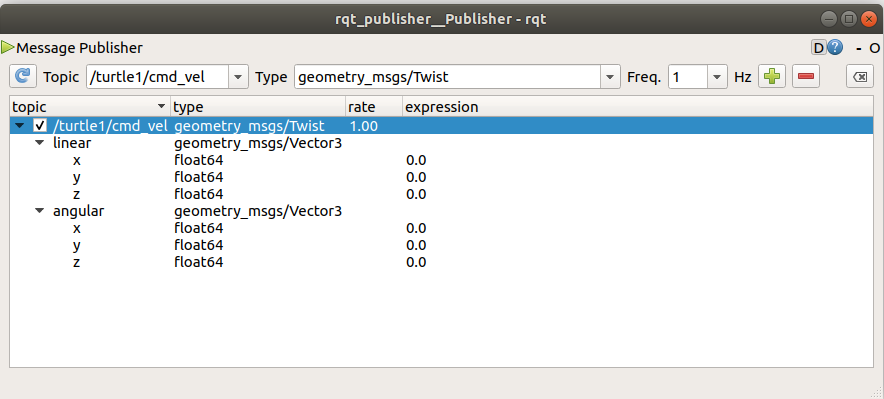
3. rqt_publisher
rqt_publisher provides a GUI plugin for publishing arbitrary messages with fixed or computed field values. Open the command line window and enter the following command, a dialog window will pop up.
xxxxxxxxxxrosrun rqt_publisher rqt_publisher
click TopicThe selection box on the right finds what we need /turtle1/cmd_velTopic, click the plus sign on the right to add it, the display is as follows:
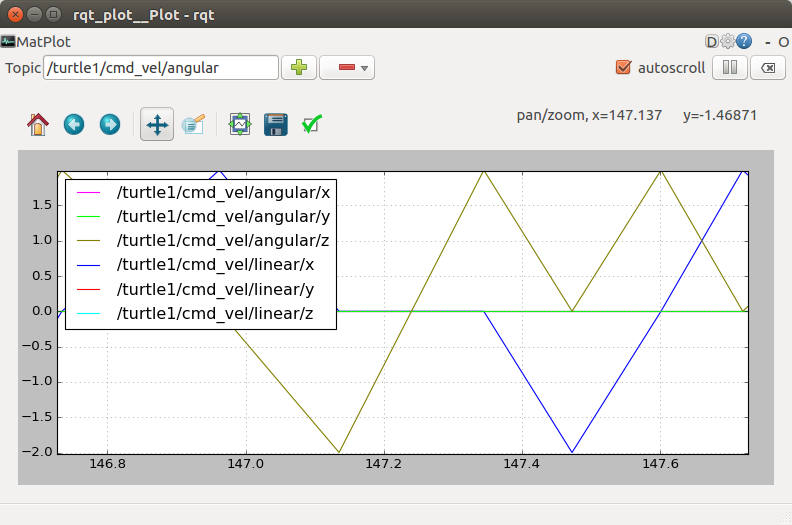
4. rqt_plot data drawing
xxxxxxxxxxrosrun rqt_plot rqt_plot
6. rqt_console log output
The function of the ROS log (log) system is to allow the program to generate some log messages, display them on the screen, send them to a specific topic, or store them in a specific log file to facilitate debugging, logging, alarming, etc.
| serial number | grade | Parse |
|---|---|---|
| 1 | DEBUG | Debug logs for development and testing |
| 2 | INFO | General log, user-visible level information |
| 3 | WARN | Warning message. |
| 4 | ERROR | error message. Message printed after program error |
| 5 | FATAL | Fatal error. downtime logging |
The log messages in ROS can be divided into 5 levels according to the severity from low to high: DEBUG, INFO, WARN, ERROR, FATAL. As long as the program can run, you don't need to pay attention, but ERROR and FATAL appear to indicate that there is a serious problem with the program that prevents it from running.
xxxxxxxxxxrosrun rqt_console rqt_console
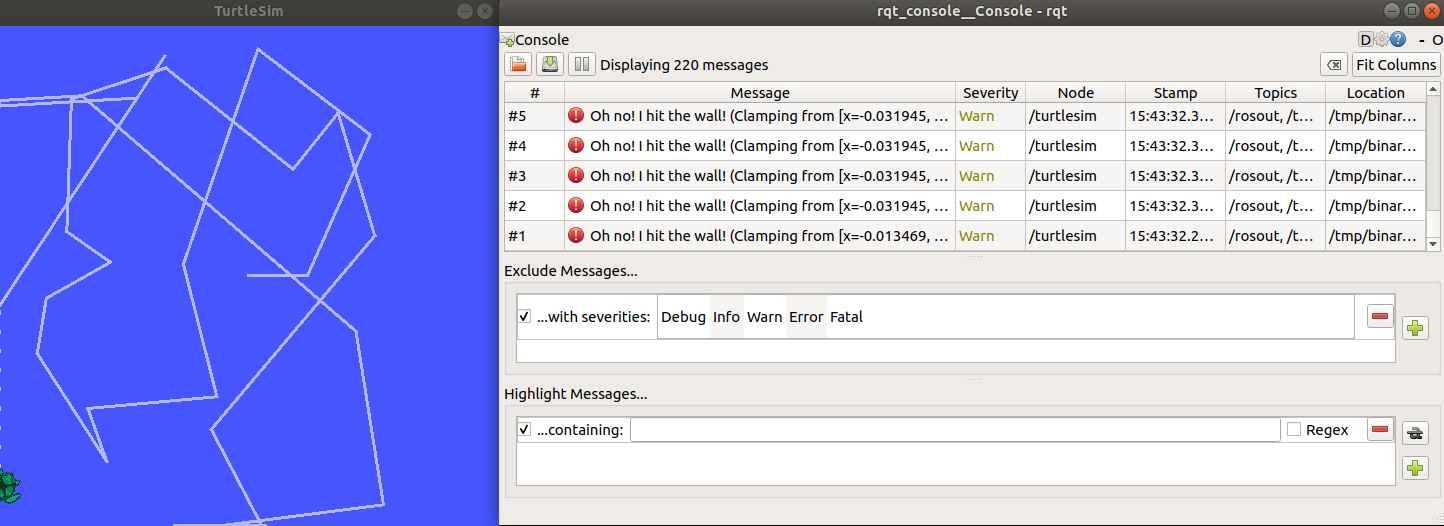
The log output tool is a part of the ROS logging framework (logging framework), which is used to display the output information of the node. From the figure, we can see that it reminds that the turtle has hit the wall.
- Common API
| C++ Basic API Format | C++ stream API format | Python logging API |
|---|---|---|
| ROS_DEBUG("Printed content"); | ROS_DEBUG_STREAM("Printed content" <<"hello"); | rospy.logdebug("printed content") |
| ROS_INFO("Printed content"); | ROS_INFO_STREAM("Printed content" <<"hello"); | rospy.loginfo("printed content") |
| ROS_WARN("Printed content"); | ROS_WARN_STREAM("Printed content" <<"hello"); | rospy.logwarn("printed content") |
| ROS_ERROR("Printed content"); | ROS_ERROR_STREAM("Printed content" <<"hello"); | rospy.logerror("Printed content") |
| ROS_FATAL("Printed content"); | ROS_FATAL_STREAM("Printed content" <<"hello"); | rospy.logfatal("Printed content") |
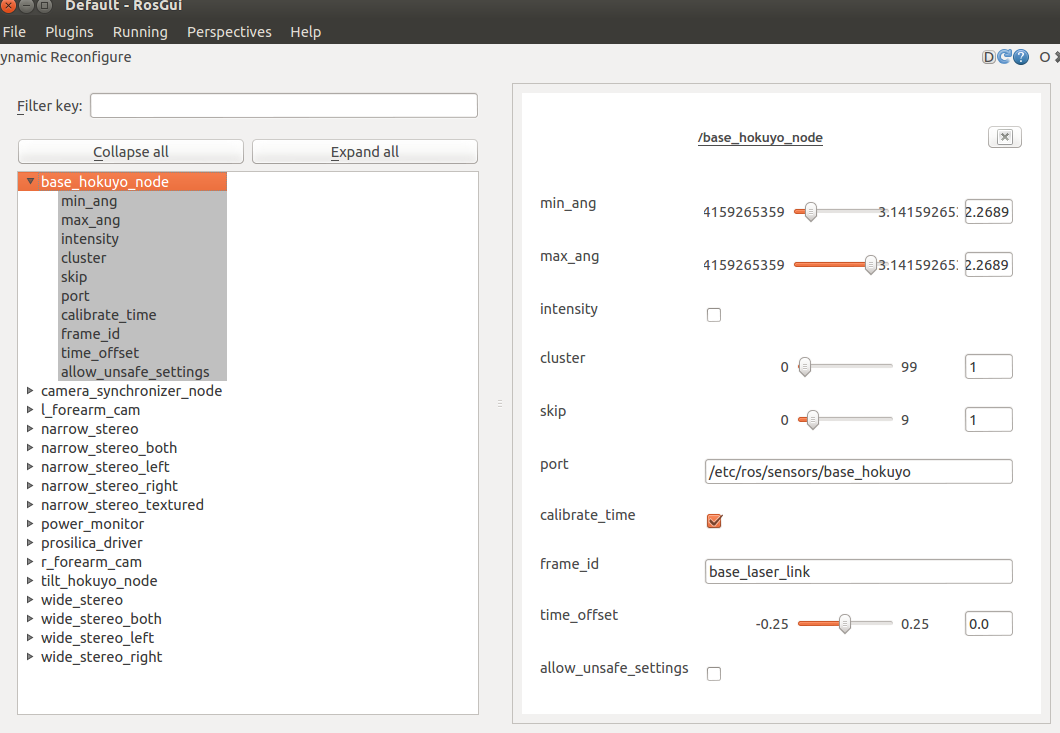
7. rqt_reconfigure dynamic parameter configuration
xxxxxxxxxxrosrun rqt_reconfigure rqt_reconfigure
Image source ROS wiki:
3.5 Rviz
rviz is a graphical tool that comes with ros, which can easily perform graphical operations on ros programs. Its use is also relatively simple.
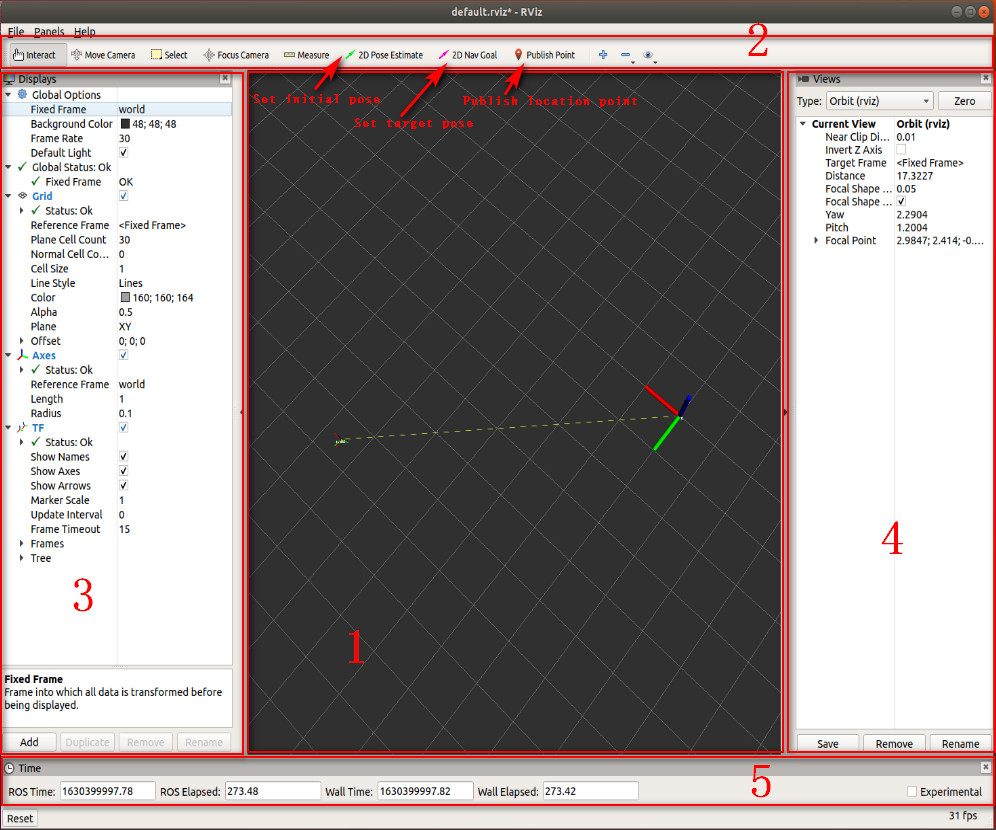
[Set initial pose], [Set target pose], [Publish location point]: generally used in map building and navigation.
The rviz interface mainly includes the following parts:
1: The 3D view area is used to visually display data. There is currently no data, so it is displayed in black.
2: Toolbar, which provides tools such as viewing angle control, target setting, and publishing location.
3: Display item list, which is used to display the currently selected display plug-ins, and the properties of each plug-in can be configured.
4: Angle setting area, you can choose a variety of observation angles.
5: Time display area, showing the current system time and ROS time.
- add display
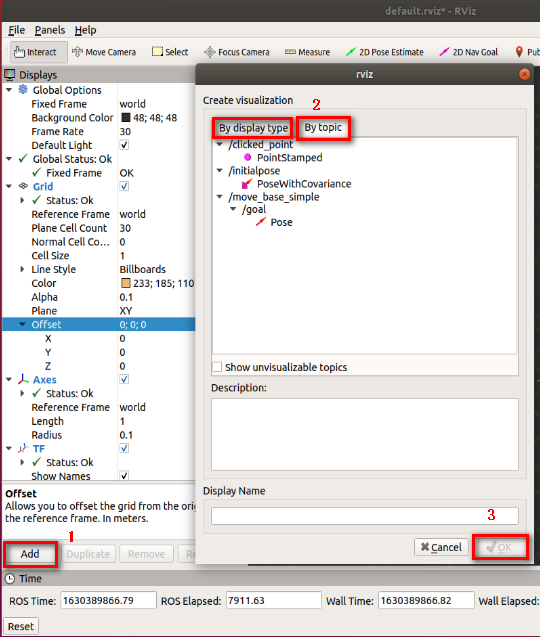
Step 1: Click the [Add] button. A checkbox will pop up.
Step 2: You can choose to add it through the display type [By display type], but you need to modify the corresponding topic before the coordinate system can be displayed; you can also directly add it by selecting the topic [By topic] and it can be displayed normally.
Step 3: Click [OK].
3.6 ROS common commands
| Order | effect |
|---|---|
| catkin_create_pkg | Information for creating feature packs |
| rospack | Get information about feature packs |
| catkin_make | Compile the function package in the workspace |
| rosdep | Automatically install other packages that feature packages depend on |
| roscd | Function package directory jump |
| roscp | Copy the files in the feature pack |
| rosed | Editing files in feature packs |
| rosrun | Run the executable in the feature pack |
| roslaunch | run startup file |