5. Bind the device ID
5. Bind the device ID5.1 Device view5.2. Device Binding5.2.1 Astra Camera Binding5.2.2 PCB and radar binding5.3 Introduction to Rule file syntax
When the robot uses two or more USB serial port devices, the corresponding relationship between the device name and the device is not fixed, but is assigned according to the order in which the device is connected to the system. Inserting a device and then another device can determine the relationship between the device and the device name, but each time the system starts, you need to insert and remove the device, which is very troublesome. The serial port can be mapped to a fixed device name, regardless of the insertion order, the device will be mapped to the new device name, we only need to use the new device name to read and write operations on the device.
Note: The ID of the matching device has been bound to the system image. The following steps can be used for binding new devices.
5.1 Device view
After SSH connects to the car, terminal input,
xxxxxxxxxxlsusbAstra has an official binding of the ID number of each device file, the handle generally does not need to be bound, the main binding PCB and radar can be.
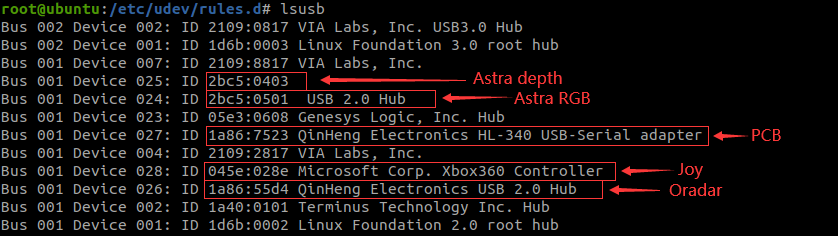
Device number view
xxxxxxxxxxll /dev/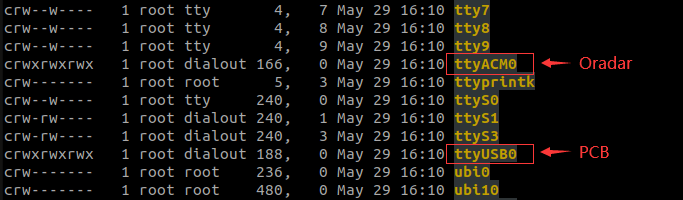

5.2. Device Binding
5.2.1 Astra Camera Binding
The binding rules file for the Astra camera is [56-orbbec-usb.rules], provided by the Astra manufacturer and demonstrated here with Astra Pro.
Place the [56-orbbec-usb.rules] file in the following directory in the cart:
xxxxxxxxxx/etc/udev/rules.d/56-orbbec-usb.rulesRun the following command on the terminal to refresh the USB rules to bind Astra camera.
xxxxxxxxxxsudo udevadm control --reload-rules && sudo udevadm triggerAfter the binding is complete, enter the following command,
xxxxxxxxxxll /dev/astra*
If the output is as follows, the binding is successful.
5.2.2 PCB and radar binding
The car terminal executes the following command,
xxxxxxxxxx#进入rules.d目录# Go to the rules.d directorycd /etc/udev/rules.d/#新建rules文件并编辑# Create new rules file and edit itsudo vim yahboomcar.rulesWrite the following (see tutorial [Linux Basics] for vim command usage)
xxxxxxxxxxKERNEL=="ttyUSB*", ATTRS{idVendor}=="1a86", ATTRS{idProduct}=="7523", MODE:="0777", SYMLINK+="myserial"KERNEL=="ttyACM*", ATTRS{idVendor}=="1a86", ATTRS{idProduct}=="55d4", MODE:="0777", SYMLINK+="oradar"Save and exit to make the rule take effect. Perform the following operations:
xxxxxxxxxxsudo udevadm control --reload-rules && sudo udevadm triggerAfter the binding is complete, enter the following command,
xxxxxxxxxxll /dev/myserial #PCBll /dev/oradar #雷达 # Radar
If the output is as follows, the binding is successful.
5.3 Introduction to Rule file syntax
xxxxxxxxxxKERNEL=="ttyUSB*", ATTRS{idVendor}=="1a86", ATTRS{idProduct}=="7523", MODE:="0777", SYMLINK+="myserial"KERNEL=="ttyACM*", ATTRS{idVendor}=="1a86", ATTRS{idProduct}=="55d4", MODE:="0777", SYMLINK+="oradar"
Parsing
xxxxxxxxxxKERNEL # 匹配事件的设备名 # Name of the device that matches the eventATTR{filename} # 匹配事件设备的sysfs属性。 # Matches the sysfs attribute of the event device.idVendor # 生产商编号 # Manufacturer IDidProduct # 产品号 # Product numberSYMLINK # 为/dev/下的设备文件产生符号链接。就是给这个设备取一个别名。 # Generate symbolic links for device files in /dev/. Just give the device an alias.MODE # 为设备设定权限。 # Sets permissions for the device.From [6.1], it can be seen that the device number of the PCB is [ttyUSB0], which is easy to jump, and the ID number is [1a86, 7523], which is fixed. [ttyUSB*] means that no matter the device number becomes [ttyUSB] in the future, it is followed by [0, 1, 2, 3, 4,...]. Both are bound to [myserial]; Radar equipment [ttyACM0] the same; The same applies to binding other devices.
Note: When using an alias, do not use some device names that already exist in the system. Otherwise, it will fail.