3. Robot control
1. Program Function Description
Turn on the chassis, run the handle/keyboard control program, you can use the handle or keyboard to control the movement of the cart, the handle also has a control buzzer, control the lights and other functions.
2. Program code reference path
After entering the docker container, the source code of the joystick control function is located in, take R2 model for example.
/root/yahboomcar_ros2_ws/yahboomcar_ws/src/yahboomcar_ctrl/yahboomcar_ctrl/yahboom_joy_R2.pyUpon entering the docker container, the location of the keyboard control function source code is located at, the
xxxxxxxxxx/root/yahboomcar_ros2_ws/yahboomcar_ws/src/yahboomcar_ctrl/yahboomcar_ctrl/yahboom_keyboard.py3. Program startup
xxxxxxxxxx#底层驱动# Underlying driversros2 run yahboomcar_bringup Ackman_driver_R2#手柄控制#Joystick controlros2 run yahboomcar_ctrl yahboom_joy_R2ros2 run joy joy_node#键盘控制# Keyboard controlros2 run yahboomcar_ctrl yahboom_keyboardIt should be noted here that the joystick and keyboard cannot run at the same time, as the keyboard control, when activated, defaults to sending a message of 0 data for speed when the keyboard is not pressed.
3.1. Joystick Control
After opening, press the "START" button, hear the buzzer sound, then you can start the remote control. The remote control will enter the sleep mode after it has been turned on for a period of time without being used, and you need to press the "START" button to end the sleep. If you want to control the trolley operation, you also need to press the R2 button, release the motion control lock, before you can use the joystick to control the trolley movement.
Remote control effect description.
| Handles | Effects |
|---|---|
| Left Stick Up/Down | Forward/Backward Straight |
| Right Stick Left/Right | Front Wheel Left/Right Turn |
| Right "1" button | Control light effect |
| Right "2" button | Unlock/Lock motion control |
| "START" button | Control Buzzer/End Sleep |
| Left Rocker Down | Adjust Line Velocity Level |
| Right Rocker Down | Adjust Angular Velocity |
3.2. Keyboard Controls
Description of the keys.
Direction control
speed control

3.3. Node Communication
The handle control trolley node communication diagram that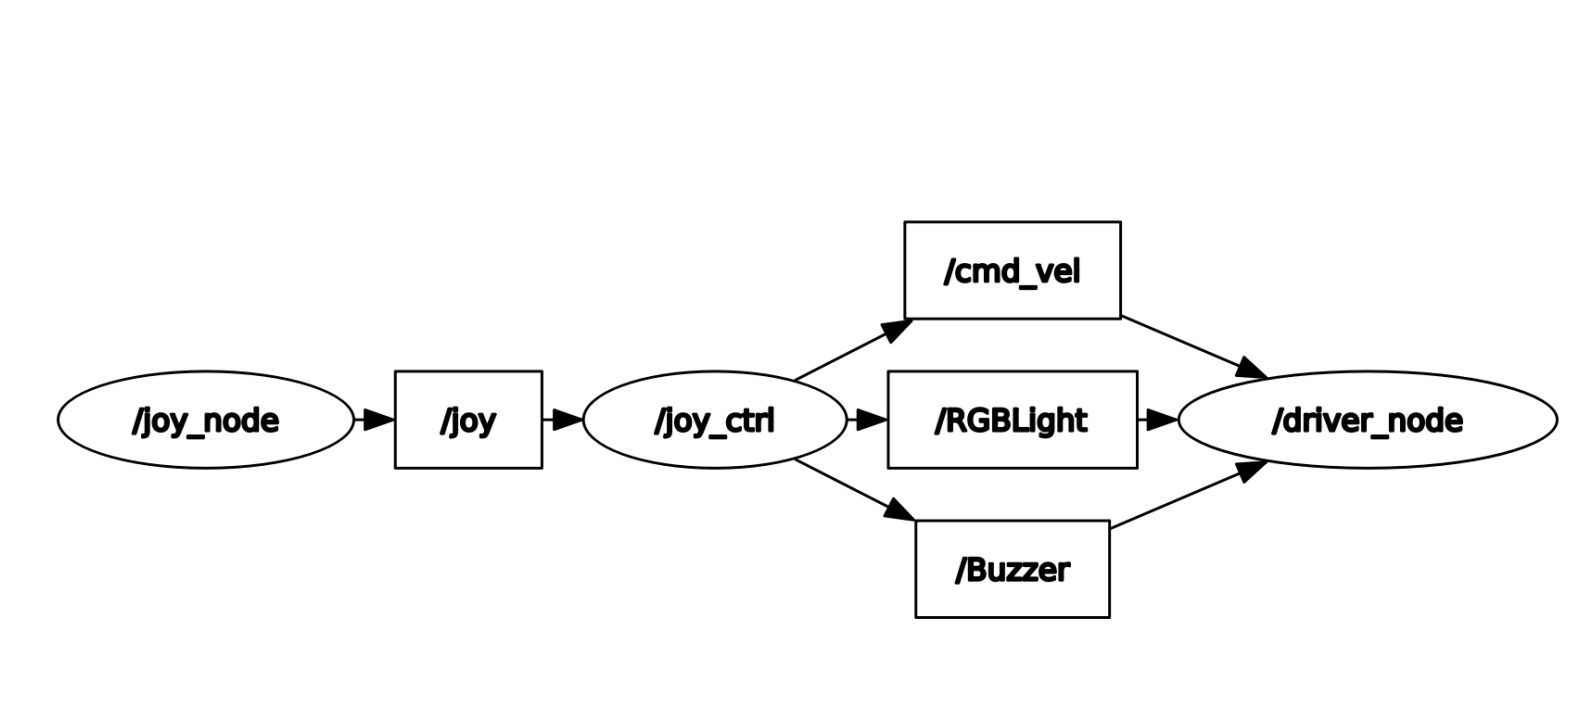
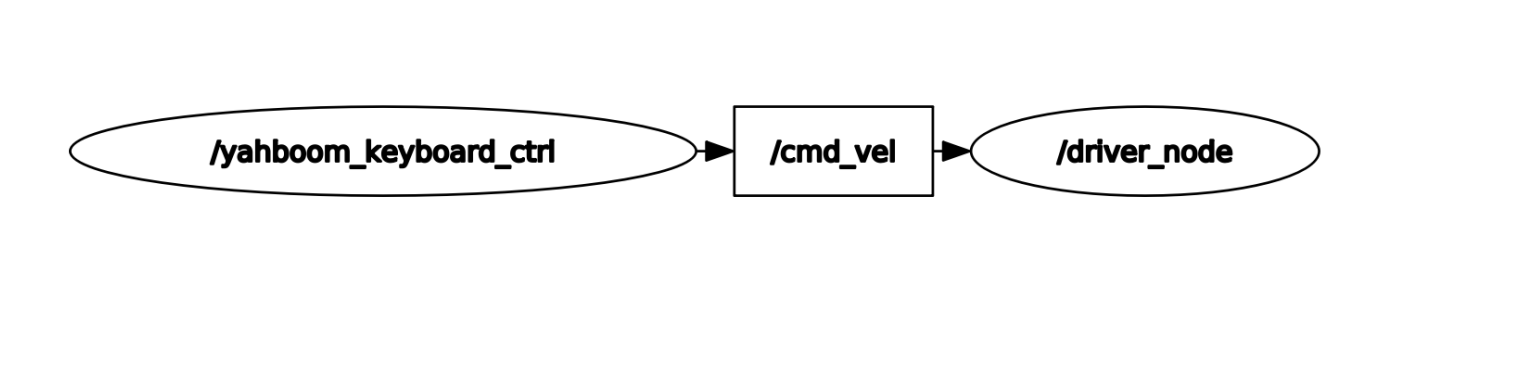
Keypad-controlled trolley node communication diagram that
4. Core Code Analysis
4.1. Handle control code
Take the R2 model as an example, as we said in the previous lesson, the chassis control program, which is also known as Ackman_driver_R2.py, defines three subscribers for speed (/cmd_vel), light band effect (/RGBLight ), and buzzer (/Buzzer), so we can control the speed, light band effect (/RGBLight ), and buzzer (/Buzzer) by posting that type of topic data in the joystick control code program, yahboom_joy_R2. py can control the velocity, light band, and buzzer just by publishing that type of topic data.
xxxxxxxxxx#create pubself.pub_goal = self.create_publisher(GoalID,"move_base/cancel",10)self.pub_cmdVel = self.create_publisher(Twist,'cmd_vel', 10)self.pub_Buzzer = self.create_publisher(Bool,"Buzzer", 1)self.pub_RGBLight = self.create_publisher(Int32,"RGBLight" , 10)self.pub_JoyState = self.create_publisher(Bool,"JoyState", 10)
In addition, we need to subscribe to the "joy" topic data, which tells us which keys (joystick and buttons) have been changed, i.e.
xxxxxxxxxx#create subself.sub_Joy = self.create_subscription(Joy,'joy', self.buttonCallback,10)
The main thing to look at is the callback function for this joy topic, which parses the received value, assigns it to the publisher's variable, and finally publishes it.
xxxxxxxxxxdef buttonCallback(self,joy_data):if not isinstance(joy_data, Joy): returnif self.user_name == "root": self.user_jetson(joy_data)else: self.user_pc(joy_data)
Here the function jumps all self.user_jetson, and the parameter variable passed in is the received topic, the
xxxxxxxxxxdef user_jetson(self, joy_data):
To analyze the example of controlling a buzzer, the
xxxxxxxxxxif joy_data.buttons[11] == 1:Buzzer_ctrl = Bool()self.Buzzer_active=not self.Buzzer_activeBuzzer_ctrl.data =self.Buzzer_activefor i in range(3): self.pub_Buzzer.publish(Buzzer_ctrl)
If joy_data.buttons[11] == 1 i.e. if "start" is pressed, then the value of the buzzer will be changed and published self.pub_Buzzer.publish(Buzzer_ctrl) . The others are in order, the principle is the same, they are all assigning values by detecting the change of key value. Refer to yahboom_joy_R2.py for detailed code.
4.2. Keyboard Control Code
Keyboard control can only control the motion control of the cart, it cannot control the cart's light strip and buzzer, therefore, there is only one /cmd_vel speed publisher that
xxxxxxxxxxself.pub = self.create_publisher(Twist,'cmd_vel',1)
The program also defines two dictionaries to detect changes in the keyboard when letters are pressed, the
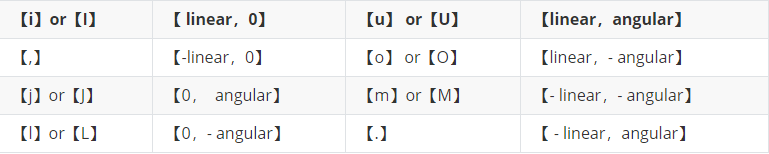
xmoveBindings = { 'i': (1, 0), 'o': (1, -1), 'j': (0, 1), 'l': (0, -1), 'u': (1, 1), ',': (-1, 0), '.': (-1, 1), 'm': (-1, -1), 'I': (1, 0), 'O': (1, -1), 'J': (0, 1), 'L': (0, -1), 'U': (1, 1), 'M': (-1, -1),}
speedBindings = { 'Q': (1.1, 1.1), 'Z': (.9, .9), 'W': (1.1, 1), 'X': (.9, 1), 'E': (1, 1.1), 'C': (1, .9), 'q': (1.1, 1.1), 'z': (.9, .9), 'w': (1.1, 1), 'x': (.9, 1), 'e': (1, 1.1), 'c': (1, .9),}Entering a while loop, the program reads the value of the keyboard press and then makes a layer upon layer of judgment that
xxxxxxxxxxkey = yahboom_keyboard.getKey()if key=="t" or key == "T": xspeed_switch = not xspeed_switchelif key == "s" or key == "S":...if key in moveBindings.keys():...elif key in speedBindings.keys():..Finally, assign to twist.linear.x, twist.linear.y, twist.angular.z based on the multi-layer judgment and post it.
xxxxxxxxxxif xspeed_switch: twist.linear.x = speed * xelse: twist.linear.y = speed * xtwist.angular.z = turn * thif not stop: yahboom_keyboard.pub.publish(twist)if stop:yahboom_keyboard.pub.publish(Twist())Refer to yahboom_keyboard.py for detailed code.
Precautions for Handle Use
When connecting the USB joystick receiver, it is recommended to connect it to the outermost USB-HUB expansion board, not directly to the motherboard or the middle USB-HUB expansion board (X3plus). If it is directly connected to the motherboard or the middle USB-HUB expansion board (X3plus), it will seriously interfere with the joystick signal reception due to the aluminium alloy grill on the top and bottom.
After plugging and unplugging the joystick receiver head, it is necessary to restart the joystick programme, otherwise it will not be able to control the trolley.
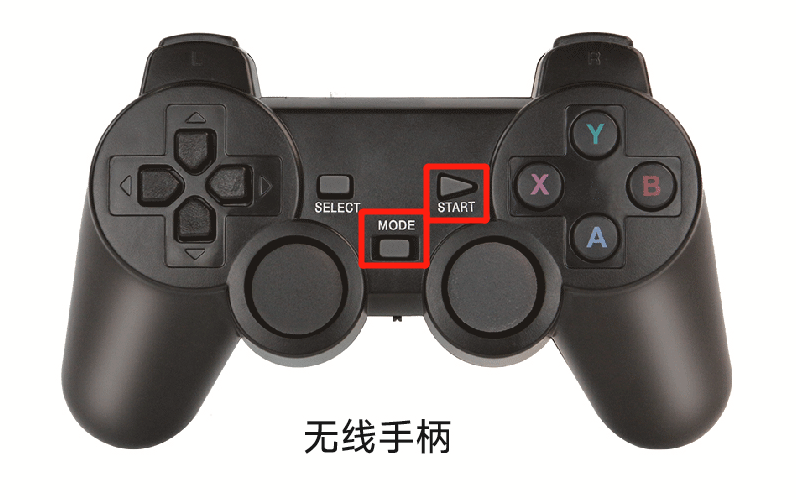
After starting the joystick control programme, if the joystick can not control the trolley, it may be caused by the incorrect control mode of the joystick, you can long press the joystick mode button for about 15 seconds to switch the mode, and when the green indicator light is always on, then press the start button again, if the buzzer sounds, it means that the switching is successful, if there is no response, you can long press the joystick mode button again for 15 seconds.
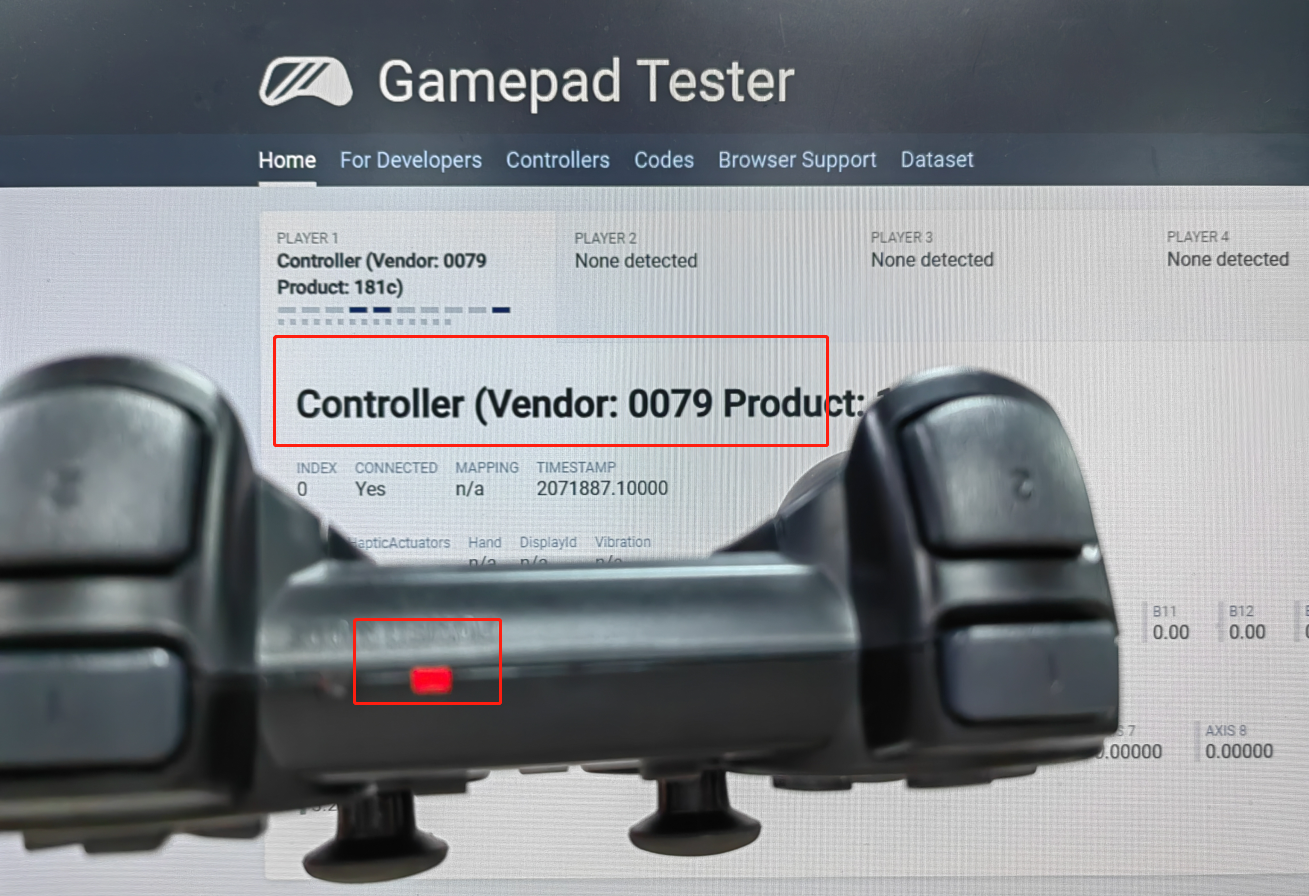
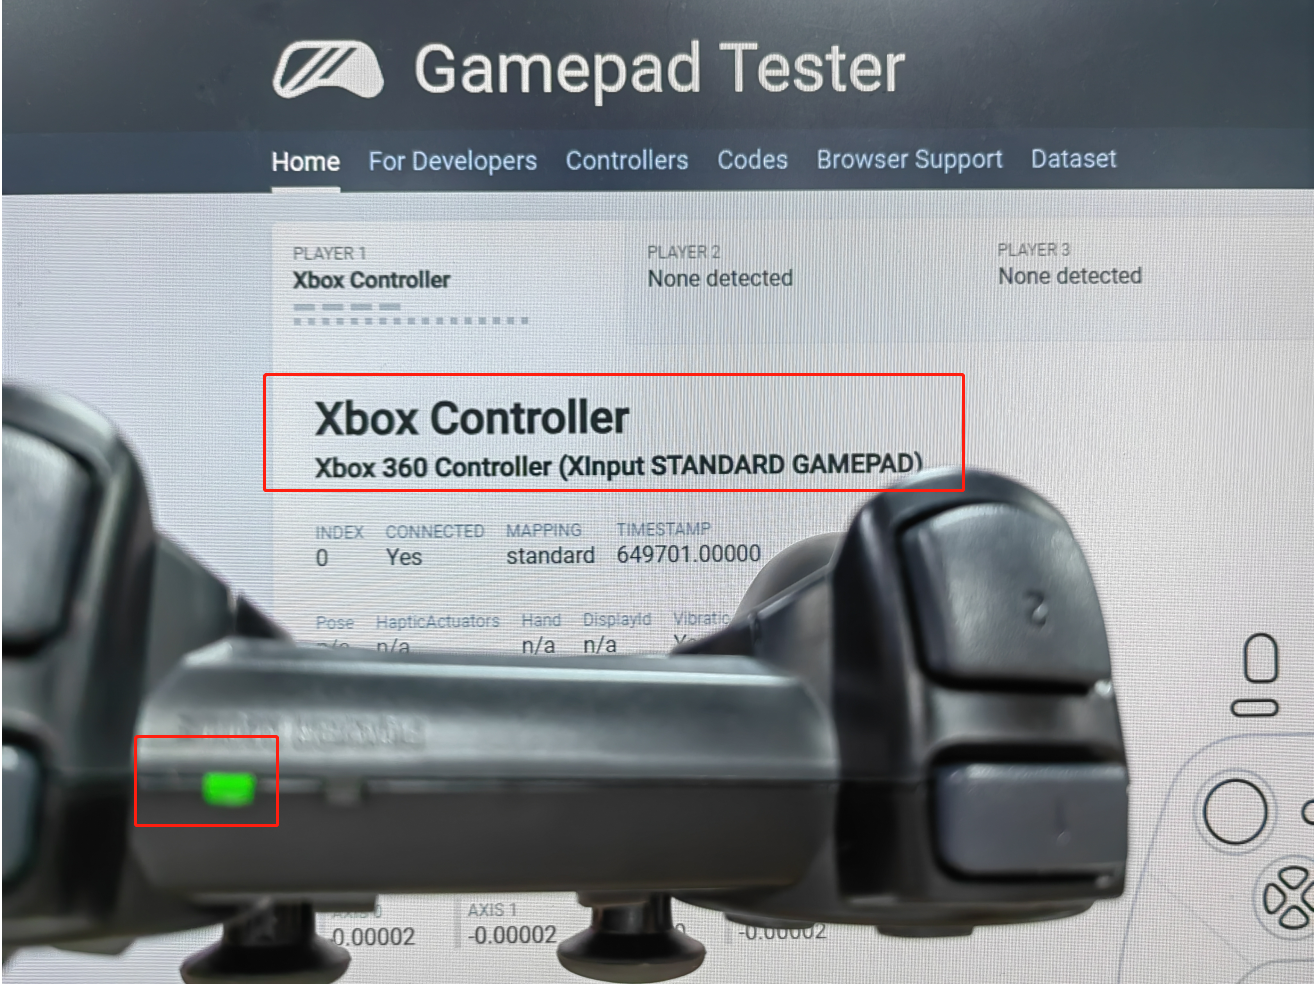
Jetson series support mode: PC/PCS mode. In PC mode, the POWER MODE indicator light is red by default. You can connect the handle receiver to the usb port of the computer to connect to the wireless handle. Enter the URL in the browser: https://gamepad-tester.com/. Pressing the button URL will display the change of the button value, as shown in the following figure:
Raspberry Pi series support mode: X-BOX mode. In X-BOX mode, the default POWER MODE indicator light is green. You can connect the handle receiver to the usb port of the computer to connect to the wireless handle. Enter the URL in the browser: https://gamepad-tester.com/. Pressing the button URL will display the change of the button value, as shown in the following figure:
After re-plugging the joystick receiver or rebooting the motherboard, the joystick will reset to factory mode, and if it is not controllable, the mode will need to be re-switched each time it is plugged in or rebooted.
In the case of unsuccessful matching, the POWER MODE indicator light will flash red and green all the time, and will not light up after a few seconds of sleep.