8. Write system file
Note: The TF from DOGZILLA has already been burned in the factory image. You can directly insert the TF card into the Raspberry Pi for use. Generally, you do not need to follow this tutorial to burn the image system! ! !
8.1 Preparing for installation
- Prepare a win10 system computer, card reader and TF card (64G or larger recommended)
- Download the mirror
Find the factory image in the documentation.
System default username: pi, password: yahboom
- Format SD card
Use SDFormatter to format the TF card. Be careful not to select the wrong Drive here, otherwise it will cause unnecessary trouble. If the TF card has already been programmed with the system, there may be an error in the first format, just execute it again.
8.2 Write system image
- Unzip the downloaded system compressed file to get the img image file
- Insert the TF card into the card reader, and then insert the card reader into the computer USB port
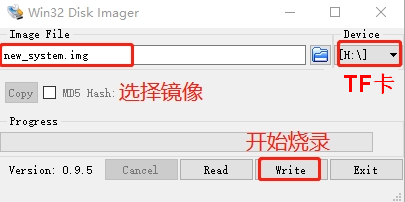
- Unzip and run the Win32DiskImager tool
- Select the img (image) file in the software, select the drive letter under "Device", and then select "Write" Then start to burn the system. Depending on the speed of your TF card and card reader, the burning process will be faster or slower.
- A completion dialog box will pop up after the burning is completed, indicating that the installation is complete. If it is not successful, please close the software such as the firewall and re-burn. Please note that after installation, the TF card is divided into multiple partitions under the Windows system and cannot be clicked to enter. This is a normal phenomenon, because the disk partition under Linux cannot be seen under Win!
So far, the Raspberry Pi system has been successfully programmed. After the burning is successful, the system may prompt to format the partition because the partition cannot be recognized. Do not format at this time! Do not format! Do not format! Click Cancel, then eject the TF card.