9 Object detection
9 Object detection9.1 experimental goals9.2 Preparation before the experiment9.3 experimental procedure9.4 experimental results9.5 experiment summary
9.1 experimental goals
This lesson focuses on the object detection function, analyzes the picture captured by the camera, and frames and displays the object type name if it matches the object type in the model.
The reference code path for this experiment is :CanMV\05-AI\voc20_object_detect.py
9.2 Preparation before the experiment
Please first import the model file into the memory card, and then insert the memory card into the memory card slot of the K210 module.
9.3 experimental procedure
The factory firmware of the module has integrated the AI vision algorithm module. If you have downloaded other firmware, please burn it back to the factory firmware before doing the experiment.
- Import the libraries and initialize the camera and LCD display.
ximport sensor, image, time, lcdfrom maix import KPUlcd.init()sensor.reset()sensor.set_pixformat(sensor.RGB565)sensor.set_framesize(sensor.QVGA)sensor.skip_frames(time = 100)clock = time.clock()
- The new object type name variable 'obj name' represents objects in order: 0. aeroplane, 1. bicycle, 2. bird, 3. boat, 4. bottle, 5. bus, 6. car, 7. cat, 8. chair, 9. cow, 10. diningtable, 11. dog, 12. horse, 13. motorbike, 14. person, 15. pottedplant, 16. sheep, 17. sofa, 18. train, 19. tvmonitor.
xxxxxxxxxxobj_name = ("aeroplane", "bicycle", "bird", "boat", "bottle", "bus", "car", "cat", "chair", "cow", "diningtable", "dog", "horse", "motorbike", "person", "pottedplant", "sheep", "sofa", "train", "tvmonitor")
- To initialize the parameters related to KPU, kpu needs to load the kmodel file. The path of the model file required for this experiment is:/sd/KPU/voc20_object_detect/voc20_detect.kmodel,And use yolo2 to calculate conformity to the model requirements. od_img is the image of the neural network, the size is 320*256, which is used to store the camera image and pass it to KPU for calculation.
xxxxxxxxxxod_img = image.Image(size=(320,256))anchor = (1.3221, 1.73145, 3.19275, 4.00944, 5.05587, 8.09892, 9.47112, 4.84053, 11.2364, 10.0071)kpu = KPU()print("ready load model")kpu.load_kmodel("/sd/KPU/voc20_object_detect/voc20_detect.kmodel")kpu.init_yolo2(anchor, anchor_num=5, img_w=320, img_h=240, net_w=320 , net_h=256 ,layer_w=10 ,layer_h=8, threshold=0.7, nms_value=0.2, classes=20)
- Create a new while loop, pass the image to the KPU for calculation, use the yolo 2 neural network algorithm to solve it, and finally get the most similar type name, frame the object and display the object name.
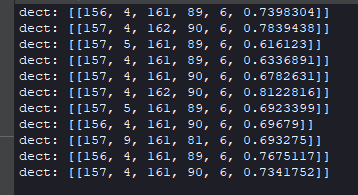
xxxxxxxxxxwhile True:clock.tick()img = sensor.snapshot()od_img.draw_image(img, 0,0)od_img.pix_to_ai()kpu.run_with_output(od_img)dect = kpu.regionlayer_yolo2()fps = clock.fps()if len(dect) > 0:print("dect:",dect)for l in dect :img.draw_rectangle(l[0],l[1],l[2],l[3], color=(0, 255, 0))img.draw_string(l[0],l[1], obj_name[l[4]], color=(0, 255, 0), scale=1.5)img.draw_string(0, 0, "%2.1ffps" %(fps), color=(0, 60, 128), scale=2.0)lcd.display(img)
9.4 experimental results
Connect the K210 module to the computer through the microUSB data cable, CanMV IDE click the connect button, after the connection is completed click the Run button to run the routine code. You can also download the code as main.py and run it in the K210 module.
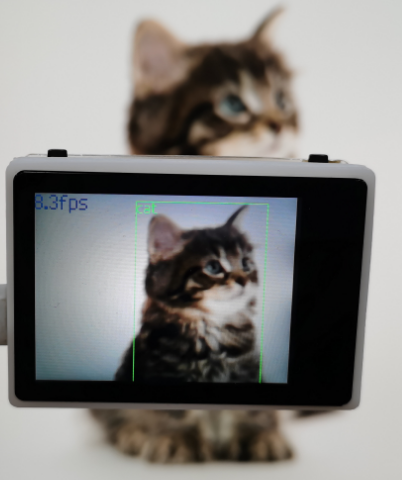
After the system initialization is completed, the LCD displays the camera screen, shoots the object with the camera, the screen displays the name of the detected object, and the serial terminal at the bottom of the IDE prints information about the detected object.
9.5 experiment summary
Object detection requires a memory card to load the model file, so you need to import the model file into the memory card in advance, and then insert the memory card into the memory card slot of the K 210 module, if the model file in the memory card cannot be read, an error will be reported.
At present, the threshold value of detecting objects is threshold=0.7, and if the detection needs to be more accurate, the threshold can be adjusted appropriately.
Detecting objects can only detect objects in the variable 'obj name', other objects cannot be detected for the time being.