9.2 Jetson Xavier NX write system
9.2 Jetson Xavier NX write system1. View NVME SSD information 2. Prepare the L4T programming package 3. Modify system data 4. build a system image 5. Replace the IMG file of the system 6. Enter the flash mode 7. start brushing
Since the EMMC capacity of the Jetson NX motherboard is too small, it is necessary to burn the system to the SSD solid state drive.
1. View NVME SSD information
Before restoring the system to the solid state drive, you need to check the information of the solid state drive to be restored. Please insert the NVME solid state drive into the SSD socket of the Jetson Xavier NX, and power on the Jetson Xavier NX, open the terminal, and enter the following command to view the information.
sudo fdisk -l /dev/nvme0n1
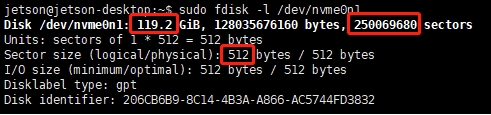
Record the three data in the red box in the figure below. The first data indicates the capacity of the SSD, the second data indicates how many sectors (num_sectors: 250069680), and the third data indicates the words occupied by each sector. The number of sections (sector_size: 512).
2. Prepare the L4T programming package
- Download the file
Go to NVIDIA official website to download Jetson Xavier NX system L4T firmware:
https://developer.nvidia.com/embedded/linux-tegra-r3261
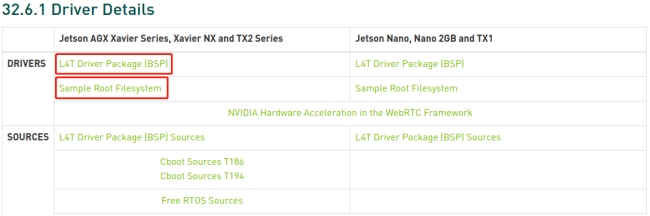
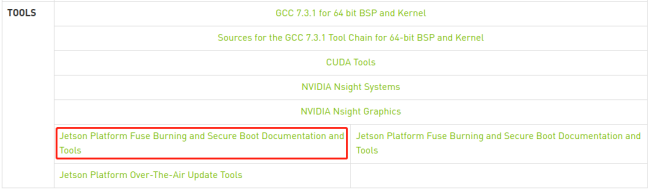
To download the latest version of the firmware, you need to download the Jetson Xavier NX-related L4T Driver Package[BSP], Sample Root Filesystem and Jetson Platform Fuse Burning and Secure Boot Documentation and Tools to the local.
For example: I create a new jetsonNX folder in the virtual machine Ubuntu18.04 system, and download the file to the jetsonNX directory here. Right-click on the blank space to open the terminal.
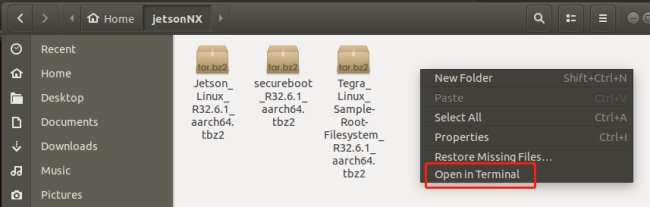
- Unzip the file, note that sudo cannot be omitted here, otherwise it will affect the subsequent installation, the file is relatively large, and the unzipping time may take a few minutes.
Enter the following command to decompress.
xtar xf Jetson_Linux_R32.6.1_aarch64.tbz2
sudo tar xf Tegra_Linux_Sample-Root-Filesystem_R32.6.1_aarch64.tbz2 -C ./Linux_for_Tegra/rootfs/
sudo tar xf secureboot_R32.6.1_aarch64.tbz2 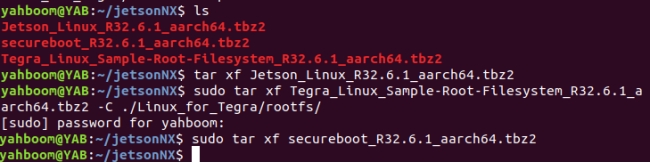
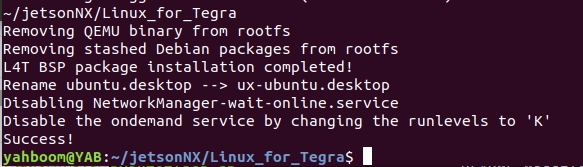
- Install the qemu file and enter y to confirm the installation.
xxxxxxxxxxsudo apt-get install qemu-user-static 
- Generate binary files
First enter the following command to enter the Linux_for_Tegra folder, and run the command to generate the binary file.
xxxxxxxxxxcd Linux_for_Tegra
sudo ./apply_binaries.sh 
When you see the final success, it means OK.
3. Modify system data
xxxxxxxxxxvim ./tools/kernel_flash/flash_l4t_nvme.xml 
Press i to enter the edit mode, and then replace the data of sector_size and num_sectors queried in the first step.
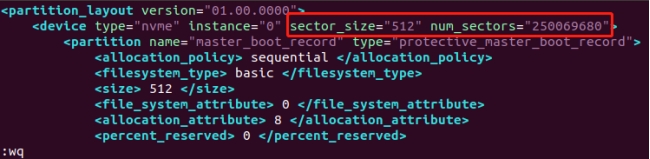
After the modification is completed, press the ESC key to exit the editing mode, then enter :wq and press the Enter key to save and exit.
4. build a system image
- Build the qspi startup component
Execute the following commands in the Linux_for_Tegra directory
xxxxxxxxxxsudo ./tools/kernel_flash/l4t_initrd_flash.sh --no-flash jetson-xavier-nx-devkit-qspi internal 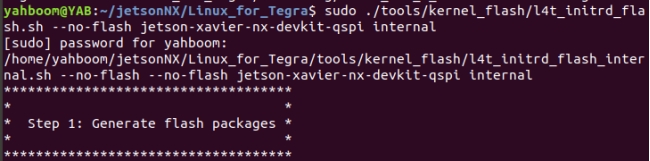
- Build the system image
Execute the following commands in the Linux_for_Tegra directory
xxxxxxxxxxsudo ./tools/kernel_flash/l4t_initrd_flash.sh --no-flash --external-device nvme0n1p1 -c ./tools/kernel_flash/flash_l4t_nvme.xml -S 118GiB --showlogs jetson-xavier-nx-devkit-emmc nvme0n1p1 
Explanation of the above parameters:
--no-flash: Indicates that the system is only compiled and not burned.
--external-device nvme0n1p1: Indicates burning to the /dev/nvme0n1p1 device, that is, the APP partition of the SSD.
-c ./tools/kernel_flash/flash_l4t_nvme.xml: Specify the burned xml file, that is, the file modified in the third step.
-S 118GiB: Indicates the size of the space occupied by the system APP partition. This value is the SSD capacity queried in the first step -1. Since the actual capacity of the SSD used this time is only 119.2GiB, the system also needs to reserve 1GiB space for other partitions, so the APP can occupy 118GiB.
--showlogs: Indicates that LOG information is displayed.
jetson-xavier-nx-devkit-emmc nvme0n1p1: Indicates that the Jetson Xavier NX device and the nvme0n1p1 partition are burned.
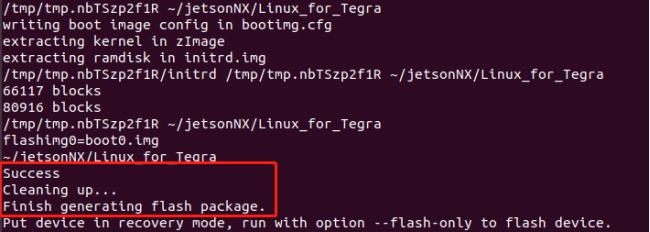
Finally, seeing Success indicates that the system was successfully built.
5. Replace the IMG file of the system
- Go to the factory image in the data to download the latest version of the image system compressed package file, and then decompress to get the img image file.
- Enter the Linux_for_Tegra directory
- Copy the original system file img as a backup (in order to save space, no backup can be made)
xxxxxxxxxxsudo cp tools/kernel_flash/images/external/system.img tools/kernel_flash/images/external/system.img.bak
- Copy and overwrite the system.img system file Copy the nx_rootfs.img file generated in the previous step to the external/ directory and overwrite the system.img file.
xxxxxxxxxxsudo cp bootloader/nx_rootfs.img tools/kernel_flash/images/external/system.img 
Among them, bootloader/nx_rootfs.img is the path of the downloaded factory image file. It is modified according to the actual path. The name has been modified in advance to nx_rootfs.img. Note that the name cannot be in Chinese.
6. Enter the flash mode
- Jetson Xavier NX enters the system REC flashing mode.
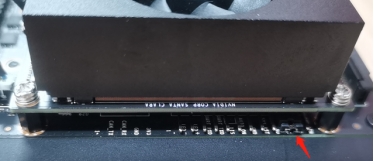
Connect the jumper caps to the FC REC and GND pins, that is, to the second and third pins of the carrier board below the core board, as shown in the image below:
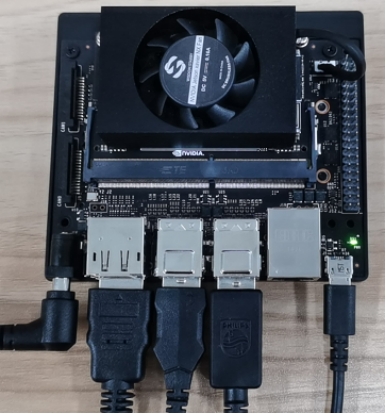
- Connect the line, connect the HDMI display, mouse, keyboard and microUSB data cable to the Jetson NX, and finally plug in the power supply. Since the jumper cap has been connected to the FC REC and GND pins in the previous step, it will automatically enter the REC flashing mode after power on.
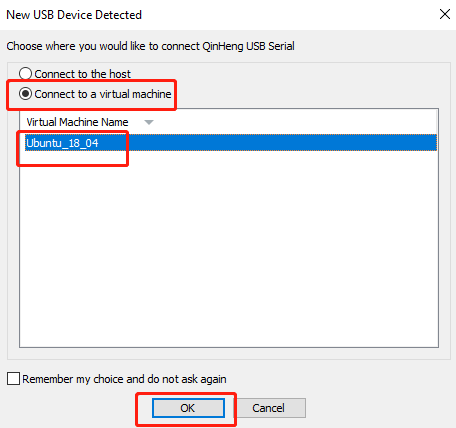
Note here that using a virtual machine requires setting the device to connect to the virtual machine.
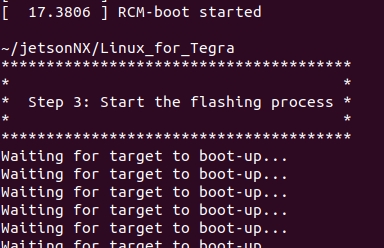
7. start brushing
Open a terminal and execute the following commands in the Linux_for_Tegra directory:
xxxxxxxxxxsudo ./tools/kernel_flash/l4t_initrd_flash.sh --flash-only --external-device nvme0n1p1 -c ./tools/kernel_flash/flash_l4t_nvme.xml -S 118GiB --showlogs jetson-xavier-nx-devkit-emmc nvme0n1p1 
Note: After starting to burn the system, Jetson Xavier NX will restart again. If you are using a virtual machine, you need to manually connect Jetson Xavier NX to the virtual machine, otherwise it will fail to connect and exit the programming over time.
After the programming is complete, the Jetson Xavier NX will automatically power on.
Note: After programming the system, please unplug the jumper caps of FC REC and GND.
If you need to burn the backup system later, you can start from the fifth step.