Jetson Nano and External Device Serial Communication Tutorial
1.Preparation work
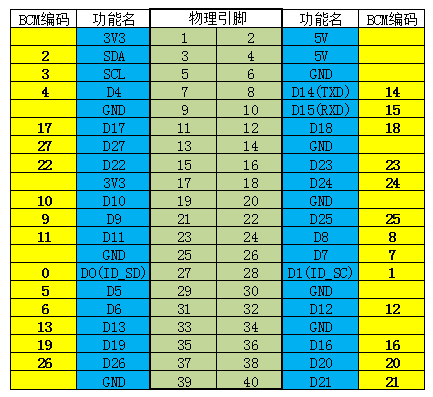
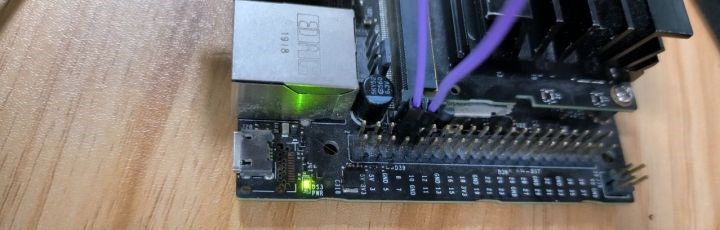
This section tests the tutorial of Jetson nano serial port sending and receiving on its own.From the figure below, it can be seen that the TXD and RXD pins of the Jetson nano serial port correspond to physical pins 8 and 10, respectively.
Wiring:
Jetson NanoPin8(TXD)→Jetson Nano Pin10(RXD)
Enable the serial port permission. Please note that this permission will also be disabled after shutdown, and you need to restart it next time
sudo chmod 777 /dev/ttyTHS1
2.Use routines to test the functionality of the serial port
Download a serial communication case from Github, the source code and explanation can be viewed through this Github connection
xxxxxxxxxxgit clone <https://github.com/JetsonHacksNano/UARTDemo>
Enter folder
xxxxxxxxxxcd UARTDemo
If you do not intend to use the serial console on UART, you should disable the serial console (it may not be a personal choice):
xxxxxxxxxxsystemctl stop nvgettysystemctl disable nvgettyudevadm trigger
Install the serial module
xxxxxxxxxxsudo apt-get install python3-serial
Terminal input running program:
xxxxxxxxxxsudo python3 uart_example.py

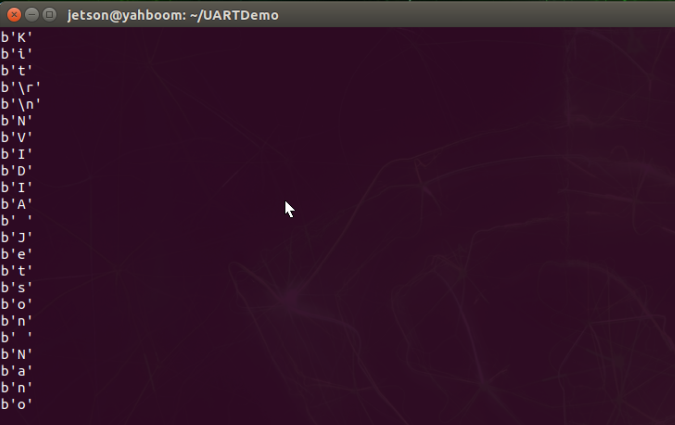
After running, you can see the characters in the "NVIDIA Jetson Nano Developer Kit" loop sent by Jetson nano and displayed on the terminal.
3.Using Linux's serial port assistant for testing
- Run the following command
xxxxxxxxxxsudo apt install cutecomsudo cutecom
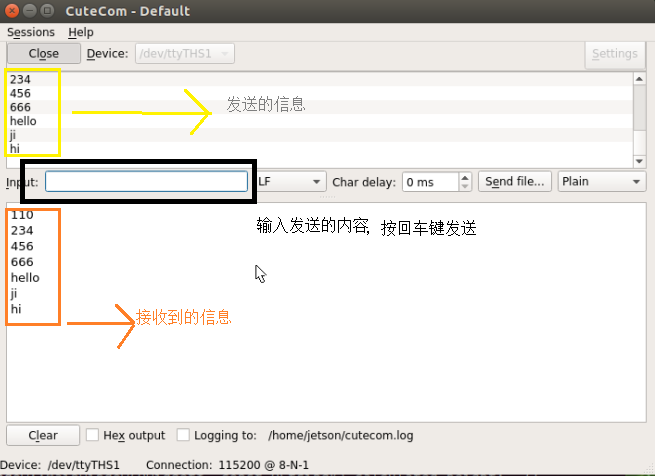
You can see that the cutecom is openGenerally, there is no need to set it up. Simply click on 'open' to use it, then input text through 'Input' and press' Enter 'to send the content.The effect is as shown in the picture:
4.note
If using a USB to TTL module for communication between a computer and a nano, please note the following points
- DuPont cable should not be too long, as it will cause garbled code
- The situation of only receiving but not sending is caused by insufficient voltage. Connect the 5V port of the USB to TTL module to the 5V port of the nano
- If the line is reasonable but garbled, check whether the baud rate, parity, and stop bit are consistent
- Other case:https://blog.csdn.net/lxj362343/article/details/89646731