AR QR code tracking
AR Function Pack Location: ~/ArTrack_ws/src/ar_track_alvar/ar_track_alvar
1. Create ARTag
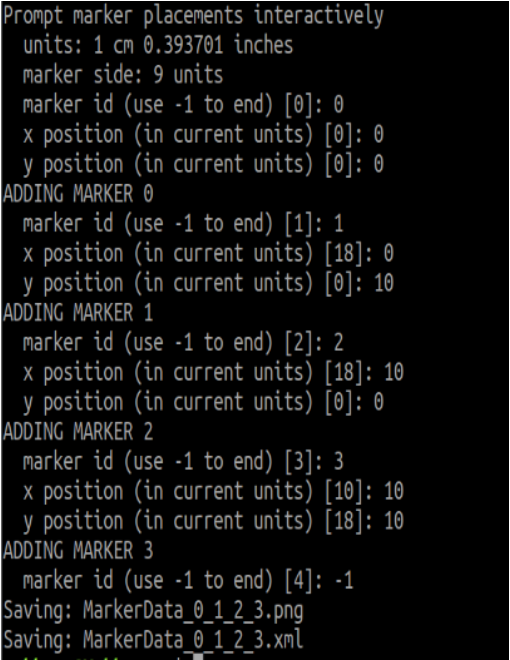
Continuously generate multiple labels on one image
roscorerosrun ar_track_alvar createMarker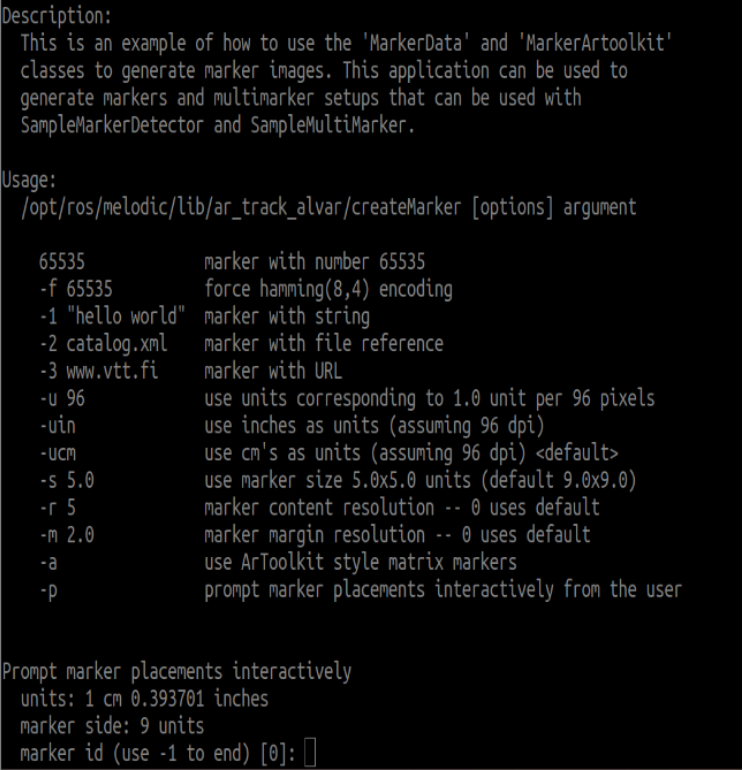
You can enter [ID] and location information here, and end with [-1].
Can generate one or more, layout your own design.
Generate a single number
Command+parameters directly generate digital images. For example
xxxxxxxxxxrosrun ar_track_alvar createMarker 11rosrun ar_track_alvar createMarker -s 5 3311: The number is the QR code for 11
s: Specify the image size.
5: 5x5 image.
33: The number is a QR code for 33.
The generated AR QR code is saved in the directory of the terminal running the instructions.
2. ARTag identification tracking
Note: When starting the camera, it is necessary to load the camera calibration file, otherwise it will not be recognized.
The supporting virtual machine has been calibrated for USB_ The parameter file required for cam startup. If it is not available, you need to follow the following tutorial for calibration.
2.1 Camera internal reference calibration
Install the camera calibration feature pack.
xxxxxxxxxxsudo apt install ros-noetic-camera-calibration -ysudo apt install ros-noetic-usb-camUsing USB cam to drive the camera.
xxxxxxxxxxroslaunch usb_cam usb_cam-test.launch Start the calibration node program.
xxxxxxxxxxrosrun camera_calibration cameracalibrator.py image:=/usb_cam/image_raw --size 9x6 --square 0.02Size: Calibrate the number of internal corner points on the chessboard, such as 9X6, with a total of six rows and nine columns of corner points.
Square: The side length of a chessboard, measured in meters.
Image: Set the image topic posted by the camera.
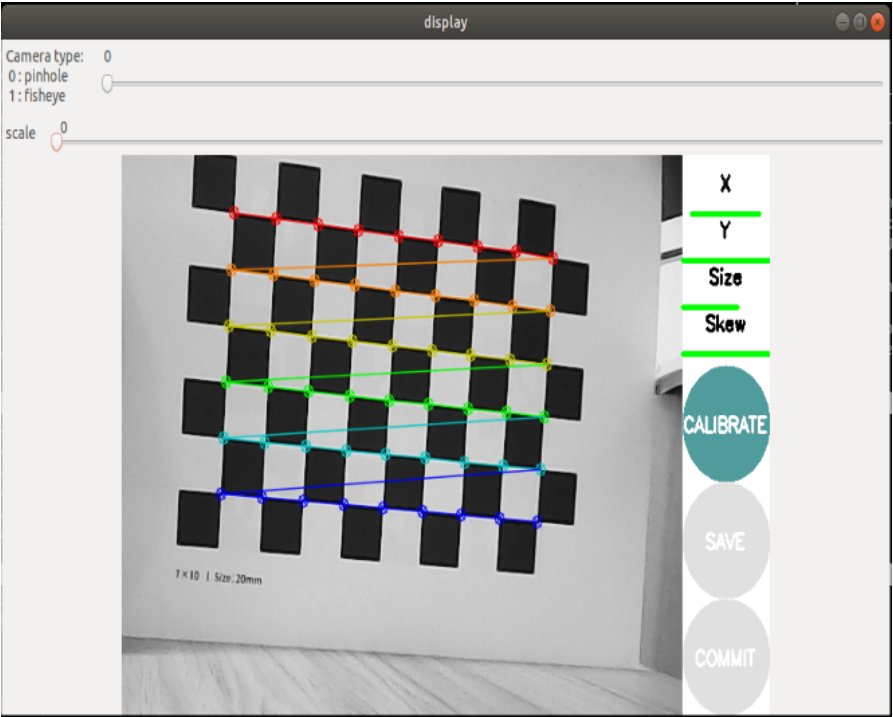
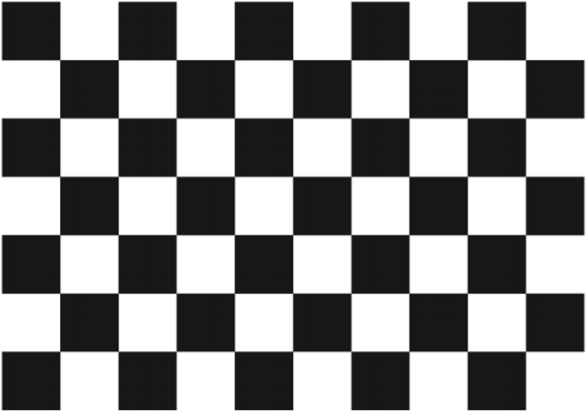
Place the prepared calibration checkerboard (7 * 10 | size: 20mm) in front of the camera.
X: The left and right movement of the checkerboard in the camera's field of view
Y: Move the checkerboard up and down in the camera's field of view
Size: The forward and backward movement of the checkerboard in the camera's field of view
Skew: Skew rotation of the checkerboard in the camera's field of view
After successful startup, place the chessboard grid in the center of the screen and change different poses. The system will autonomously recognize, and the best scenario is for the lines below [X], [Y], [Size], and [Skew] to change from red to yellow and then to green as the data is collected, filling as much as possible.
Click on 【CALIBRATE】to calculate the camera's internal parameters. The more images, the longer the time, and just wait.
(Sixty or seventy pieces are enough, too many can easily get stuck)
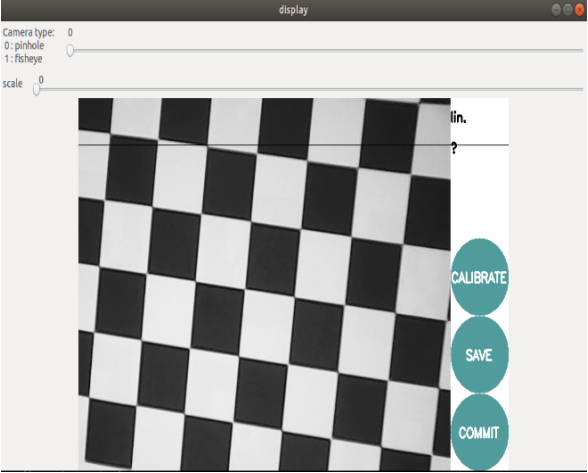
Click 【SAVE】to save the calibration results. The calibration results will be saved in the directory of the terminal running the calibration program.
Input following command to move it out:
xxxxxxxxxxsudo mv /tmp/calibrationdata.tar.gz ~
After decompressing, there are just calibrated images, an OST.txt file, and an OST.yaml file inside.
The yaml file is what we need, but it still needs to be modified before we can use it.
Change ostyaml to head_ Camera. yaml
Move files to~/. ros/camera_ Under the info folder
xxxxxxxxxxcd ~/.rossudo mkdir camera_infosudo cp ~/calibrationdata/head_camera.yaml ~/.ros/camera_info
2.2 Start ARTag recognition tracking
xxxxxxxxxxroslaunch astra_visual ar_track.launch
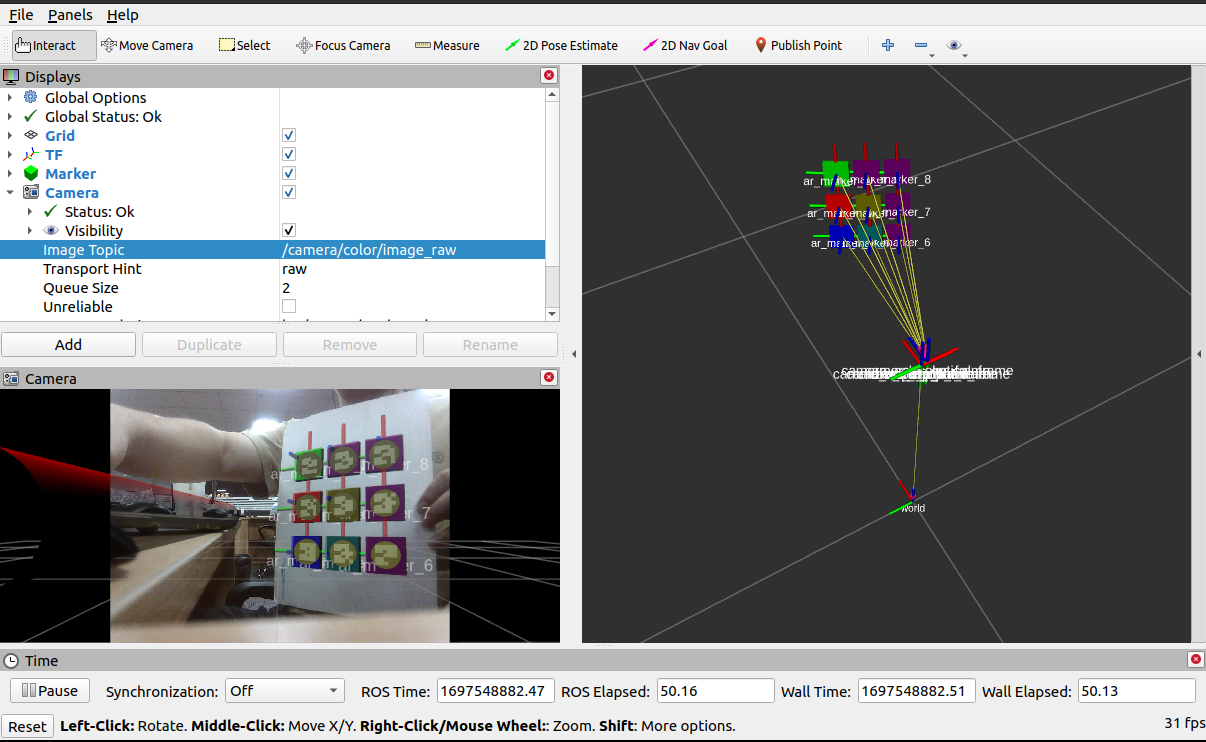
In rviz, it is necessary to set the corresponding camera topic name.
- Image_ Topic: The camera of Obi Zhongguang is [/camera/color/imageraw].
- Marker: The display component of rviz displays the location of the AR QR code in different blocks.
- TF: The display component of rviz, used to display the coordinate system of AR QR code.
- Camera: The display component of rviz, which displays the camera image.
- World: World coordinate system.
- Camera_ Link: Camera coordinate system.
Launh file parsing.
x<launch> <arg name="open_rviz" default="true"/> <arg name="marker_size" default="5.0"/> <arg name="max_new_marker_error" default="0.08"/> <arg name="max_track_error" default="0.2"/> <!-- Dabai_dcw2相机配置参数--> <arg name="cam_image_topic" default="/camera/color/image_raw"/> <arg name="cam_info_topic" default="/camera/color/camera_info"/> <arg name="output_frame" default="/camera_link"/> <!-- 相机启动节点--> <include file="$(find orbbec_camera)/launch/orbbec_camera.launch"/> <node pkg="tf" type="static_transform_publisher" name="world_to_cam" args="0 0 0.5 0 0 0 world camera_link 10"/> <node name="ar_track_alvar" pkg="ar_track_alvar" type="individualMarkersNoKinect" respawn="false" output="screen"> <param name="marker_size" type="double" value="$(arg marker_size)"/> <param name="max_new_marker_error" type="double" value="$(arg max_new_marker_error)"/> <param name="max_track_error" type="double" value="$(arg max_track_error)"/> <param name="output_frame" type="string" value="$(arg output_frame)"/> <remap from="camera_image" to="$(arg cam_image_topic)"/> <remap from="camera_info" to="$(arg cam_info_topic)"/> </node> <group if="$(arg open_rviz)"> <node pkg="rviz" type="rviz" name="rviz" args="-d $(find astra_visual)/rviz/ar_track.rviz"/> </group></launch>
Node parameters:
- Marker_ Size (double): The width (in centimeters) of one side of the black square marker border.
- Max_ New_ Marker_ Error (double): The threshold for determining when a new tag can be detected under uncertain conditions.
- Max_ Track_ Error (double): A threshold used to determine how many tracking errors can be observed before the marker disappears.
- Camera_ Image (string): Provides the image topic name used to detect AR tags. This can be monochrome or color, but it should be an uncorrected image as the correction is done in this package.
- Camera_ Info (string): Provides camera calibration parameters to correct the theme name of the image.
- Output_ Frame (string): Publish the coordinate position of the AR label in the camera coordinate system.
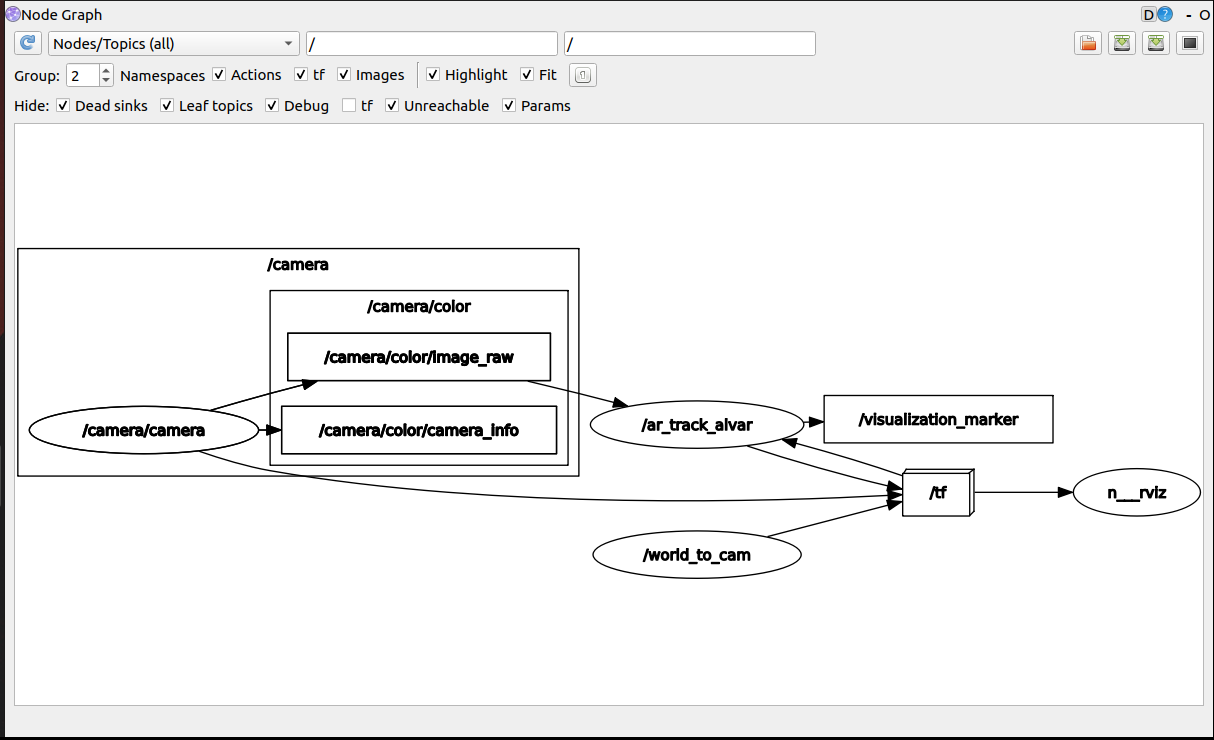
2.3 View node diagram
xxxxxxxxxxrqt_graph
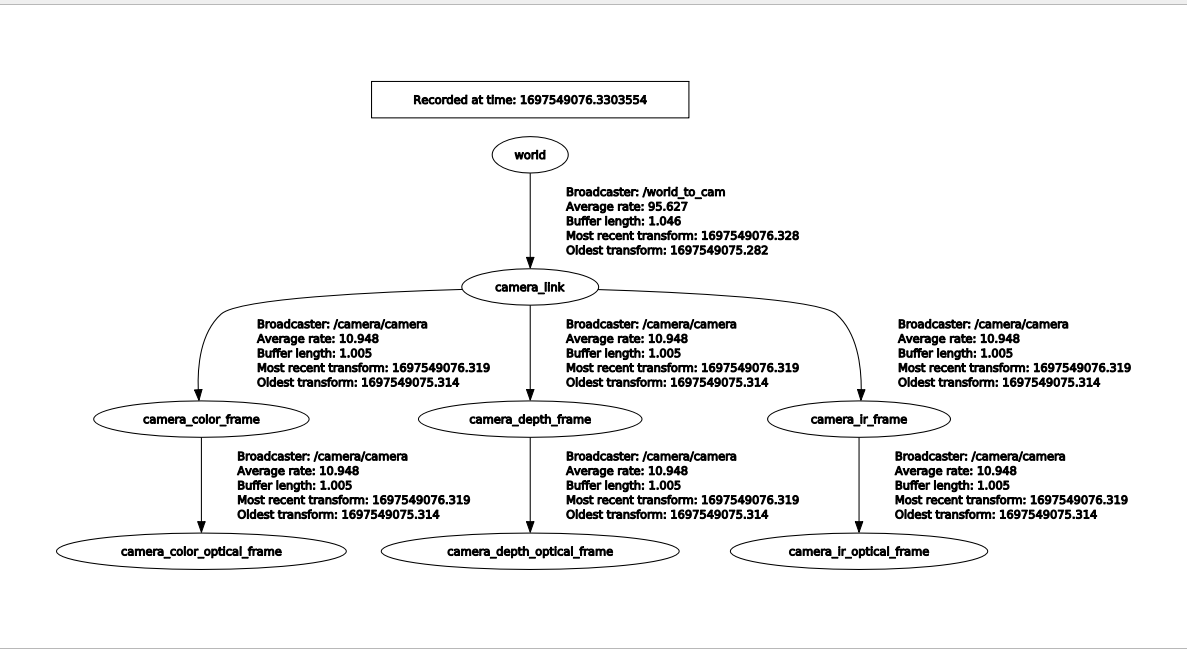
2.4 View TF Tree
xxxxxxxxxxrosrun rqt_tf_tree rqt_tf_tree
2.5 View the output topic information
xxxxxxxxxxrostopic echo /ar_pose_marker
The display is as follows:
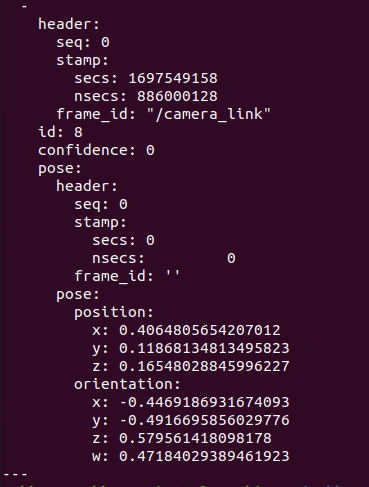
- frame_ ID: The coordinate system name of the camera
- ID: The recognized number is 8
- pose: The pose of the QR code
- position: The position of the QR code coordinate system relative to the camera coordinate system
- orientation: The orientation of the QR code coordinate system relative to the camera coordinate system