Battery voltage detection
Battery voltage detection1. Experimental purpose2. Hardware connection3. Core code analysis4. Compile, download and flash firmware5. Experimental results
1. Experimental purpose
Use the voltage detection function on the microROS control board to learn the function of ESP32 to read ADC values.
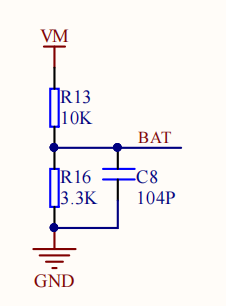
2. Hardware connection
As shown in the figure below, the battery voltage detection circuit has been integrated on the microROS control board, so there is no need to connect other external devices. You only need to connect the type-C data cable to the computer and the microROS control board as a firmware flash function.
3. Core code analysis
The virtual machine path corresponding to the program source code is as follows
~/esp/Samples/esp32_samples/voltage
First, initialize the battery voltage detection ADC channel. The hardware GPIO connected to the voltage detection is GPIO3, and the corresponding ADC channel is ADC1 channel 2.
static void Battery_Adc_Init(void){adc_oneshot_unit_init_cfg_t init_config1 = {.unit_id = ADC_UNIT_1,};ESP_ERROR_CHECK(adc_oneshot_new_unit(&init_config1, &battery_handle));adc_oneshot_chan_cfg_t config = {.bitwidth = ADC_BITWIDTH_DEFAULT,.atten = ADC_ATTEN_BATTERY,};ESP_ERROR_CHECK(adc_oneshot_config_channel(battery_handle, ADC_CHANNEL_BATTERY, &config));Battery_Adc_Calibration_Init(ADC_UNIT_1, ADC_CHANNEL_BATTERY, ADC_ATTEN_BATTERY, &battery_cali_handle);}
Since the value read by the ADC needs to be converted before the GPIO voltage value can be obtained, the ADC voltage conversion function needs to be initialized.
xxxxxxxxxxstatic bool Battery_Adc_Calibration_Init(adc_unit_t unit, adc_channel_t channel, adc_atten_t atten, adc_cali_handle_t *out_handle){adc_cali_handle_t handle = NULL;esp_err_t ret = ESP_FAIL;bool calibrated = false;if (!calibrated){ESP_LOGI(TAG, "calibration scheme version is %s", "Curve Fitting");adc_cali_curve_fitting_config_t cali_config = {.unit_id = unit,.chan = channel,.atten = atten,.bitwidth = ADC_BITWIDTH_DEFAULT,};ret = adc_cali_create_scheme_curve_fitting(&cali_config, &handle);if (ret == ESP_OK){calibrated = true;}}*out_handle = handle;if (ret == ESP_OK){ESP_LOGI(TAG, "Calibration Success");}else{ESP_LOGE(TAG, "Invalid arg or no memory");}return calibrated;}
Create a new battery voltage detection task and convert the ADC value read from ADC1 channel 2 into a GPIO voltage value.
xxxxxxxxxxstatic void Battery_Task(void *arg){ESP_LOGI(TAG, "Start Battery_Task with core:%d", xPortGetCoreID());while (1){ESP_ERROR_CHECK(adc_oneshot_read(battery_handle, ADC_CHANNEL_BATTERY, &adc_raw));ESP_ERROR_CHECK(adc_cali_raw_to_voltage(battery_cali_handle, adc_raw, &cali_voltage));Battery_Update_Voltage(cali_voltage);// ESP_LOGI(TAG, "Raw Data: %d, Calibration voltage: %d", adc_raw, cali_voltage);vTaskDelay(pdMS_TO_TICKS(100));}// 结束任务前注销ADC Deregister ADC before ending the taskESP_ERROR_CHECK(adc_oneshot_del_unit(battery_handle));Battery_Adc_Calibration_Init_Deinit(battery_cali_handle);vTaskDelete(NULL);}
Calculate the battery terminal voltage based on the GPIO voltage.
xxxxxxxxxxstatic void Battery_Update_Voltage(int gpio_voltage_mV){// battery_voltage = gpio_voltage*(10+3.3)/3.3;battery_voltage = gpio_voltage_mV / 1000.0 * 4.03;}
Read the battery voltage, unit: V.
xxxxxxxxxxfloat Battery_Get_Voltage(void){return battery_voltage;}
Call the Battery_Init function in app_main to initialize the battery voltage ADC interface, and then print the current battery voltage value every 500 milliseconds in the loop.
xxxxxxxxxxvoid app_main(void){printf("hello yahboom\n");ESP_LOGI(TAG, "Nice to meet you!");Battery_Init();while (1){vTaskDelay(pdMS_TO_TICKS(500));float voltage = Battery_Get_Voltage();ESP_LOGI(TAG, "Voltage:%.2fV", voltage);}}
4. Compile, download and flash firmware
Use a Type-C data cable to connect the virtual machine/computer and the microROS control board. If the system pops up, choose to connect to the virtual machine.
Activate the ESP-IDF development environment. Note that every time you open a new terminal, you need to activate the ESP-IDF development environment before compiling the firmware.
xxxxxxxxxxsource ~/esp/esp-idf/export.sh
Enter the project directory
xxxxxxxxxxcd ~/esp/Samples/esp32_samples/voltage
Compile, flash, and open the serial port simulator
xxxxxxxxxxidf.py build flash monitor
If you need to exit the serial port simulator, press Ctrl+].
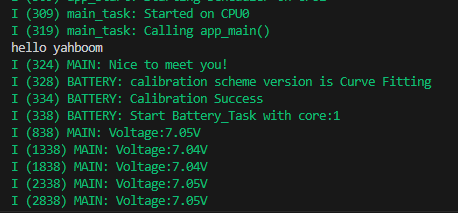
5. Experimental results
The serial port simulator prints the "hello yahboom" greeting. And continue to print the current battery voltage value, for example, the current battery voltage is 7.05V.