Mobile APP remote control
Mobile APP remote controlAPP remote control1. Download YahBoomRobot2. Hardware installation3. Startup status4. Robotic arm connection4.1. Select product4.2. Install the map4.3. Connection method4.4. IP connection4.5. Robotic arm calibration4.6. Color calibration5. Robotic arm control5.1. Function interface5.2. Remote control5.3. Action group5.4. Gesture interaction5.5. Color interaction5.6. Tracking gameplay5.7. Garbage sorting5.8. How to play as a developer5.9. Robot arm settings
Mainly introduces how to quickly use Dofbot!
APP remote control
1. Download YahBoomRobot

2. Hardware installation
Follow the assembly video and check whether all hardware connections of Dofbot are correct.
3. Startup status
Turn on the power switch of the expansion board and wait for the mainboard system and the startup program to start. It will take about 1 minute. After the system starts, there will be three beeps to indicate that the robotic arm has started normally.
If there is still no buzzer after waiting for a few minutes, you can connect to the hotspot corresponding to the Dofbot motherboard and use VNC to remotely check the running status of the boot program based on the IP address displayed by the OLED!In hotspot mode, the corresponding IP address of the Raspberry Pi is 192.168.1.11
4. Robotic arm connection
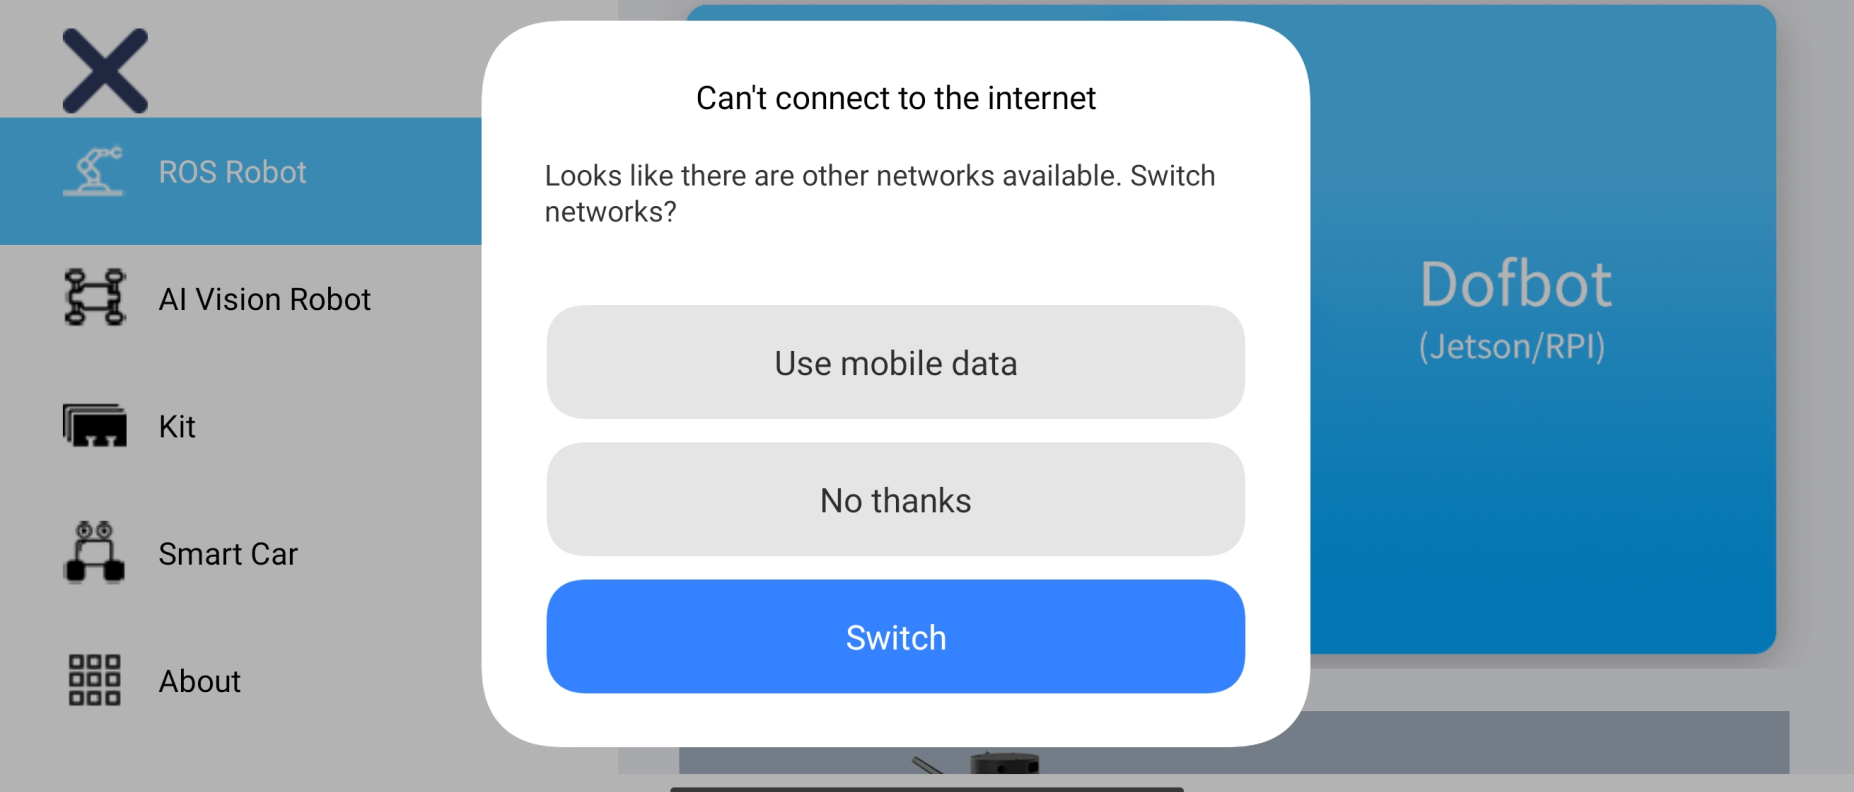
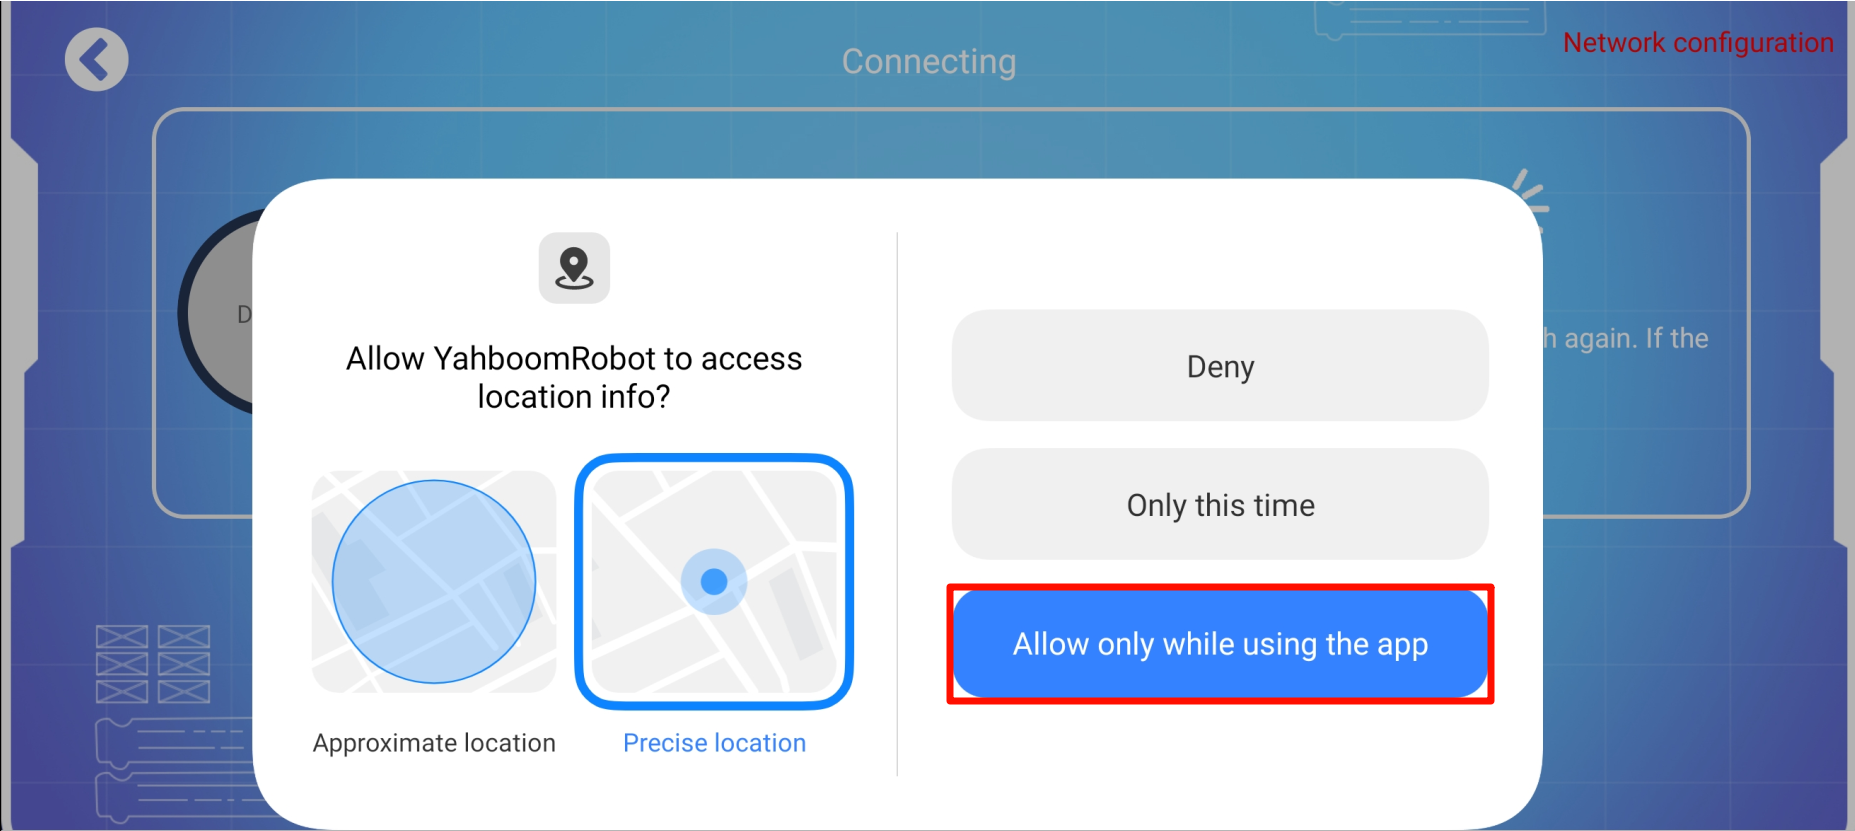
Before using the APP to control Dofbot, we need to ensure that Dofbot and the mobile phone are in the same LAN (commonly, the mobile phone is connected to the Dofbot hotspot or both are connected to the same WiFi).
xxxxxxxxxxSome mobile phones will display prompts corresponding to hotspots without network. Mobile phones connected to Dofbot hotspots need to click to stay connected!
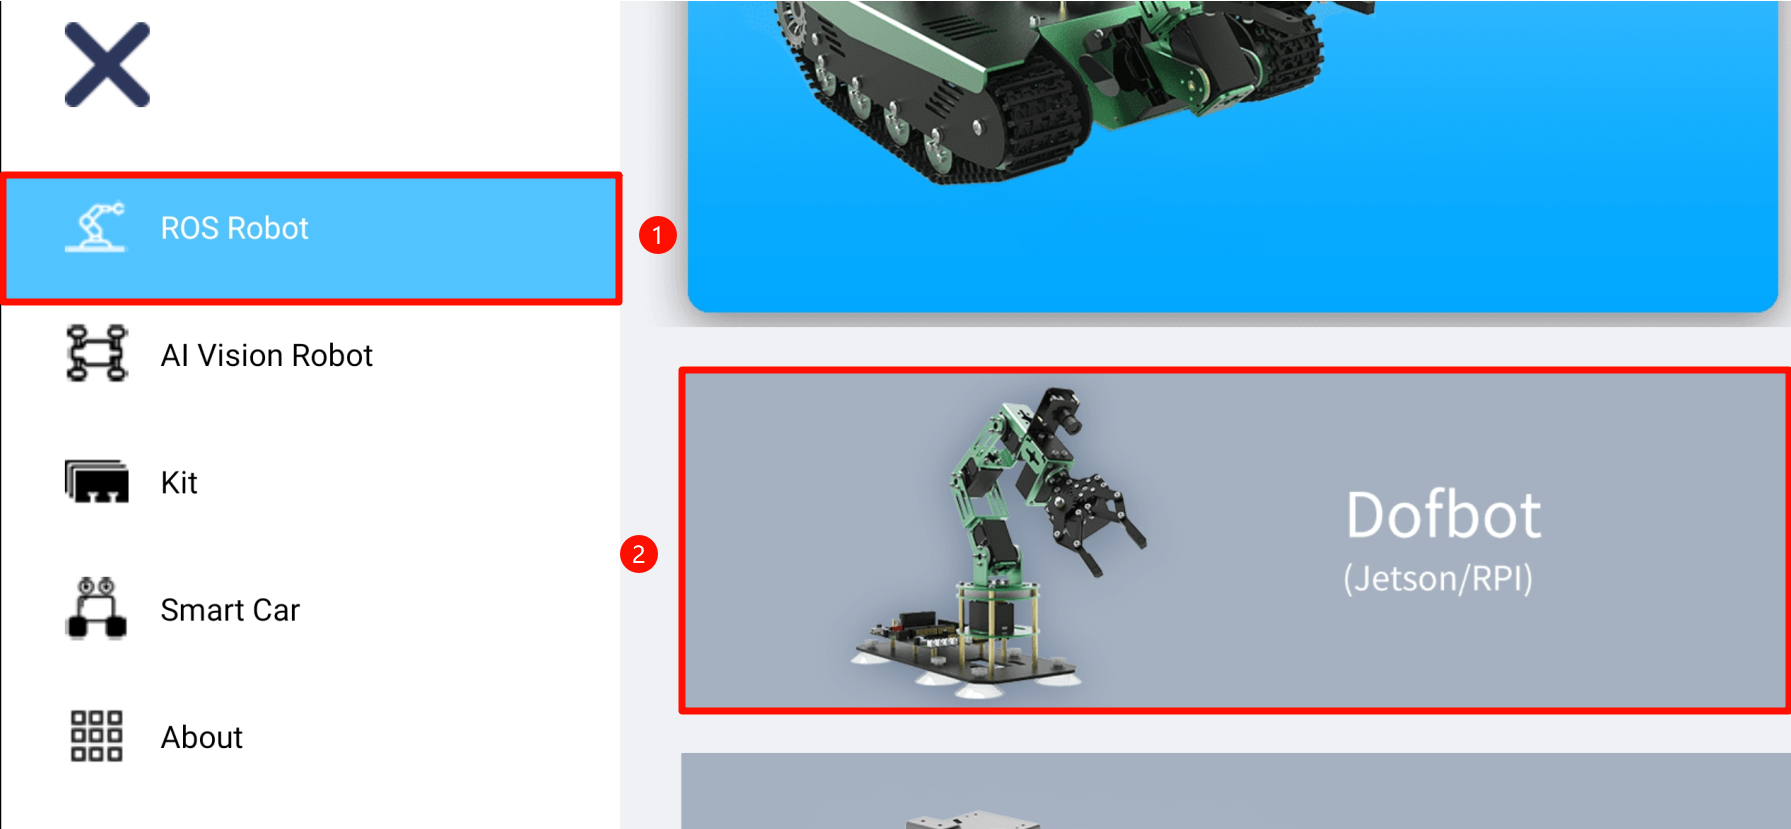
4.1. Select product
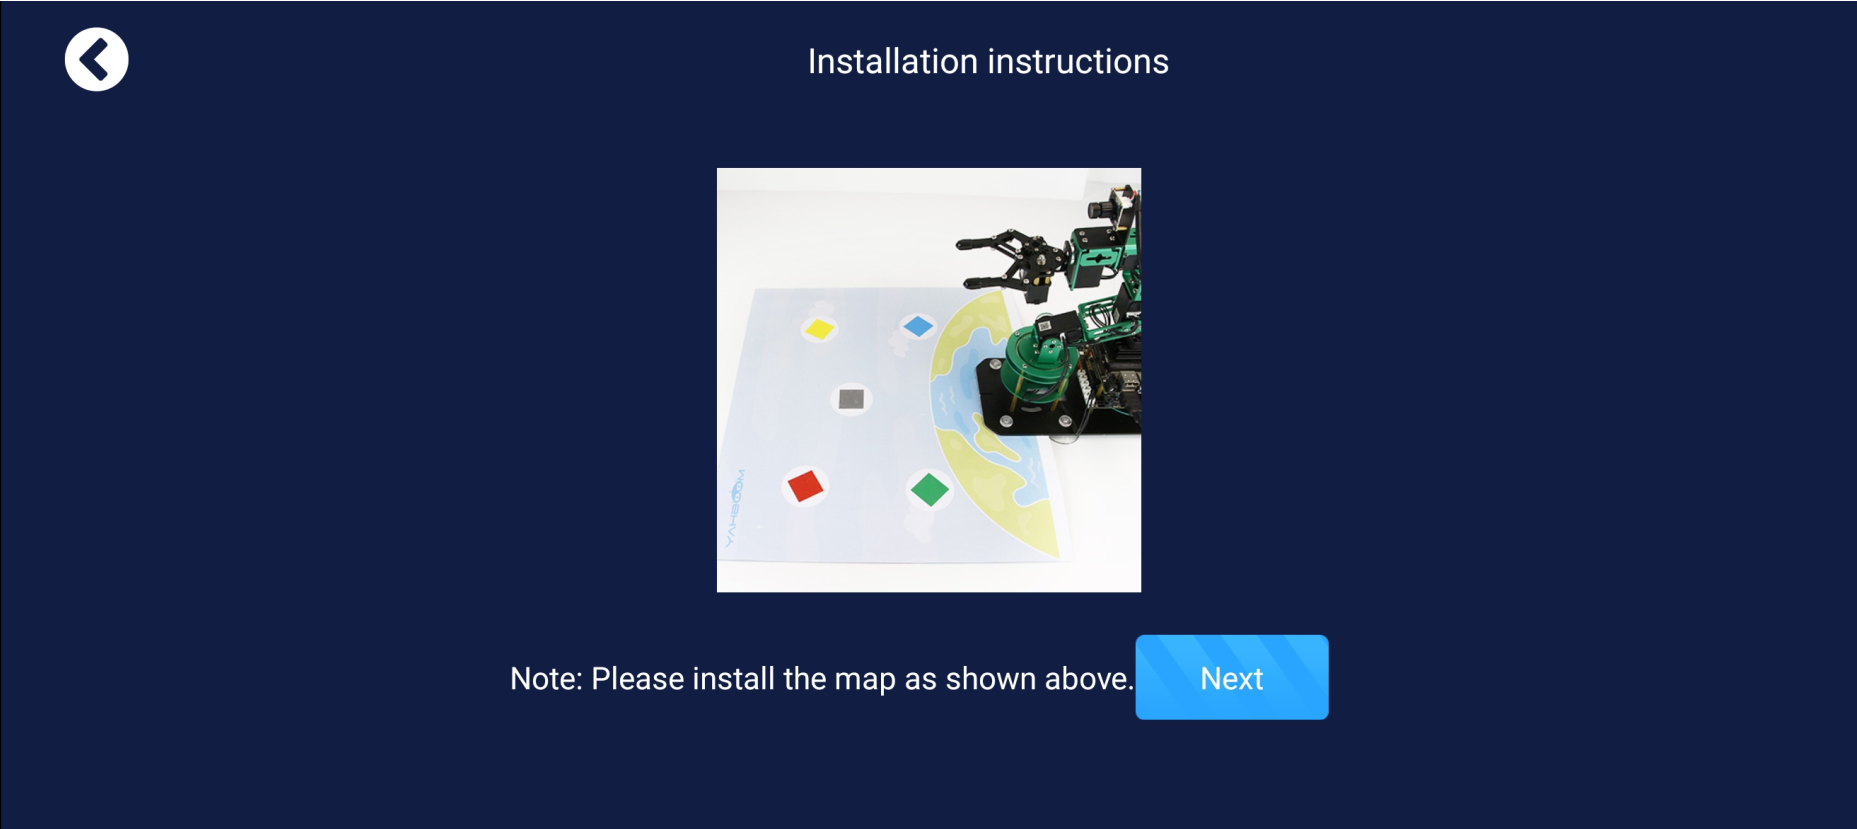
4.2. Install the map
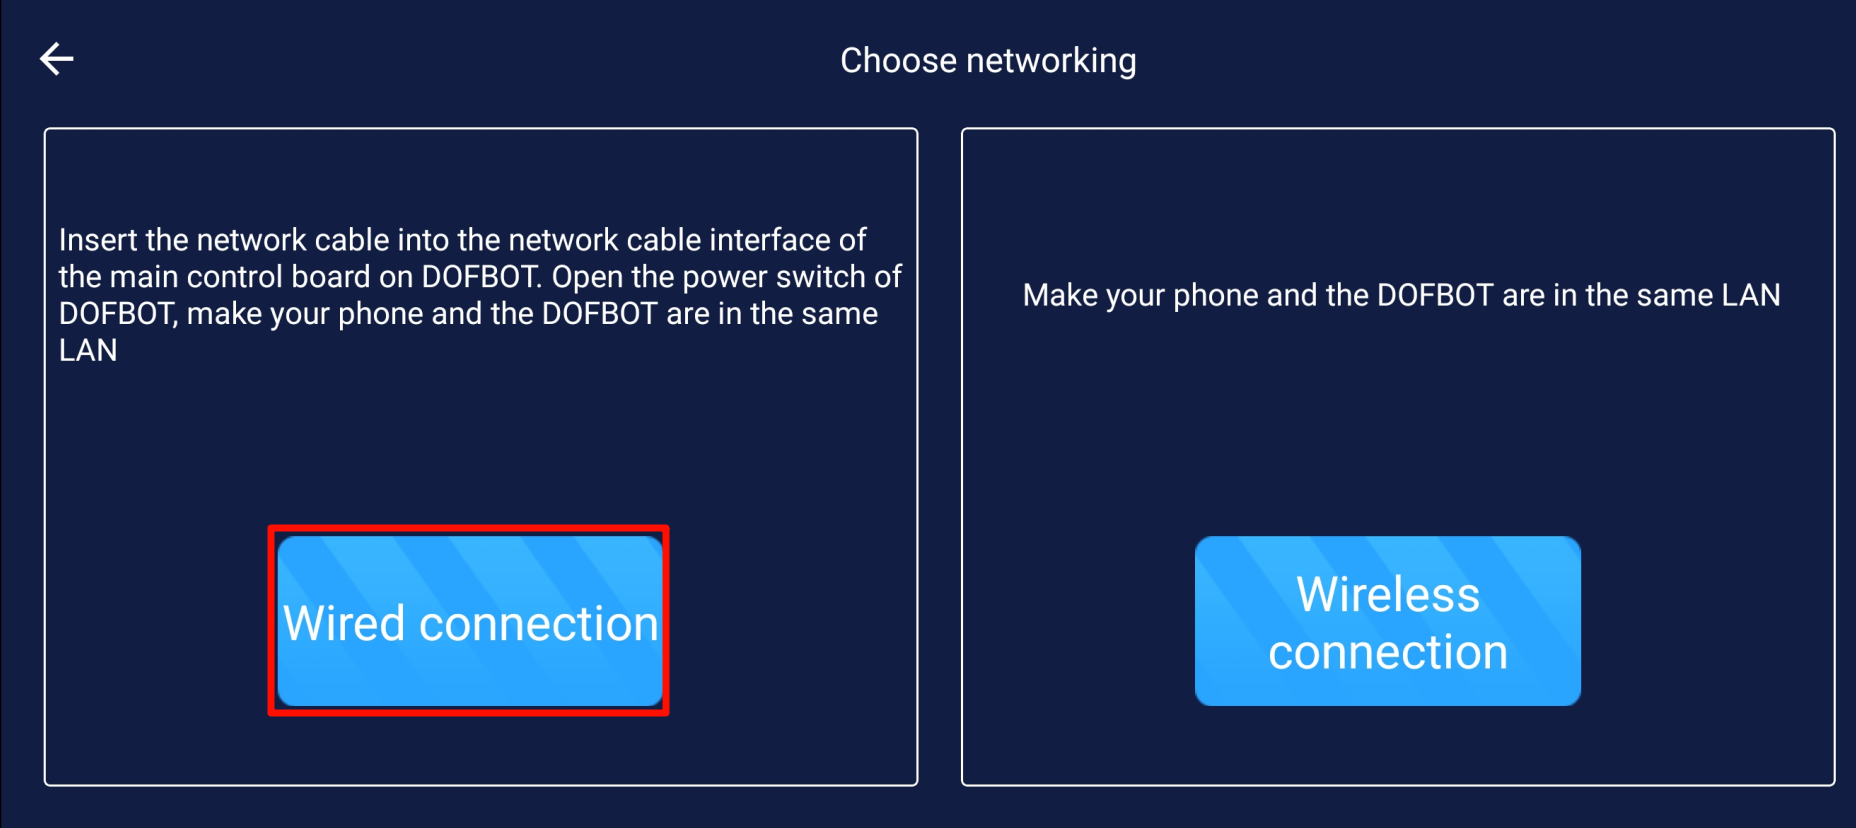
4.3. Connection method
Currently, Dofbot comes with a built-in hotspot, so there is no need to configure the network, just choose the wired connection method!
xxxxxxxxxxThe wired connection here does not require a network cable, we mainly connect by configuring IP!
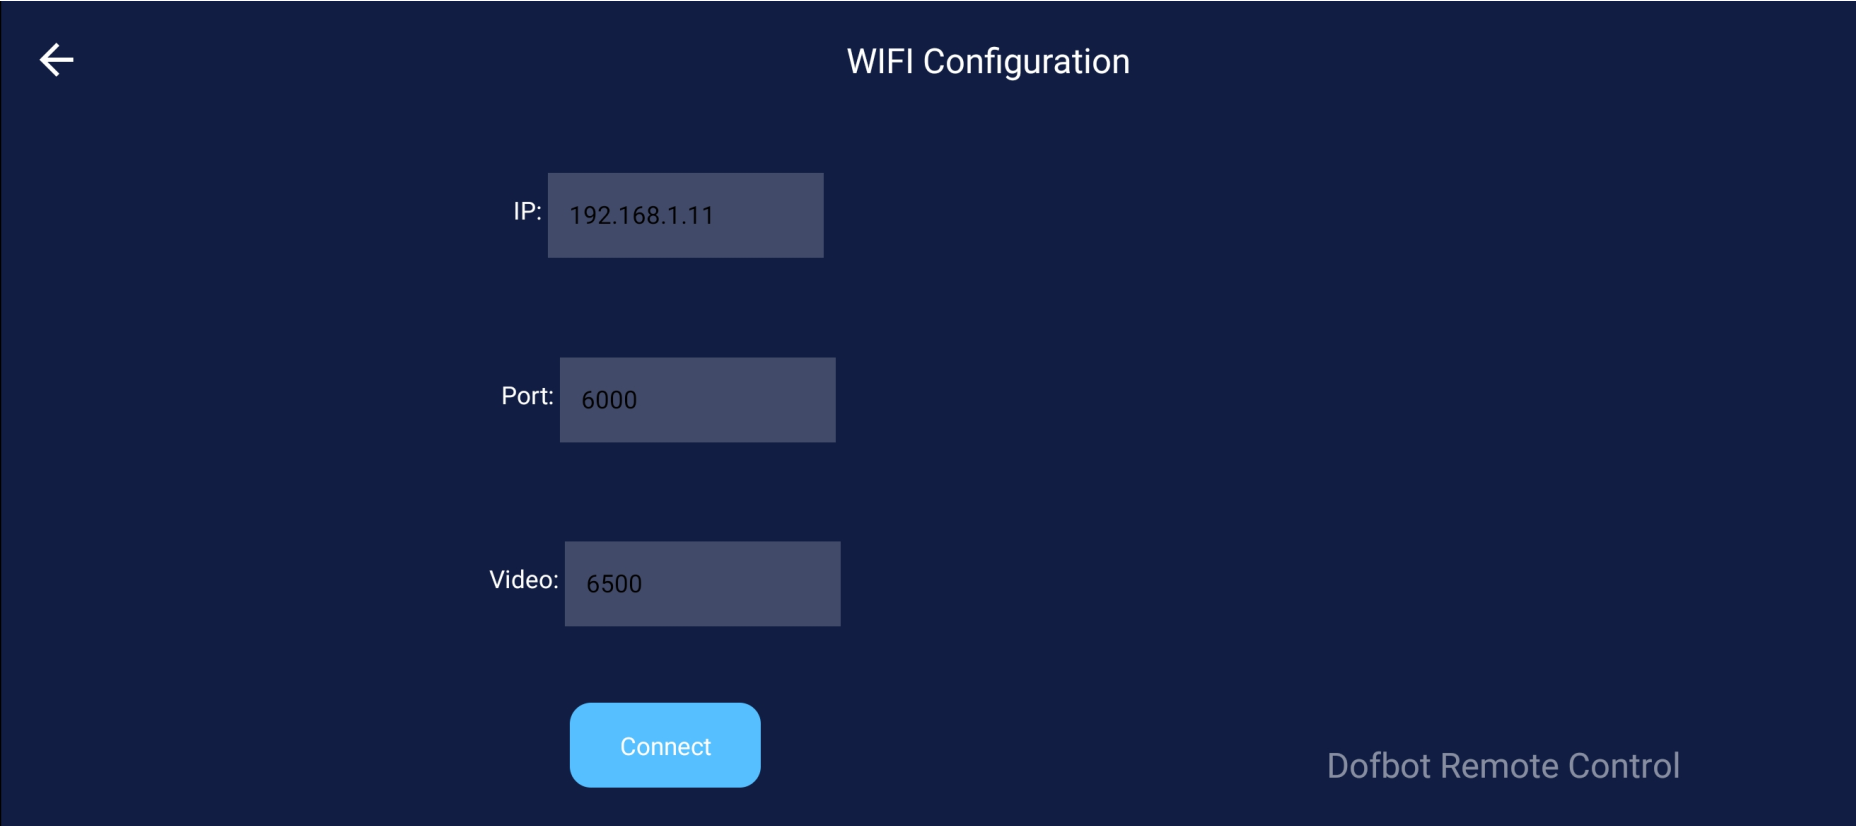
4.4. IP connection
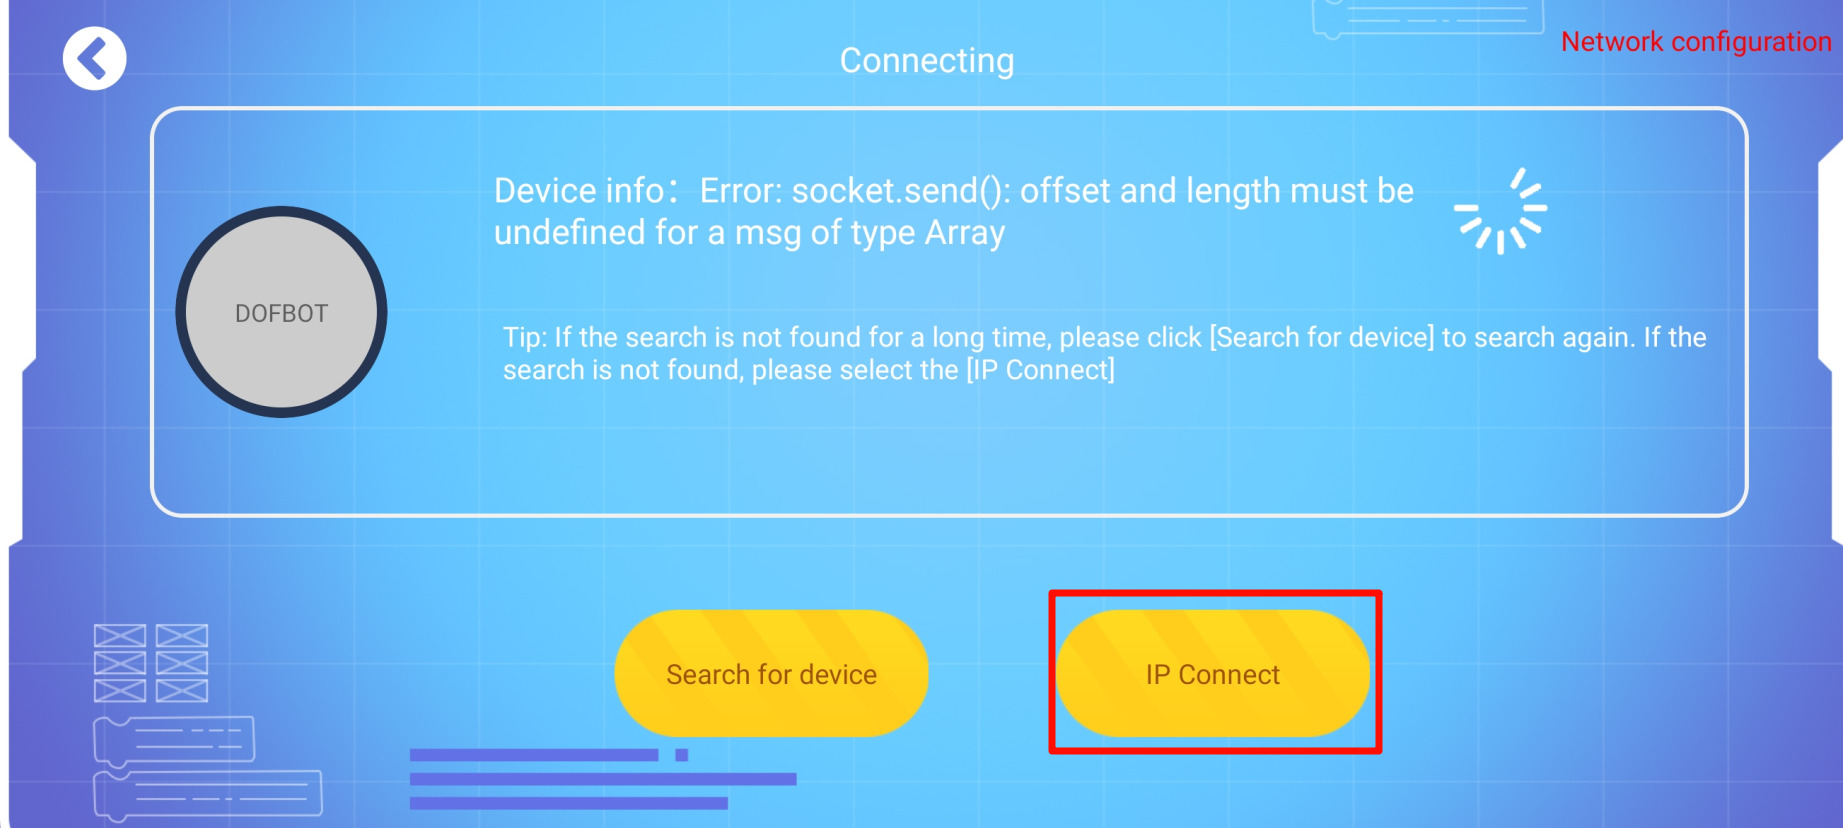
Connect according to your actual IP. The default hotspot mode is 192.168.1.11.
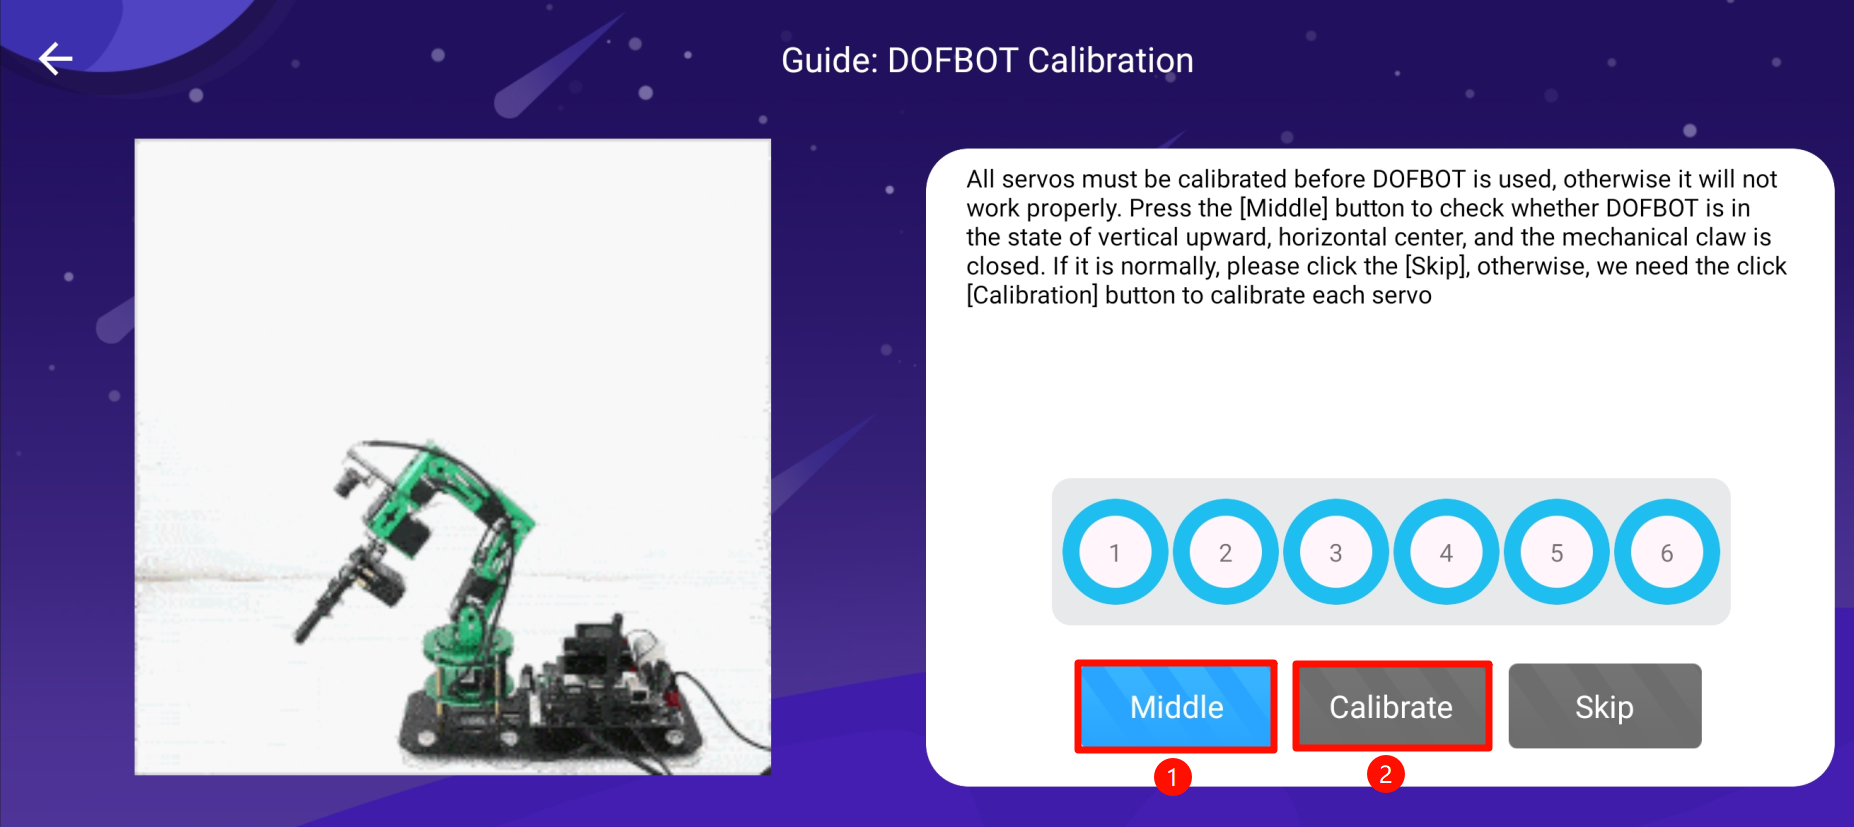
4.5. Robotic arm calibration
Before using the robotic arm, the center position of the robotic arm is very important. The deviation of the center position will directly affect the accuracy of all subsequent gameplays.
Press the [Return to Center] button to determine whether the robotic arm is vertically upward, centered left and right, and the mechanical claw is in a grasped state. If it is normal, please click the [Skip] button. If it is not normal, click [Start Calibration].
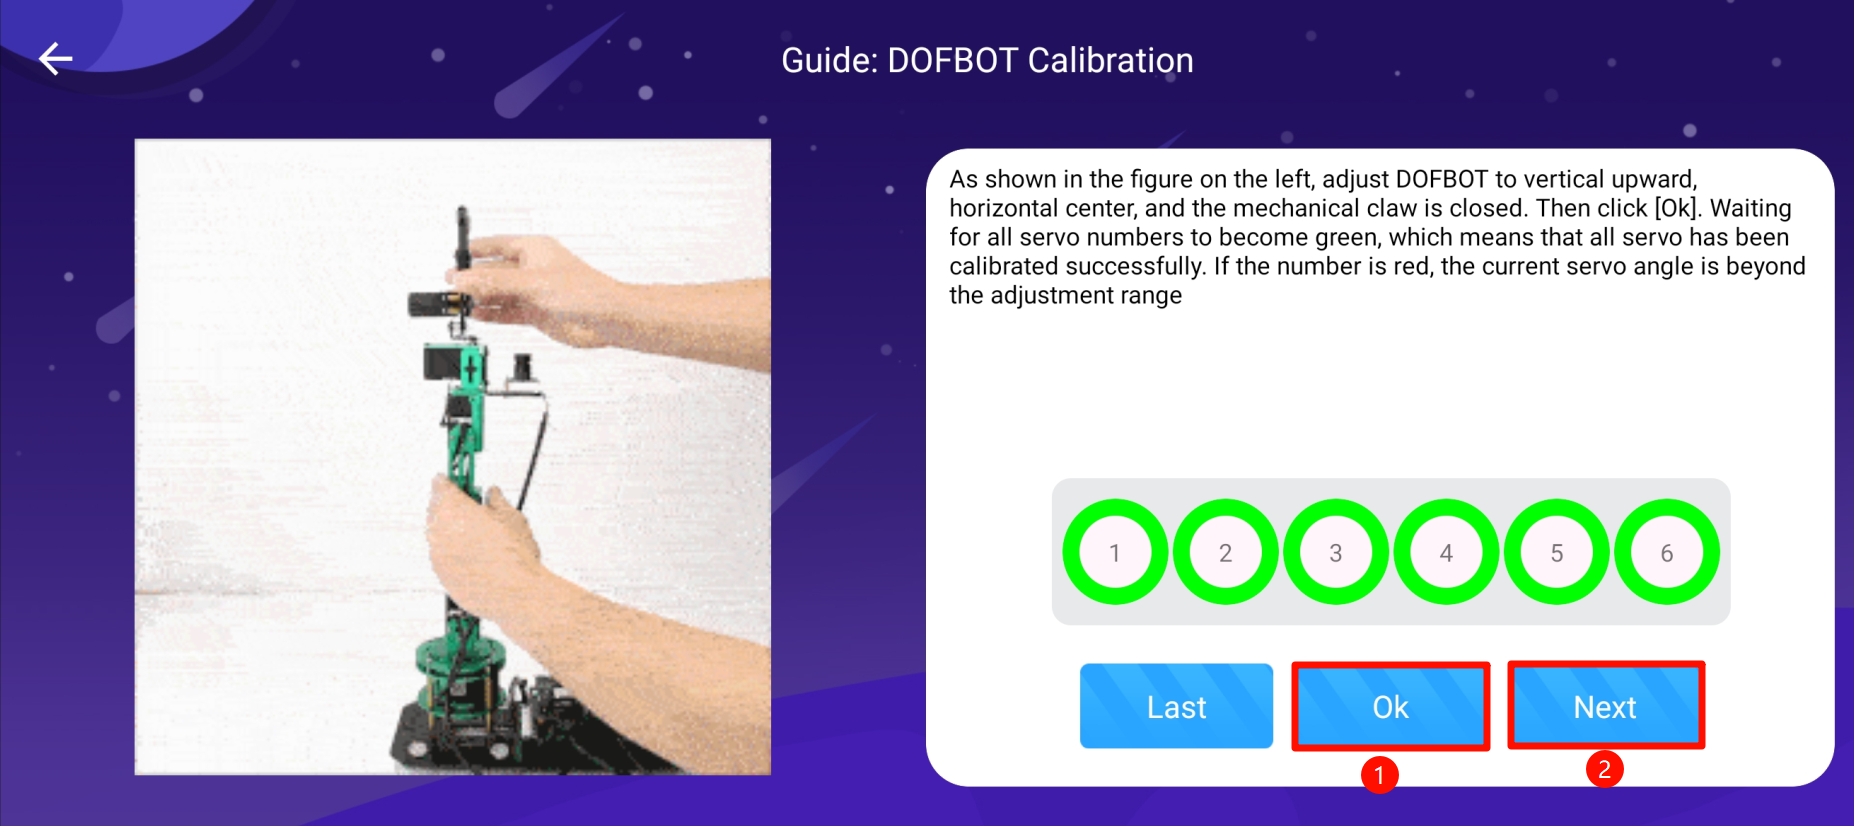
After clicking [Start Calibration], you will enter the state of calibrating the robotic arm. Carefully check whether the robotic arm is upright and whether the left and right centering is normal. The mechanical claw should be pressed to the grasping state by hand. After the adjustment is completed, click [Confirm Calibration]. When all numbers The indicator ring changes from blue to green, indicating that the setting is successful, click [Next].
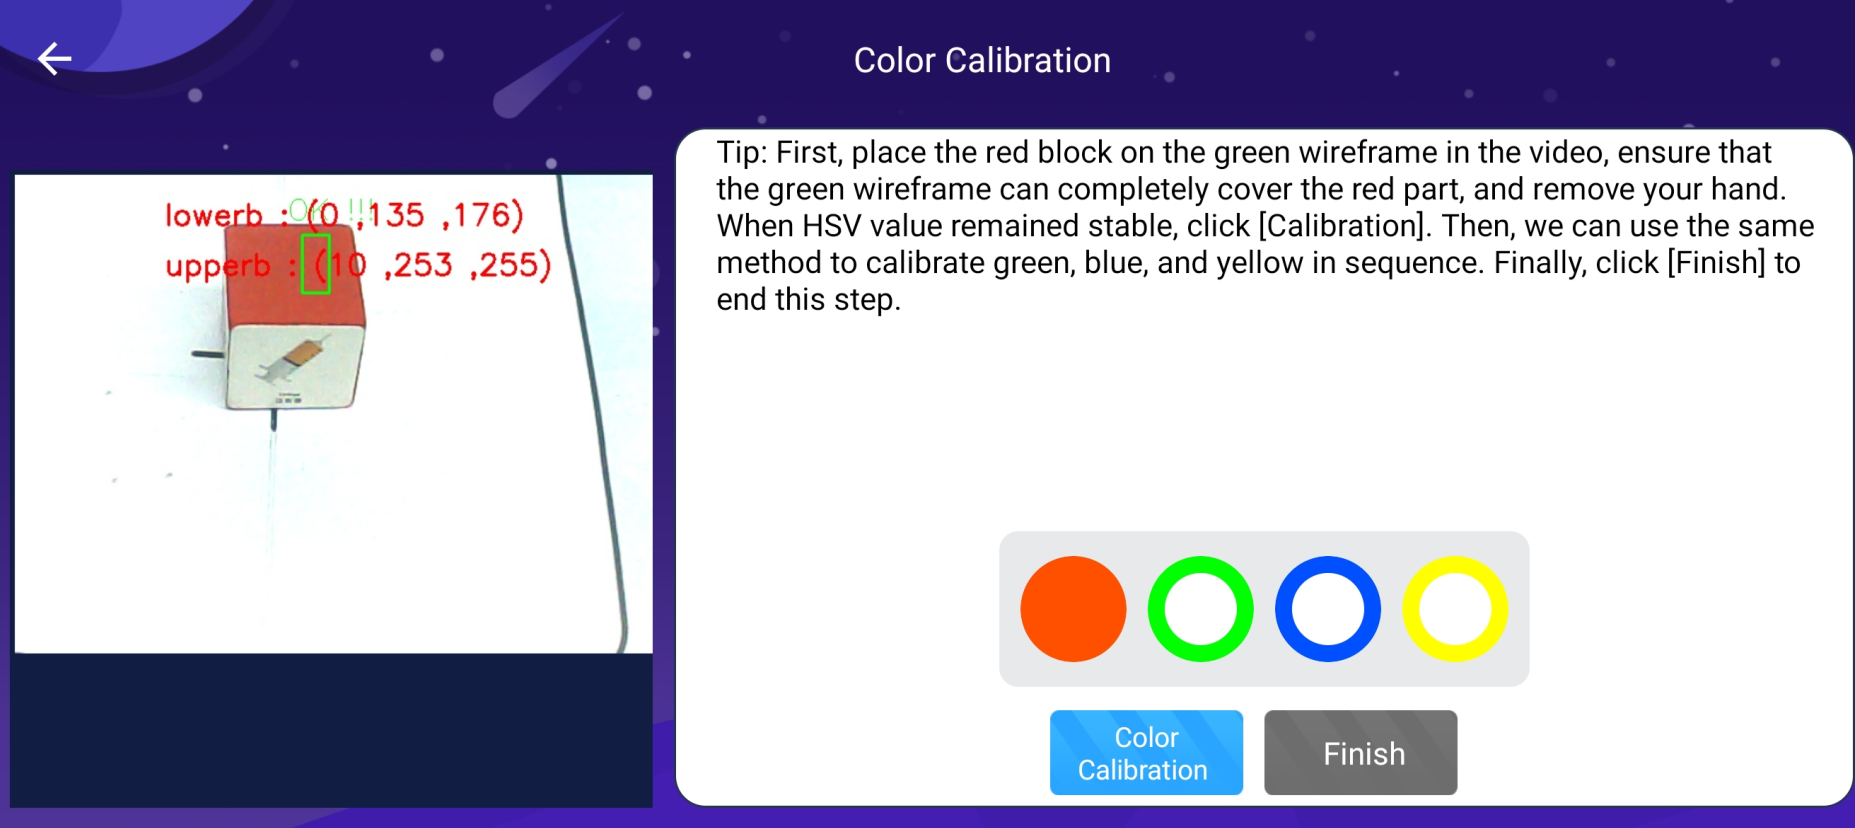
4.6. Color calibration
Bring the red building block to the position of the camera field of view and the recognition frame can completely cover the color block. Remove your hand and wait until the HSV value of the color displayed in real time in the image stabilizes. OK will be displayed. Click [Color Calibration] to complete the calibration. Calibrate the color, then check the green, blue, and yellow building blocks in sequence according to the method just mentioned, and finally click [Finish] to end the entire guide.
5. Robotic arm control
5.1. Function interface
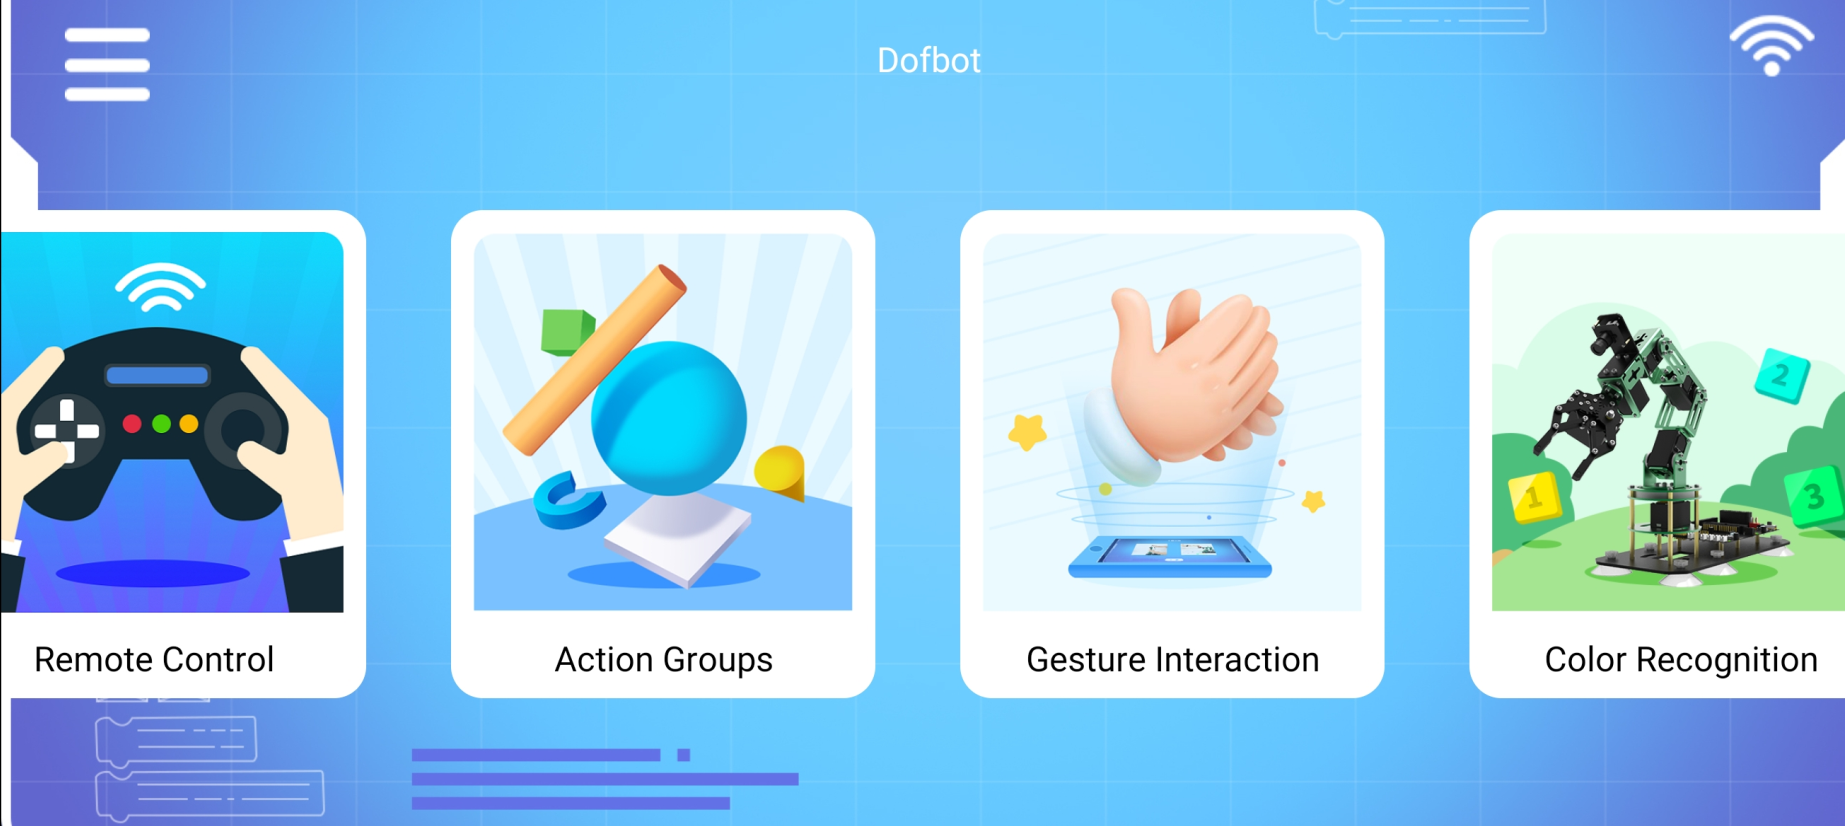

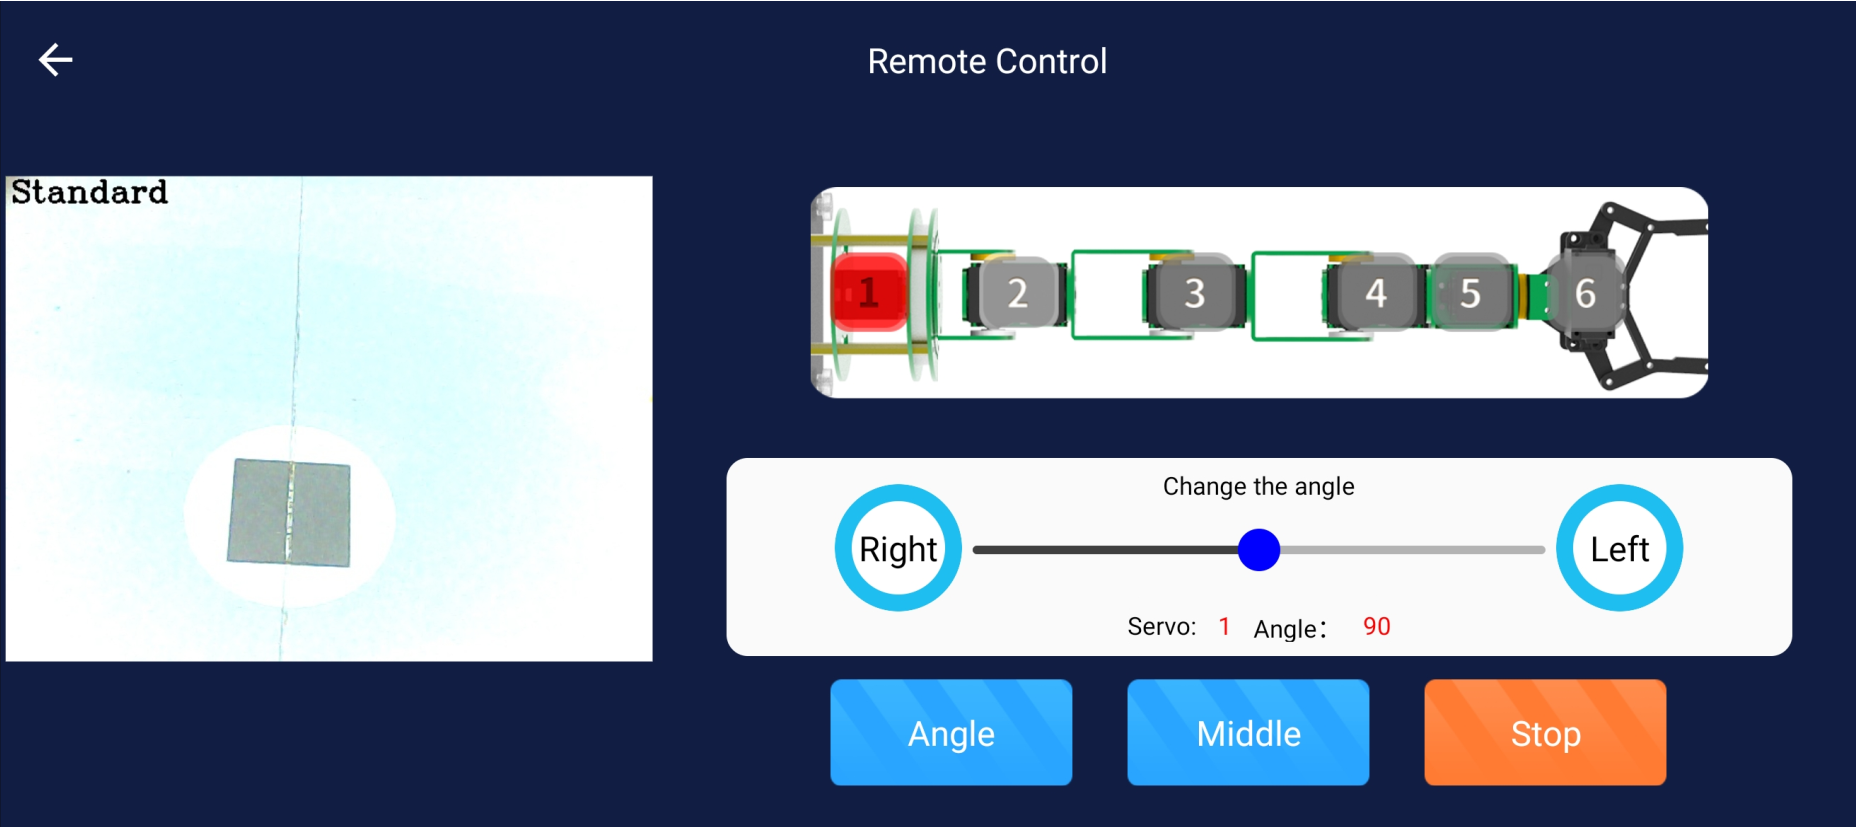
5.2. Remote control
The left side is the picture displayed by the camera. The upper right side shows a robotic arm with numbers 1 to 6 written on it, which represent the six servos of the robotic arm. When it is displayed in red, it means that the servo with the current ID number is selected, and then you can Drag the sliding bar below or press the buttons on the left and right to adjust the position of the servo.
[Get Angle]: After each click, the APP will read the current angle of the servo and then update it to the sliding bar above.
[Return to center]: The robotic arm stands upright.
[Emergency Stop]: The first click will cause the robot arm to turn off the torque, the servos will no longer receive control commands, and there is no function to maintain the current position. You can move the positions of all servos by hand. The second click will cause the robot arm to turn on torque, all servos will maintain their current positions, and can receive control commands.
5.3. Action group
There are two ways to play the action group. The first is the custom action group on the left, and the second is the fixed action group on the right. The action group in the middle has a preview screen, a running action group and a stop action group. Click [Run] to run it. For the current action group, click [Emergency Stop] and the robot arm will stop running the action group.
[Fixed Action Group]: Click on different number buttons to know the functions of the corresponding action group from the preview window. When you click [Run], the fixed robot arm action group function will be run.
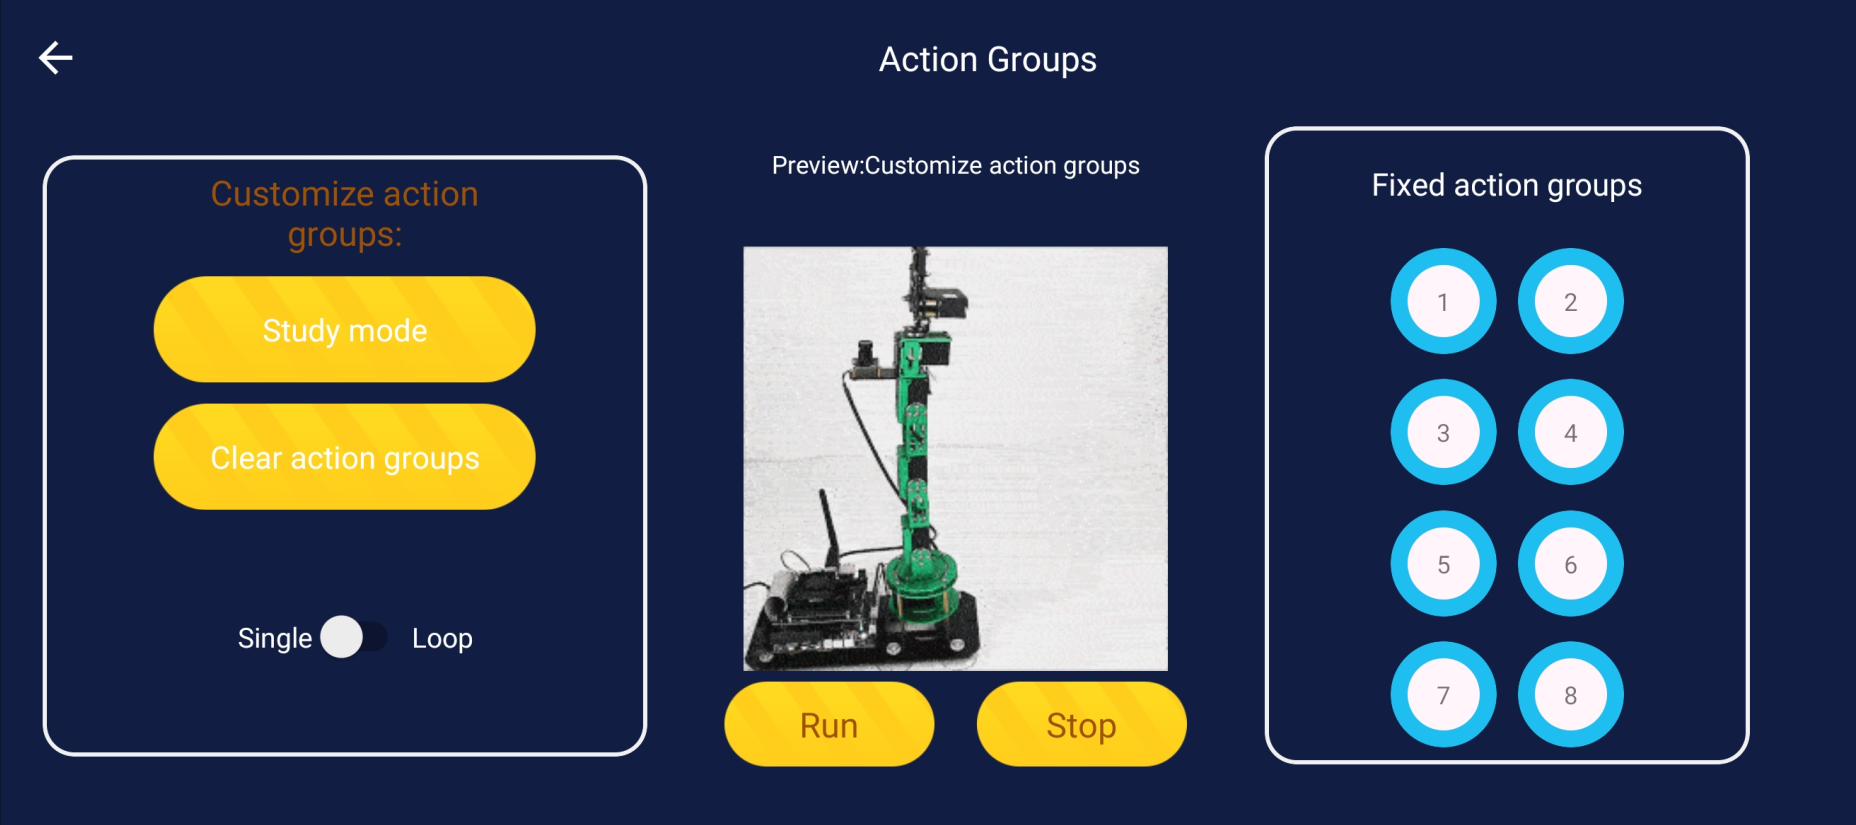
[Customized work group]: You can let the robot arm learn to perform action groups by yourself. Click [Learning Mode], a dialog box will pop up, and the RGB light on the robot arm expansion board will show a blue breathing light:
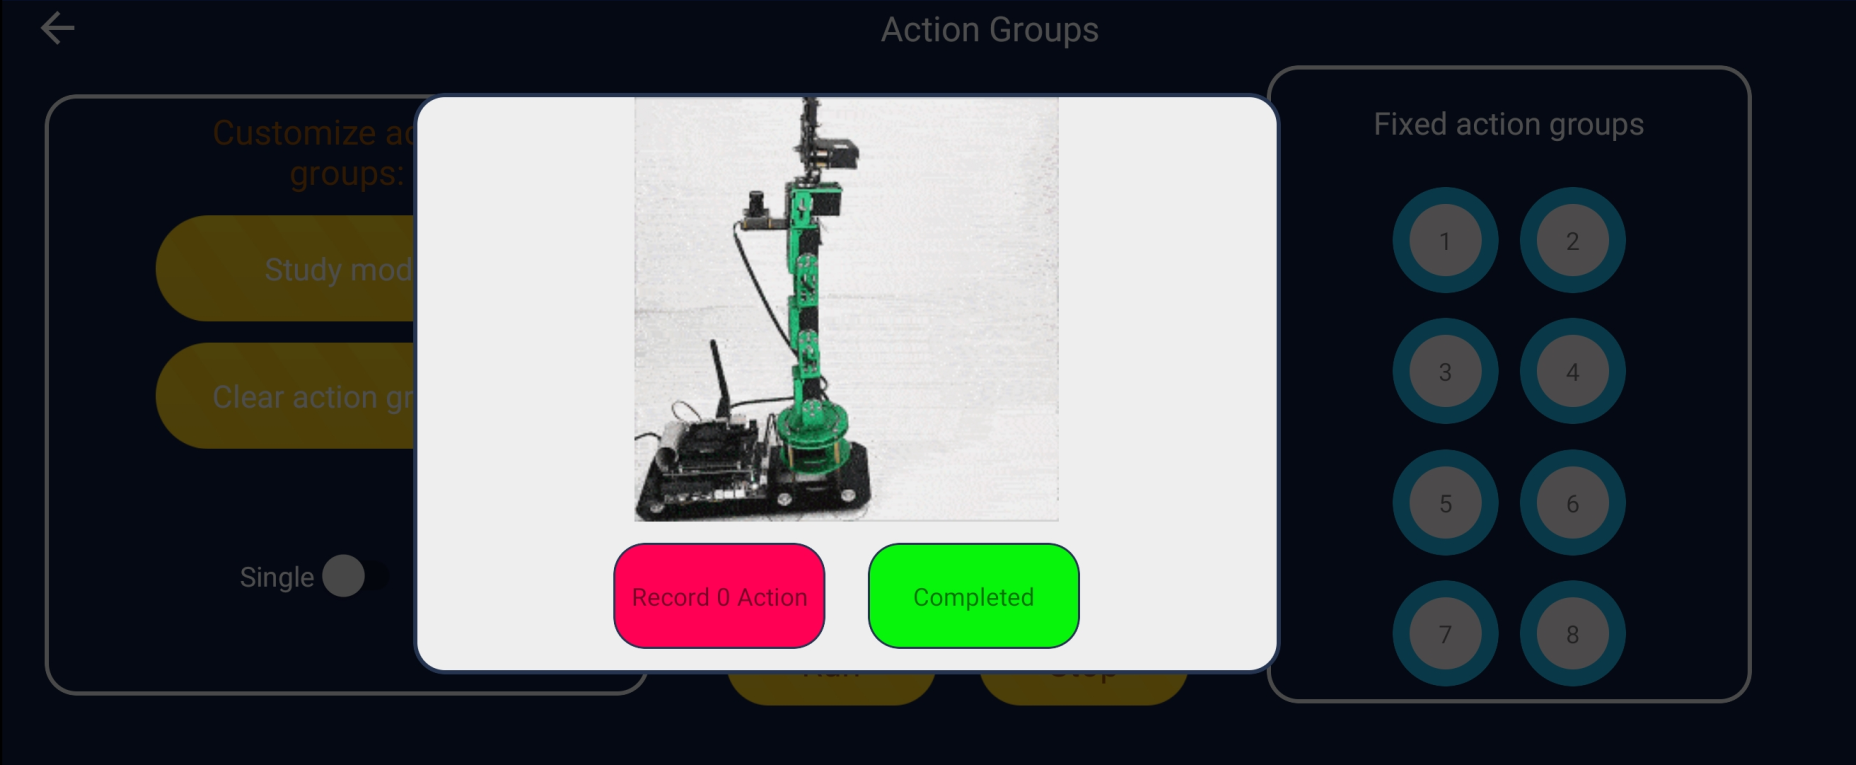
Click the [Record the If you want to exit after the action, click [Complete Learning], and the breathing light on the expansion board will go out.
If a red breathing light appears, it means there is a learning error or the recorded action group is full (up to 20 groups of actions can be stored). Please click the [Complete Learning] button to exit.
5.4. Gesture interaction
xxxxxxxxxxGesture interaction requires registering a Baidu Human Analysis account. For registration tutorials, please refer to the [Gesture Recognition] tutorial. Modify it according to your own APPID. The product will not be recognized when the user receives it!
Gesture interaction includes two ways to play, the first is gesture recognition action, and the second is gesture recognition stacking; after selecting the corresponding function, click the slider of [Game Switch] to start playing, and the function preview window will display the currently recognized gestures; Click the slider of [Gameplay Switch] again to turn off the function.
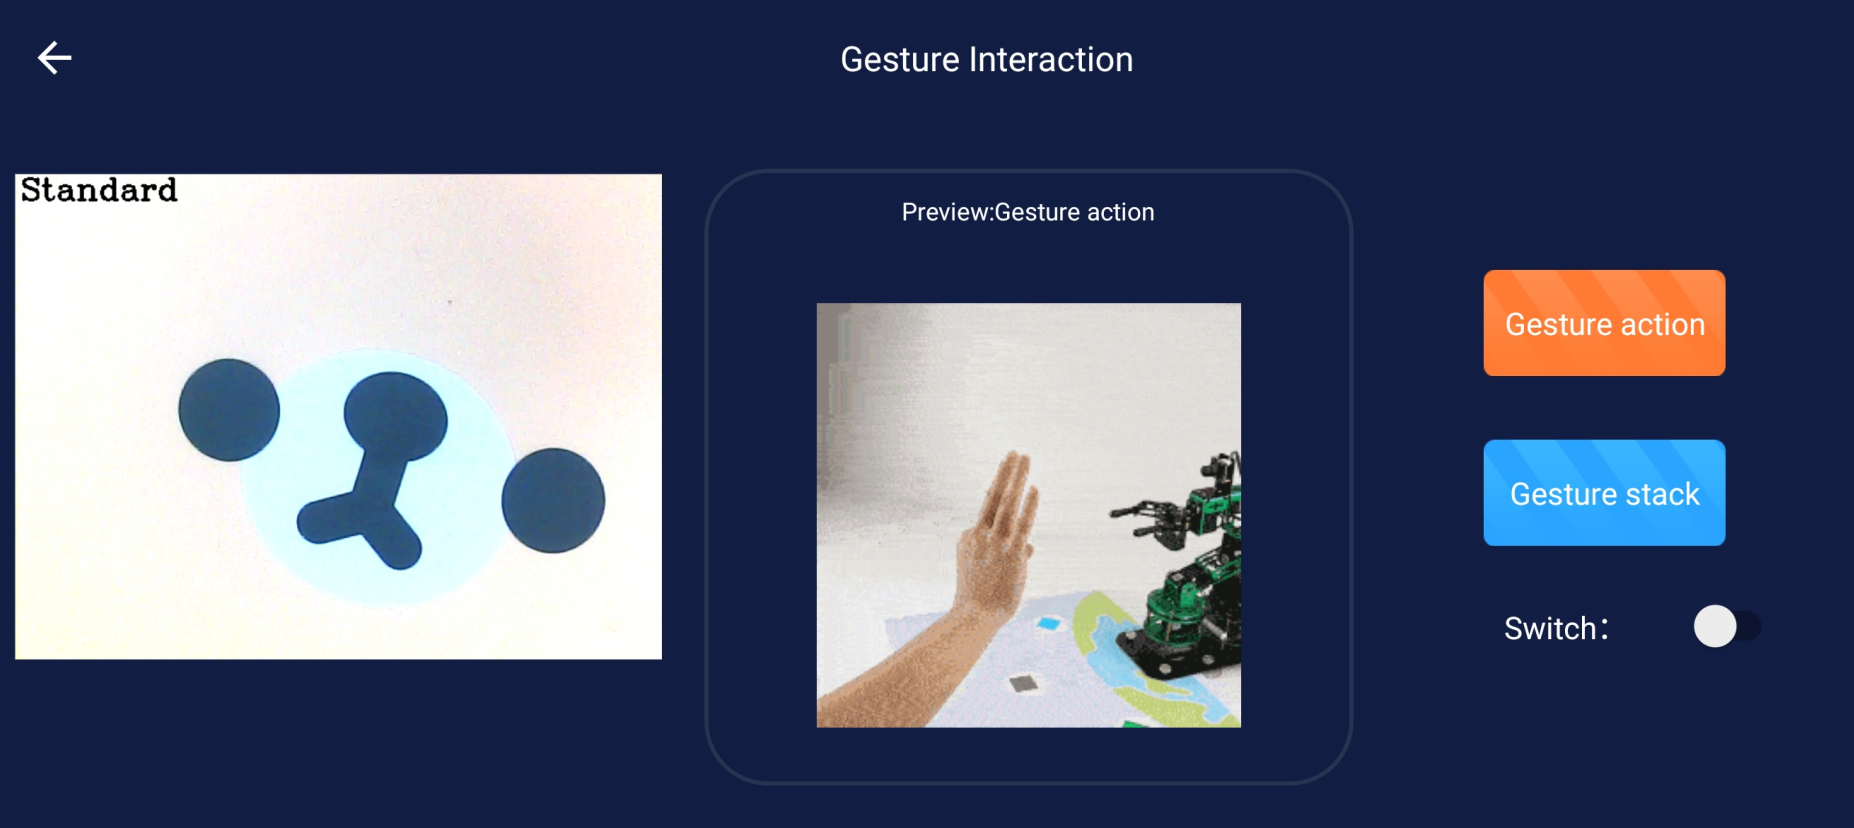
[Gesture Recognition Action]: Can recognize a variety of gestures and perform corresponding actions.
[Gesture Recognition Stacking]: Recognize gesture 1234, pick up yellow, red, green, and blue building blocks and stack them in order. Recognize that the fist pushes down all the building blocks and resets the recognition data.
5.5. Color interaction
xxxxxxxxxxSince we calibrate colors:The camera is facing the map, so the accuracy of your capture will be higher;The accuracy of color grabbing and luring snakes out of the hole is not high. In the following single function cases, we can adjust the calibration by ourselves, which can improve the recognition accuracy!
Color interaction includes a total of three gameplays. The first is to let me catch you, the second is to grab the color, and the third is to lure the snake out of the hole. After selecting the corresponding function, click the slider of the gameplay development to open the function, and click again to close the function. .
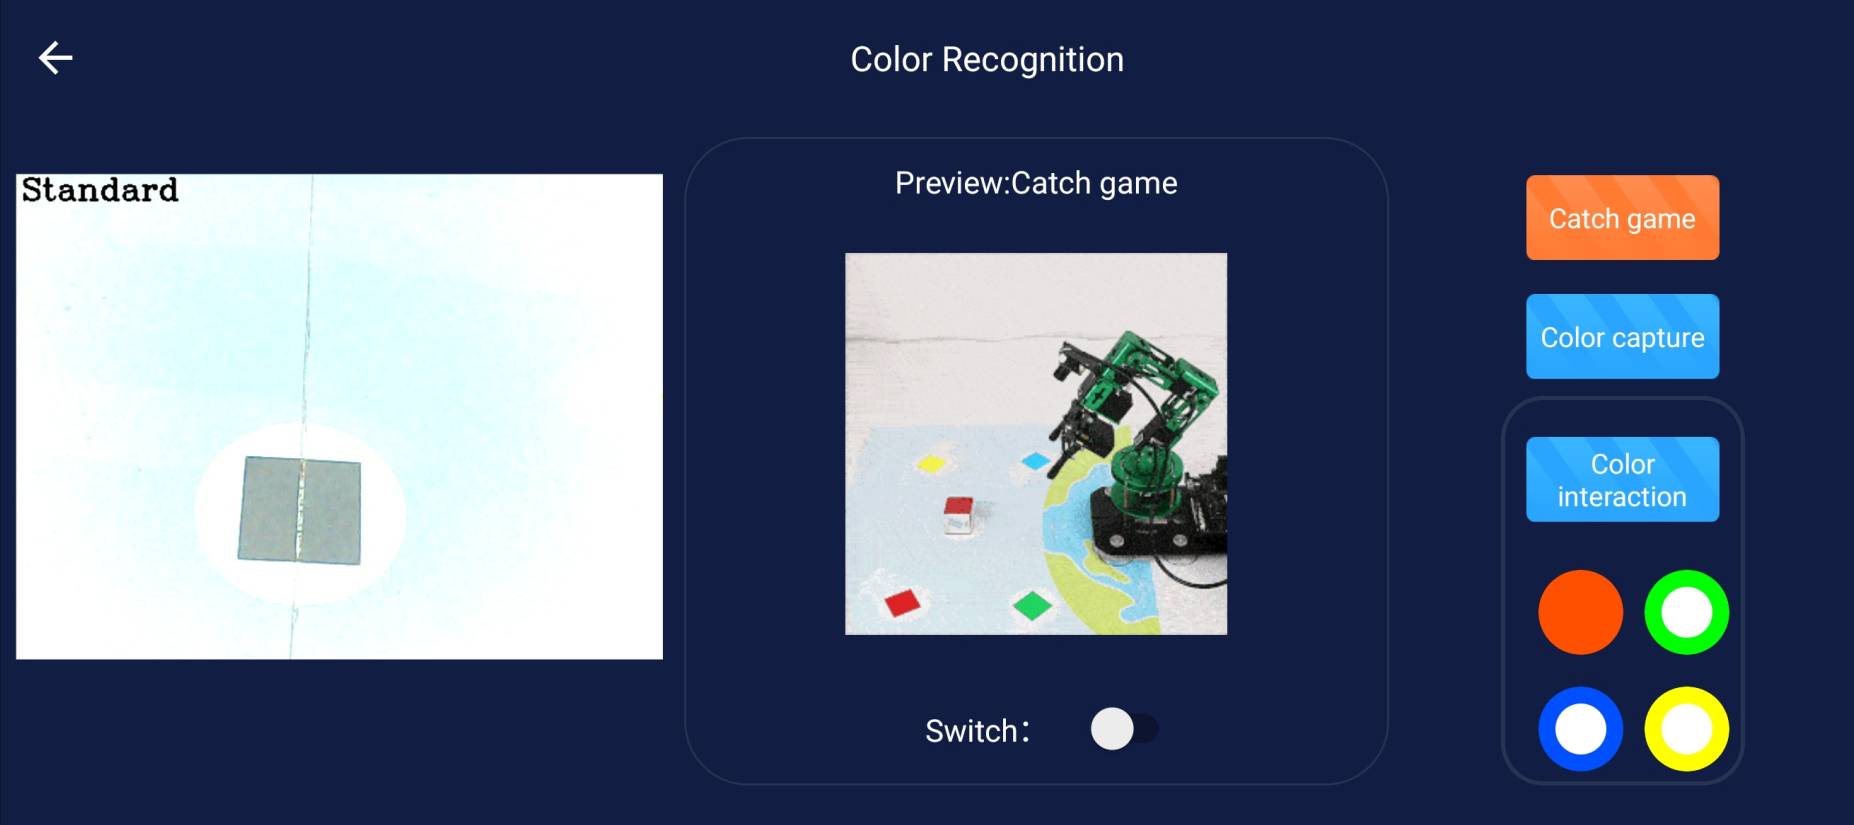
[Put it down and grab it]: Place the block in the area recognized by the camera, and the robot arm will automatically identify the current color, grab the building block, and place it in the area of the corresponding color.
[Color Grabbing]: Put the building blocks on the camera, and after the robot arm recognizes the color of the building blocks, it grabs the building blocks from the corresponding color area to the middle area.
[Luring the snake out of the hole]: Select the color below and then turn on the gameplay switch. Place the building blocks of the selected color in front of the camera of the robotic arm. The robotic arm will imitate the movements of the snake, leading the 'snake' to the longest position and opening its claws. Pick up the building blocks and put them down. When the building block is of a different color than the selected one or is infinitely close to it, the 'snake' will tremble with fear. When switching colors, turn off the gameplay switch first to make it effective.
5.6. Tracking gameplay
The tracking gameplay includes a total of three gameplays. The first is color tracking, the second is color picking tracking, and the third is face tracking. Click the slider of [Game Switch] to turn on the function, and click again to turn off the function.
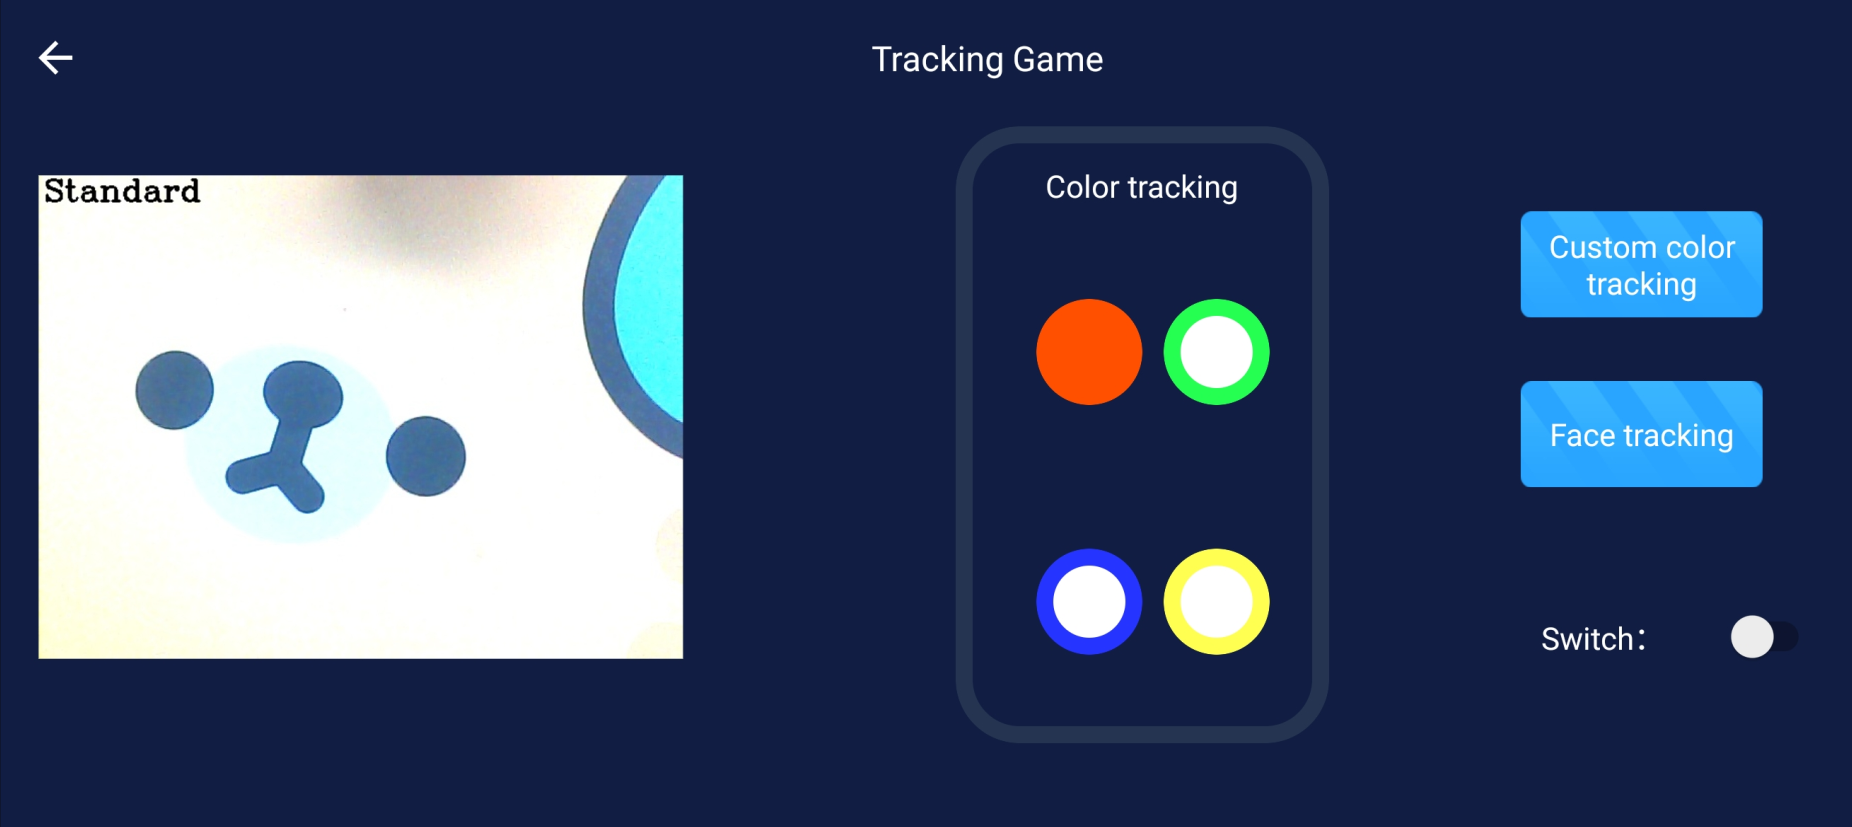
[Color Tracking]: Select a color, turn on the gameplay switch, then place the building blocks of the corresponding color in front of the camera, move the building blocks, and the robotic arm will follow the movement of the building blocks.
[Color Picking Tracking]: After clicking the 'Color Picking Tracking' button, a box will be displayed on the camera interface. Fill the box with the color to be tracked. After picking the color accurately, click the slider of [Playing Switch], and the system Once the outline of that color is completely detected, the robotic arm will move accordingly.
[Face Tracking]: The robotic arm will detect whether there is a face in the current camera image, and if so, mark and follow the face.
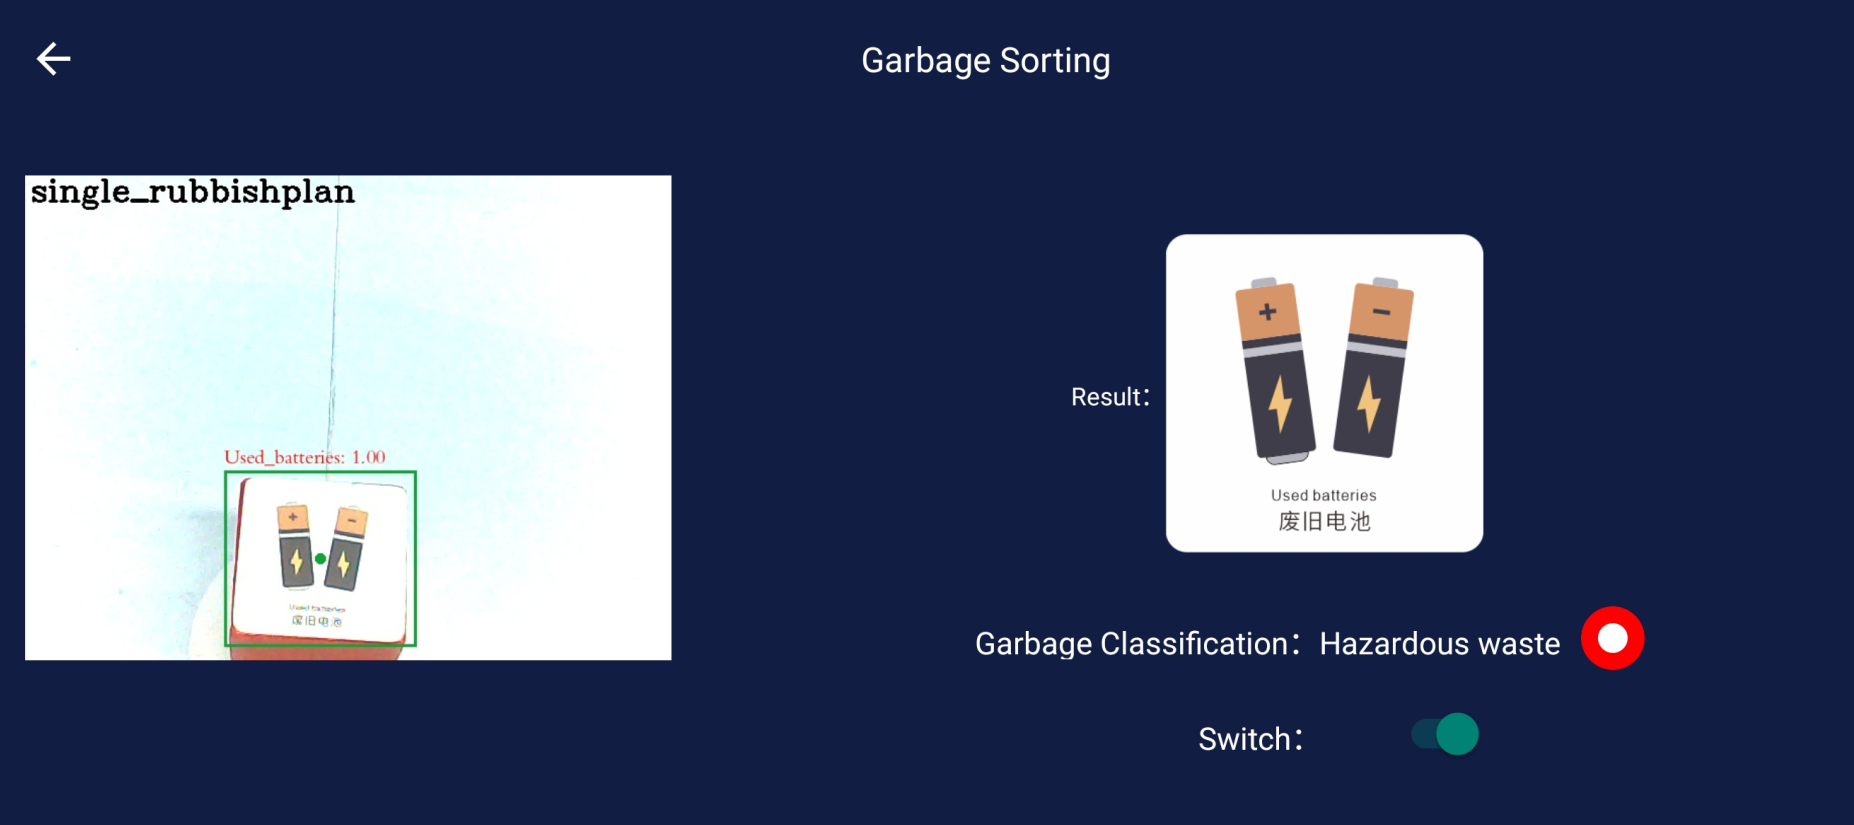
5.7. Garbage sorting
Click the slider of [Gameplay Switch], and the system will automatically load the model. After the red prompt [Model-Loading...] in the image disappears, place the square with the garbage image in the camera's field of view. The garbage sorting function can identify the type of garbage posted on the current building block. The camera collects the information in the picture and displays the type of garbage on the APP. After continuous recognition for 10 times, the garbage will be sorted according to the type of garbage to the corresponding location on the map. Junk location.
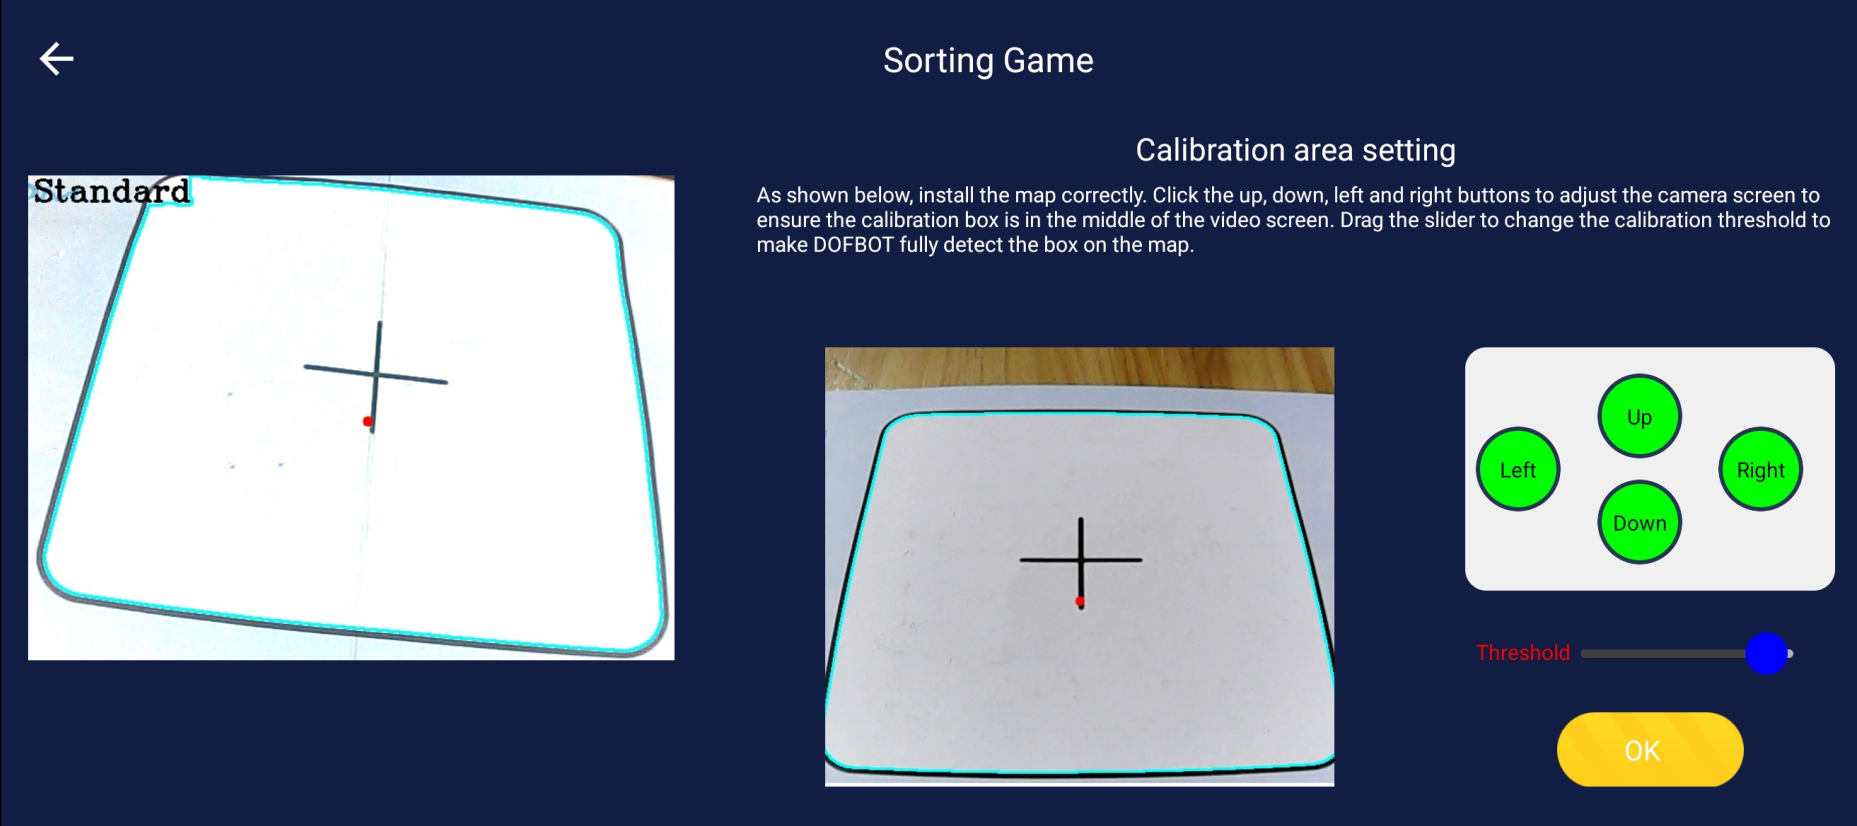
5.8. How to play as a developer
Adjust the [up, down, left, and right] buttons to move the robotic arm so that the box appears completely in the field of view. Slide the slider of [Calibration Threshold] to adjust the border detection threshold until all four sides of the box are fully detected, as shown in the figure above. Click [Confirm Calibration] to enter the [Sorting Gameplay] interface, as shown in the figure below.
[Color Sorting] How to play: Click the [1], [2], [3], [4] boxes to change the color (black means no selection).
Click the [Color Sorting] button to open the color recognition channel. After the recognition is correct, click the slider of [Playing Switch] to sort and capture in the order of color selection.
[Garbage Sorting] How to play: Click the [Garbage Sorting] button to load the model. Please wait patiently. After the red prompt [Model-Loading...] in the image disappears, place the square with the garbage image in the camera field of view. The system Automatically identify, click the slider of [Game Switch] to sort and capture.
5.9. Robot arm settings
The robot arm settings include a total of three functions, the first is servo calibration, the second is color calibration, and the third is to restore the default configuration.
[Servo Calibration]: Refer to [4.5, Robotic Arm Calibration]
[Color Calibration]: Color calibration is divided into two functions. The first is [Entry-Level Calibration], which has the same function as in the boot configuration, and the second is [Color Professional Calibration].

[Color introductory calibration]: Refer to [4.6, Color Calibration].
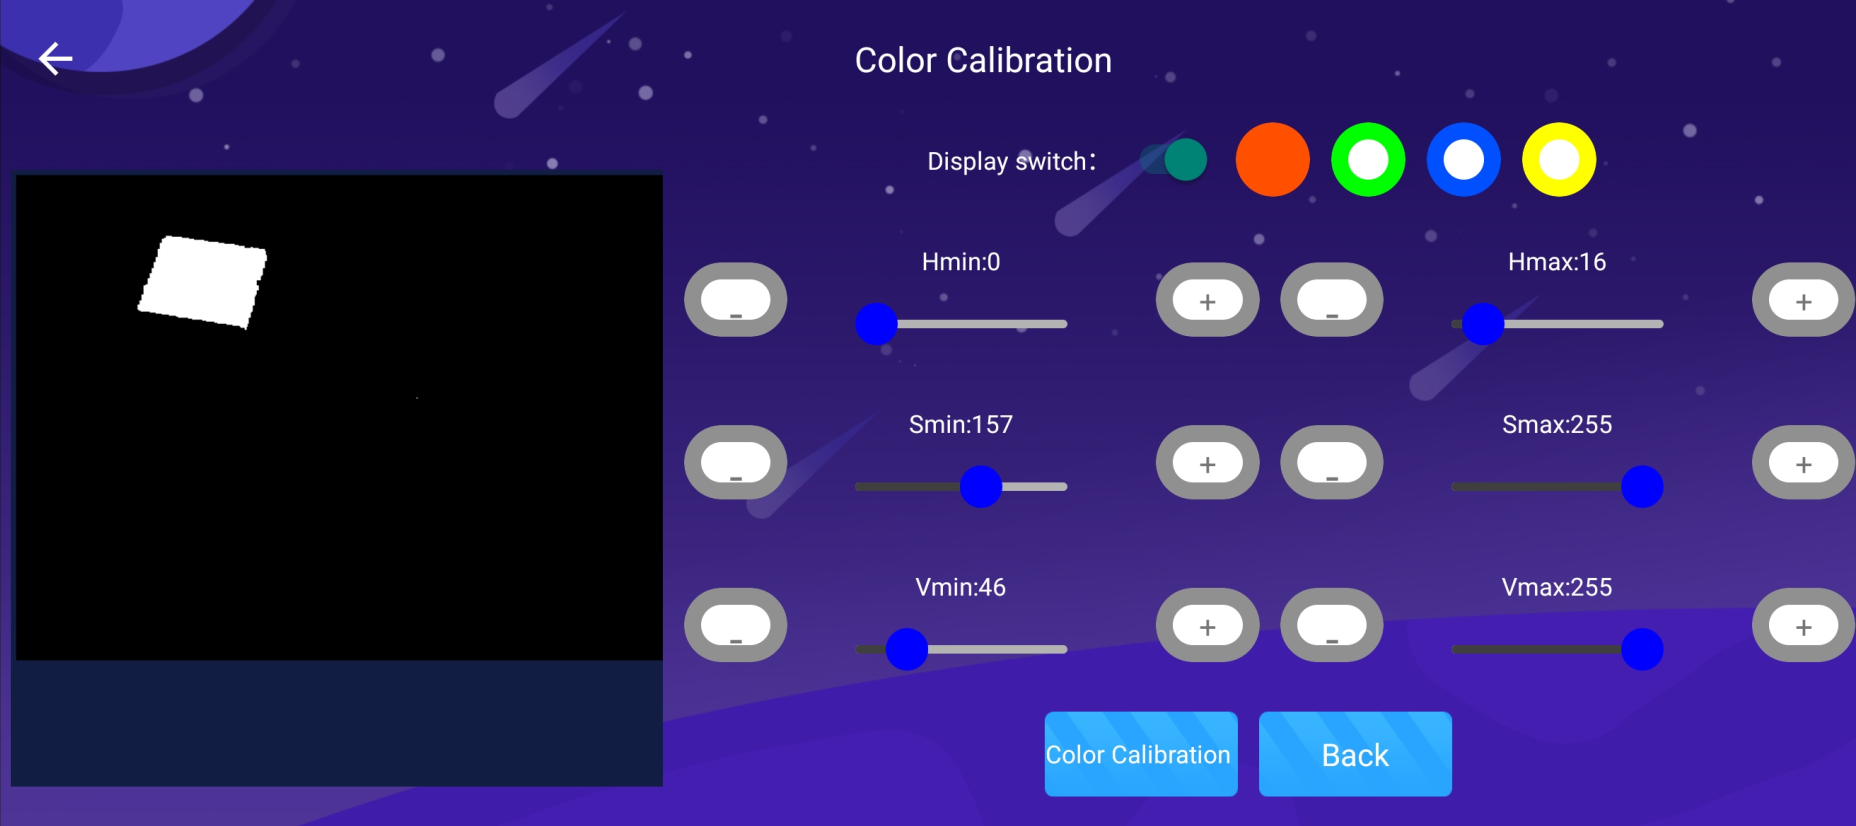
[Professional Color Calibration]: First put the building blocks of four colors into the field of view at the same time, select the color that needs to be calibrated, and then slide the [Display Switch] button to view the black and white image, and adjust it through the HSV slider until no interference is detected Color, click [Color Calibration] to complete the calibration of this color, and calibrate other colors in the same way. Verify the results, change the position of the building blocks at will, and accurately identify the building blocks under the color picture, click [Finish] to end the entire guide.