Mediapipe arm attitude control robotic arm
Note: There are related running codes on Raspberry Pi and Jetson nano, but due to the difference in motherboard performance, they may not run so smoothly. The supporting virtual machine also has the operating environment and programs installed. If the experience on the motherboard is not good, you can Remove the camera and insert it into the virtual machine. Connect the camera device to the virtual machine to run the image processing program on the virtual machine and run the driver on the motherboard. The premise is that distributed communication between the motherboard and the virtual machine needs to be set up. Refer to the previous tutorial to set it up.
1 Introduction
MediaPipe is an open source data stream processing machine learning application development framework developed by Google. It is a graph-based data processing pipeline for building and using multiple forms of data sources, such as video, audio, sensor data, and any time series data.
MediaPipe is cross-platform and can run on embedded platforms (Raspberry Pi, etc.), mobile devices (iOS and Android), workstations and servers, and supports mobile GPU acceleration. MediaPipe provides cross-platform, customizable ML solutions for real-time and streaming media.
The core framework of MediaPipe is implemented in C++ and provides support for languages such as Java and Objective C. The main concepts of MediaPipe include Packet, Stream, Calculator, Graph and Subgraph.
Features of MediaPipe:
End-to-end acceleration: Built-in fast ML inference and processing accelerates even on commodity hardware.
Build once, deploy anywhere: Unified solution for Android, iOS, desktop/cloud, web and IoT.
Ready-to-use solutions: cutting-edge ML solutions that showcase the full capabilities of the framework.
Free and open source: frameworks and solutions under Apache2.0, fully extensible and customizable.
2. Implementation principle
MediaPipe Hands infers the 3D coordinates of 21 hand-valued joints from a frame,

The landmark model in MediaPipe Pose predicts the positions of 33 pose coordinates (see the figure below),
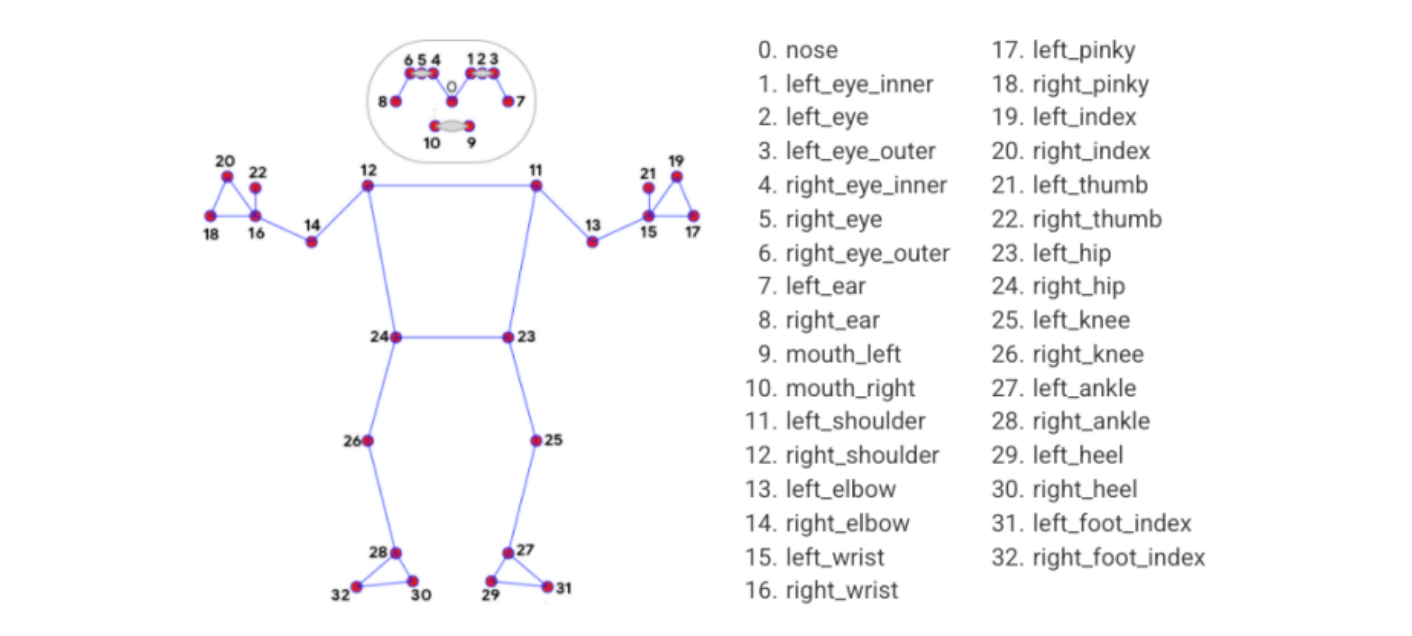
In this program, what we need is the coordinates of that part of the right arm. By calculating the angle formed by these coordinates, we can calculate how much angle each servo of the robotic arm needs to rotate.
3. Start
3.1. Preparation before starting the program
If you have a notebook, use the camera on the notebook and unplug the connection between the robotic arm camera and the PC. If there is no camera on the PC, remove the camera from the robotic arm and fix it on the PC. Note that when this program is running, the robotic arm will move to the right and the range of motion is relatively large. There should be no other objects around the robotic arm to avoid being hit by the robotic arm.
3.2. Program description
After the program is started, stand in front of the camera so that the entire arm appears in the screen. At this time, the buzzer will sound. This is written in the program to prevent the robot arm from continuing to move after the arm is put down, causing program confusion. We raise our elbows and wait for the buzzer to stop sounding, and the robotic arm will simulate the movement of the arm. You can straighten and bend the elbow joint, wrist joint, shoulder joint, and open/close the palm to control the robotic arm. During the whole process, the arm needs to change slowly, otherwise the robotic arm will be mistakenly recognized and move randomly.
3.3. Program startup
Start Docker
After entering the Raspberry Pi 5 desktop, open a terminal and run the following command to start the container corresponding to Dofbot:
xxxxxxxxxx./Docker_Ros.sh
roscorerosrun arm_mediapipe arm_driver.pyrosrun arm_mediapipe PoseArm.py3.4. Source code
Raspberry Pi source code location:/root/dofbot_ws/src/arm_mediapipe/scripts/PoseArm.py
x#!/usr/bin/env python3# encoding: utf-8import threadingimport cv2 as cvimport numpy as npfrom media_library import *from time import sleep, time
class PoseCtrlArm: def __init__(self): self.car_status = True self.stop_status = 0 self.locking = False self.pose_detector = Holistic() self.hand_detector = HandDetector() self.pTime = self.index = 0 self.media_ros = Media_ROS() self.event = threading.Event() self.event.set() self.Joy_active = True
def process(self, frame): frame = cv.flip(frame, 1) if self.Joy_active: frame, pointArray, lhandptArray, rhandptArray = self.pose_detector.findHolistic(frame) threading.Thread(target=self.arm_ctrl_threading, args=(pointArray, lhandptArray, rhandptArray)).start() self.cTime = time() fps = 1 / (self.cTime - self.pTime) self.pTime = self.cTime text = "FPS : " + str(int(fps)) cv.putText(frame, text, (20, 30), cv.FONT_HERSHEY_SIMPLEX, 0.9, (0, 0, 255), 1) self.media_ros.pub_imgMsg(frame) return frame
def arm_ctrl_threading(self, pointArray, lhandptArray, rhandptArray): if self.event.is_set(): self.event.clear() joints = [0, 145, 0, 0, 90, 30] if self.stop_status <= 30: self.media_ros.pub_vel(0, 0) self.stop_status += 1 if len(pointArray) != 0: point11 = pointArray[11][1:3] point12 = pointArray[12][1:3] point13 = pointArray[13][1:3] point15 = pointArray[15][1:3] point21 = pointArray[21][1:3] angle11 = round(calc_angle(point11, point12, point13), 2) angle13 = round(180 - calc_angle(point11, point13, point15), 2) if len(lhandptArray) != 0: point0 = lhandptArray[0][1:3] point4 = lhandptArray[4][1:3] point8 = lhandptArray[8][1:3] angle15 = round(180 - calc_angle(point13, point0, point8), 2) if point8[1] > point0[1]: angle15 = -angle15 grip_angle = round(180 - calc_angle(point4, point0, point8), 2) grip_joint = np.interp(grip_angle, [90, 180], [30, 190]) else: angle15 = round(180 - calc_angle(point13, point15, point21), 2) if point21[1] > point15[1]: angle15 = -angle15 grip_joint = 30 if point13[1] > point11[1]: angle11 = -angle11 if point15[1] > point13[1]: angle13 = -angle13 angle13 += 90 angle15 += 90 # print("angle11: {},angle13: {},angle15: {}".format(angle11, angle13, angle15)) print(angle11) if abs(angle11) > 20: print("shoulder up") self.media_ros.RobotBuzzer() else: if angle11 < 0: angle11 = 0 # [0, 30] angle11 = np.interp(angle11, [0, 30], [0, 90]) self.media_ros.pub_arm([0, angle11, angle13, angle15, 90, grip_joint]) self.index = 0 #self.media_ros.RobotBuzzer() self.event.set() else: #self.media_ros.RobotBuzzer() #self.media_ros.pub_arm(joints, runtime=5000) self.event.set() #self.car_status = True #self.event.set()
if __name__ == '__main__': rospy.init_node('PoseCtrlArm_node', anonymous=True) pose_ctrl_arm = PoseCtrlArm() capture = cv.VideoCapture(0) capture.set(6, cv.VideoWriter.fourcc('M', 'J', 'P', 'G')) capture.set(cv.CAP_PROP_FRAME_WIDTH, 640) capture.set(cv.CAP_PROP_FRAME_HEIGHT, 480) print("capture get FPS : ", capture.get(cv.CAP_PROP_FPS)) while capture.isOpened(): ret, frame = capture.read() frame = pose_ctrl_arm.process(frame) if cv.waitKey(1) & 0xFF == ord('q'): break cv.imshow('frame', frame) capture.release() cv.destroyAllWindows()