Car Diagonal Movement
Car Diagonal MovementDevice connectionHardware connectionSoftware connectionMotion analysisControl the motorControl PrincipleCommon parametersControl pinsCode analysisExperimental results
Control the car's oblique movement by pressing K1.
Device connection
Hardware connection
Use Type-B data cable to connect Arduino Uno and computer.
Software connection
Open the "Arduino IDE" software and select the model and serial port number corresponding to the development board.
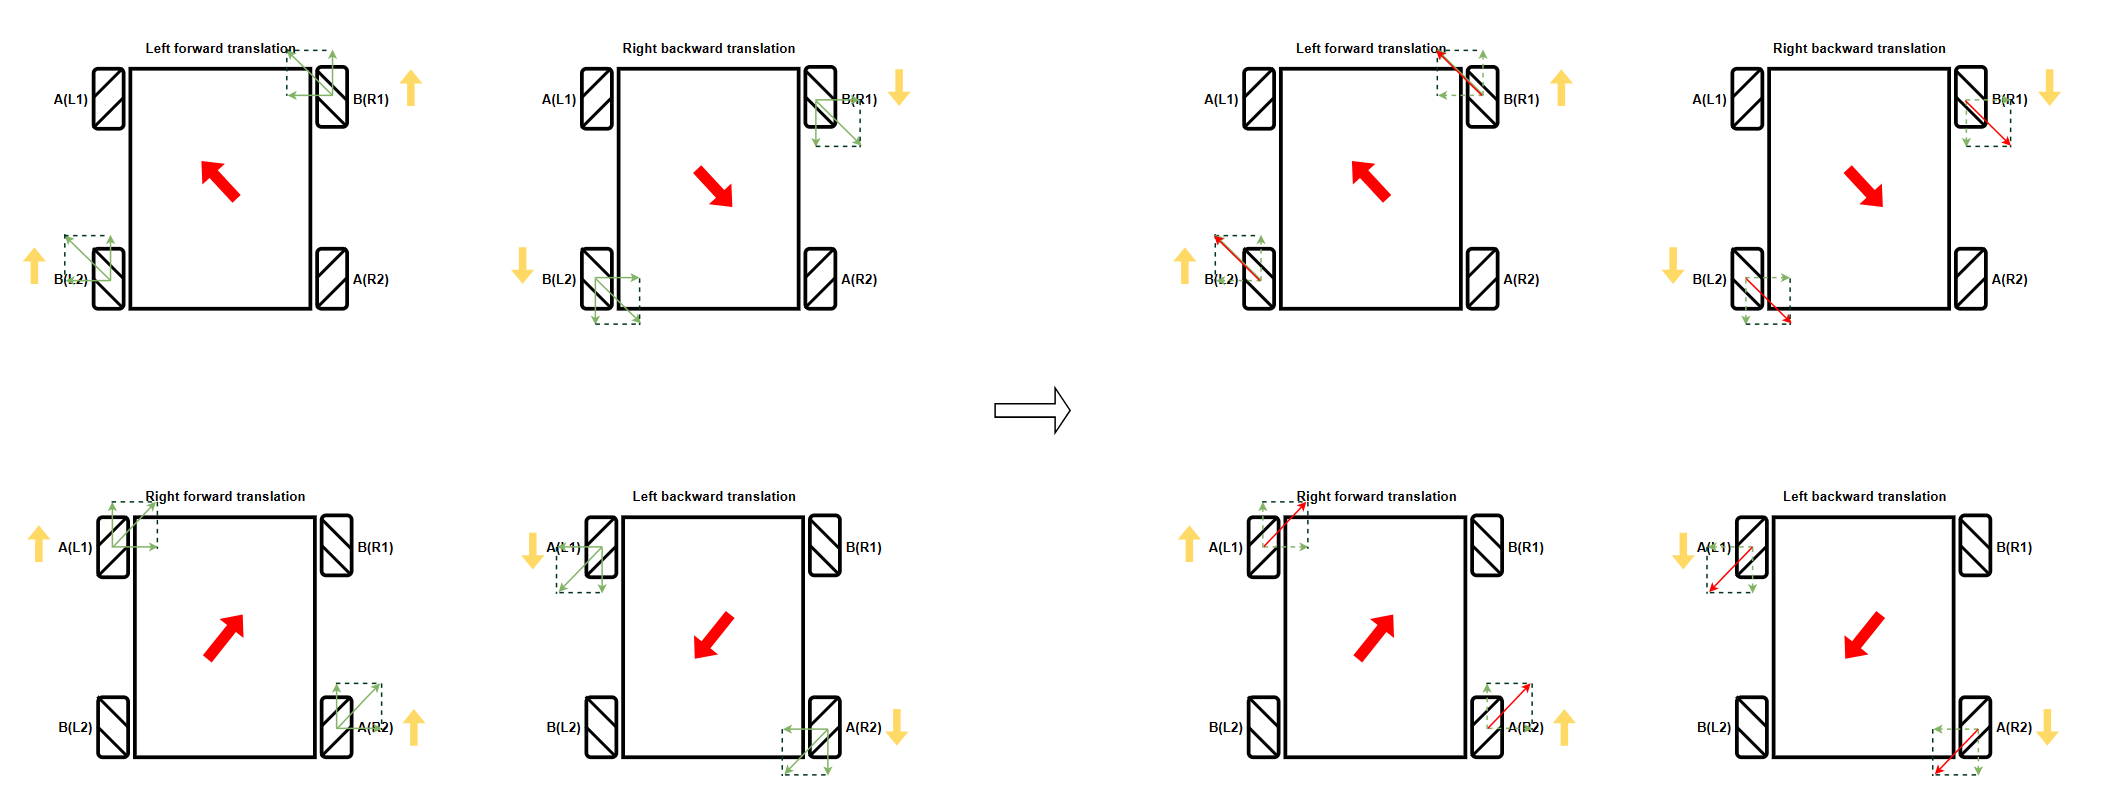
Motion analysis
Yellow arrow: motor rotation direction (upward means forward-motor forward rotation, downward means backward-motor reverse rotation)
Red arrow: actual movement direction of the car
Green arrow: speed decomposition direction (where the dotted arrow is the offset speed component, and the red arrow is the actual speed component)
Control the motor
The motor is directly driven by the underlying driver chip on the Robduino expansion board. The underlying driver chip and the Arduino Uno board use I2C communication, and the I2C address is 0x40.
Control Principle
The motor rotation angle is controlled by changing the duty cycle of the PWM signal that controls the motor signal pin.
Common parameters
Period: The duration of a complete PWM waveform;
Duty cycle: The ratio of the duration of the high level to the cycle time;
Frequency: The reciprocal of the period is called the frequency, that is, the number of PWM periods generated per second;
xxxxxxxxxxSet the period of the PWM control signal to 20ms, that is, the frequency of 50Hz; the high level time of the pulse determines the speed of the motor rotation
Control pins
| Peripheral module | I2C register first address number (STC8GK2K64S4) | Control motor direction |
|---|---|---|
| L1 (upper left corner motor) | 11 | Control forward (forward) |
| L1 (upper left corner motor) | 10 | Control reverse (backward) |
| L2 (lower left corner motor) | 8 | Control forward (forward) |
| L2 (lower left corner motor) | 9 | Control reverse (backward) |
| R1 (upper right corner motor) | 13 | Control forward rotation (forward) |
| R1 (upper right corner motor) | 12 | Control reverse rotation (backward) |
| R2 (lower right corner motor) | 14 | Control forward rotation (forward) |
| R2 (lower right corner motor) | 15 | Control reverse rotation (backward) |
Code analysis
Here we only briefly introduce the code content. For detailed code, please refer to the corresponding code file, which is provided in the download area!
Include
Wire、Adafruit_PWMServoDriverlibrary
x#include <Wire.h> // 包含Wire(I2C)通讯库 Include Wire library#include <Adafruit_PWMServoDriver.h> // 包含Adafruit PWMServoDriver库 Include Adafruit PWMServoDriver library
Define the motor, button control pin, I2C address, motor frequency and initial speed
x// 定义电机控制引脚 Define motor control pins#define Motor_L1_F_PIN 11 // 控制小车左前方电机前进 Control the motor on the left front of the car#define Motor_L1_B_PIN 10 // 控制小车左前方电机后退 Control the motor back on the left front of the car#define Motor_L2_F_PIN 8 // 控制小车左后方电机前进 Control car left rear motor forward#define Motor_L2_B_PIN 9 // 控制小车左后方电机后退 Control the car left rear motor back#define Motor_R1_F_PIN 13 // 控制小车右前方电机前进 Control the right front motor of the car to move forward#define Motor_R1_B_PIN 12 // 控制小车右前方电机后退 Control the motor back on the right front of the car#define Motor_R2_F_PIN 14 // 控制小车右后方电机前进 Control car right rear motor forward#define Motor_R2_B_PIN 15 // 控制小车右后方电机后退 Control car right rear motor back// 定义底层驱动芯片参数 Bottom-layer driver chip related parameters#define Bottom_Layer_Driver_ADDR 0x40// 定义PWM频率 Define PWM frequency#define PWM_FREQUENCY 50// 定义按键引脚和控制状态 Define pin and key(button) states#define KEY_PIN 7#define Press_KEY 0#define Release_KEY 1bool Car_Switch = false;int MotorSpeed = 75;
Enumerate the common movement modes of omnidirectional cars
x// 枚举全向小车的常见运动方式 Enumerate the common movement modes of omnidirectional carsenum OmniDirectionalCar {STOP,FORWARD,BACKWARD,LEFT,RIGHT,LEFT_ROTATE,RIGHT_ROTATE,LEFT_FORWARD,RIGHT_BACKWARD,RIGHT_FORWARD,LEFT_BACKWARD,};
Create an instance of the Adafruit_PWMServoDriver class
x// 创建Adafruit_PWMServoDriver类的实例 Create an instance of the Adafruit_PWMServoDriver classAdafruit_PWMServoDriver pwm = Adafruit_PWMServoDriver(Bottom_Layer_Driver_ADDR);
Setting the Motor Speed
x/*** @brief 设置单个电机速度 Setting the Motor Speed* @param motor_forward_pin: 控制电机前进引脚 Control the motor forward pin* @param motor_backward_pin: 控制电机后退引脚 Control the motor backward pin* @param motor_speed: 设置电机速度 Setting the Motor Speed* @retval 无 None*/void setMotorSpeed(uint16_t motor_forward_pin, uint16_t motor_backward_pin, int motor_speed) {motor_speed = map(motor_speed, -255, 255, -4095, 4095);if (motor_speed >= 0) {pwm.setPWM(motor_forward_pin, 0, motor_speed);pwm.setPWM(motor_backward_pin, 0, 0);} else if (motor_speed < 0) {pwm.setPWM(motor_forward_pin, 0, 0);pwm.setPWM(motor_backward_pin, 0, -(motor_speed));}}
Set the car movement mode and speed
x/*** @brief 设置小车运动方式和速度 Set the car movement mode and speed* @param Movement: 小车运动方式 Car movement* @param Speed: 小车运动速度 Car speed* @retval 无 None*/void setCarMove(uint8_t Movement, int Speed) {switch (Movement) {case STOP:setMotorSpeed(Motor_L1_F_PIN, Motor_L1_B_PIN, 0);setMotorSpeed(Motor_L2_F_PIN, Motor_L2_B_PIN, 0);setMotorSpeed(Motor_R1_F_PIN, Motor_R1_B_PIN, 0);setMotorSpeed(Motor_R2_F_PIN, Motor_R2_B_PIN, 0);break;case FORWARD:setMotorSpeed(Motor_L1_F_PIN, Motor_L1_B_PIN, Speed);setMotorSpeed(Motor_L2_F_PIN, Motor_L2_B_PIN, Speed);setMotorSpeed(Motor_R1_F_PIN, Motor_R1_B_PIN, Speed);setMotorSpeed(Motor_R2_F_PIN, Motor_R2_B_PIN, Speed);break;case BACKWARD:setMotorSpeed(Motor_L1_F_PIN, Motor_L1_B_PIN, -Speed);setMotorSpeed(Motor_L2_F_PIN, Motor_L2_B_PIN, -Speed);setMotorSpeed(Motor_R1_F_PIN, Motor_R1_B_PIN, -Speed);setMotorSpeed(Motor_R2_F_PIN, Motor_R2_B_PIN, -Speed);break;case LEFT:setMotorSpeed(Motor_L1_F_PIN, Motor_L1_B_PIN, -Speed);setMotorSpeed(Motor_L2_F_PIN, Motor_L2_B_PIN, Speed);setMotorSpeed(Motor_R1_F_PIN, Motor_R1_B_PIN, Speed);setMotorSpeed(Motor_R2_F_PIN, Motor_R2_B_PIN, -Speed);break;case RIGHT:setMotorSpeed(Motor_L1_F_PIN, Motor_L1_B_PIN, Speed);setMotorSpeed(Motor_L2_F_PIN, Motor_L2_B_PIN, -Speed);setMotorSpeed(Motor_R1_F_PIN, Motor_R1_B_PIN, -Speed);setMotorSpeed(Motor_R2_F_PIN, Motor_R2_B_PIN, Speed);break;case LEFT_ROTATE:setMotorSpeed(Motor_L1_F_PIN, Motor_L1_B_PIN, -Speed);setMotorSpeed(Motor_L2_F_PIN, Motor_L2_B_PIN, -Speed);setMotorSpeed(Motor_R1_F_PIN, Motor_R1_B_PIN, Speed);setMotorSpeed(Motor_R2_F_PIN, Motor_R2_B_PIN, Speed);break;case RIGHT_ROTATE:setMotorSpeed(Motor_L1_F_PIN, Motor_L1_B_PIN, Speed);setMotorSpeed(Motor_L2_F_PIN, Motor_L2_B_PIN, Speed);setMotorSpeed(Motor_R1_F_PIN, Motor_R1_B_PIN, -Speed);setMotorSpeed(Motor_R2_F_PIN, Motor_R2_B_PIN, -Speed);break;case LEFT_FORWARD:setMotorSpeed(Motor_L1_F_PIN, Motor_L1_B_PIN, 0);setMotorSpeed(Motor_L2_F_PIN, Motor_L2_B_PIN, Speed);setMotorSpeed(Motor_R1_F_PIN, Motor_R1_B_PIN, Speed);setMotorSpeed(Motor_R2_F_PIN, Motor_R2_B_PIN, 0);break;case RIGHT_BACKWARD:setMotorSpeed(Motor_L1_F_PIN, Motor_L1_B_PIN, 0);setMotorSpeed(Motor_L2_F_PIN, Motor_L2_B_PIN, -Speed);setMotorSpeed(Motor_R1_F_PIN, Motor_R1_B_PIN, -Speed);setMotorSpeed(Motor_R2_F_PIN, Motor_R2_B_PIN, 0);break;case RIGHT_FORWARD:setMotorSpeed(Motor_L1_F_PIN, Motor_L1_B_PIN, Speed);setMotorSpeed(Motor_L2_F_PIN, Motor_L2_B_PIN, 0);setMotorSpeed(Motor_R1_F_PIN, Motor_R1_B_PIN, 0);setMotorSpeed(Motor_R2_F_PIN, Motor_R2_B_PIN, Speed);break;case LEFT_BACKWARD:setMotorSpeed(Motor_L1_F_PIN, Motor_L1_B_PIN, -Speed);setMotorSpeed(Motor_L2_F_PIN, Motor_L2_B_PIN, 0);setMotorSpeed(Motor_R1_F_PIN, Motor_R1_B_PIN, 0);setMotorSpeed(Motor_R2_F_PIN, Motor_R2_B_PIN, -Speed);break;default:setMotorSpeed(Motor_L1_F_PIN, Motor_L1_B_PIN, 0);setMotorSpeed(Motor_L2_F_PIN, Motor_L2_B_PIN, 0);setMotorSpeed(Motor_R1_F_PIN, Motor_R1_B_PIN, 0);setMotorSpeed(Motor_R2_F_PIN, Motor_R2_B_PIN, 0);break;}}
Get key(button) status
x/*** @brief 获取按键状态 Get key(button) status* @param pin: 按键控制引脚 Control key(button) pins* @retval 按键状态 Key(button) Status*/int getKeyState(uint8_t pin) {if (digitalRead(pin) == LOW) {delay(20);if (digitalRead(pin) == LOW) {while (digitalRead(pin) == LOW);return Press_KEY;}return Release_KEY;} else {return Release_KEY;}}
Set the car function switch
x/*** @brief 设置小车功能开关 Set the car function switch* @param 无 None* @retval 开启/关闭 true/false*/bool setCarSwitch() {if (getKeyState(KEY_PIN) == Press_KEY) {Car_Switch = !Car_Switch;}return Car_Switch;}
Initialization Code
xxxxxxxxxxvoid setup() {Wire.begin(); // 初始化I2C通讯 Initialize I2C communicationdelay(1000); // 如果小车功能异常,可以增加这个延时 If the function is abnormal, you can increase the delaypwm.begin(); // PWM初始化 Initialize the Pulse Width Modulation (PWM) librarypwm.setPWMFreq(PWM_FREQUENCY); // 设置PWM频率 Set the PWM frequencysetCarMove(STOP, 0); // 设置小车停止状态 Set the car to stop state}
Looping code
xxxxxxxxxxvoid loop() {// 按键控制小车斜向运动启动 The key control car oblique motion startif (setCarSwitch()) {setCarMove(LEFT_FORWARD, MotorSpeed);delay(1000);setCarMove(STOP, 0);delay(500);setCarMove(RIGHT_BACKWARD, MotorSpeed);delay(1000);setCarMove(STOP, 0);delay(500);setCarMove(RIGHT_FORWARD, MotorSpeed);delay(1000);setCarMove(STOP, 0);delay(500);setCarMove(LEFT_BACKWARD, MotorSpeed);delay(1000);setCarMove(STOP, 0);delay(500);} else {setCarMove(STOP, 0);}}
Experimental results
After compiling the program successfully, upload the code to the Arduino Uno development board.
After the program starts, press the K1 button to start the car's oblique motion function.
Since our code uses blocking delay, pressing the K1 button may not stop the car; so to stop the car from running, you can turn off the power switch on the expansion board or press the Reset button on the expansion board to restart the program back to the original state.
xxxxxxxxxxThe drive motor needs an external battery pack and turn on the expansion board switch to drive normally.The burning program cannot use other programs to occupy the serial port or an external serial communication module (for example: WiFi camera module), otherwise the program cannot be burned or an error message will be prompted!