Jupyter Lab environment setup tutorial
Note: This development environment has been built in the factory image. You can skip this tutorial if you use the factory image.
Since Jetson Orin NX/Orin Nano uses Docker and the system environment is already available, this installation takes Jetson Nano as an example.
1. Jupyter Lab installation
First, install Jupyter Lab from Tsinghua source (the installation and download speed of this source in China is relatively fast at present, and other sources can also be used for installation). During the installation, some dependent packages need to be downloaded from the external network, and occasionally the connection will be disconnected, causing the installation to fail. You can execute the installation command again and continue the installation from the breakpoint.
xxxxxxxxxxsudo pip3 install jupyterlab -i https://pypi.tuna.tsinghua.edu.cn/simple
2. Add Jupyter Lab path
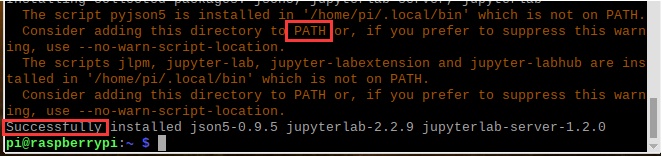
When successfully appears, it means that Jupyter Lab is installed, but it should be noted that the above alarm information does not find the path. If this problem is not solved, Jupyter Lab cannot be used.
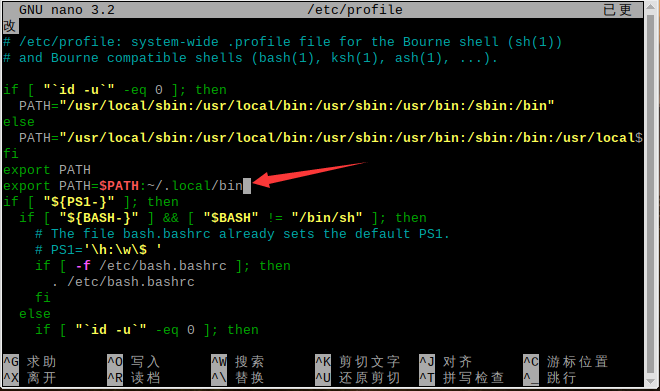
Modify the profile configuration file
xxxxxxxxxxsudo nano /etc/profile
Add configuration instructions, as shown in the figure
xxxxxxxxxxexport PATH=$PATH:~/.local/bin
After writing, press Ctrl+S to save, and then press Ctrl+X to exit.
Then execute
xxxxxxxxxxsource /etc/profile
Start jupyterlab. After starting, the browser will automatically pop up the jupyterlab interface.
xxxxxxxxxxjupyter lab
3. Set up LAN to access Jupyter Lab
If you want to run it on other devices in the same LAN, you need to follow the following process
- Generate a key
Open the terminal and enter the following content in sequence, and then enter the password twice according to the prompt. It is recommended to be consistent with the user password.
xxxxxxxxxxipythonfrom jupyter_server.auth import passwdpasswd()
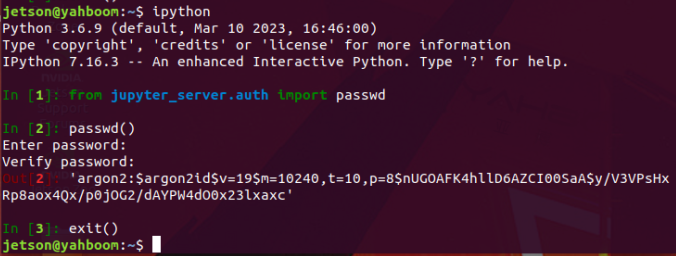
A string of keys will be generated after the password confirmation is completed. Copy this key and enter the following command to exit.
xxxxxxxxxxexit()
- Create a configuration file
After creation, the detailed location of the file will be output, please remember this location.
xxxxxxxxxxjupyter lab --generate-config
- Modify the configuration file
xxxxxxxxxxnano ~/.jupyter/jupyter_lab_config.py
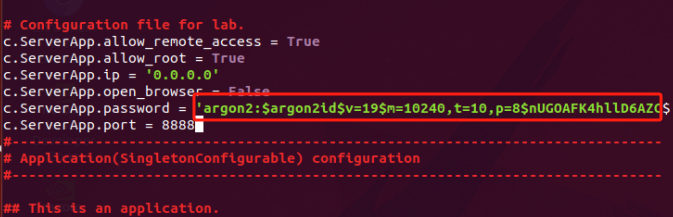
Add the following content, where the password item needs to be replaced with the key generated above.
xxxxxxxxxxc.ServerApp.allow_remote_access = Truec.ServerApp.allow_root = Truec.ServerApp.ip = '0.0.0.0'c.ServerApp.open_browser = Falsec.ServerApp.password = 'argon2:$argon2id$v=19$m=10240,t=10,p=8$nUGOAFK4hllD6AZCI00SaA$y/V3VPsHxRp8aox4Qx/p0jOG2/dAYPW4dO0x23lxaxc'c.ServerApp.port = 8888
After writing, press Ctrl+S to save, and then press Ctrl+X to exit.
Restart the system
xxxxxxxxxxsudo reboot
Step 5: Run the test
xxxxxxxxxxjupyter lab
You can access http://127.0.0.1:8888 in your local browser or http://
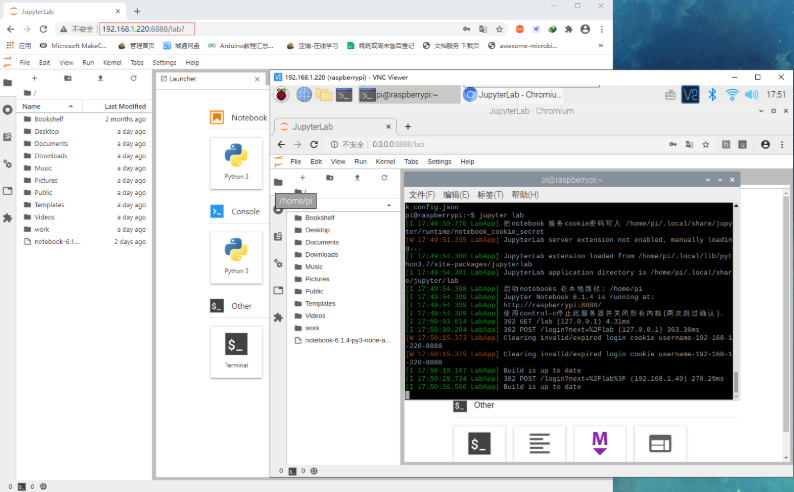
For example: If the robot's address is 192.168.1.220, then the machine in the LAN should access http://192.168.1.220:8888 as shown below:
4. Configure Jupyter Lab's startup program
After the installation is complete, under normal circumstances, each time you use JupyterLab, you need to enter the command jupyter lab to start. For convenience, we configure the startup program. The operation is as follows:
Step 1: Create a startup file
xxxxxxxxxxsudo vim /etc/systemd/system/yahboom_jupyterlab.service
Step 2: Copy the code to this file, save and exit
jetson nano system service file
xxxxxxxxxx[Unit]Description=Jupyter Lab Service[Service]Type=simpleUser=jetsonEnvironment="OPENBLAS_CORETYPE=ARMV8"ExecStart=/bin/sh -c "jupyter lab --ip=0.0.0.0 --no-browser"WorkingDirectory=/home/jetsonRestart=always[Install]WantedBy=multi-user.target
Raspberry Pi system service file
xxxxxxxxxx[Unit]Description=Jupyter Lab Service[Service]Type=simpleUser=piEnvironment="OPENBLAS_CORETYPE=ARMV8"ExecStart=/bin/sh -c "jupyter lab --ip=0.0.0.0 --no-browser"WorkingDirectory=/home/piRestart=always[Install]WantedBy=multi-user.target
After writing, press Ctrl+S to save, and then press Ctrl+X to exit.
Step 3: Enable the service to start automatically at boot
xxxxxxxxxxsudo systemctl daemon-reloadsudo systemctl enable yahboom_jupyterlab.servicesudo systemctl restart yahboom_jupyterlab.service
Step 4: Restart the system
xxxxxxxxxxsudo reboot
Try to access http://127.0.0.1:8888 locally
Or
Access http://《your-ip-address》:8888 on a machine in the LAN, such as: http://192.168.1.220:8888
If the access is normal, the Jupyter Lab environment is successfully built!