Target Detection
The main problem solved in this section is how to use the dnn module in OpenCV to import a trained target detection network. However, there are requirements for the version of opencv.
At present, there are three main methods for target detection using deep learning:
- Faster R-CNNs
- You Only Look Once (YOLO)
- Single Shot Detectors (SSDs)
Faster R-CNNs is the most commonly heard neural network based on deep learning. However, this method is technically difficult to understand (especially for deep learning novices), difficult to implement, and difficult to train.
In addition, even if the "Faster" method is used to implement R-CNNs (here R stands for Region Proposal), the algorithm is still relatively slow, about 7FPS.
If we pursue speed, we can turn to YOLO, because it is very fast, reaching 40-90 FPS on TianXGPU, and the fastest version may reach 155 FPS. But the problem with YOLO is that its accuracy needs to be improved.
SSDs were originally developed by Google and can be said to be a balance between the above two. Compared to Faster R-CNNs, its algorithm is more direct and compared to YOLO, it is more accurate.
1. Model structure
The main work of MobileNet is to replace the previous standard convolutions with depthwise sparable convolutions to solve the problems of computational efficiency and parameter quantity of convolutional networks. The MobileNets model is based on depthwise sparable convolutions, which can decompose standard convolutions into a depthwise convolution and a point convolution (1 × 1 convolution kernel). Deep convolution applies each convolution kernel to each channel, while 1 × 1 convolution is used to combine the outputs of channel convolutions.
Batch Normalization (BN) is added to the basic components of MobileNet, that is, at each SGD (stochastic gradient descent), the standardization process is performed so that the result (each dimension of the output signal) has a mean of 0 and a variance of 1. Generally, when the convergence speed of the neural network training is very slow, or the gradient explodes and other conditions that cannot be trained, BN can be tried to solve the problem. In addition, BN can also be added in general use to speed up the training speed and improve the model accuracy.
In addition, the model also uses the ReLU activation function, so the basic structure of depthwise separable convolution is shown in the following figure.

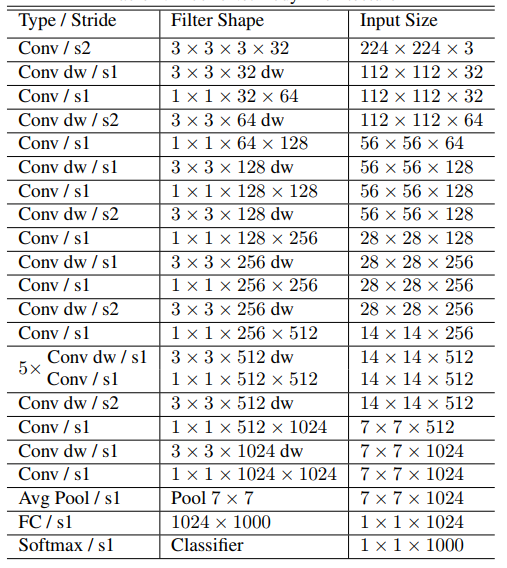
The MobileNets network is composed of many depthwise separable convolutions as shown in the figure above.
Its specific network structure is shown in the figure below.
2. About code
List of recognizable objects
[person, bicycle, car, motorcycle, airplane, bus, train, truck, boat, traffic light, fire hydrant, street sign, stop sign, parking meter, bench, bird, cat, dog, horse, sheep, cow, elephant, bear, zebra, giraffe, hat, backpack, umbrella, shoe, eye glasses, handbag, tie, suitcase, frisbee, skis, snowboard, sports ball, kite, baseball bat, baseball glove, skateboard, surfboard, tennis racket, bottle, plate, wine glass, cup, fork, knife, spoon, bowl, banana, apple, sandwich, orange, broccoli, carrot, hot dog, pizza, donut, cake, chair, couch, potted plant, bed, mirror, dining table, window, desk, toilet, door, tv, laptop, mouse, remote, keyboard, cell phone, microwave, oven, toaster, sink, refrigerator, blender, book, clock, vase, scissors, teddy bear, hair drier, toothbrush]Load the category【object_detection_coco.txt】, import the model 【frozen_inference_graph.pb】, and specify the deep learning framework 【TensorFlow】.
xxxxxxxxxx# Load COCO class namewith open('object_detection_coco.txt', 'r') as f: class_names = f.read().split('\n')# Display different colors for different targetsCOLORS = np.random.uniform(0, 255, size=(len(class_names), 3))# Loading DNN image modelmodel = cv.dnn.readNet(model='frozen_inference_graph.pb', config='ssd_mobilenet_v2_coco.txt', framework='TensorFlow')Import the image, extract the height and width, calculate the 300x300 pixel blob, and pass this blob into the neural network.
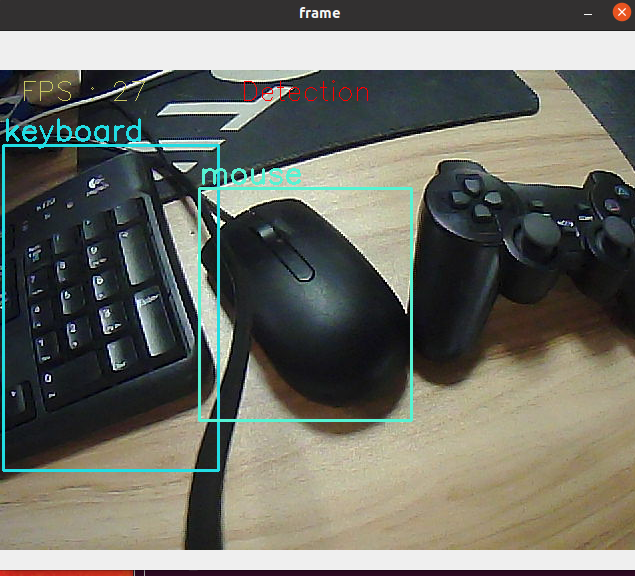
xxxxxxxxxxdef Target_Detection(image): image_height, image_width, _ = image.shape # Creating a blob from an image blob = cv.dnn.blobFromImage(image=image, size=(300, 300), mean=(104, 117, 123), swapRB=True) model.setInput(blob) output = model.forward() # Iterate through each detection for detection in output[0, 0, :, :]: # Extracting the confidence of detection confidence = detection[2] # Draw bounding boxes only when the detection confidence is above a certain threshold, otherwise skip if confidence > .4: # Get the class ID class_id = detection[1] # Map the class ID to the class class_name = class_names[int(class_id) - 1] color = COLORS[int(class_id)] # Get bounding box coordinates box_x = detection[3] * image_width box_y = detection[4] * image_height # Get the width and height of the bounding box box_width = detection[5] * image_width box_height = detection[6] * image_height # Draw a rectangle around each detected object cv.rectangle(image, (int(box_x), int(box_y)), (int(box_width), int(box_height)), color, thickness=2) # Draw a rectangle around each detected object cv.putText(image, class_name, (int(box_x), int(box_y - 5)), cv.FONT_HERSHEY_SIMPLEX, 1, color, 2) return image3. Start
xxxxxxxxxxcd ~/jetcobot_ws/src/jetcobot_visual/detectionpython3 target_detection.py
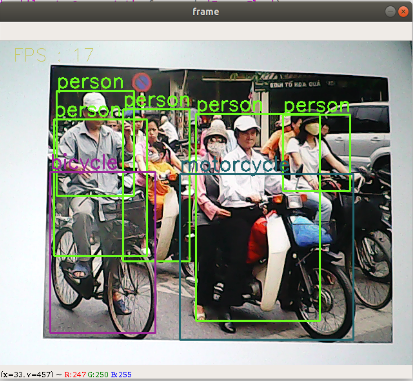
Camera display.