Block color calibration
By adjusting the high and low thresholds of HSV, interfering colors are filtered out, so that the blocks can be identified even in complex environments.
Before using color functions for the first time, it is recommended that customers calibrate.
Code path:
~/jetcobot_ws/src/jetcobot_color_identify/scripts/HSV_calibration.ipynb
1. Introduction to HSV
HSV (Hue, Saturation, Value) is a color space created by A. R. Smith in 1978 based on the intuitive characteristics of color, also known as the Hexcone Model.
The color parameters in this model are: hue (H), saturation (S), and value (V).
H: 0 — 180
S: 0 — 255
V: 0 — 255
- HSV parameter table:
| Black | Gray | White | Red | Orange | Yellow | Green | Cyanogen | Blue | Purple | ||
|---|---|---|---|---|---|---|---|---|---|---|---|
| H_min | 0 | 0 | 0 | 0 | 156 | 11 | 26 | 35 | 78 | 100 | 125 |
| H_max | 180 | 180 | 180 | 10 | 180 | 25 | 34 | 77 | 99 | 124 | 155 |
| S_min | 0 | 0 | 0 | 43 | 43 | 43 | 43 | 43 | 43 | 43 | |
| S_max | 255 | 43 | 30 | 255 | 255 | 255 | 255 | 255 | 255 | 255 | |
| V_min | 0 | 0 | 0 | 46 | 46 | 46 | 46 | 46 | 46 | 46 | |
| V_max | 46 | 220 | 255 | 255 | 255 | 255 | 255 | 255 | 255 | 255 |
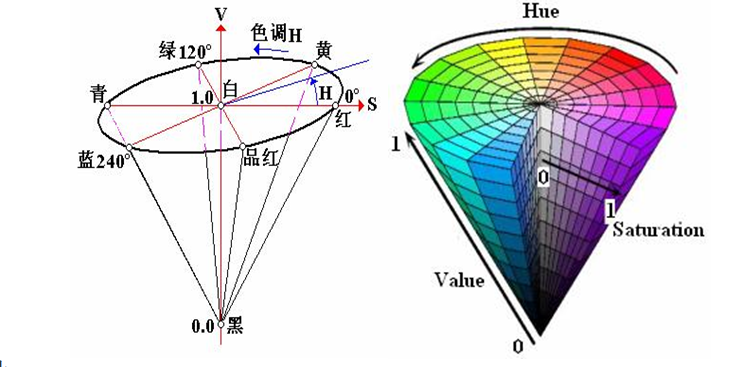
- HSV hexagonal pyramid
(1) Hue H.
Represents color information, that is, the position of the spectral color. This parameter is expressed as an angle, ranging from 0° to 360°. Starting from red and counting counterclockwise, red is 0°, green is 120°, and blue is 240°. Their complementary colors are: yellow is 60°, cyan is 180°, and purple is 300°.
(2) Saturation S.
Saturation S: It is expressed as the ratio between the purity of the selected color and the maximum purity of the color. When S=0, there is only grayscale. The complementary colors are 120 degrees apart. The complementary colors differ by 180 degrees. A color can be regarded as the result of mixing a certain spectral color with white. The larger the proportion of the spectral color, the closer the color is to the spectral color, and the higher the saturation of the color. The higher the saturation, the deeper and brighter the color. The white light component of the spectral color is 0, and the saturation reaches the highest. The value range is usually 0% to 100%. The larger the value, the more saturated the color.
(3) Brightness V.
Brightness indicates the brightness of the color. For light source color, the brightness value is related to the brightness of the light source; for object color, this value is related to the transmittance or reflectance of the object. The value range is usually 0% (black) to 100% (white). One thing to note is that there is no direct connection between it and light intensity. The three-dimensional representation of the HSV model evolved from the RGB cube. Imagine observing from the white vertex along the diagonal of the RGB cube to the black vertex, and you can see the hexagonal shape of the cube. The hexagonal boundary represents the color, the horizontal axis represents the purity, and the brightness is measured along the vertical axis.
2. About code
- Import header file
xxxxxxxxxximport threadingimport cv2 as cvfrom time import sleepfrom jetcobot_config import *import ipywidgets as widgetsfrom IPython.display import display- Create an instance and initialize parameters
x
# Create and update HSV instancesupdate_hsv = update_hsv()# Initialize num parameternum=0# Initialization Modemodel = "General"# Initialize HSV nameHSV_name=None# Initialize HSV valuescolor_hsv = {"red" : ((0, 143, 163), (11, 255, 255)),
"green" : ((55, 80, 66), (78, 255, 255)),
"blue" : ((110, 100, 121), (117, 255, 255)),
"yellow": ((26, 100, 91), (32, 255, 255))}
# HSV parameter path (Jupyter lab and ros packages need to use absolute paths)HSV_path="/home/jetson/jetcobot_ws/src/jetcobot_color_identify/scripts/HSV_config.txt"# Read HSV configuration file and update HSV valuetry: read_HSV(HSV_path,color_hsv)except Exception: print("No HSV_config file!!!")- Creating Controls
x
button_layout = widgets.Layout(width='320px', height='55px', align_self='center')output = widgets.Output()# Enter color update modeHSV_update_red= widgets.Button(description='HSV_update_red', button_style='success',layout=button_layout)...# Adjust the slider
H_min_slider=widgets.IntSlider(description='H_min :',value=0,min=0,max=255,step=1, orientation='horizontal')...# Exitexit_button=widgets.Button(description='Exit',button_style='danger',layout=button_layout)- Color update callback
xxxxxxxxxxdef   update_red_Callback(value):    pass
def   update_green_Callback(value):    pass
def   update_blue_Callback(value):    pass
def   update_yellow_Callback(value):    pass
HSV_update_red.on_click(update_red_Callback)HSV_update_green.on_click(update_green_Callback)HSV_update_blue.on_click(update_blue_Callback)HSV_update_yellow.on_click(update_yellow_Callback)- Mode switch control
xxxxxxxxxxdef   write_file_Callback(value):    pass
def   Color_Binary_Callback(value):    pass
def   exit_button_Callback(value):    pass
HSV_write_file.on_click(write_file_Callback)Color_Binary.on_click(Color_Binary_Callback)exit_button.on_click(exit_button_Callback)xCode path: jetcobot_ws/src/jetcobot_color_identify/scripts/HSV_calibration.ipynb
- Interface example
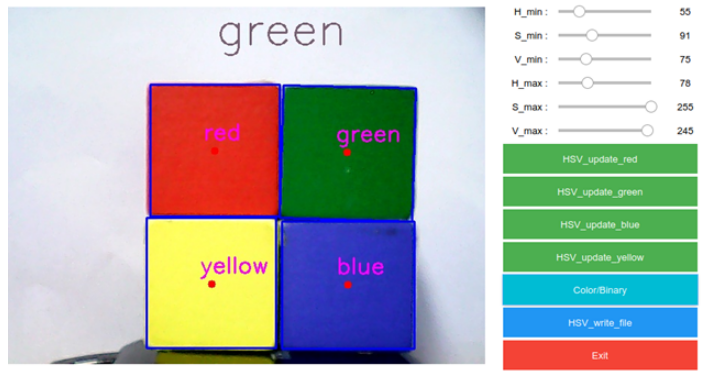
The upper middle part of the screen shows which color is selected, and the six sliders on the upper right side correspond to the six HSV values.
Moving the slider can adjust the HSV threshold of each color in real time.
3. Operation process
(1) After running all the codes, the following interface is displayed at the bottom of the code. By default, the color selection is empty, which means that no color is recognized.
(2) Click the [HSV_update_green] button to start recognizing green objects. (Note: This color recognition detects the contour, which means that the object must be completely within the camera range to be recognized normally)
Slide the slider on the upper right to adjust the green HSV threshold.
We can adjust it multiple times under different field of view environments until we can clearly recognize objects of this color in complex environments without being disturbed by other objects.
(3) The [Color/Binary] button can switch between color images and binary images. It will only take effect after the color is selected. After switching, only the selected color binary image will be displayed, which is convenient for us to debug.
(4) [HSV_write_file] button. After debugging the HSV values of all colors, click this button. Save all the debugged parameters in the [.txt] format in the same path as the code. The system will automatically read the parameters of the file when it is started next time.
(5) [Exit] button to turn off the camera and exit the program.