Color block tracking
This tutorial is an advanced gameplay for color block positioning experiments, with the addition of a robotic arm following function.
Overview: Target tracking includes two gameplay modes: color tracking and color picking tracking (learning tracking). The principle is to process the image through a camera, recognize the target in a specific way, obtain the coordinate position of the target under the camera, calculate the deviation value between the center point of the target and the center point of the image, and drive the robotic arm to move through PID algorithm debugging. Make the target center point coincide with the image center point.
Code path:~/jetcobot_ws/src/jetcobot_color_follow/color_tracking.ipynb
1. Control Design
- Import header file
import cv2 as cvimport threadingimport randomfrom time import sleepimport ipywidgets as widgetsfrom IPython.display import displayfrom color_follow import color_followfrom jetcobot_utils.jetcobot_info import *- Create an instance and initialize parameters
xfollow = color_follow()model = 'General'HSV_learning = ()color_hsv = {"red": ((0, 25, 90), (10, 255, 255)), "green": ((53, 36, 40), (80, 255, 255)), "blue": ((110, 80, 90), (120, 255, 255)), "yellow": ((25, 20, 55), (50, 255, 255))}color = [[random.randint(0, 255) for _ in range(3)] for _ in range(255)]if is_Jetson_Nano(): HSV_path="/home/jetson/jetcobot_ws/src/jetcobot_color_identify/scripts/HSV_config.txt"else: HSV_path="/root/jetcobot_ws/src/jetcobot_color_identify/scripts/HSV_config.txt"
try: read_HSV(HSV_path,color_hsv)except Exception as e: print(e) print("Read HSV_config Error !!!")- Create control
xxxxxxxxxxbutton_layout = widgets.Layout(width='200px', height='100px', align_self='center')# 输出控件 Output widgetoutput = widgets.Output()# 颜色追踪 Color trackingcolor_follow = widgets.Button(description='color_follow', button_style='success', layout=button_layout)# 选择颜色 Select colorchoose_color = widgets.ToggleButtons(options=['red', 'green', 'blue', 'yellow'], button_style='success', tooltips=['Description of slow', 'Description of regular', 'Description of fast'])# 取消追踪 Cancel trackingfollow_cancel = widgets.Button(description='follow_cancel', button_style='danger', layout=button_layout)# 学习颜色 Learn colorlearning_color = widgets.Button(description='learning_color', button_style='primary', layout=button_layout)# 学习颜色追踪 Learn color trackinglearning_follow = widgets.Button(description='learning_follow', button_style='success', layout=button_layout)# 退出 exitexit_button = widgets.Button(description='Exit', button_style='danger', layout=button_layout)# 图像控件 Image widgetimgbox = widgets.Image(format='jpg', height=480, width=640, layout=widgets.Layout(align_self='auto'))# 垂直布局 Vertical layoutimg_box = widgets.VBox([imgbox, choose_color], layout=widgets.Layout(align_self='auto'))# 垂直布局 Vertical layoutSlider_box = widgets.VBox([color_follow, learning_color, learning_follow,follow_cancel,exit_button], layout=widgets.Layout(align_self='auto'))# 水平布局 Horizontal layoutcontrols_box = widgets.HBox([img_box, Slider_box], layout=widgets.Layout(align_self='auto'))# ['auto', 'flex-start', 'flex-end', 'center', 'baseline', 'stretch', 'inherit', 'initial', 'unset']- Mode switching
xxxxxxxxxxdef color_follow_Callback(value): global model model = 'color_follow'def learning_color_Callback(value): global model model = 'learning_color'def learning_follow_Callback(value): global model model = 'learning_follow'def follow_cancel_Callback(value): global model model = 'General'def exit_button_Callback(value): global model model = 'Exit'color_follow.on_click(color_follow_Callback)learning_color.on_click(learning_color_Callback)learning_follow.on_click(learning_follow_Callback)follow_cancel.on_click(follow_cancel_Callback)exit_button.on_click(exit_button_Callback)- Main function
xxxxxxxxxxdef camera(): global HSV_learning,model # 打开摄像头 Open camera capture = cv.VideoCapture(0) capture.set(3, 640) capture.set(4, 480) capture.set(5, 30) # Be executed in loop when the camera is opened normally # 当摄像头正常打开的情况下循环执行 while capture.isOpened(): try: _, img = capture.read() img = cv.resize(img, (640, 480))# cv.line(img, (320, 0), (320, 480), color=(0, 255, 0), thickness=1)# cv.line(img, (0, 240), (640, 240), color=(0, 255, 0), thickness=1) print("model = ",model) if model == 'color_follow': img= follow.follow_function(img, color_hsv[choose_color.value]) cv.putText(img, choose_color.value, (int(img.shape[0] / 2), 50), cv.FONT_HERSHEY_SIMPLEX, 2, color[random.randint(0, 254)], 2) if model == 'learning_color': img,HSV_learning = follow.get_hsv(img) if model == 'learning_follow' : if len(HSV_learning)!=0: img = follow.learning_follow(img, HSV_learning) cv.putText(img,'LeColor', (240, 50), cv.FONT_HERSHEY_SIMPLEX, 1, color[random.randint(0, 254)], 1) if model == 'Exit': cv.destroyAllWindows() capture.release() break imgbox.value = cv.imencode('.jpg', img)[1].tobytes() # except KeyboardInterrupt: except Exception as e: print(e) capture.release()- Start
xxxxxxxxxxdisplay(controls_box,output)threading.Thread(target=camera, ).start()
2. Run program
Click the program run button on the jupyterlab toolbar, run the entire program, and then drag it to the bottom.

- Color tracking
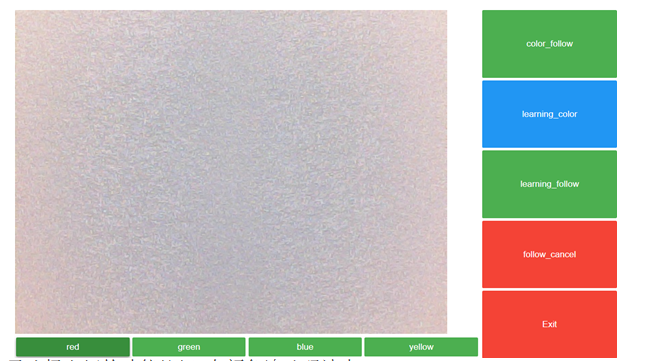
By default, no color blocks are tracked, and we need to select the corresponding function button.
Start the code block and click the 【 colorfollow 】 button to enable color tracking. You can switch colors below the image by placing the color block in front of the camera. Once the camera recognizes it, the robotic arm will move along with the block and face the center of the block.
Click the 【follow_cancel】 button to cancel tracking.
Click the 【Exit】 button to exit the program
- Custom color tracking
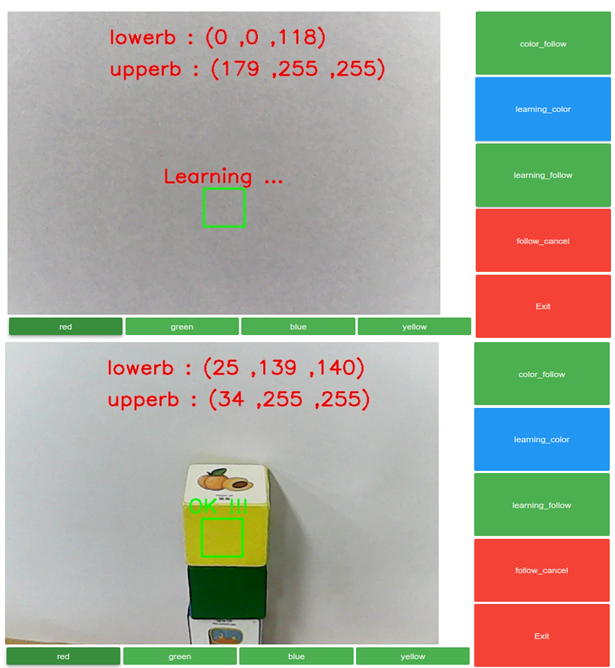
Start the code block, click the 【 leraning_color 】 button, and a box will appear in the center of the screen, as shown in the left figure
Place objects inside the box and print the high and low thresholds of HSV in real-time. When the word 【OK!!!】appears below the box, it indicates successful recognition
Click the 【leraning_follow】 button, and as long as the contour of the learned color can be detected, it can be tracked in real time
Click the 【follow_cancel】 button to cancel tracking.
Click the 【Exit】 button to exit the program.