7、Install ROS1/ROS2 in docker container
7、Install ROS1/ROS2 in docker container7.1 Install the corresponding images mirror (ROS environment)7.1.1 Method 1. Download from docke hub warehouse (requires internet connection)ROS1-(melodic)ROS2-(foxy)7.1.2 Method 2: Load from local file (offline)7.2 Usage tips7.3 Using accessories in docker container ROS1/ROS27.3.1 Install device udev rules rule file7.3.2 Write startup script7.3.3 Run the script to enter the container7.3.4 Incoming accessory function package
Raspberry Pi Pi 5 raspios-bookwormDOCKER HUB repository: https://hub.docker.com/7.1 Install the corresponding images mirror (ROS environment)
(Use our latest image to skip the 7.1 installation image part!!!)
xxxxxxxxxxdocker pull [latest image version number]#(All version numbers of the tutorial are subject to the latest)
7.1.1 Method 1. Download from docke hub warehouse (requires internet connection)
ROS1-(melodic)
Use the command on the host:
xxxxxxxxxxdocker pull yahboomtechnology/ros-melodic:1.2 # The latest image version number here is based on the actual modifications seen 
ROS2-(foxy)
Use the command on the host:
xxxxxxxxxxdocker pull yahboomtechnology/ros2-foxy:2.0.1 # The latest image version number here is based on the actual modifications seen 
After the installation is complete, enter the docker images command to see the image list.
xxxxxxxxxxpi@raspberrypi:~ $ docker imagesREPOSITORY TAG IMAGE ID CREATED SIZEyahboomtechnology/ros2-foxy 2.0.1 4b8a5eee5110 7 days ago 5.61GByahboomtechnology/ros-melodic 1.2 1f3f7da97f2b 7 days ago 3.05GBhello-world latest b038788ddb22 7 months ago 9.14kB7.1.2 Method 2: Load from local file (offline)
Obtain the .tar compressed package from the network disk data and select the ROS environment you need.
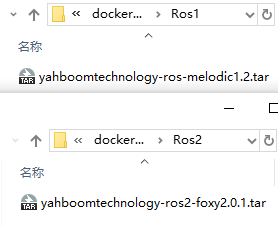
Use the command in the directory where the [xxx.tar] file of the host machine is located:
xxxxxxxxxxdocker load -i xxx.tar
This operation takes some time, but rarely fails.

After docker load execution is completed, execute:
xxxxxxxxxxdocker images
You can view the updated image and experience the new features

If you see the REPOSITORY TAG displayed as <_none>
In order to facilitate the use of subsequent scripts, we need to update the label of the image we pulled.
Command prototype: docker tag <IMAGE_ID> <REPOSITORY_NAME>:<TAG_NAME>
xxxxxxxxxxdocker tag 4b8a yahboomtechnology/ros2-foxy:2.0.1docker tag 1f3f yahboomtechnology/ros-melodic:1.2 
7.2 Usage tips
At this point, the ros environment in docker has been set up. Follow the instructions for the corresponding accessories to enter the docker container and use it.
xxxxxxxxxxNote: The environments inside the docker container and outside the container (host) are completely independent. If there is a lack of dependent environments, you need to install the relevant dependencies.
7.3 Using accessories in docker container ROS1/ROS2
7.3.1 Install device udev rules rule file
xxxxxxxxxxNote: This step needs to be used according to the tutorial (environment setup or preparation before use) of the corresponding accessory.Whether you are using ROS1 or ROS2 environment, you only need to bind it onceThe rule file .rules is in the /etc/udev/rules.d/ directory->Here we take Astra camera binding as an example
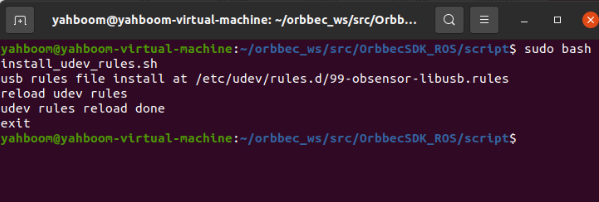
Terminal input,
xxxxxxxxxxcd ~/orbbec_ws/src/orbbec-ros-sdk/scriptsudo chmod 777 install.shsudo bash install.shinstall.sh is mainly a script that executes binding rule files
Mainly done (move xxx.rules to the /etc/udev/rules.d/ directory) operation
The script or startup folder under each function package generally has a .sh script. Each function package is not necessarily named install.sh. Before using it, cd to the directory and ls to see the full name of the script, and then execute it. bash command. If there is no script, you can manually cp the .rules file to the directory and the effect will be the same.
After the installation is complete, it is best to restart.
Enter the following command to verify,
xxxxxxxxxx#astraproplusls -l /dev/astro_pro_plus#gemini2ls -l /dev/OrbbecGemini2The following content appears, indicating that the binding is successful
astraproplusshow

gemini2display

7.3.2 Write startup script
xxxxxxxxxxPlaces to add modifications: (After the Raspberry Pi is connected to accessories, all newly added device numbers need to be mapped to the container)--device=/dev/xxx #Needs to be replaced with the bound device name--device=/dev/videox #The video device number that needs to be replaced with the accessory-v /dev/bus/usb/00x/0xx:/dev/bus/usb/00x/0xx #Needs to be replaced with the actual queried USB device number->Add it to the script after modificationROS1 example: docker_ros1.sh
xxxxxxxxxxxhost+docker run -it \--net=host \--env="DISPLAY" \--env="QT_X11_NO_MITSHM=1" \-v /tmp/.X11-unix:/tmp/.X11-unix \--security-opt apparmor:unconfined \-v /home/pi/temp:/root/temp \--device=/dev/xxx \yahboomtechnology/ros-melodic:1.2 /bin/bashROS2 example: docker_ros2.sh
xxxxxxxxxxxhost+docker run -it \--net=host \--env="DISPLAY" \--env="QT_X11_NO_MITSHM=1" \-v /tmp/.X11-unix:/tmp/.X11-unix \--security-opt apparmor:unconfined \-v /home/pi/temp:/root/temp \--device=/dev/xxx \yahboomtechnology/ros2-foxy:2.0.1 /bin/bashAnnotated script (not run directly)
xxxxxxxxxxxhost + # xhost is used to support GUI display in dockerdocker run -it \ # Interactively run the docker image--net=host \ # Container network is set to host mode--env="DISPLAY" \ # Turn on the display GUI interface--env="QT_X11_NO_MITSHM=1" \ # Use X11 port 1 for display-v /tmp/.X11-unix:/tmp/.X11-unix \ # Mapping display service node directory--security-opt apparmor:unconfined \-v /home/pi/temp:/root/temp \ # As a directory for the host and container to temporarily transfer files. Later, the corresponding function package of the accessories needs to be imported for use. The directory name can be modified by yourself.-v /dev/bus/usb/00x/0xx:/dev/bus/usb/00x/0xx \ # Add host device to the container, here is the xxx device port--device=/dev/videox \ # Add host device to the container, here is x--device=/dev/xxx \ # Add the host device to the container, here is xxx. If you don’t add it, the corresponding peripherals will not be recognized after entering the container.-p 9090:9090 \ # Open port-p 8888:8888 \yahboomtechnology/ros2-foxy:2.0.1 /bin/bash # Mirror version number7.3.3 Run the script to enter the container
Note: It must be executed on the VNC of the host machine or on the screen. It cannot be executed on the terminal that remotely accesses the Raspberry Pi through SSH. Otherwise, the GUI image may not be displayed in the container.
(If entering via ssh, this is an error message)

xxxxxxxxxx./run_docker.sh 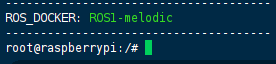
After entering the container, you can execute the rviz/rviz2 command to test whether the GUI is displayed normally.
xxxxxxxxxxTest whether the device is mapped into the container: ls -l /dev
7.3.4 Incoming accessory function package
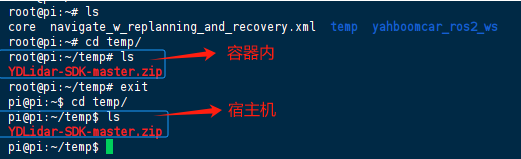
Pass the corresponding function package of the accessory into the temporary transfer file directory in the container (the shared directory set in the startup script).
For example: Use WINSCP software to transfer the function package to the host, and then copy it to the shared directory, that is, /home/pi/temp. The files in the /root/temp directory in the container are synchronized.
Next, just follow the tutorial corresponding to the accessory in the container to use it.