Deep pseudo-color image
Before starting this function, you need to close the process of the big program and APP. Enter the following program in the terminal to close the process of the big program and APP.
xxxxxxxxxxsh ~/app_Arm/kill_YahboomArm.shsh ~/app_Arm/stop_app.shIf you need to start the big program and APP again later, start the terminal.
xxxxxxxxxxsudo systemctl start yahboom_arm.servicesudo systemctl start yahboom_app.service
1. Function description
After the program is started, the subscribed black and white depth image will be converted into a pseudo-color image. According to the information of the depth, the image will show different degrees of color.
2. Start and operate
Terminal input,
xxxxxxxxxx#启动相机 Start the cameraroslaunch orbbec_camera dabai_dcw2.launch#启动深度图转伪彩色图程序 Start the depth map to pseudo-color image programrosrun dofbot_pro_RGBDCam Depth2Color.pySuccessful startup is shown in the figure below, and a window will be generated to display the pseudo-color image,
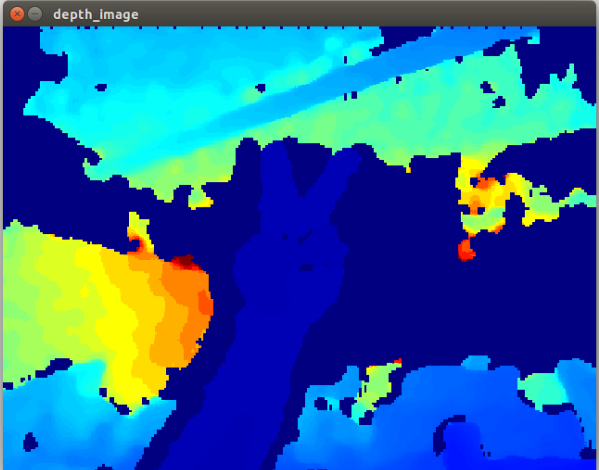
From the actual distance, it can be seen that the difference in depth information is very intuitively reflected by color.
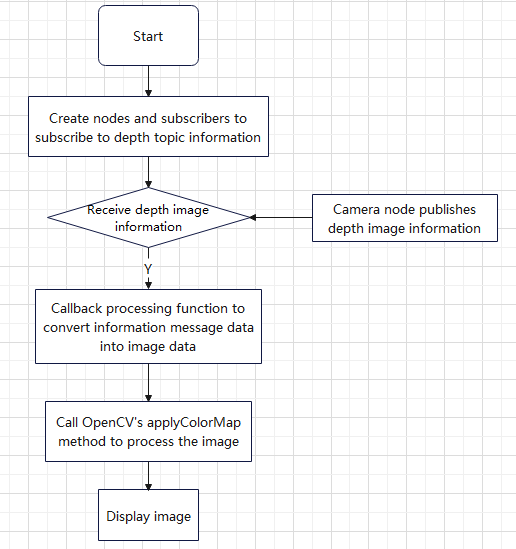
3. Program flow chart
4. Core code analysis
The code path is as follows, /home/jetson/dofbot_pro_ws/src/dofbot_pro_RGBDCam/scripts/Depth2Color.py
Code analysis,
Import necessary libraries
xxxxxxxxxx#rospy库 rospy libraryimport rospy#opencv图像处理库 opencv image processing libraryimport cv2 as cv#cv_bridge库,用于消息数据转换成图像数据之间的转换#cv_bridge library, used for conversion between message data and image datafrom cv_bridge import CvBridge#导入图像数据的消息类型 Import image data message typefrom sensor_msgs.msg import ImageDefine image encoding format
xxxxxxxxxxencoding = ['16UC1', '32FC1']
Create subscriber and CvBridge object
xxxxxxxxxx#定义一个订阅者,订阅/camera/depth/image_raw话题消息数据,回调函数是topic#Define a subscriber, subscribe to /camera/depth/image_raw topic message data, the callback function is topicself.sub = rospy.Subscriber("/camera/depth/image_raw", Image, self.topic)self.depth_bridge = CvBridge()Callback function, specifically processes the received image message data and converts the image and displays it
xxxxxxxxxxdef topic(self,msg): #使用创建的depth_bridge的imgmsg_to_cv2方法,把接收的消息msg数据转换成图像imgae数据,输入的参数是接收到的msg数据和图像的编码格式,这里取值是'32FC1' #Use the imgmsg_to_cv2 method of the created depth_bridge to convert the received message msg data into image imgae data. The input parameters are the received msg data and the encoding format of the image. Here the value is '32FC1' depth_image_orin = self.depth_bridge.imgmsg_to_cv2(msg, encoding[1]) #调用opencv中的applyColorMap方法,把上一步得到的深度图像转换成伪彩色图像,传入的参数是按照比例缩放后的深度图像和颜色映射类型 #Call the applyColorMap method in opencv to convert the depth image obtained in the previous step into a pseudo-color image. The parameters passed in are the scaled depth image and color mapping type. depth_to_color_image = cv.applyColorMap(cv.convertScaleAbs(depth_image_orin, alpha=0.03), cv.COLORMAP_JET) #显示图像 Displaying images cv.imshow(self.window_name, depth_to_color_image) cv.waitKey(1)cv2.convertScaleAbs: used to process images to enhance contrast or adjust brightness, the parameters passed in are:
- frame: input image, usually a
numpyarray. - alpha: scaling factor, defaults to 1. It affects the scaling of pixel values.
cv2.applyColorMap: a function used to apply pseudo-color mapping to grayscale images, which can enhance the visualization of images. The parameters passed in are:
frame: input grayscale image, usually a single-channel
numpyarray.colormap: color mapping type, the type here has different effects from the following choices,
- COLORMAP_AUTUMN: gradient from black to red.
- COLORMAP_BONE: gradient from gray to blue.
- COLORMAP_JET: gradient from blue to red, commonly used in heat maps.
- COLORMAP_WINTER: gradient from blue to green.
- COLORMAP_RAINBOW: Rainbow gradient.
- COLORMAP_OCEAN: Gradient from dark blue to light blue.
- COLORMAP_SUMMER: Gradient from green to yellow.
- COLORMAP_SPRING: Gradient from pink to yellow.
- COLORMAP_COOL: Gradient from cyan to pink.
- COLORMAP_HSV: Gradient based on HSV color space.
- COLORMAP_PINK: Gradient from black to pink.
- COLORMAP_HOT: Gradient from black to red to yellow.
You can change the default COLORMAP_JET in the program to the above parameters and test to see the different effects.