Serial port output
1. Learning objectives
Detect through the linear CCD module and print to the computer's serial port assistant through the serial port.
2. Hardware connection
Linear CCD module, USB to TTL and MSPM0G3507 wiring
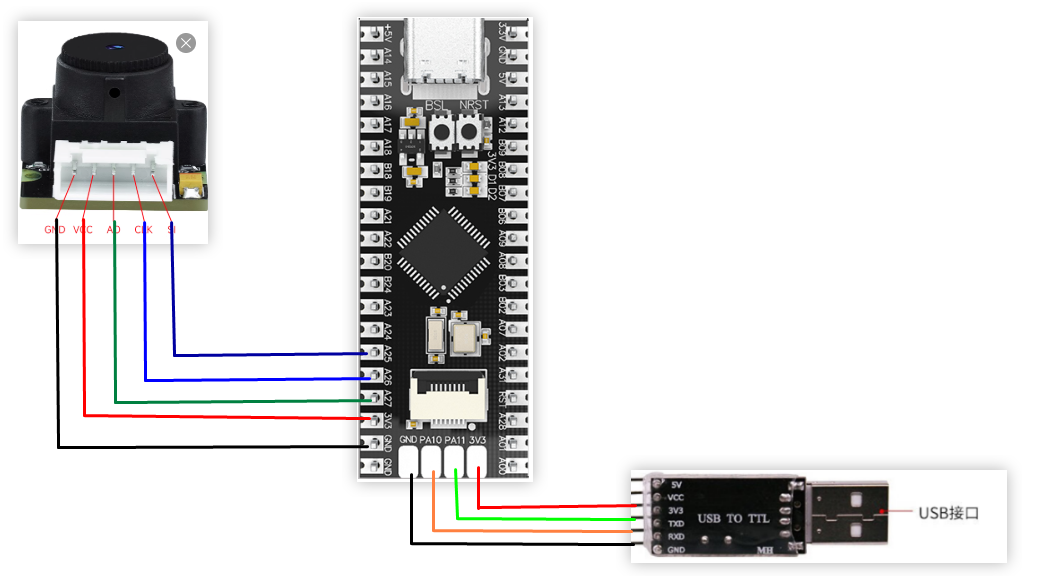
Note: If there is no TTL module, you can also use the type-c serial port directly
3. Program description
- usart.h
x#ifndef __USART_H__#define __USART_H__#include "ALLHeader.h"void USART_Init(void);void USART_SendData(unsigned char data);#endif
Define the header file for serial port transmission of one byte
- usart.c
xxxxxxxxxxvoid USART_Init(void){// SYSCFG初始化// SYSCFG initializationSYSCFG_DL_init();//清除串口中断标志//Clear the serial port interrupt flagNVIC_ClearPendingIRQ(UART_0_INST_INT_IRQN);//使能串口中断//Enable serial port interruptNVIC_EnableIRQ(UART_0_INST_INT_IRQN);}//串口发送一个字节//The serial port sends a bytevoid USART_SendData(unsigned char data){//当串口0忙的时候等待//Wait when serial port 0 is busywhile( DL_UART_isBusy(UART_0_INST) == true );//发送//sendDL_UART_Main_transmitData(UART_0_INST, data);}//串口的中断服务函数//Serial port interrupt service functionvoid UART_0_INST_IRQHandler(void){uint8_t receivedData = 0;//如果产生了串口中断//If a serial port interrupt occursswitch( DL_UART_getPendingInterrupt(UART_0_INST) ){case DL_UART_IIDX_RX://如果是接收中断 If it is a receive interrupt// 接收发送过来的数据保存 Receive and save the data sentreceivedData = DL_UART_Main_receiveData(UART_0_INST);// 检查缓冲区是否已满 Check if the buffer is fullif (recv0_length < RE_0_BUFF_LEN_MAX - 1){recv0_buff[recv0_length++] = receivedData;}else{recv0_length = 0;}// 标记接收标志 Mark receiving flagrecv0_flag = 1;break;default://其他的串口中断 Other serial port interruptsbreak;}}
Define the serial port initialization function, the function to send one byte of data, and the serial port interrupt service function.
- delay.h
xxxxxxxxxx#ifndef _DELAY_H#define _DELAY_H#include <stdint.h>#include "ti_msp_dl_config.h"void delay_us(unsigned long __us);void delay_ms(unsigned long ms);#endif
Header file declaring millisecond and microsecond functions
- delay.c
xxxxxxxxxx#include "delay.h"volatile unsigned int delay_times = 0;//搭配滴答定时器实现的精确us延时//Accurate us delay with tick timervoid delay_us(unsigned long __us){uint32_t ticks;uint32_t told, tnow, tcnt = 38;// 计算需要的时钟数 = 延迟微秒数 * 每微秒的时钟数// Calculate the number of clocks required = delay microseconds * number of clocks per microsecondticks = __us * (32000000 / 1000000);// 获取当前的SysTick值// Get the current SysTick valuetold = SysTick->VAL;while (1){// 重复刷新获取当前的SysTick值// Repeatedly refresh to get the current SysTick valuetnow = SysTick->VAL;if (tnow != told){if (tnow < told)tcnt += told - tnow;elsetcnt += SysTick->LOAD - tnow + told;told = tnow;// 如果达到了需要的时钟数,就退出循环// If the required number of clocks is reached, exit the loopif (tcnt >= ticks)break;}}}//搭配滴答定时器实现的精确ms延时//Accurate ms delay with tick timervoid delay_ms(unsigned long ms){delay_us( ms * 1000 );}
Millisecond and microsecond delays are achieved through tick timer counting
- ccd.h
xxxxxxxxxx//SI //CLKunsigned int adc_getValue(void);void RD_TSL(void); void slove_data(void);void sendToPc(void);void deal_data_ccd(void);Declare the linear CCD data acquisition function, ADC related functions and serial port printing function
- ccd.c
xxxxxxxxxx/**************************************************************************函数功能:CCD数据采集 Function: CCD data acquisition入口参数:无 Input parameters: None返回 值:无 Return value: None**************************************************************************/void RD_TSL(void){uint8_t i=0,tslp=0;TSL_CLK(1);TSL_SI(0);delay_us(10);TSL_SI(1);TSL_CLK(0);delay_us(10);TSL_CLK(1);TSL_SI(0);delay_us(10);for(i=0;i<128;i++)//读取128个像素点电压值 Read 128 pixel voltage values{TSL_CLK(0);delay_us(10); //调节曝光时间 Adjusting the exposure timeADV[tslp]=(adc_getValue())>>4;++tslp;TSL_CLK(1);delay_us(10);}}//读取ADC的数据 Read ADC dataunsigned int adc_getValue(void){unsigned int gAdcResult = 0;//软件触发ADC开始转换 Software triggers ADC to start conversionDL_ADC12_startConversion(AO_INST);//如果当前状态为正在转换中则等待转换结束 If the current state is in transition, wait for the transition to end.while (false == gCheckADC) {__WFE();}//获取数据 Get datagAdcResult = DL_ADC12_getMemResult(AO_INST, AO_ADCMEM_CH0);//清除标志位 Clear flaggCheckADC = false;return gAdcResult;}//将待发送的信息通过串口发送至上位机Send the information to be sent to the host computer through the serial portvoid sendToPc(void){int i;slove_data();for(i=0;i<128;i++){printf("%d",ADV[i]);printf(" ");}printf("\r\n");printf("*--------------------------------------------------------------------------*");printf("\r\n");}void slove_data(void){RD_TSL();}
The ADC conversion is triggered by software, and data is collected after the conversion is successful. Finally, the collected data is printed out through the serial port.
- empty.c
xxxxxxxxxxint main(void){USART_Init(); //Initialization function 初始化函数NVIC_EnableIRQ(AO_INST_INT_IRQN);//使能ADC中断 Enable ADC interruptwhile(1){sendToPc(); //发送信息至上位机 Send information to the host computerdelay_ms(10);}}
Initialize the serial port, enable ADC interrupt, start ADC conversion and obtain data in the sendToPc function. Finally, print the data of the CCD module on the serial port every 10 milliseconds.
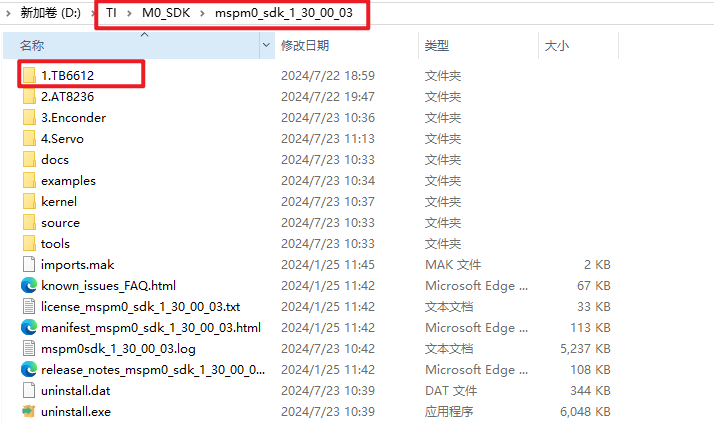
Note: The project source code must be placed in the SDK path for compilation.
** For example, the path: D:\TI\M0_SDK\mspm0_sdk_1_30_00_03\1.TB6612**
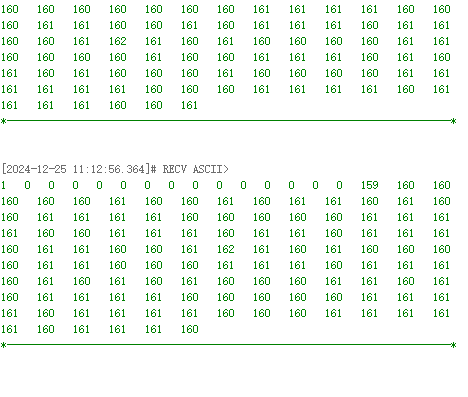
4. Experimental phenomenon
Burn the program to MSPM0G3507 and connect the wires according to the wiring diagram. Close other programs that occupy the serial port, open the serial port assistant on the computer, select the serial port number, and set the baud rate to 115200. In the serial port assistant, you can see the printed CCD data. The figure below is the CCD data printed by the serial port assistant. You can see that the first 15 data are too small, so some places will skip the first 15 data when the algorithm is processed later, so as to ensure the stability of data calculation.