12. Apriltag tag code tracking
12.1. Introduction
Apriltag tag code tracking is based on Apriltag tag code recognition, and adds the function of robot arm movement. The robot arm will keep the tag code in the middle of the vision and move. Based on this feature, the tag code tracking function is realized.
12.2. Startup
12.2.1. Preparation before program startup
This Apriltag tag code uses the TAG36H11 format. The factory has equipped the relevant tag code and attached it to the building block. You need to take out the building block and place it under the camera screen for identification.
12.2.2. Program description
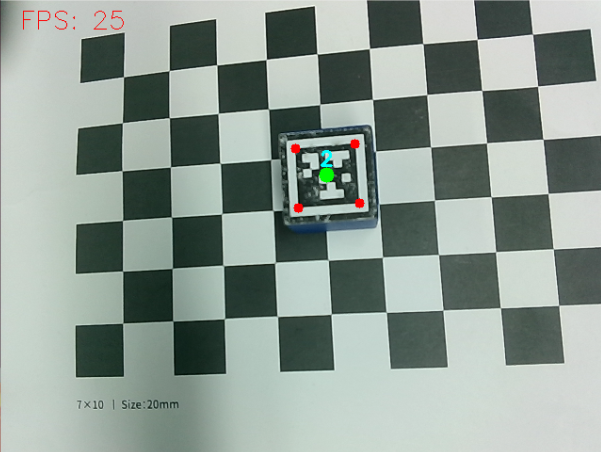
After the program is started, the camera captures the image, puts the tag code into the camera screen, and the system will identify and frame the four vertices of the tag code and display the ID number of the tag code. Then slowly move the position of the building block, and the robot arm will move with the building block.
Note: When the building block moves, the tag code should face the camera, and the moving speed should not be too fast to prevent the robot arm from being unable to keep up.
12.2.3, Program Startup
Enter the following command to start the program
xxxxxxxxxxros2 run jetcobot_advance apriltag_tracking12.2.4, Source Code
Code path: ~/jetcobot_ws/src/jetcobot_advance/jetcobot_advance/apriltag_tracking.py
x#!/usr/bin/env python3import osimport cv2import rclpyfrom rclpy.node import Nodeimport numpy as npfrom dt_apriltags import Detectorfrom pymycobot.mycobot import MyCobotfrom simple_pid import PIDfrom jetcobot_advance.fps import FPSfrom jetcobot_advance.vutils import draw_tags
class TagTrackingNode: def __init__(self): rospy.init_node('apriltag_tracking')
self.target_servox=0 self.target_servoy=-90 self.xservo_pid = PID(3.5, 0.1, 0.05) self.yservo_pid = PID(2, 0.05, 0.05)
self.tracker = None self.enable_select = False
self.at_detector = Detector(searchpath=['apriltags'], families='tag36h11', nthreads=8, quad_decimate=2.0, quad_sigma=0.0, refine_edges=1, decode_sharpening=0.25, debug=0)
self.fps = fps.FPS() # 帧率统计器 self.mc = MyCobot('/dev/ttyUSB0', 1000000) self.mc.send_angles([0, 0, -90, 90, 0, -45], 50)
# 订阅相机图像话题 source_image_topic = rospy.get_param('~source_image_topic', '/usb_cam/image_raw') rospy.loginfo("source_image_topic = {}".format(source_image_topic)) self.image_sub = rospy.Subscriber(source_image_topic, Image, self.image_callback, queue_size=2)
def image_callback(self, ros_image): # 将画面转为 opencv 格式 rgb_image = np.ndarray(shape=(ros_image.height, ros_image.width, 3), dtype=np.uint8, buffer=ros_image.data) result_image = np.copy(rgb_image) #rgb_image = cv2.resize(rgb_image, (int(rgb_image[1] / factor), int(rgb_image[0] / factor))) tags = self.at_detector.detect(cv2.cvtColor(rgb_image, cv2.COLOR_RGB2GRAY), False, None, 0.025) tags = sorted(tags, key=lambda tag: tag.tag_id) # 貌似出来就是升序排列的不需要手动进行排列 draw_tags(result_image, tags, corners_color=(0, 0, 255), center_color=(0, 255, 0)) rospy.loginfo("len(tags)={}".format(len(tags))) if len(tags) == 1: center_x, center_y = tags[0].center center_x = center_x / rgb_image.shape[1] if abs(center_x - 0.5) > 0.02: # 相差范围小于一定值就不用再动了 self.xservo_pid.setpoint = 0.5 # 我们的目标是要让色块在画面的中心, 就是整个画面的像素宽度的 1/2 位置 output = self.xservo_pid(center_x, dt=0.1) self.target_servox = min(max(self.target_servox + output, -160), 160) else: self.yservo_pid.reset()
center_y = center_y / rgb_image.shape[0] if abs(center_y - 0.5) > 0.02: self.yservo_pid.setpoint = 0.5 output = self.yservo_pid(center_y, dt=0.1) self.target_servoy = min(max(self.target_servoy + output, -140), 0) else: self.yservo_pid.reset() joints_0 = [self.target_servox, 0, self.target_servoy, -self.target_servoy, 0, -45] rospy.loginfo("joints_0 = {}".format(joints_0)) self.mc.send_angles(joints_0, 50)
self.fps.update() self.fps.show_fps(result_image) result_image = cv2.cvtColor(result_image, cv2.COLOR_RGB2BGR) cv2.imshow("result_image", result_image) key = cv2.waitKey(1) if key != -1: rospy.signal_shutdown('KeyboardInterrupt')
if __name__ == '__main__': try: tag_tracking = TagTrackingNode() rospy.spin() except Exception as e: rospy.logerr(str(e))