DM code recognition
DM code recognitionRoutine Effect IntroductionWhat is DM codeThe difference between DM code and QR code (two-dimensional code)Generate DM codeRun the routineCode ExplanationKey CodeCode structure
Routine Effect Introduction
What is DM code
DM code (Data Matrix code) is a two-dimensional barcode with the following characteristics:
- The shape is square or rectangular, composed of black and white dots.
- Supports smaller sizes, suitable for small area marking
- Strong anti-damage ability, can still be read even if it is damaged by 30%
- High coding density, can store more data
The difference between DM code and QR code (two-dimensional code)
- Appearance recognition:
- DM code: only solid border
- QR code: There are 3 positioning points
- size:
- DM code: can be made very small, suitable for tiny products
- QR code: has a minimum size limit, larger
- Application scenarios:
- DM code: industrial identification, small parts traceability
- QR code: marketing, payment, website sharing and other popular applications
- Storage capacity:
- DM code: up to 2335 alphanumeric characters
- QR code: up to 4296 alphanumeric characters
Generate DM code
You can use the DM code generation tool provided in our materials, or you can search for an online DM generator online.

Run the routine
After connecting to the IDE, click the Run button in the lower left corner, and use K230 to aim at the DM code we just generated. You can see that the content of the DM code is recognized on the screen.
The [3.00] in the right bracket refers to the rotation offset angle of the DM code.
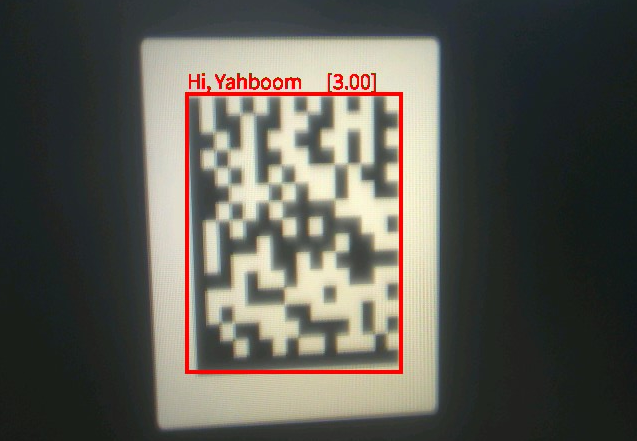
It should be noted that the recognition success rate of DM is lower than that of QR Code. If it cannot be recognized, you can try rotating the DM code or the camera.
Code Explanation
The complete example code file for this section is located in [Source Code/06.Codes/04.find_datamatrices]
Key Code
xxxxxxxxxx# 使用默认配置构造 Sensor 对象# Create a Sensor object with default configurationsensor = Sensor()# 重置 sensor# Reset the sensorsensor.reset()# 设置输出大小和格式# Set the output size and pixel formatsensor.set_framesize(width=DETECT_WIDTH, height=DETECT_HEIGHT)sensor.set_pixformat(Sensor.RGB565)# sensor.set_pixformat(Sensor.GRAYSCALE)# 初始化显示# Initialize the displayDisplay.init(Display.ST7701, width=DETECT_WIDTH, height=DETECT_HEIGHT, to_ide=True)# 初始化媒体管理器# Initialize the media managerMediaManager.init()# 启动 sensor# Start the sensorsensor.run()fps = time.clock()while True: fps.tick() # 检查是否应该退出 # Check if we should exit if os.exitpoint(): break img = sensor.snapshot() # 遍历图像中的 Data Matrix 条形码 # Iterate through the Data Matrix codes found in the image for matrix in img.find_datamatrices(): # 绘制识别到的 Data Matrix 码的矩形框 # Draw the rectangle around the detected Data Matrix code (x, y, w, h) = matrix.rect() y = y - 25 if y - 25 > 0 else y img.draw_rectangle([v for v in matrix.rect()], color=(255, 0, 0), thickness=4) # 打印矩阵的行列数、内容、旋转角度(度)以及当前的 FPS # Print the matrix's row, column count, payload, rotation in degrees, and current FPS print_args = (matrix.payload(), (180 * matrix.rotation()) / math.pi) img.draw_string_advanced(x, y, 20, "%s [%.2f]°" % print_args, color=(255,0,0)) print("内容 payload \"%s\", 旋转 rotation %f (度)" % print_args) # 将结果显示到屏幕上 # Display the result on the screen Display.show_image(img) # 进行垃圾回收,释放内存 # Perform garbage collection to release memory gc.collect()Code structure
Execution process:
First import the necessary modules and define constants
In the try block:
Initialize and configure the Sensor
Initialize the display and media managers
Start Sensor
Enter the main loop:
- Check if you need to exit
- Get image frame
- Find Data Matrix Code
- Plotting and displaying results
- Performing garbage collection
Exception handling:
- Handling keyboard interrupts
- Handling other exceptions
Finally, in the finally block:
- Stop Sensor
- Destroy Display
- Enable Hibernation Mode
- Release the media buffer
The detailed flow chart is as follows: