2 Button and the click event
2 Button and the click event2.1 experimental goals2.2 experimental procedure2.3 experimental results2.4 experiment summary
2.1 experimental goals
In this lesson, you will learn how to draw buttons and click buttons.
The reference code path for this experiment :CanMV\04-GUI\button.py
2.2 experimental procedure
The factory firmware of the module has been integrated with the lvgl graphical library. If you have downloaded other firmware, please burn it back to the factory firmware before experimenting.
Import the relevant libraries.
import lvgl as lvimport lvgl_helper as lv_himport lcdimport timefrom machine import Timerimport touchscreen as ts
Initialize the lcd, touchpad, and lvgl.
xxxxxxxxxxlcd.init()ts.init()lv.init()
Connect K210's screen driver to lvgl's display registration interface.
xxxxxxxxxxdisp_buf1 = lv.disp_buf_t()buf1_1 = bytearray(320*10)lv.disp_buf_init(disp_buf1, buf1_1, None, len(buf1_1)//4)disp_drv = lv.disp_drv_t()lv.disp_drv_init(disp_drv)disp_drv.buffer = disp_buf1disp_drv.flush_cb = lv_h.flushdisp_drv.hor_res = 320disp_drv.ver_res = 240lv.disp_drv_register(disp_drv)
Connect the K210 touchpad driver pair to the lvgl input registration interface.
xxxxxxxxxxindev_drv = lv.indev_drv_t()lv.indev_drv_init(indev_drv)indev_drv.type = lv.INDEV_TYPE.POINTERindev_drv.read_cb = lv_h.readlv.indev_drv_register(indev_drv)
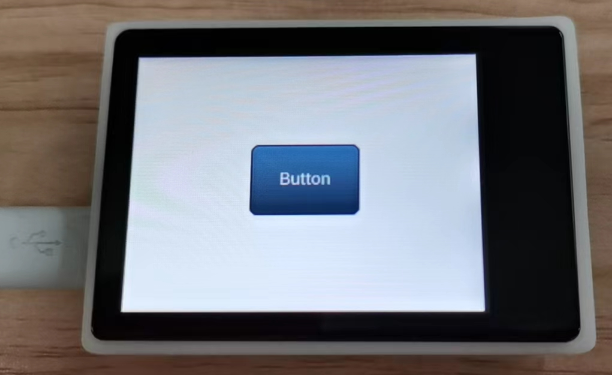
Create a new Button and display the name "Button".
xxxxxxxxxxscr = lv.obj()btn = lv.btn(scr)btn.align(lv.scr_act(), lv.ALIGN.CENTER, 0, 0)label = lv.label(btn)label.set_text("Button")label.set_size(20,20)lv.scr_load(scr)btn.set_event_cb(on_btn_cb)
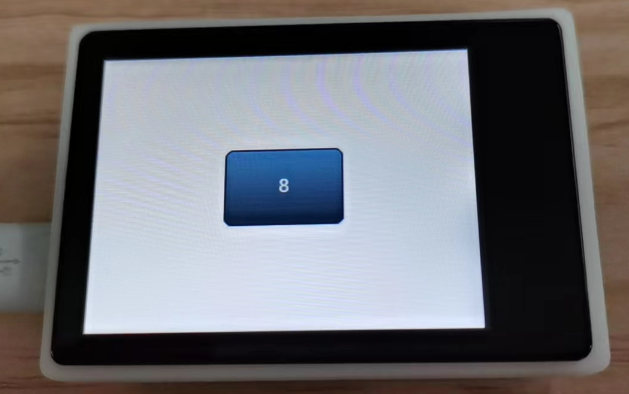
Button presses are handled as follows: Each time a button press is detected, btn_count is automatically incremented and displayed on the button.
xxxxxxxxxxbtn_count = 0def on_btn_cb(obj, event):global btn_countif event == lv.EVENT.CLICKED:btn_count += 1label.set_text(str(btn_count))print("Button Press:", btn_count)
Since the images of lvgl need to be updated in real time, it is necessary to refresh the tasks of lvgl every 5 ms.
xxxxxxxxxxtim = time.ticks_ms()while True:if time.ticks_ms()-tim > 5:tim = time.ticks_ms()lv.task_handler()lv.tick_inc(5)
2.3 experimental results
Connect the K210 module to the computer through the microUSB data cable, CanMV IDE click the connect button, after the connection is completed click the Run button to run the routine code. You can also download the code as main.py and run it in the K210 module.
You can see a blue "Button" in the middle of the LCD display, and each time the button is touched, the number on the button will automatically increase by 1.
If you need to run the program again, reconnect to avoid issues with buttons that add a number overlay.
2.4 experiment summary
Using CanMV IDE, with MicroPython syntax written in the factory firmware, it is very convenient to draw buttons and handle button touch events. Button touch event handling is best done without printing data, but it is included here for illustrative purposes only.