Handle control
Handle control1、Operating environment2、Install driver3、Steps for usage4、Handle control turtle4.1、Start the turtle4.2、View node4.3、View the node information4.4、Handle control turtle5、Handle control Transbot5.1、handle control node5.2、Associated node5.3、Operating procedures5.4、Source code analysis5.5、Handle control effectAppendixjetson nanoRaspberry PiPrecautions for using the handle
1、Operating environment
Operating system:Ubuntu 18.04 LTS
ROS version:melodic
Device:jetson nano 、Raspberry Pi、PC、handle(USB receiver)
Handle control function package path:~/transbot_ws/src/transbot_ctrl
2、Install driver
ROS driver for general Linux handles. The Joy package contains Joy_node, which is a node that connects a general Linux controller to ROS. The node publishes a "/Joy" message, which contains the current state of each button and axis of the handle.
sudo apt install ros-melodic-joy ros-melodic-joystick-drivers
3、Steps for usage
Device connection
First of all, we need to insert the USB adapter of the wireless controller into Jetson NANO, Raspberry Pi, and PC.
In this lesson, we will insert the USB port of the wireless controller to Jetson NANO board.
View device
Open the terminal, enter the following command, it shows [js0], this is the wireless controller.
xxxxxxxxxxls /dev/input

Test handle
Open the terminal and input the following commands.
As shown in the figure, the wireless handle has 8 axial inputs and 15 key inputs. You can press the keys to test the numbers corresponding to the keys on handle.
xxxxxxxxxxsudo jstest /dev/input/js0

If jstest is not installed, you need run the following command to install it.
xxxxxxxxxxsudo apt-get install joystick
Run the controller node
Open three terminals, enter the following commands in sequence to view the detailed information, which is the same as [Test Handle].
Different devices (Raspberry Pi, Jetson NANO, PC) and different systems have different handle states.
xxxxxxxxxxroscore Step.1rosrun joy joy_node Step.3rostopic echo joy Step.3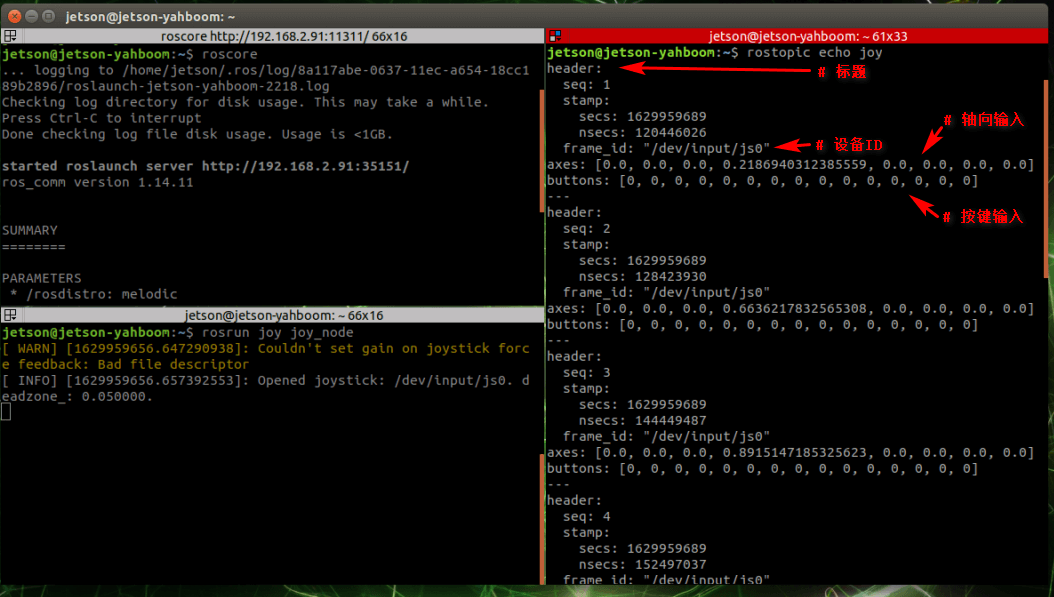
4、Handle control turtle
4.1、Start the turtle
xxxxxxxxxxroscorerosrun turtlesim turtlesim_node
If you want to drive the little turtle, just give the little turtle a certain speed. Next, check the ROS speed control node.
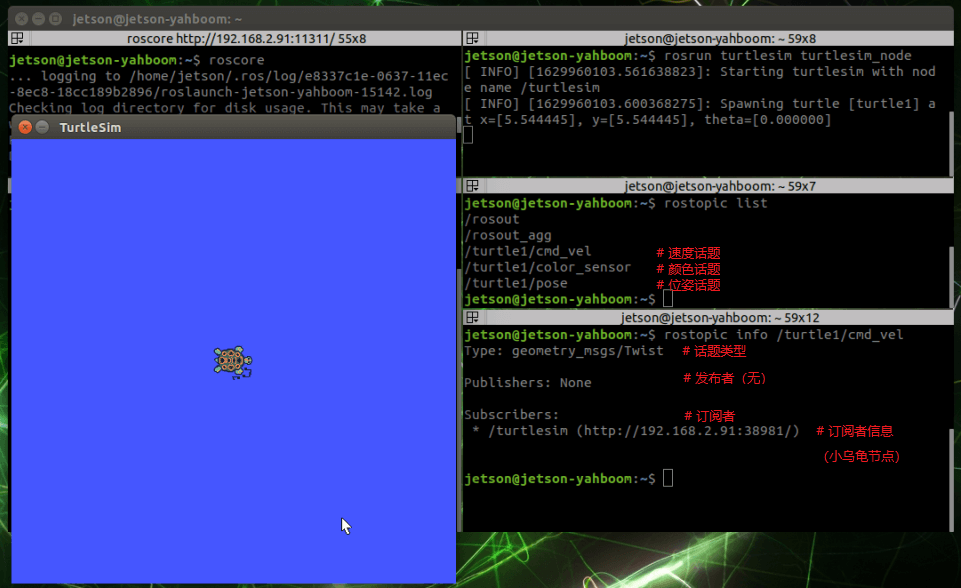
4.2、View node
xxxxxxxxxxrostopic list 4.3、View the node information
xxxxxxxxxxrostopic info /turtle1/cmd_vel
4.4、Handle control turtle
Receive the current status information of the handle, and send instructions to the little turtle by pressing the button or shaking the joystick to receive different information feedback from the wireless handle.
Copy the wireless controller control function package to the workspace, compile and update the environment.
xxxxxxxxxxcatkin_make # Compilesource devel/setup.bash # Update environmentNote: As long as you modify the C++ code, you must recompile the update to take effect.
Input command to start up python code
xxxxxxxxxxroslaunch transbot_ctrl turtlesim_joy.launch
Input command to start up C++ code
xxxxxxxxxxroslaunch transbot_ctrl turtlesim_turtle.launch
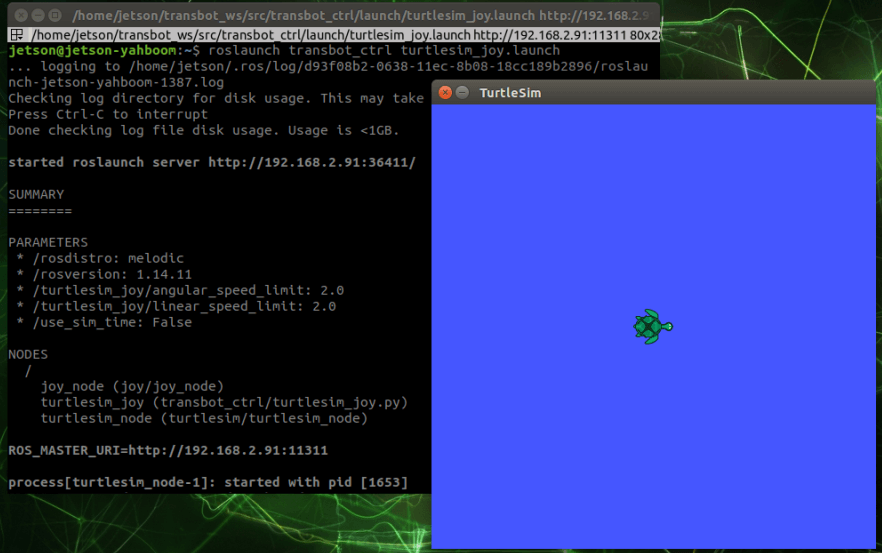
At this point, we can use the handle to control the little turtle to run.
Correspondence between the handle and the turtle
| Handle | Turtle |
|---|---|
| Left rocker up | advance |
| Left rocker down | back |
| Left rocker left | turn left |
| Left rocker right | turn right |
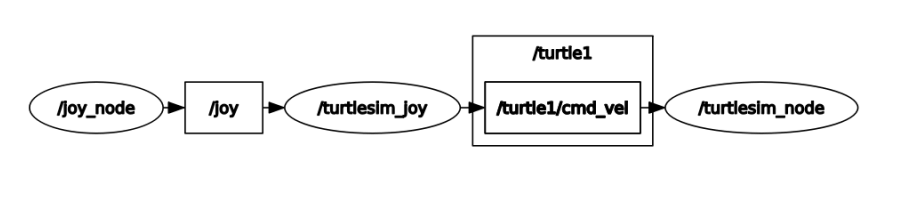
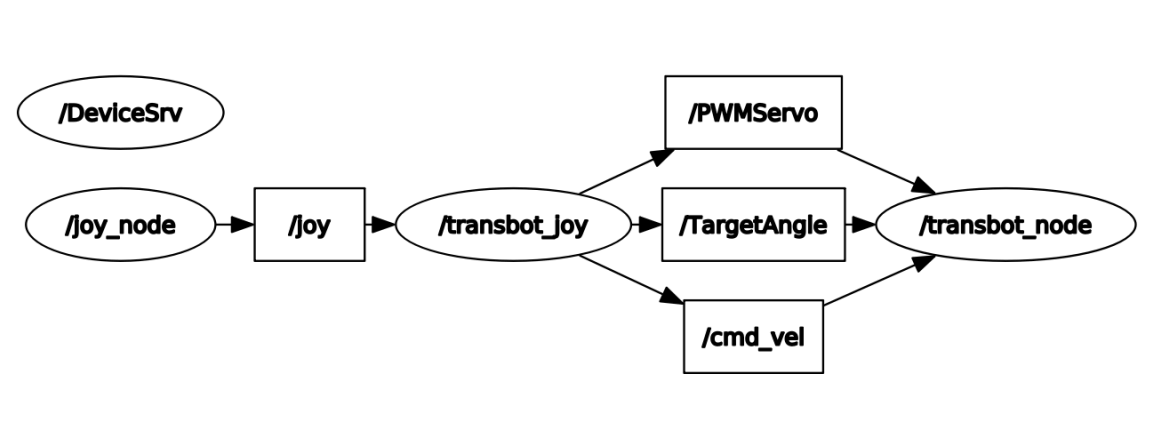
View node graph
【/joy_node】:Handle information node
【/turtlesim_joy】:Handle control node
【/turtlesim_node】:Turtle node
xxxxxxxxxxrqt_graph
5、Handle control Transbot
Handle controls Transbot, which is similar to the handle control of the turtle; let the handle control node establish a connection with the Transbot bottom driver node, change the current state of the handle, send different information to Transbot, and drive Transbot to make different responses. We need to control the buzzer, searchlight, pan-tilt, light bar, robotic arm, and trolley movement (linear velocity, angular velocity).
5.1、handle control node
Corresponding to the MCU coprocessorof Transbot
Topic
Publish car movement news 【/cmd_vel】
Publish robotic arm control message 【/TargetAngle】
Publish gimbal servo control message 【/PWMServo】
Service (client)
Publish buzzer control message【/Buzzer】
Publish searchlight control message【/Headlight】
Publish obtain the current angle of the robotic arm 【/CurrentAngle】
Publish running water light control message 【/RGBLight】
Other topic
Joy_node corresponds
Subscribe to the news of the wireless controller【/joy】
corresponding to move_base
Issue the cancel motion planning message【/move_base/cancel】
Pause/start of all functions
Publish the current Joy state (custom) message【/JoyState】
Node【DeviceSrv】
Get the current camera device【/CamDevice】
-Joy_node corresponds
5.2、Associated node
Low-level driver
Topic
Subscribe to car sports messages【/cmd_vel】
Subscribe to robotic arm control messages【/TargetAngle】
Subscribe to gimbal servo control messages【/PWMServo】
Service (client)
Publish buzzer control message【/Buzzer】
Publish searchlight control message【/Headlight】
Publish obtain the current angle of the robotic arm 【/CurrentAngle】
Publish running water light control message 【/RGBLight】
Joy_node
Topic
Publish the news of the wireless controller 【/joy】
DeviceSrv
service
Enable access to the current camera equipment service【/CamDevice】
5.3、Operating procedures
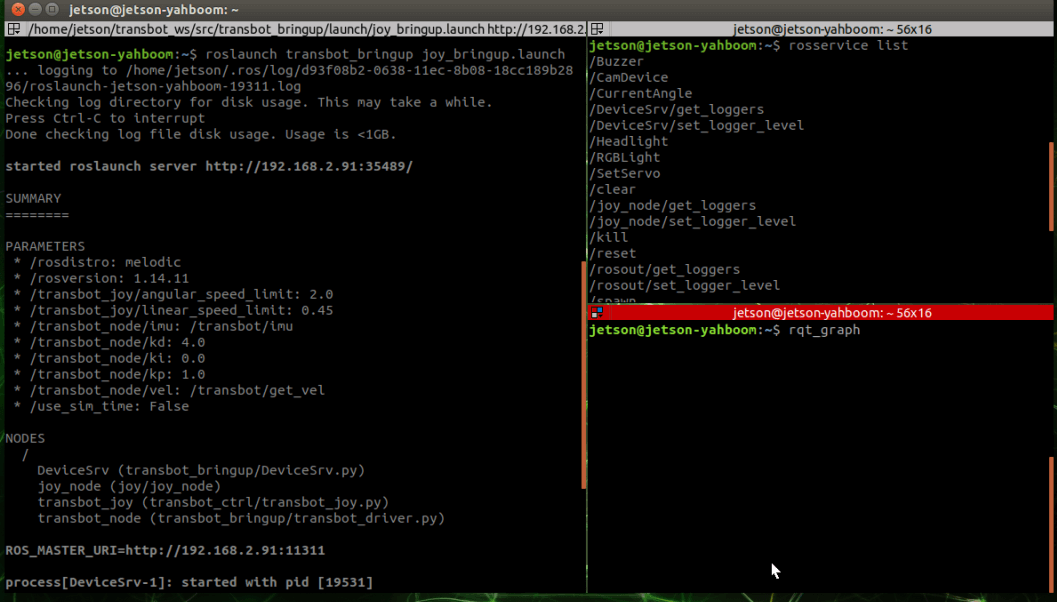
Start up command
xxxxxxxxxxroslaunch transbot_bringup joy_bringup.launch
View node graph
xxxxxxxxxxrqt_graph
Can only see the connections between topics
View service list
xxxxxxxxxxrosservice list
The system will print the following:
xxxxxxxxxx/Buzzer/CamDevice/CurrentAngle/DeviceSrv/get_loggers/DeviceSrv/set_logger_level/Headlight/RGBLight/SetServo/clear/joy_node/get_loggers/joy_node/set_logger_level/kill/reset... ...5.4、Source code analysis
launch file
Code path: ~/transbot_ws/src/transbot_bringup/launch/joy_bringup.launch
xxxxxxxxxx<launch><!--Start the camera device service--><node pkg="transbot_bringup" type="DeviceSrv.py" name="DeviceSrv" output="screen"/><!--Start Transbot bottom node--><node pkg="transbot_bringup" type="transbot_driver.py" name="transbot_node" required="true" output="screen"><param name="imu" value="/transbot/imu"/><param name="vel" value="/transbot/get_vel"/><param name="kp" value="1.0"/><param name="ki" value="0.0"/><param name="kd" value="4.0"/></node><!--Start handle control node--><include file="$(find transbot_ctrl)/launch/transbot_joy.launch"/></launch>
Node 【DeviceSrv】 starts the camera device service: obtains the current camera device number, and publishes whether it is currently connected to the Astra camera.
py file
Code path: ~/transbot_ws/src/transbot_ctrl/scripts/transbot_joy.py
xxxxxxxxxx arm_thread = threading.Thread(target=self.analyse_PWM()) arm_thread.setDaemon(True) arm_thread.start()Start the thread, get the currently connected camera device in the 【self.analyse_PWM()】function, which is convenient for processing different cameras, and turn on the loop to control the gimbal servo and robotic arm.
xxxxxxxxxx def buttonCallback(self, joy_data): ''' Obtain the wireless controller receiving signal [1: Clamp, 2: Release, upper left: joint2+, lower left: joint2-, left left: joint1 upper, left and right joint1: lower] ''' if not isinstance(joy_data, Joy): return # rospy.loginfo("joy_data.buttons:", joy_data.buttons) # rospy.loginfo("joy_data.axes:", joy_data.axes) if self.user_name == "pi": self.user_pi(joy_data) else: self.user_jetson(joy_data) # rospy.loginfo("linear_Gear: {},angular_Gear: {}".format(self.linear_Gear,self.angular_Gear)) #rospy.loginfo("linear_speed: {},angular_speed: {}".format(linear_speed,angular_speed))5.5、Handle control effect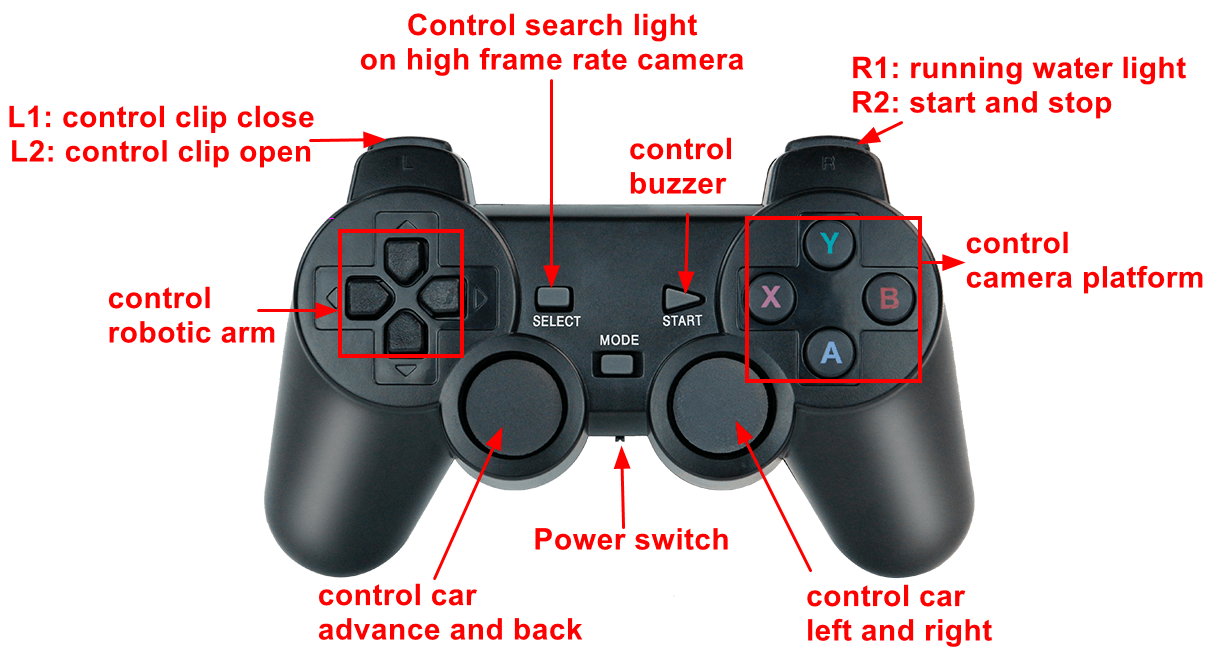
Appendix
jetson nano
xxxxxxxxxxjoy_data.buttons:header:seq: 335stamp:secs: 1628324636nsecs: 962988952frame_id: "/dev/input/js0"axes: [0.0, 0.0, 0.0, 0.0, 0.0, 0.0, 0.0, 0.0]buttons: [0, 0, 0, 0, 0, 0, 0, 0, 0, 0, 0, 0, 0, 0, 0]
axes(8)
| Code analysis | Handle button | Car control |
|---|---|---|
| axes[0] | Left rocker | |
| axes[1] | Left rocker | advance and back |
| axes[2] | Right rocker | left and right |
| axes[3] | Right rocker | |
| axes[4] | ||
| axes[5] | ||
| axes[6] | Left button | Arm-1 |
| axes[7] | Left button | Arm-2 |
buttons(15)
| Code analysis | Handle button | Car control |
|---|---|---|
| buttons[0] | A | camera platform move down |
| buttons[1] | B | camera platform move right |
| buttons[2] | ||
| buttons[3] | X | camera platform move left |
| buttons[4] | Y | camera platform move up |
| buttons[5] | ||
| buttons[6] | L1 | Arm-clip close |
| buttons[7] | R1 | running water light |
| buttons[8] | L2 | Arm-clip open |
| buttons[9] | R2 | control switch |
| buttons[10] | SELECT | search light on high frame rate camera |
| buttons[11] | START | buzzer |
| buttons[12] | ||
| buttons[13] | Press left rocker | Linear speed [ 0.15 , 0.3 , 0.45 ] |
| buttons[14] | Press right rocker | Angular speed [ 0.5 , 1 , 1.5 , 2 ] |
Raspberry Pi
xxxxxxxxxxjoy_data.buttons: header:seq: 264stamp:secs: 1628326479nsecs: 848359307frame_id: "/dev/input/js0"axes: [-0.0, -0.0, 0.0, -0.0, -0.0, 0.0, 0.0, 0.0]buttons: [0, 0, 0, 0, 0, 0, 0, 0, 0, 0, 0]
axes(8)
| Code analysis | Handle button | Car control |
|---|---|---|
| axes[0] | Left rocker | |
| axes[1] | Left rocker | advance and back |
| axes[2] | L2(press:-1,release:1) | Arm clip |
| axes[3] | Right rocker | left and right |
| axes[4] | Right rocker | |
| axes[5] | R2(press:-1,release:1) | control switch |
| axes[6] | Left button | Arm-1 |
| axes[7] | Left button | Arm-2 |
buttons(11)
| Code analysis | Handle button | Car control |
|---|---|---|
| buttons[0] | A | camera platform move down |
| buttons[1] | B | camera platform move right |
| buttons[2] | X | camera platform move left |
| buttons[3] | Y | camera platform move up |
| buttons[4] | L1 | Arm clip |
| buttons[5] | R1 | running water light |
| buttons[6] | SELECT | search light on high frame rate camera |
| buttons[7] | START | buzzer |
| buttons[8] | MODE | |
| buttons[9] | Press left rocker | Linear speed [ 0.15 , 0.3 , 0.45 ] |
| buttons[10] | Press right rocker | Angular speed [ 0.5 , 1 , 1.5 , 2 ] |
Precautions for using the handle
After plugging and unplugging the handle receiving head, the handle program needs to be restarted, otherwise the car will not be able to be controlled.
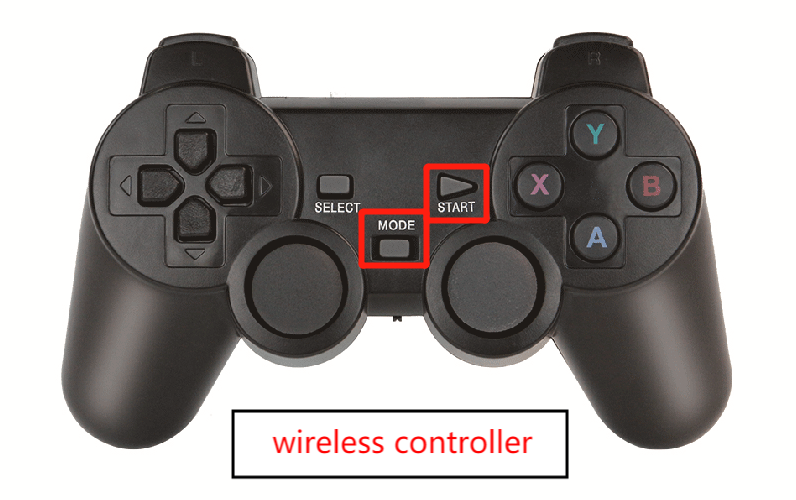
After starting the handle control program, if the handle cannot control the car, it may be caused by the wrong handle control mode. You can press and hold the handle mode button for about 15 seconds to switch modes. After the green indicator light is always on, press the start button again. If the buzzer sounds, it means the switching is successful. If there is no response, you can press and hold the mode button on the handle again for 15 seconds.
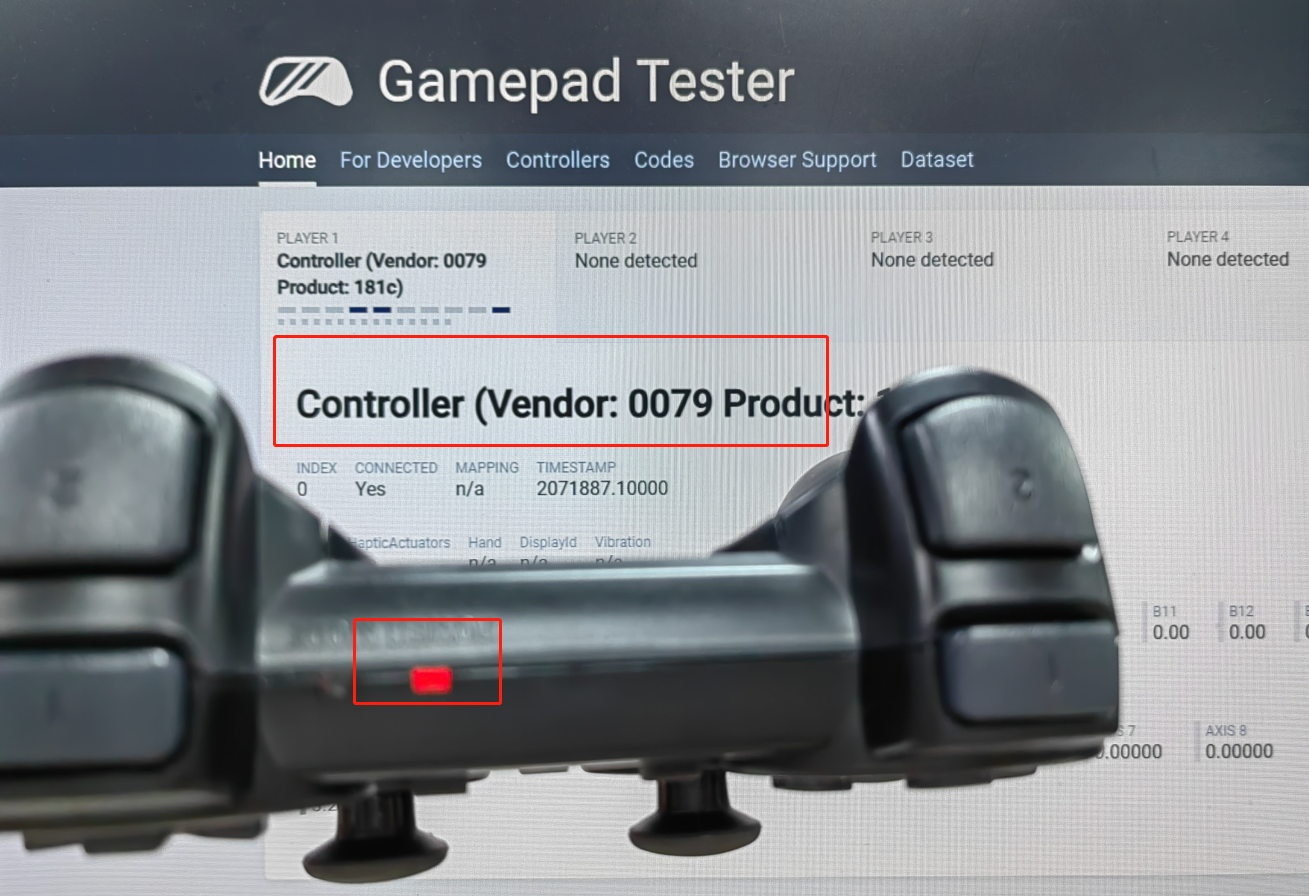
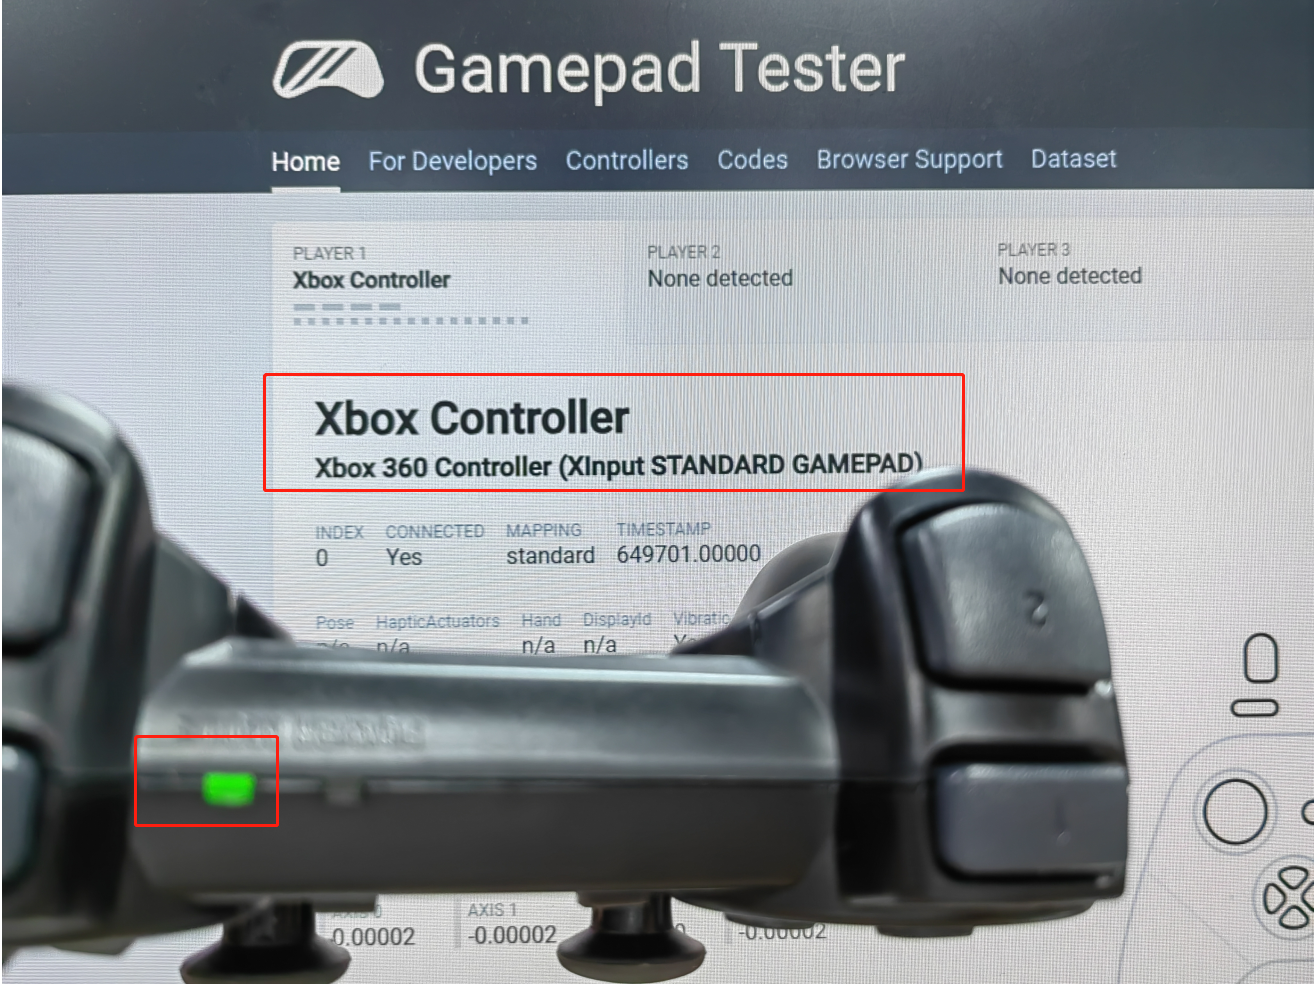
Jetson series support mode: PC/PCS mode. In PC mode, the POWER MODE indicator light is red by default. You can connect the handle receiver to the usb port of the computer to connect to the wireless handle. Enter the URL in the browser: https://gamepad-tester.com/. Pressing the button URL will display the change of the button value, as shown in the following figure:
Raspberry Pi series support mode: X-BOX mode.In X-BOX mode, the default POWER MODE indicator light is green. You can connect the handle receiver to the usb port of the computer to connect to the wireless handle. Enter the URL in the browser: https://gamepad-tester.com/. Pressing the button URL will display the change of the button value, as shown in the following figure:
After re-plugging the handle receiver or restarting the motherboard, the handle will reset to the factory mode. If it cannot be controlled, you need to switch the mode again every time you plug or restart.
In the case of unsuccessful matching, the POWER MODE indicator light will flash red and green all the time, and will not light up after a few seconds of sleep.