7. Color recognition
1. Introduction to HSV color space:
RGB color space is the most familiar color space, that is, the three primary color spaces. Any color can be mixed by the three colors. However, effective processing of images in color space is generally carried out in HSV space. HSV (Hue, Saturation, Brightness Value) is a color space created based on the intuitive characteristics of color, also known as the hexagonal pyramid model.
Why choose HSV space instead of RGB space? For images, identifying corresponding colors is feasible in RGB space, HSV space or other color spaces. The reason why HSV was chosen is because the hue represented by H can basically determine a certain color, and combined with the saturation and brightness information, it can be judged to be greater than a certain threshold. RGB is composed of three components, and the contribution proportion of each component needs to be judged. That is, the recognition range of HSV space is wider and more convenient.
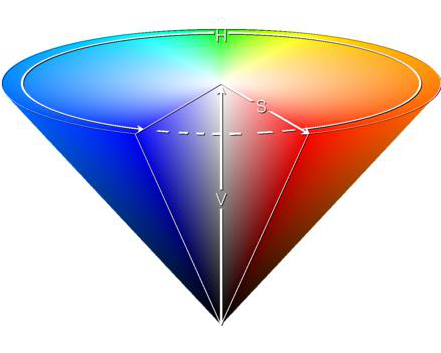
HSV color space model
2. Conversion of three color spaces (gray BGR HSV):
There are more than 150 color space conversion methods in OpenCV, but there are only two that we often use, namely BGR->Gray and BGR->HSV. Note that Gray and HSV are not convertible to each other. Color space conversion: cv2.cvtColor(input_image, flag)
BGR->Gray: flag is cv2.COLOR_BGR2GRAY
BGR->HSV: flag is cv2.COLOR_BGR2HSV
The value range of HSV color space in OpenCV:
H [0, 179] S [0, 255] V [0, 255]
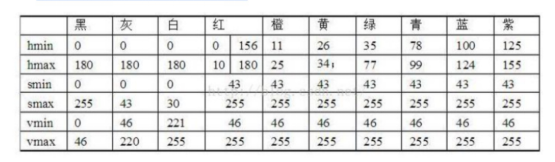
Value range of commonly used colors
Based on the above interval, our goal is to identify whether it is the color interval we set, and replace this color with white first, replace it with black if it is not this color, and finally replace the white part with the original image.
x#bgr8 to jpeg formatimport enumimport cv2def bgr8_to_jpeg(value, quality=75):return bytes(cv2.imencode('.jpg', value)[1])
xxxxxxxxxx#Camera component displayimport traitletsimport ipywidgets.widgets as widgetsimport time# Thread function operation libraryimport threadingimport inspectimport ctypesorigin_widget = widgets.Image(format='jpeg', width=320, height=240)mask_widget = widgets.Image(format='jpeg',width=320, height=240)result_widget = widgets.Image(format='jpeg',width=320, height=240)# create a horizontal box container to place the image widget next to each otherimage_container = widgets.HBox([origin_widget, mask_widget, result_widget])display(image_container)
xxxxxxxxxx#Thread related functionsdef _async_raise(tid, exctype):"""raises the exception, performs cleanup if needed"""tid = ctypes.c_long(tid)if not inspect.isclass(exctype):exctype = type(exctype)res = ctypes.pythonapi.PyThreadState_SetAsyncExc(tid, ctypes.py_object(exctype))if res == 0:raise ValueError("invalid thread id")elif res != 1:# """if it returns a number greater than one, you're in trouble,# and you should call it again with exc=NULL to revert the effect"""ctypes.pythonapi.PyThreadState_SetAsyncExc(tid, None)def stop_thread(thread):_async_raise(thread.ident, SystemExit)
xxxxxxxxxx#Main process functionimport cv2import numpy as npimport ipywidgets.widgets as widgetscap = cv2.VideoCapture(0)cap.set(3, 640)cap.set(4, 480)cap.set(5, 120) #Set frame ratecap.set(cv2.CAP_PROP_FOURCC, cv2.VideoWriter.fourcc('M', 'J', 'P', 'G'))# image.set(cv2.CAP_PROP_BRIGHTNESS, 40) #Set brightness -64 - 64 0.0# image.set(cv2.CAP_PROP_CONTRAST, 50) #Set contrast -64 - 64 2.0# image.set(cv2.CAP_PROP_EXPOSURE, 156) #Set exposure value 1.0 - 5000 156.0#The red one is selected by default. If you want to identify other ones, please comment the red interval code below and release the other interval code segments below.# red intervalcolor_lower = np.array([0, 43, 46])color_upper = np.array([10, 255, 255])# #Green interval# color_lower = np.array([35, 43, 46])# color_upper = np.array([77, 255, 255])# #Blue interval# color_lower=np.array([100, 43, 46])# color_upper = np.array([124, 255, 255])# #Yellow interval# color_lower = np.array([26, 43, 46])# color_upper = np.array([34, 255, 255])# #Orange range# color_lower = np.array([11, 43, 46])# color_upper = np.array([25, 255, 255])def Color_Recongnize():while(1):# get a frame and show Get the video frame and convert it to HSV format. Use cvtColor() to convert the BGR format to HSV format. The parameter is cv2.COLOR_BGR2HSV.ret, frame = cap.read()#cv2.imshow('Capture', frame)origin_widget.value = bgr8_to_jpeg(frame)# change to hsv modelhsv = cv2.cvtColor(frame, cv2.COLOR_BGR2HSV)# get mask Use the inRange() function and the upper and lower bounds of the blue range in the HSV model to obtain the mask. The blue part of the original video in the mask will be made white and the other parts black.mask = cv2.inRange(hsv, color_lower, color_upper)#cv2.imshow('Mask', mask)mask_widget.value = bgr8_to_jpeg(mask)# detect blue Perform a bitwise AND operation on the mask on the original video frame, then the white in the mask will be replaced with the real image:res = cv2.bitwise_and(frame, frame, mask=mask)#cv2.imshow('Result', res)result_widget.value = bgr8_to_jpeg(res)# if cv2.waitKey(1) & 0xFF == ord('q'):#breaktime.sleep(0.01)cap.release()#cv2.destroyAllWindows()
xxxxxxxxxx#Start processthread1 = threading.Thread(target=Color_Recongnize)thread1.setDaemon(True)thread1.start()
xxxxxxxxxx#End the process, this code needs to be executed only when it endsstop_thread(thread1)
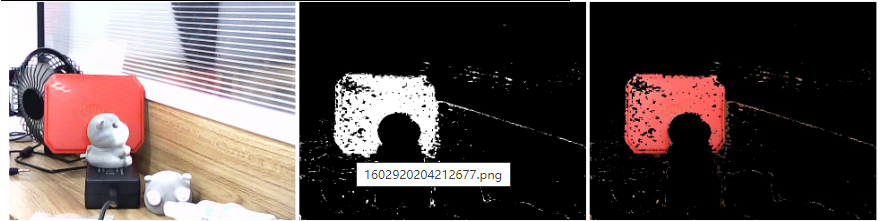
This is the effect of performing red recognition. If you want to recognize other colors, you can annotate the red range and open other color ranges.
For CSI camera:
xxxxxxxxxx#bgr8 to jpeg formatimport enumimport cv2def bgr8_to_jpeg(value, quality=75):return bytes(cv2.imencode('.jpg', value)[1])
xxxxxxxxxx#Thread-dependent functionsdef _async_raise(tid, exctype):"""raises the exception, performs cleanup if needed"""tid = ctypes.c_long(tid)if not inspect.isclass(exctype):exctype = type(exctype)res = ctypes.pythonapi.PyThreadState_SetAsyncExc(tid, ctypes.py_object(exctype))if res == 0:raise ValueError("invalid thread id")elif res != 1:# """if it returns a number greater than one, you're in trouble,# and you should call it again with exc=NULL to revert the effect"""ctypes.pythonapi.PyThreadState_SetAsyncExc(tid, None)def stop_thread(thread):_async_raise(thread.ident, SystemExit)
xxxxxxxxxx#Main process functionimport cv2 as cvimport numpy as npimport ipywidgets.widgets as widgetsimport libcamerafrom picamera2 import Picamera2cv.startWindowThread()picam2 = Picamera2()config = picam2.create_preview_configuration(main={"format": 'RGB888', "size": (640, 480)})config["transform"] = libcamera.Transform(hflip=0, vflip=1)picam2.configure(config)picam2.start()# image.set(cv2.CAP_PROP_BRIGHTNESS, 40) #set brightness -64 - 64 0.0# image.set(cv2.CAP_PROP_CONTRAST, 50) #set contrast -64 - 64 2.0# image.set(cv2.CAP_PROP_EXPOSURE, 156) #Setting exposure value 1.0 - 5000 156.0#The default selection is red. If you want to identify others, please comment the following red interval code, and let go of other interval code segments# Red rangecolor_lower = np.array([0, 43, 46])color_upper = np.array([10, 255, 255])# #Green range# color_lower = np.array([35, 43, 46])# color_upper = np.array([77, 255, 255])# #Blue range# color_lower=np.array([100, 43, 46])# color_upper = np.array([124, 255, 255])# #yellow range# color_lower = np.array([26, 43, 46])# color_upper = np.array([34, 255, 255])# #orange range# color_lower = np.array([11, 43, 46])# color_upper = np.array([25, 255, 255])def Color_Recongnize():while(1):# get a frame and show. Take the video frame and convert it to HSV format, using cvtColor() to convert the BGR format to HSV format with cv2.COLOR_BGR2HSV.frame = picam2.capture_array()#cv2.imshow('Capture', frame)origin_widget.value = bgr8_to_jpeg(frame)# change to hsv modelhsv = cv2.cvtColor(frame, cv2.COLOR_BGR2HSV)# get mask We use the inRange() function and the upper and lower bounds of the blue range from the HSV model.In this mask, the blue part of the original video is colored white and the other parts are colored black.mask = cv2.inRange(hsv, color_lower, color_upper)#cv2.imshow('Mask', mask)mask_widget.value = bgr8_to_jpeg(mask)# detect blue Applying a bitwise and to the original video frame will replace the white in the mask with the real image:res = cv2.bitwise_and(frame, frame, mask=mask)#cv2.imshow('Result', res)result_widget.value = bgr8_to_jpeg(res)# if cv2.waitKey(1) & 0xFF == ord('q'):# breaktime.sleep(0.01)cap.release()#cv2.destroyAllWindows()
xxxxxxxxxx#Camera component displayimport traitletsimport ipywidgets.widgets as widgetsimport time# Thread function manipulation libraryimport threadingimport inspectimport ctypesorigin_widget = widgets.Image(format='jpeg', width=320, height=240)mask_widget = widgets.Image(format='jpeg',width=320, height=240)result_widget = widgets.Image(format='jpeg',width=320, height=240)# create a horizontal box container to place the image widget next to eachotherimage_container = widgets.HBox([origin_widget, mask_widget, result_widget])display(image_container) #Display camera assembly
xxxxxxxxxx#Starting processesthread1 = threading.Thread(target=Color_Recongnize)thread1.setDaemon(True)thread1.start()
xxxxxxxxxx#Terminates the process, and this code needs to be executed only when it doesstop_thread(thread1)
Note: For CSI cameras, if you want to rerun the program, you need to do the following:
