1. Install Raspbot V2 driver library
1. Install Raspbot V2 driver library1.1. Download Python driver library file1.2. Transfer files to Raspberry Pi 51.3. Start installation1.4. Import library files1.5 API Introduction
1.1. Download Python driver library file
The latest version of Raspbot V2 driver library is provided in this course material, named py_install.zip.
The compressed package contains the following files:
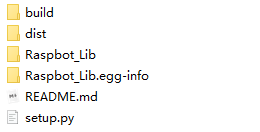
Or go to Yahboom official website and click [Python Driver Library] in the download area to download the latest version of the file py_install.zip.
1.2. Transfer files to Raspberry Pi 5
If you use the browser that comes with Raspberry Pi 5 to download files from Yabo Smart Official Website, please download the files to a user-operable path, such as the desktop.
If you use the driver library compressed package file in the data, or download the driver library file using a computer browser, you can use WinSCP software to drag the driver library compressed package file to the Raspberry Pi 5 desktop.
After successful installation, the driver library file can be deleted.
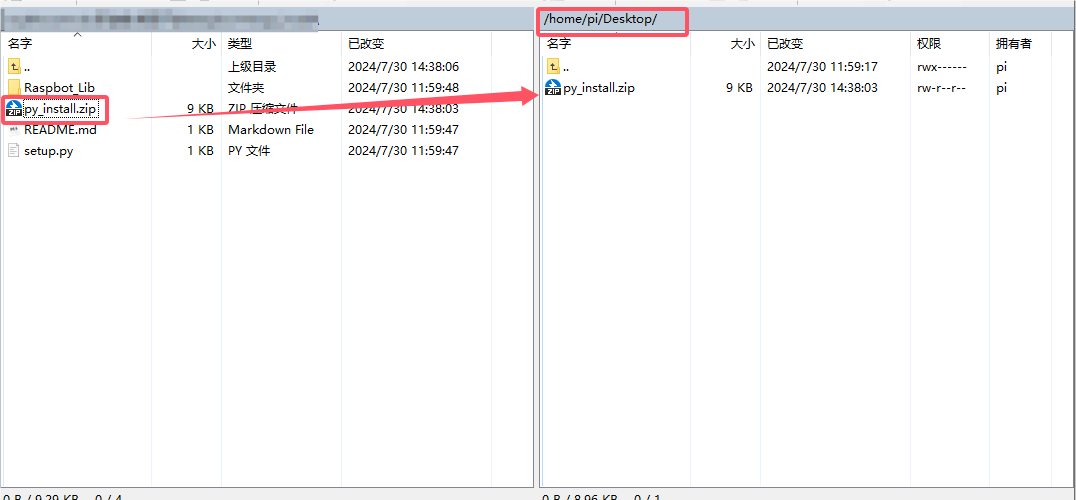
If you don’t know how to use WinSCP to transfer files, you can search online for tutorials on how to use winscp.
1.3. Start installation
Open the terminal of Raspberry Pi 5 and enter the following command to decompress.
Go to the desktop and check whether the file exists. The target file is in the red box
xxxxxxxxxxcd ~/Desktop && ls
Unzip the file
xxxxxxxxxxunzip py_install.zip
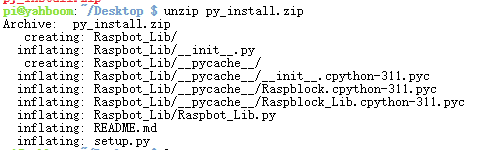
Note: The entire document example uses the py_install.zip compressed package placed on the Raspberry Pi 5 system desktop as an example. If you store the compressed package in a different path, please enter the corresponding directory according to the actual path.
Enter the folder of the driver library
xxxxxxxxxxcd py_install
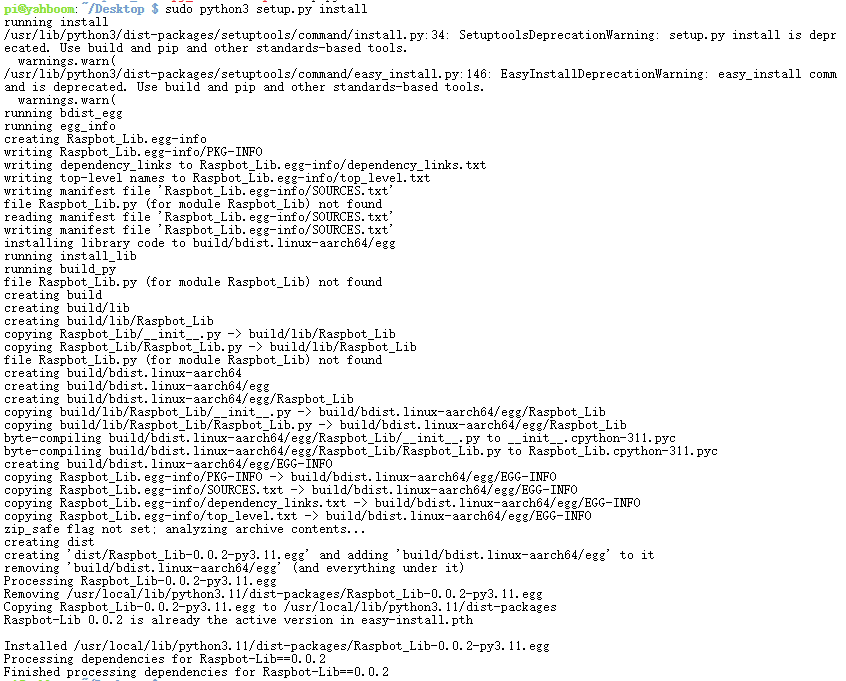
Run the installation command. If you see the installation version number at the end, it means the installation is successful. This command will overwrite the previously installed Raspbot V2 driver library.
xxxxxxxxxxsudo python3 setup.py install
1.4. Import library files
Refer to the following picture to import the driver library. If no error message appears, the installation is successful.

1.5 API Introduction
xclass Raspbot():"""Raspberry Pi car control class, used to communicate with the Raspberry Pi car through I2C."""def get_i2c_device(self, address, i2c_bus):"""Get the I2C device instance.Args:address (int): I2C device address.i2c_bus (int): I2C bus number.Returns:SMBus: I2C device instance."""def __init__(self):"""Initialize the Raspbot instance and create an I2C device."""def write_u8(self, reg, data):"""Writes one byte of data to the specified register.Args:reg (int): Register address.data (int): The data to be written."""def write_reg(self, reg):"""Command to write one byte to the device.Args:reg (int): Command byte."""def write_array(self, reg, data):"""Writes a series of bytes of data to the specified register.Args:reg (int): Register address.data (list): List of data to be written."""def read_data_byte(self):"""Reads a byte of data from the device.Returns:int: The data read."""def read_data_array(self, reg, length):"""Reads a series of bytes of data from the specified register.Args:reg (int): Register address.length (int): The length of data to read.Returns:list: The list of data read."""def Ctrl_Car(self, motor_id, motor_dir, motor_speed):"""Control the rotation direction and speed of the motor.Args:motor_id (int): Motor ID.motor_dir (int): Motor direction (0 is forward, 1 is reverse).motor_speed (int): Motor speed (0-255)."""def Ctrl_Muto(self, motor_id, motor_speed):"""Control the motor forward and reverse, accepting speed values from -255 to 255.Args:motor_id (int): Motor ID.motor_speed (int): Motor speed (-255 to 255)."""def Ctrl_Servo(self, id, angle):"""Control the angle of the servo.Args:id (int): Servo ID.angle (int): Servo angle (0-180 degrees)."""def Ctrl_WQ2812_ALL(self, state, color):"""Control the status and color of all LED lights.Args:state (int): The state of the light (0 for off, 1 for on).color (int): Color code."""def Ctrl_WQ2812_Alone(self, number, state, color):"""Control the state and color of individual LED lights.Args:number (int): The number of the light.state (int): The state of the light (0 for off, 1 for on).color (int): Color code."""def Ctrl_WQ2812_brightness_ALL(self, R, G, B):"""Set the RGB brightness of all LED lights.Args:R (int): Red brightness (0-255).G (int): Brightness of green (0-255).B (int): Brightness of blue (0-255)."""def Ctrl_WQ2812_brightness_Alone(self, number, R, G, B):"""Set the RGB brightness of a single LED light.Args:number (int): The number of the light.R (int): Red brightness (0-255).G (int): Brightness of green (0-255).B (int): Brightness of blue (0-255)."""def Ctrl_IR_Switch(self, state):"""Control the on/off status of the infrared remote controller.Args:state (int): The switch status (0 is off, 1 is on)."""def Ctrl_BEEP_Switch(self, state):"""Control the on/off state of the buzzer.Args:state (int): The switch status (0 is off, 1 is on)."""def Ctrl_Ulatist_Switch(self, state):"""Control the on/off state of the ultrasonic ranging module.Args:state (int): The switch status (0 is off, 1 is on)."""class LightShow():"""LED light effect control class, used to achieve various lighting effects."""def __init__(self):"""Initialize the LightShow instance, set basic parameters and initialize the Raspberry Pi car control object."""def execute_effect(self, effect_name, effect_duration, speed, current_color):"""Executes the specified lighting effect.Args:effect_name (str): The name of the effect.effect_duration (float): Duration of the effect in seconds.speed (float): The speed (in seconds) at which the effect is executed.current_color (int): The current color code."""def turn_off_all_lights(self):"""Turn off all LED lights."""def run_river_light(self, effect_duration, speed):"""Execute the running light effect.Args:effect_duration (float): Duration of the effect in seconds.speed (float): The speed (in seconds) at which the effect is executed."""def breathing_light(self, effect_duration, speed, current_color):"""Execute breathing light effect.Args:effect_duration (float): Duration of the effect in seconds.speed (float): The speed (in seconds) at which the effect is executed.current_color (int): The current color code."""def random_running_light(self, effect_duration, speed):"""Perform a random marquee effect.Args:effect_duration (float): Duration of the effect in seconds.speed (float): The speed (in seconds) at which the effect is executed."""def starlight_shimmer(self, effect_duration, speed):"""Perform a starlight twinkling effect.Args:effect_duration (float): Duration of the effect in seconds.speed (float): The speed (in seconds) at which the effect is executed."""def gradient_light(self, effect_duration, speed):"""Performs a gradient effect.Args:effect_duration (float): Duration of the effect (seconds).speed (float): Effect execution speed (seconds)."""def rgb_remix(self, val):"""RGB value color mixing algorithm.Args:val (int): Enter the RGB value.Returns:int: The RGB value after color mixing."""def rgb_remix_u8(self, r, g, b):"""RGB value mixing algorithm (for 8-bit values).Args:r (int): red value.g (int): green value.b (int): blue value.Returns:tuple: The RGB value after color mixing."""def calculate_breath_color(self, color_code, breath_count):"""Calculate the color value of the breathing light effect.Args:color_code (int): Color code.breath_count (int): Breath count.Returns:tuple: RGB color value."""def stop(self):"""Stop the currently executing lighting effect."""