AI vision processing code structure
AI vision processing code structureIntroductionImporting modulesCustom detection classExecute the current routineEnd the current routineMain Process
Introduction
In this section, we will briefly introduce the general prerequisite knowledge and code structure of K230's subsequent AI-related routines
Let's take the simplest face recognition Face_detection as an example
The example code is located in [Source code/07.Face/01.face_detection]
Note: The following code is to demonstrate the code structure of AIDemo, not all of it is from face detection, because face detection does not require the complete code structure. Directly copying the following code will not run successfully. The complete executable code has been placed in the [Source Code] directory
Importing modules
Below is the import list of FaceDection
# 从libs.PipeLine模块导入PipeLine和ScopedTiming类# (Import PipeLine and ScopedTiming classes from libs.PipeLine module)from libs.PipeLine import PipeLine, ScopedTiming# Pipeline 是集成了摄像头、LCD屏幕显示等多媒体功能的模块,大大简化了调用摄像头和显示相关的操作# (Pipeline is a module that integrates camera, LCD display and other multimedia functions, # greatly simplifying camera and display-related operations)# ScopedTiming是一个代码执行计时器,使用方法可以参考例程代码# (ScopedTiming is a code execution timer, refer to example code for usage)# 从libs.AIBase模块导入AIBase类# (Import AIBase class from libs.AIBase module)from libs.AIBase import AIBase# 从libs.AI2D模块导入Ai2d类# (Import Ai2d class from libs.AI2D module)from libs.AI2D import Ai2d# AIBase和AI2D 用来处理AI底层的逻辑# (AIBase and AI2D are used to handle underlying AI logic)# AIBase是所有AI功能实现类的基类,AI2D则用于处理图像# (AIBase is the base class for all AI function implementations, while AI2D is used for image processing)# 导入os模块,用于文件和目录操作# (Import os module for file and directory operations)import os# 导入ujson模块,用于JSON数据处理# (Import ujson module for JSON data processing)import ujson# os和ujson分别提供系统相关操作和JSON数据相关操作,不是每个例程都能用上# (os and ujson provide system-related operations and JSON data-related operations respectively, # they may not be used in every example)# 从media.media导入所有内容# (Import everything from media.media)from media.media import *# 从time模块导入所有内容# (Import everything from time module)from time import *# 导入nncase运行时库# (Import nncase runtime library)import nncase_runtime as nn# nncase是K230进行AI推理的核心模块,提供了便捷的方法供用户调用K230的KPU# (nncase is the core module for K230 AI inference, providing convenient methods # for users to call K230's KPU)# 导入ulab.numpy模块并别名为np# (Import ulab.numpy module and alias it as np)import ulab.numpy as np# ulab.numpy是从python的numpy中移植而来,用于进行一些AI运算中必要的矩阵操作# (ulab.numpy is ported from Python's numpy, used for necessary matrix operations in AI computations)# 导入time模块# (Import time module)import time# 导入utime模块# (Import utime module)import utime# 导入image模块# (Import image module)import image# 导入random模块# (Import random module)import random# 导入gc模块(垃圾回收)# (Import gc module (garbage collection))import gc# 导入sys模块# (Import sys module)import sys# 导入aidemo模块# (Import aidemo module)import aidemo# aidemo也是核心模块之一,K230固件中预制了非常多的AI玩法,# (aidemo is also one of the core modules, K230 firmware has many pre-built AI applications)# 通过aidemo模块可以快速简单的调用这些玩法中的复杂方法# (Through the aidemo module, you can quickly and easily call complex methods in these applications)# 导入 _thread 模块# (Import _thread module)import _thread# _thread 是线程模块,前面章节中我们有做过详细讲解,这里就不再赘述# (_thread is the threading module, we've explained it in detail in previous chapters, so we won't elaborate here)
Custom detection class
We can customize a detection class based on the AIBase class, which generally contains the following methods:
init Initialization function, used to configure basic information of AI tasks
def __init__(self, kmodel_path, model_input_size, rgb888p_size=[224,224], display_size=[1920,1080], debug_mode=0):# 调用基类的构造函数# (Call the constructor of the parent class)super().__init__(kmodel_path, model_input_size, rgb888p_size, debug_mode)# 模型文件路径# (Path to the model file)self.kmodel_path = kmodel_path# 模型输入分辨率# (Input resolution for the model)self.model_input_size = model_input_size# sensor给到AI的图像分辨率,并对宽度进行16的对齐# (Image resolution from sensor to AI, with width aligned to 16 pixels)self.rgb888p_size = [ALIGN_UP(rgb888p_size[0], 16), rgb888p_size[1]]# 显示分辨率,并对宽度进行16的对齐# (Display resolution, with width aligned to 16 pixels)self.display_size = [ALIGN_UP(display_size[0], 16), display_size[1]]# 是否开启调试模式# (Whether to enable debug mode)self.debug_mode = debug_mode# 实例化Ai2d,用于实现模型预处理# (Instantiate Ai2d for model preprocessing)self.ai2d = Ai2d(debug_mode)# 设置Ai2d的输入输出格式和类型# (Set the input/output format and data type for Ai2d)self.ai2d.set_ai2d_dtype(nn.ai2d_format.NCHW_FMT, nn.ai2d_format.NCHW_FMT, np.uint8, np.uint8)config_preprocess configures image processing information and some preprocessing operations
def config_preprocess(self, input_image_size=None):with ScopedTiming("set preprocess config", self.debug_mode > 0):# 初始化ai2d预处理配置,默认为sensor给到AI的尺寸,可以通过设置input_image_size自行修改输入尺寸# (Initialize ai2d preprocessing configuration, default is the size provided by the sensor to AI,# you can modify the input size by setting input_image_size)ai2d_input_size = input_image_size if input_image_size else self.rgb888p_size# 配置resize预处理方法# (Configure resize preprocessing method)# 这里使用了resize,Ai2d支持crop/shift/pad/resize/affine,具体代码请打开/sdcard/libs/AI2D.py查看# (Resize is used here, Ai2d supports crop/shift/pad/resize/affine,# check /sdcard/libs/AI2D.py for specific code)self.ai2d.resize(nn.interp_method.tf_bilinear, nn.interp_mode.half_pixel)# 构建预处理流程# (Build the preprocessing pipeline)# 参数分别为输入尺寸[batch,channel,height,width]和输出尺寸[batch,channel,height,width]# (Parameters are input size [batch,channel,height,width] and output size [batch,channel,height,width])self.ai2d.build([1,3,ai2d_input_size[1],ai2d_input_size[0]],[1,3,self.model_input_size[1],self.model_input_size[0]])PreProcess Image preprocessing
def preprocess(self, input_np):# 假设该任务需要crop和resize预处理,顺序是先resize再crop,该顺序不符合ai2d的处理顺序,因此需要设置两个Ai2d实例分别处理# (Assuming this task requires crop and resize preprocessing, in the order of resize first then crop,# which doesn't match ai2d's processing order, so two Ai2d instances are needed for separate processing)# 使用第一个ai2d实例执行resize操作# (Use the first ai2d instance to perform resize operation)resize_tensor = self.ai2d_resize.run(input_np)# 将resize后的tensor转换为numpy数组,以便进行下一步处理# (Convert the resized tensor to numpy array for the next processing step)resize_np = resize_tensor.to_numpy()# 使用第二个ai2d实例执行crop操作# (Use the second ai2d instance to perform crop operation)crop_tensor = self.ai2d_crop.run(resize_np)# 返回预处理后的tensor列表,便于后续推理使用# (Return the preprocessed tensor list for subsequent inference)return [crop_tensor]run is the core step for AI reasoning. For AI tasks without preprocessing, this function needs to be rewritten in the subclass.
def run(self, inputs_np):# 因为没有预处理过程,所以原来run操作(AIBase)中包含的preprocess->inference->postprocess不合适,这里只包含inference->postprocess# (Since there is no preprocessing process, the original run operation (AIBase) that includes# preprocess->inference->postprocess is not suitable, here it only includes inference->postprocess)# 先将ulab.numpy.ndarray列表转换成tensor列表# (First convert the ulab.numpy.ndarray list to a tensor list)tensors = []for input_np in inputs_np:# 将每个numpy数组转换为神经网络可接受的tensor格式# (Convert each numpy array to tensor format acceptable by the neural network)tensors.append(nn.from_numpy(input_np))# 调用AIBase内的inference函数进行模型推理# (Call the inference function within AIBase to perform model inference)results = self.inference(tensors)# 调用当前子类的postprocess方法进行自定义后处理# (Call the postprocess method of the current subclass for custom post-processing)outputs = self.postprocess(results)# 返回最终处理结果# (Return the final processing results)return outputs
PostProcess: post-process the results of AI recognition
def postprocess(self, results):# 自定义当前任务的后处理,results是模型输出array列表,这里使用了aidemo库的face_det_post_process接口# (Customize the post-processing for the current task, results is a list of model output arrays,# here the face_det_post_process interface from the aidemo library is used)# 使用ScopedTiming上下文管理器跟踪后处理阶段的执行时间(如果debug_mode大于0则启用)# (Use ScopedTiming context manager to track execution time of the post-processing phase if debug_mode > 0)with ScopedTiming("postprocess", self.debug_mode > 0):# 调用aidemo库的人脸检测后处理函数处理模型输出# (Call the face detection post-processing function from aidemo library to process model outputs)post_ret = aidemo.face_det_post_process(self.confidence_threshold, # 置信度阈值,用于过滤低置信度的检测结果# (Confidence threshold to filter out low-confidence detection results)self.nms_threshold, # 非极大值抑制阈值,用于合并重叠的边界框# (Non-maximum suppression threshold for merging overlapping bounding boxes)self.model_input_size[1], # 模型输入宽度,用于坐标转换# (Model input width, used for coordinate conversion)self.anchors, # 锚框配置,用于解码模型输出# (Anchor box configuration for decoding model outputs)self.rgb888p_size, # 原始图像尺寸,用于将检测结果映射回原始图像坐标系# (Original image size for mapping detection results back to original image coordinates)results # 模型推理输出的结果# (Results output from model inference))# 如果没有检测到人脸,直接返回空列表# (If no faces detected, return empty list directly)if len(post_ret) == 0:return post_ret# 否则返回第一个检测结果(假设这是单张图片的处理)# (Otherwise return the first detection result, assuming this is processing for a single image)else:return post_ret[0]DrawResult Draws the result on the screen
def draw_result(self, pl, dets):# 自定义绘制检测结果的方法,pl 是用于显示的对象,dets 是检测到的对象列表# (Custom method to draw detection results, pl is the display object, dets is the list of detected objects)# 使用ScopedTiming上下文管理器跟踪绘制阶段的执行时间(如果debug_mode大于0则启用)# (Use ScopedTiming context manager to track execution time of the drawing phase if debug_mode > 0)with ScopedTiming("display_draw", self.debug_mode > 0):# 检查是否有检测结果# (Check if there are detection results)if dets:pl.osd_img.clear() # 清除OSD图像# (Clear the OSD image)for det in dets:# 将检测框的坐标转换为显示分辨率下的坐标# (Convert the bounding box coordinates to the display resolution coordinates)x, y, w, h = map(lambda x: int(round(x, 0)), det[:4]) # 提取并四舍五入坐标# (Extract and round the coordinates)# 根据显示尺寸调整坐标# (Adjust coordinates according to display size)x = x * self.display_size[0] // self.rgb888p_size[0]y = y * self.display_size[1] // self.rgb888p_size[1]w = w * self.display_size[0] // self.rgb888p_size[0]h = h * self.display_size[1] // self.rgb888p_size[1]pl.osd_img.draw_rectangle(x, y, w, h, color=(255, 255, 0, 255), thickness=2)else:# 如果没有检测结果,清除OSD图像# (If there are no detection results, clear the OSD image)pl.osd_img.clear()
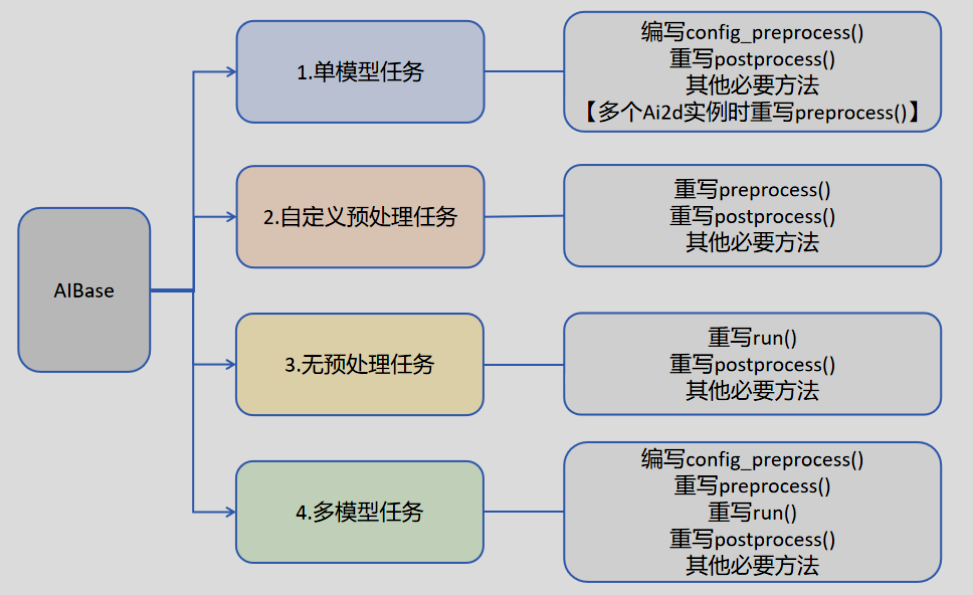
Not all AIBase methods need to be rewritten. We can divide tasks into four categories: single-model tasks, multi-model tasks, custom preprocessing tasks, and no preprocessing tasks. Different tasks require different code implementations, as shown in the following figure:
Execute the current routine
We define the exce_demo(pl) method to execute the current AI routine
The parameter pl passed in is a Pipeline instance
This design allows this AI routine to be called externally. Pipeline manages the global camera and display output of K230, so there can only be one Pipeline instance in a program run.
The code flow of this part is basically the same. Let's take the face detection routine as an example.
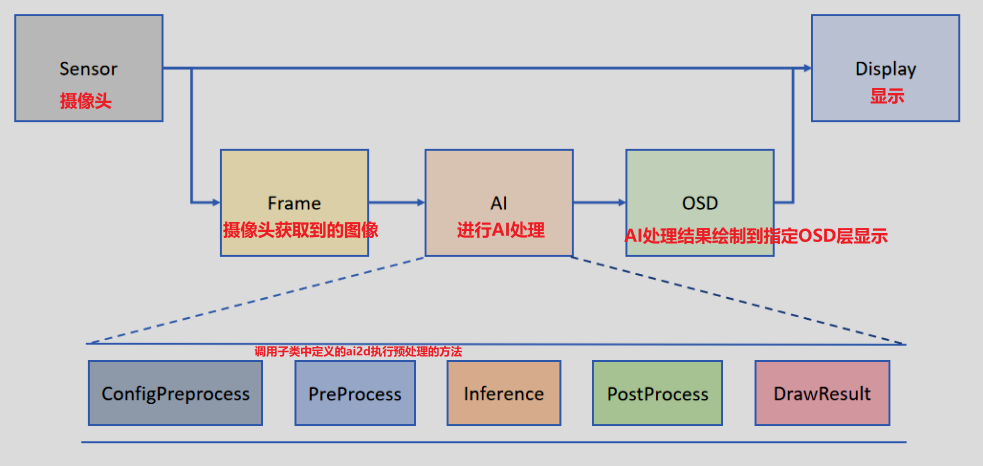
xxxxxxxxxxdef exce_demo(pl): # 全局变量face_det,用于记录人脸检测应用程序实例 global face_det # 获取当前显示模式、分辨率和显示尺寸 # (Get the current display mode, resolution and display size) display_mode = pl.display_mode rgb888p_size = pl.rgb888p_size display_size = pl.display_size # 设置模型路径和其他参数 # (Set the model path and other parameters) kmodel_path = "/sdcard/kmodel/face_detection_320.kmodel" confidence_threshold = 0.5 nms_threshold = 0.2 anchor_len = 4200 det_dim = 4 anchors_path = "/sdcard/utils/prior_data_320.bin" anchors = np.fromfile(anchors_path, dtype=np.float) anchors = anchors.reshape((anchor_len, det_dim)) try: # 创建人脸检测应用程序实例 # (Create a FaceDetectionApp instance) face_det = FaceDetectionApp( kmodel_path, model_input_size=[320, 320], anchors=anchors, confidence_threshold=confidence_threshold, nms_threshold=nms_threshold, rgb888p_size=rgb888p_size, display_size=display_size, debug_mode=0 ) face_det.config_preprocess() # 配置预处理 # (Configure the pre-processing) # 进入主循环 # (Enter the main loop) while True: with ScopedTiming("total", 0): # 获取当前帧数据 # (Get the current frame data) img = pl.get_frame() # 在当前帧上运行人脸检测 # (Run face detection on the current frame) res = face_det.run(img) # 绘制检测结果 # (Draw the detection results) face_det.draw_result(pl, res) # 显示结果图像 # (Show the result image) pl.show_image() # 进行垃圾回收 # (Perform garbage collection) gc.collect() # 短暂休眠一段时间 # (Sleep for a short duration) # 注:这是为了在其它程序中以多线程的形式调用人脸检测时,避免人脸检测的线程把CPU跑满 # Micropython 的线程机制是非抢占式的,需要执行中的线程主动调用time.sleep,否则将会一直占用处理器 time.sleep_us(10) except Exception as e: # 捕获异常并打印退出消息 # (Catch exceptions and print the exit message) print("人脸检测功能退出") finally: # 反初始化人脸检测应用程序 # (De-initialize the FaceDetectionApp) face_det.deinit()The execution flow chart is as follows:
In the definition of Pipeline, the Camera outputs two images by default: one in the format of YUV420SP (Sensor.YUV420SP), which is directly provided to the Display; the other in the format of RGBP888 (Sensor.RGBP888), which is used for AI processing. AI is mainly responsible for the pre-processing, reasoning and post-processing of the task. After the processing is completed, the result will be drawn on the OSD image instance and sent to the Display for overlay display.
End the current routine
The end routine part is very simple, just release the instance we created. Take face recognition as an example
x
def exit_demo(): global face_det face_det.deinit()
Main Process
When we want to call a routine in other programs, we need to import the routine, create an object of the routine and call the exce_demo() method, passing in the Pipeline instance.
If we want to run this routine directly in K230, we need to create a Pipeline instance in the main function
The code is as follows
if __name__ == "__main__": rgb888p_size=[640,360] display_size=[640,480] display_mode="lcd" # 初始化PipeLine,用于图像处理流程 # init pipeline pl = PipeLine(rgb888p_size=rgb888p_size, display_size=display_size, display_mode=display_mode) pl.create() # 创建PipeLine实例 create pipeline object # 初始化自定义人脸检测实例 # run process exce_demo(pl)