Cartographer-SLAM mapping
Cartographer-SLAM mapping1. Course Content2. Introduction to Cartographer2.1 Introduction2.2 Related Materials3. Preparation3.1 Content Description3.2 Starting the Agent4. Run the case4.1 Mapping Process4.2 Save the map4.3 Saving pbstream format maps5. Node parsing5.1 Displaying the Node Computation Graph5.2 TF Transformation5.3 Cartographer Node Details
1. Course Content
Learn the robot cartographer mapping algorithm for SLAM mapping function
After running the sample program, use the keyboard or handle to control the robot to move and complete the map construction and save the map.
2. Introduction to Cartographer
2.1 Introduction
Cartographer is an open-source 2D and 3D SLAM (simultaneous localization and mapping) library from Google, supported by the ROS system. This mapping algorithm utilizes graph optimizations (multi-threaded backend optimization and problem optimization built using Cere). It combines data from multiple sensors (such as LIDAR, IMU, and cameras) to simultaneously calculate sensor positions and map the surrounding environment.
The source code of cartographer mainly consists of three parts: cartographer, cartographer_ros and ceres-solver (backend optimization).
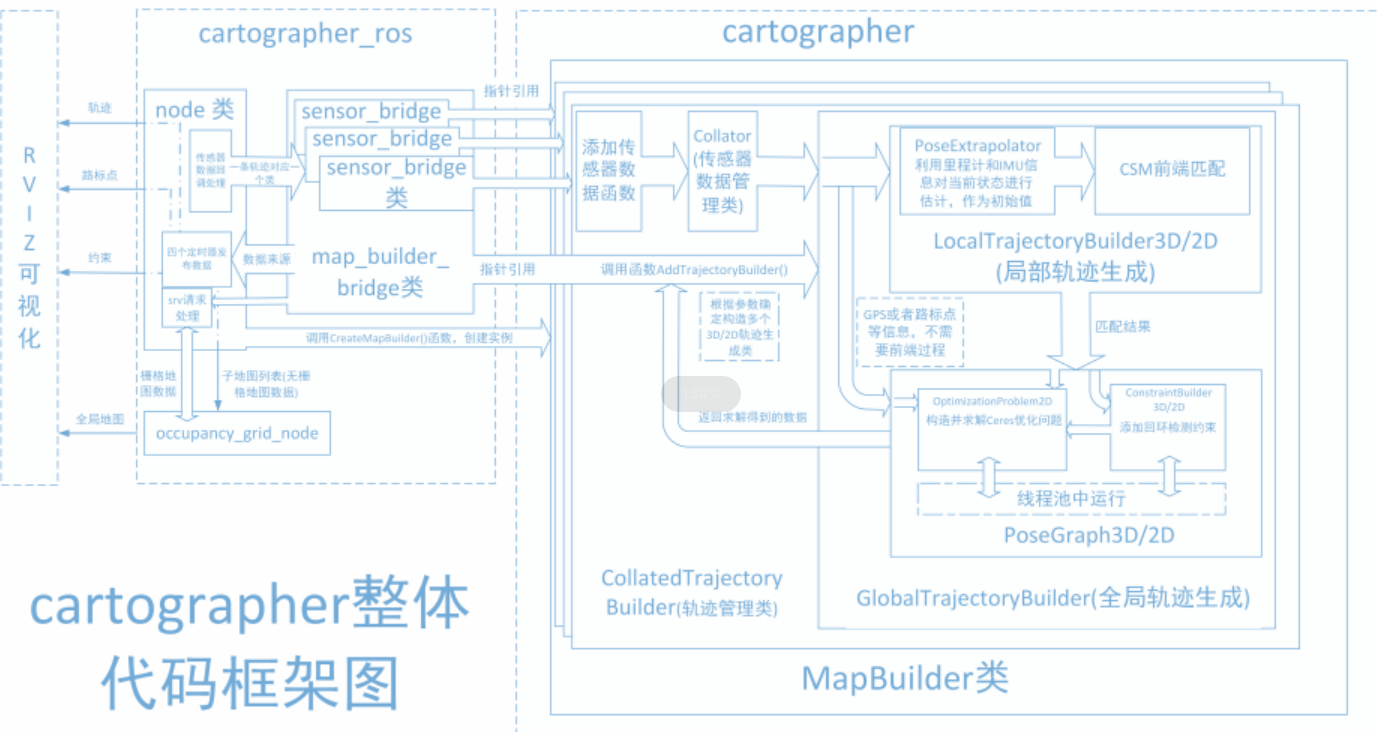
Cartographer uses the mainstream SLAM framework, which consists of a three-step process of feature extraction, loop closure detection, and backend optimization. A certain number of LaserScans form a submap, and a series of submaps form the global map. While the short-term cumulative error of constructing submaps using LaserScans is small, the long-term cumulative error of constructing a global map using submaps is significant. Therefore, loop closure detection is required to correct the positions of these submaps. The basic unit of loop closure detection is the submap, which uses the scan_match strategy. Cartographer focuses on creating submaps that fuse multi-sensor data (odometry, IMU, LaserScan, etc.) and implementing the scan_match strategy for loop closure detection.
- cartographer_ros
cartographer_ros runs under ROS and can receive various sensor data in the form of ROS messages.
After processing, it is published in the form of a message to facilitate debugging and visualization.
2.2 Related Materials
3. Preparation
3.1 Content Description
This lesson uses the Jetson Orin NX as an example. For Raspberry Pi and Jetson Nano boards, you need to open a terminal and enter the command to enter the Docker container. Once inside the Docker container, enter the commands mentioned in this lesson in the terminal. For instructions on entering the Docker container, refer to the product tutorial [Configuration and Operation Guide]--[Enter the Docker (Jetson Nano and Raspberry Pi 5 users, see here)]. For Orin and NX boards, simply open a terminal and enter the commands mentioned in this lesson.
3.2 Starting the Agent
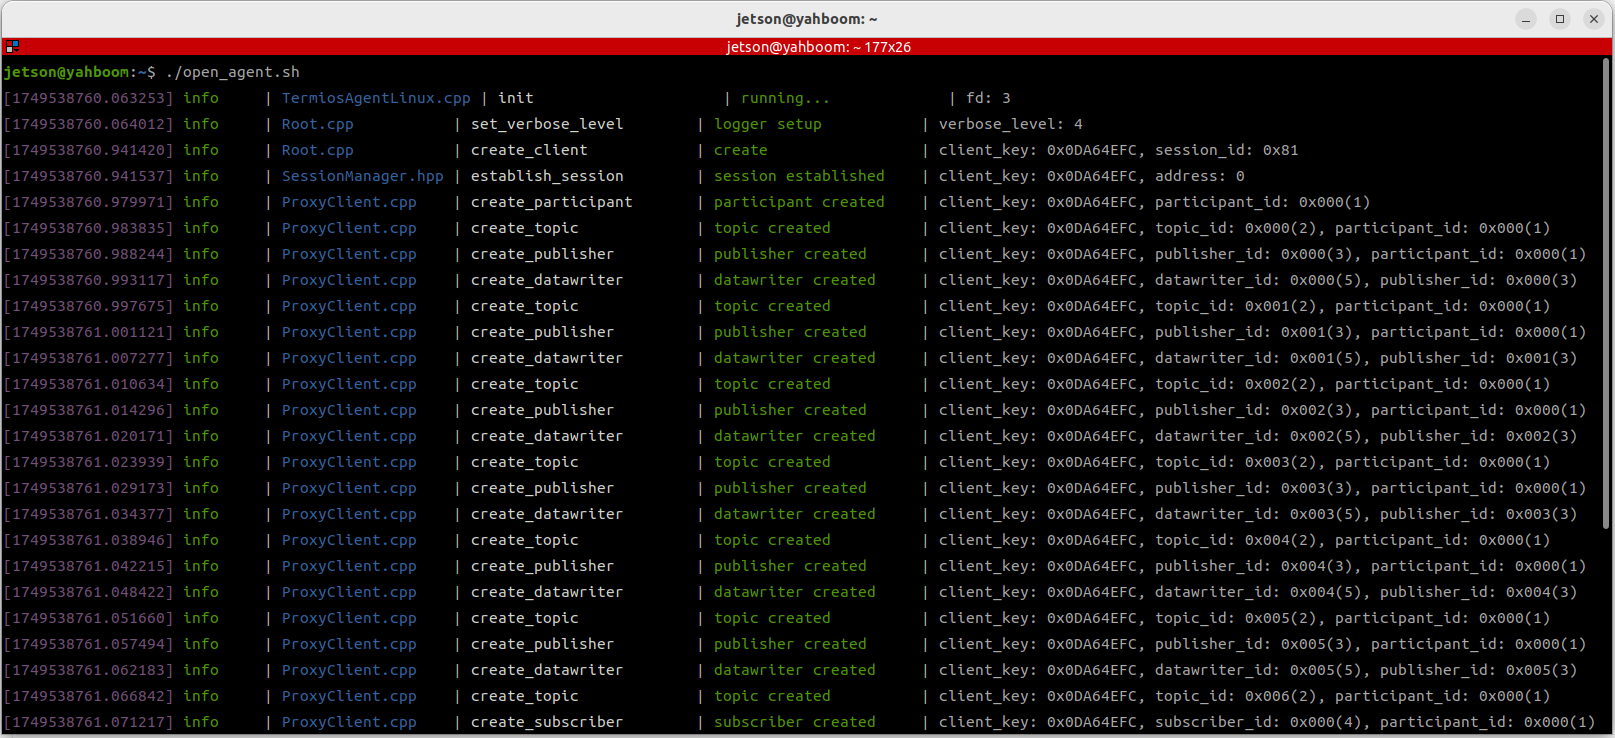
Note: To test all cases, you must start the docker agent first. If it has already been started, you do not need to start it again.
Enter the command in the vehicle terminal:
sh start_agent.sh
The terminal prints the following information, indicating that the connection is successful
4. Run the case
4.1 Mapping Process
Notice:
- When building a map, the slower the speed, the better the effect (mainly the slower the rotation speed). If the speed is too fast, the effect will be very poor.
- Jetson Nano and Raspberry Pi series controllers need to enter the Docker container first (please refer to the [Docker course chapter - Entering the robot's Docker container] for steps).
The vehicle terminal starts the underlying sensor command:
xxxxxxxxxxros2 launch slam_mapping bringup.launch.py
Restart the mapping command:
xxxxxxxxxxros2 launch slam_mapping cartographer.launch.py
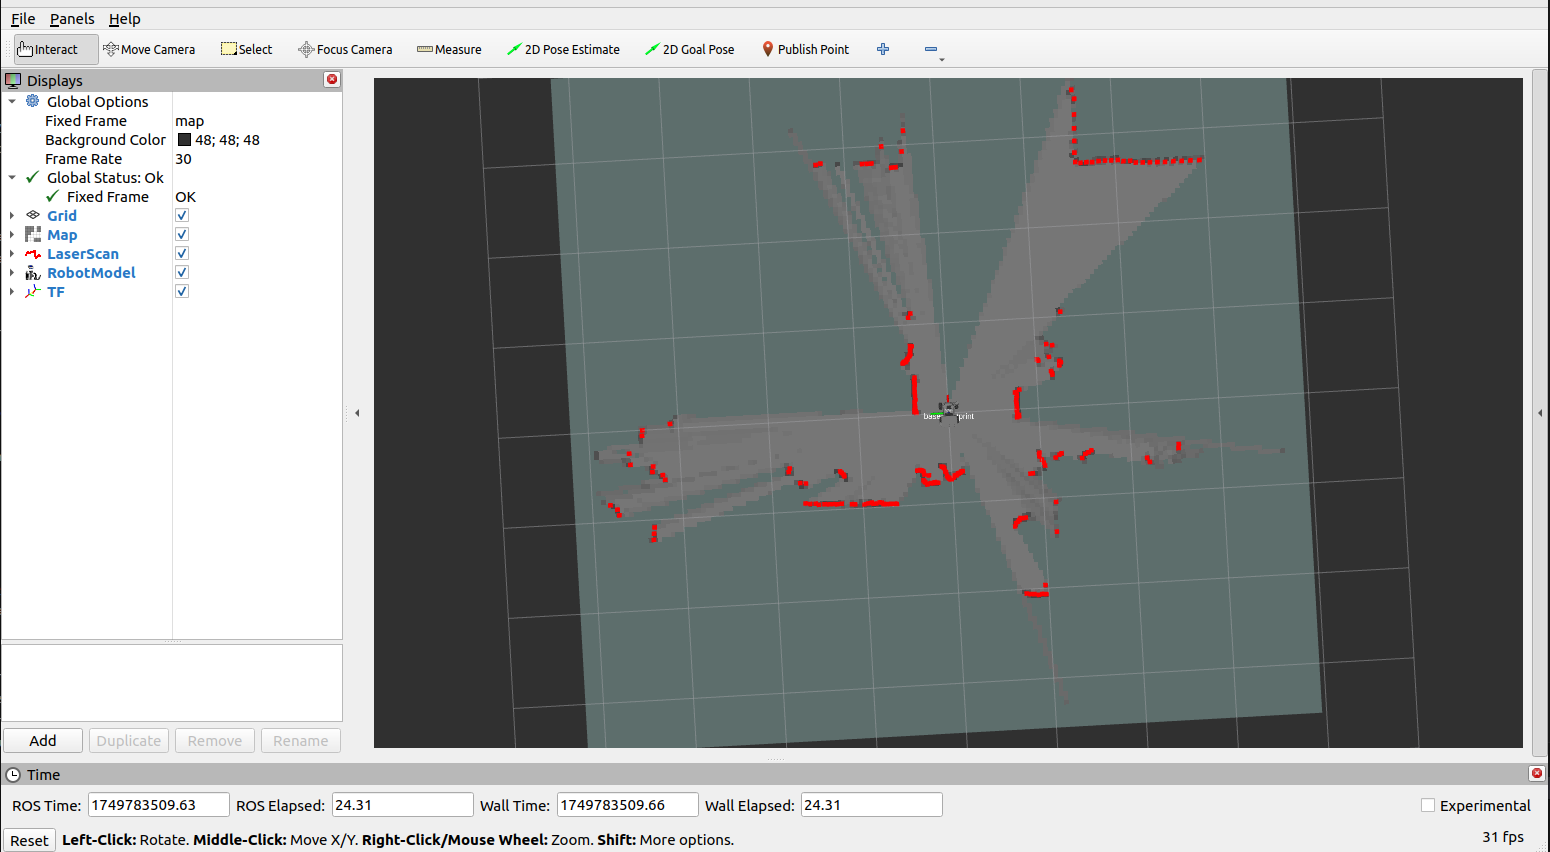
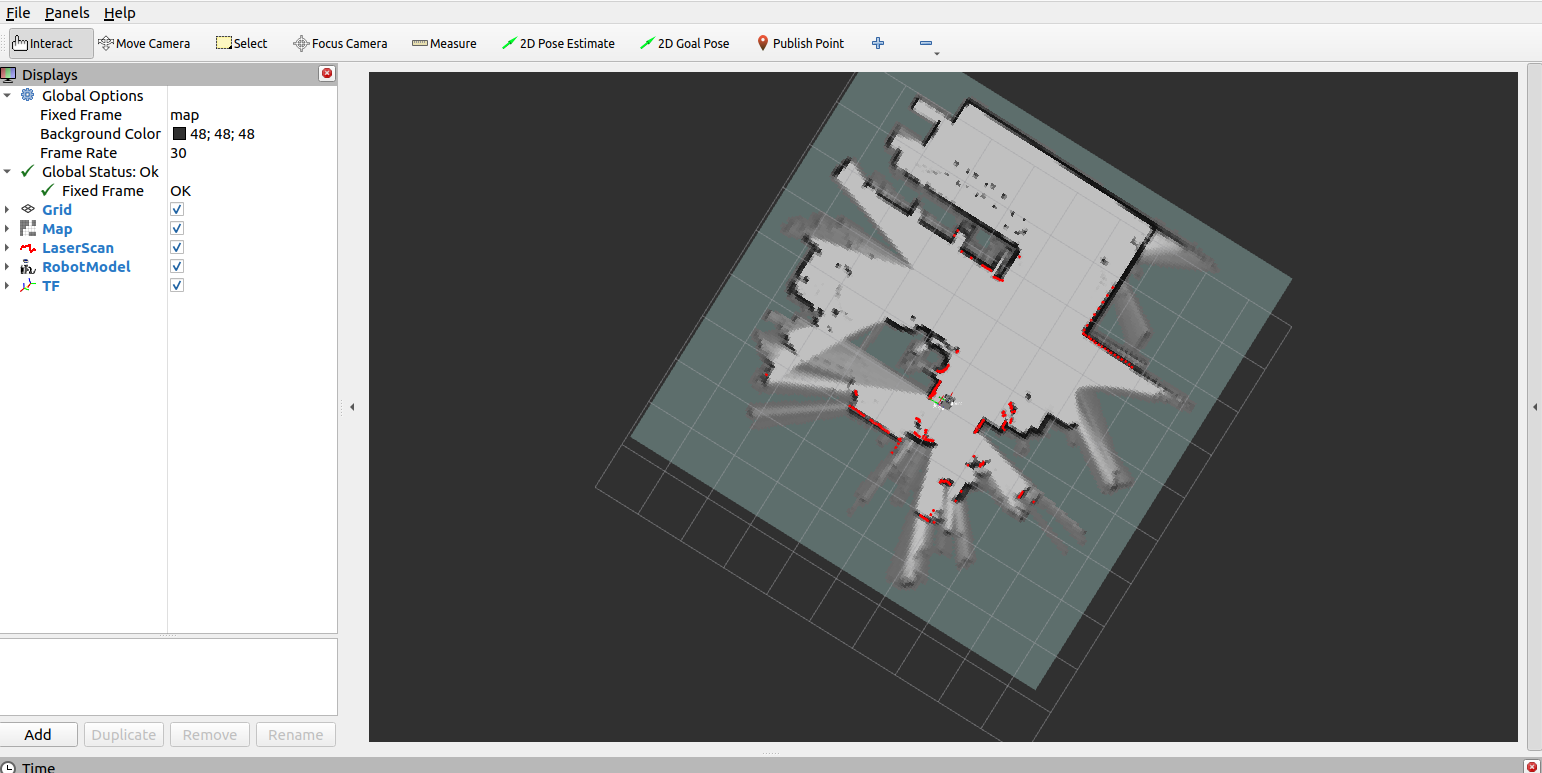
The rviz visualization function can be started on the vehicle side or the virtual machine side. You can choose either method to start it. It is forbidden to start it on the virtual machine side and the vehicle side repeatedly:
Taking the configuration of a virtual machine as an example, open a terminal and start the rviz visualization interface:
xxxxxxxxxxros2 launch slam_view slam_view.launch.py
Start the rviz visualization interface command on the vehicle:
xxxxxxxxxxros2 launch slam_mapping slam_view.launch.py
Open another terminal in the virtual machine to start the keyboard control node (you can also use the handle remote control):
xxxxxxxxxxros2 run yahboomcar_ctrl yahboom_keyboard
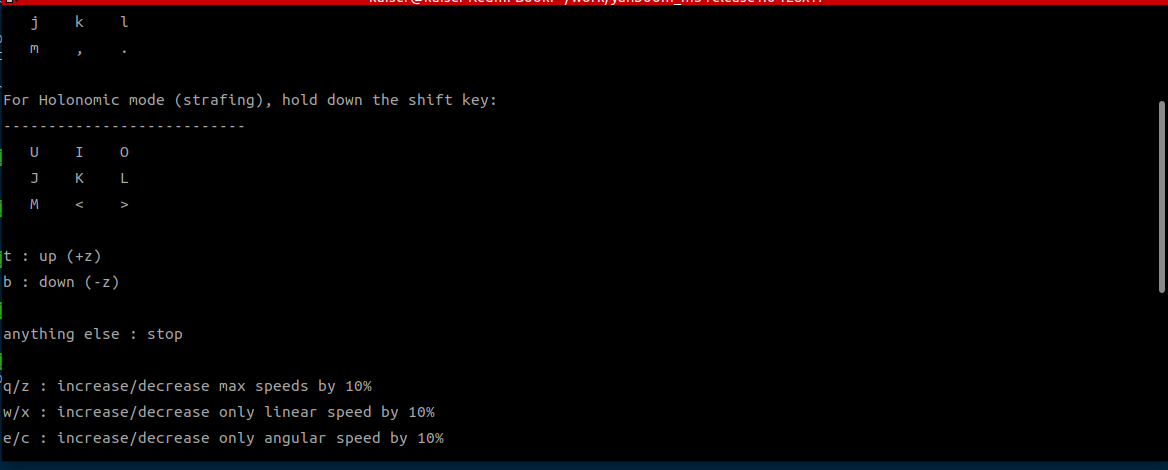
Click the window in the terminal with the mouse, press z to reduce the speed appropriately, press I, <, J, L to control the car to move forward, backward, turn left, and turn right respectively, and control the car to move slowly to complete the map building
4.2 Save the map
Open a new terminal on the car and save the map
xxxxxxxxxxros2 launch yahboomcar_nav save_map_launch.py
The terminal prompts "Map saved successfully" to indicate that the map has been saved successfully.
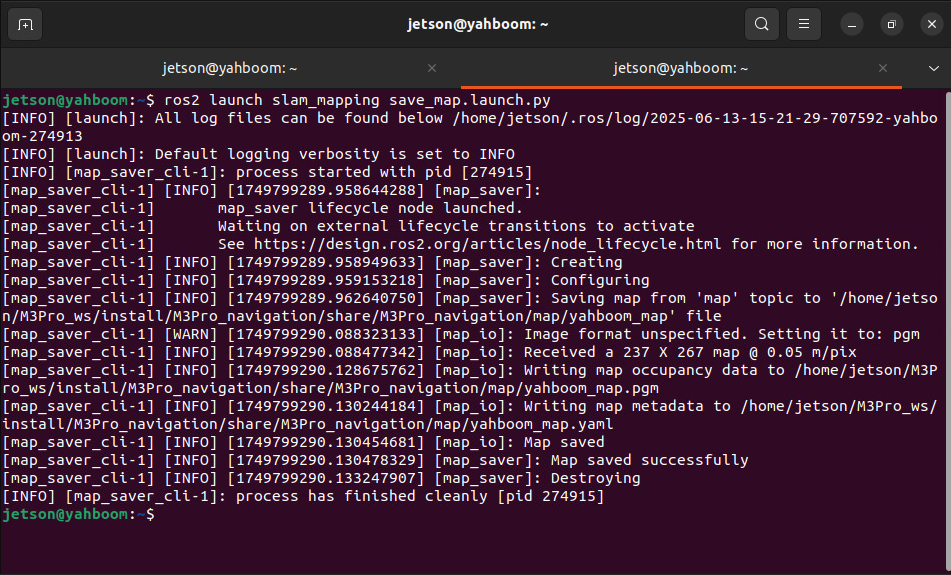
The map save path is as follows:
jetson orin nano, jetson orin NX :
xxxxxxxxxx/home/jetson/M3Pro_ws/install/M3Pro_navigation/share/M3Pro_navigation/map
Jetson Orin Nano, Raspberry Pi :
You need to enter docker first
xxxxxxxxxx/root/M3Pro_ws/install/M3Pro_navigation/share/M3Pro_navigation/map/
A pgm image, a yaml file yahboom_map.yaml
xxxxxxxxxximageyahboom_map.pgmmodetrinaryresolution0.05origin-10 -10 0negate0occupied_thresh0.65free_thresh0.25Parameter analysis:
- image: The path of the map file, which can be an absolute path or a relative path
- mode: This attribute can be one of trinary, scale or raw, depending on the selected mode. Trinary mode is the default mode.
- resolution: map resolution, meters/pixels
- origin: The 2D position (x, y, yaw) of the lower-left corner of the map, where yaw is a counterclockwise rotation (yaw=0 means no rotation). Currently, many parts of the system ignore the yaw value.
- negate: whether to invert the meaning of white/black, free/occupied (the interpretation of thresholds is not affected)
- occupied_thresh: Pixels with an occupancy probability greater than this threshold are considered fully occupied.
- free_thresh: Pixels with an occupancy probability less than this threshold are considered completely free.
4.3 Saving pbstream format maps
Map files in pbstream format are used for repositioning navigation, which will be explained in subsequent chapters.
After the map is built, open a new terminal and enter the command to end the map track:
xxxxxxxxxxros2 service call /finish_trajectory cartographer_ros_msgs/srv/FinishTrajectory "{trajectory_id: 0}"
Then open another terminal to save the pbstream format map file:
Save command on jetson orin nano and jetson orin NX s:
xxxxxxxxxxros2 service call /write_state cartographer_ros_msgs/srv/WriteState "{filename: '/home/jetson/yahboom_map.pbstream'}"
Save the command on Jetson Orin Nano and Raspberry Pi :
You need to enter docker first
xxxxxxxxxxros2 service call /write_state cartographer_ros_msgs/srv/WriteState "{filename: '/root/yahboom_map.pbstream'}"
5. Node parsing
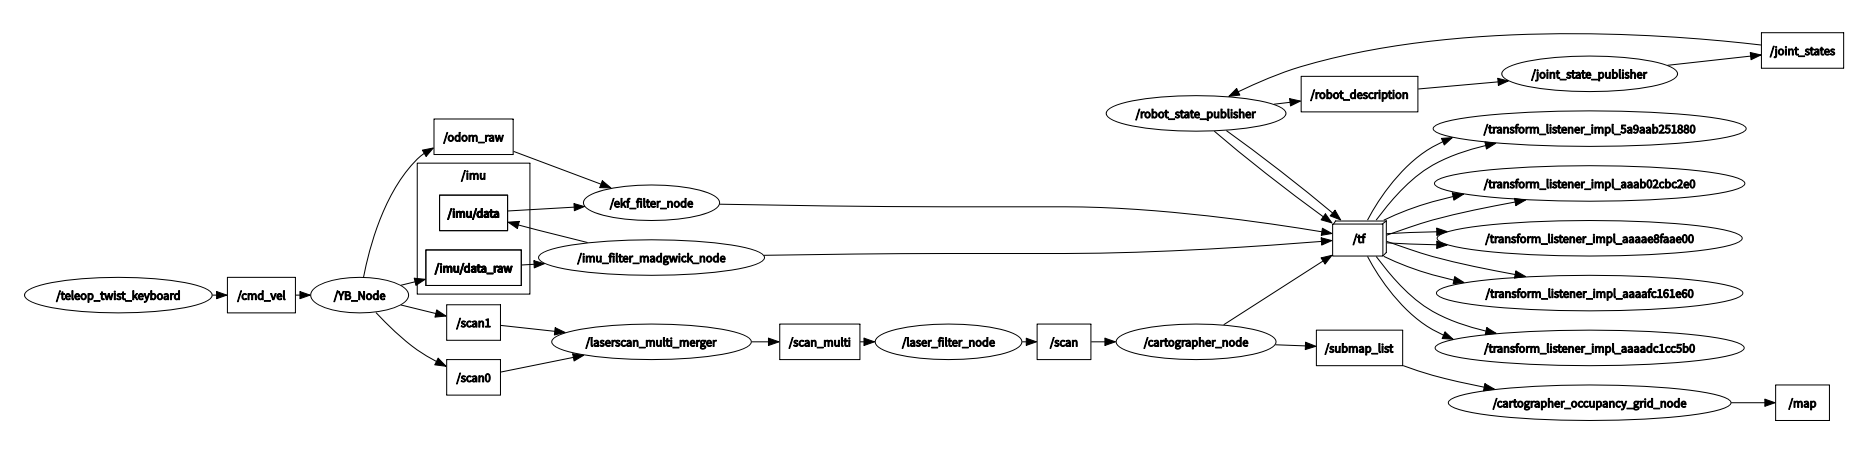
5.1 Displaying the Node Computation Graph
xxxxxxxxxxros2 run rqt_graph rqt_graph
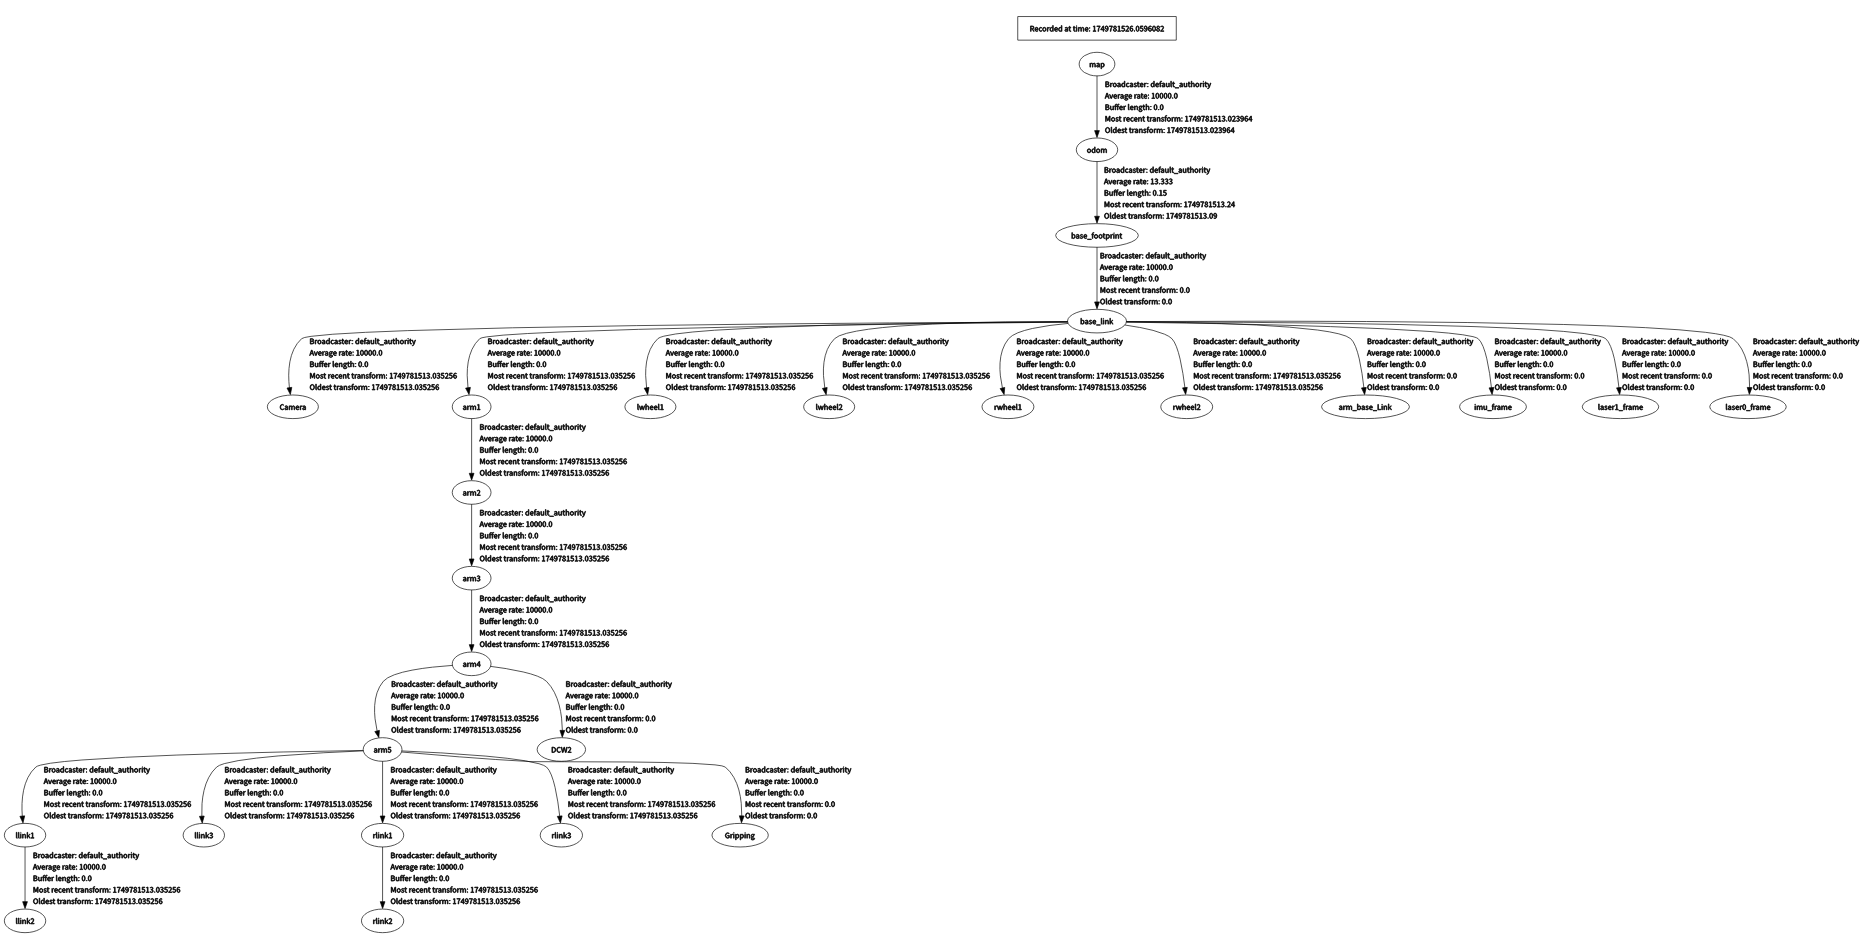
5.2 TF Transformation
The virtual machine terminal runs:
xxxxxxxxxxros2 run rqt_tf_tree rqt_tf_tree
The image size is too large. The original image can be viewed in the folder of this course.
5.3 Cartographer Node Details
xxxxxxxxxxros2 node info /slam_gmapping
Enter the above command in the terminal to view the subscription and publishing topics related to the gmapping node.
x/cartographer_nodeSubscribers:/parameter_events: rcl_interfaces/msg/ParameterEvent/scan: sensor_msgs/msg/LaserScanPublishers:/constraint_list: visualization_msgs/msg/MarkerArray/landmark_poses_list: visualization_msgs/msg/MarkerArray/parameter_events: rcl_interfaces/msg/ParameterEvent/rosout: rcl_interfaces/msg/Log/scan_matched_points2: sensor_msgs/msg/PointCloud2/submap_list: cartographer_ros_msgs/msg/SubmapList/tf:tf2_msgs/msg/TFMessage/trajectory_node_list: visualization_msgs/msg/MarkerArrayService Servers:/cartographer_node/describe_parameters: rcl_interfaces/srv/DescribeParameters/cartographer_node/get_parameter_types: rcl_interfaces/srv/GetParameterTypes/cartographer_node/get_parameters: rcl_interfaces/srv/GetParameters/cartographer_node/list_parameters: rcl_interfaces/srv/ListParameters/cartographer_node/set_parameters: rcl_interfaces/srv/SetParameters/cartographer_node/set_parameters_atomically: rcl_interfaces/srv/SetParametersAtomically/finish_trajectory: cartographer_ros_msgs/srv/FinishTrajectory/get_trajectory_states: cartographer_ros_msgs/srv/GetTrajectoryStates/read_metrics: cartographer_ros_msgs/srv/ReadMetrics/start_trajectory: cartographer_ros_msgs/srv/StartTrajectory/submap_query: cartographer_ros_msgs/srv/SubmapQuery/tf2_frames: tf2_msgs/srv/FrameGraph/trajectory_query: cartographer_ros_msgs/srv/TrajectoryQuery/write_state: cartographer_ros_msgs/srv/WriteStateService Clients:Action Servers:Action Clients: