AprilTag machine code following
AprilTag machine code following1. Program Functionality2. Program Code Reference Path3. Program Startup3.1. Startup Commands3.2 Dynamic Parameter Adjustment4. Core Code4.1. apriltagFollow.py
1. Program Functionality
After the program starts, it automatically detects the AprilTag in the image. When a tag is detected, the servos and gimbal lock onto it, keeping it centered in the image, and the robot enters follow mode. Press the
q/Qkey to exit the program. TheR2button on the remote controller has a [Pause/Start] function for this function.📝 The following object example uses a 3x3cm building block and an A36h11 series AprilTag. If you change the following object, you will need to adjust the corresponding parameters to achieve your desired effect!
2. Program Code Reference Path
xxxxxxxxxx~/yahboomcar_ros2_ws/yahboomcar_ws/src/yahboomcar_astra/yahboomcar_astra/apriltagFollow.py
apriltagFollow.py
This function mainly detects the AprilTag machine code and calculates the required servo rotation angle and vehicle angular velocity based on the tag's center coordinates. It also calculates the vehicle's required linear velocity based on the tag's area. After PID calculation, the data is sent to the vehicle chassis.
3. Program Startup
3.1. Startup Commands
For the Raspberry Pi 5 controller, you must first enter the Docker container. This is not necessary for the Orin board.
Enter the Docker container (for steps, see the Docker section [3. Docker Submission and Multi-Terminal Access]).
Enter the terminal.
xxxxxxxxxx# Start the car chassis and joystick nodesros2 launch yahboomcar_bringup yahboomcar_bringup_A1_launch.py# Start the Apriltag follower programros2 run yahboomcar_astra apriltagFollow 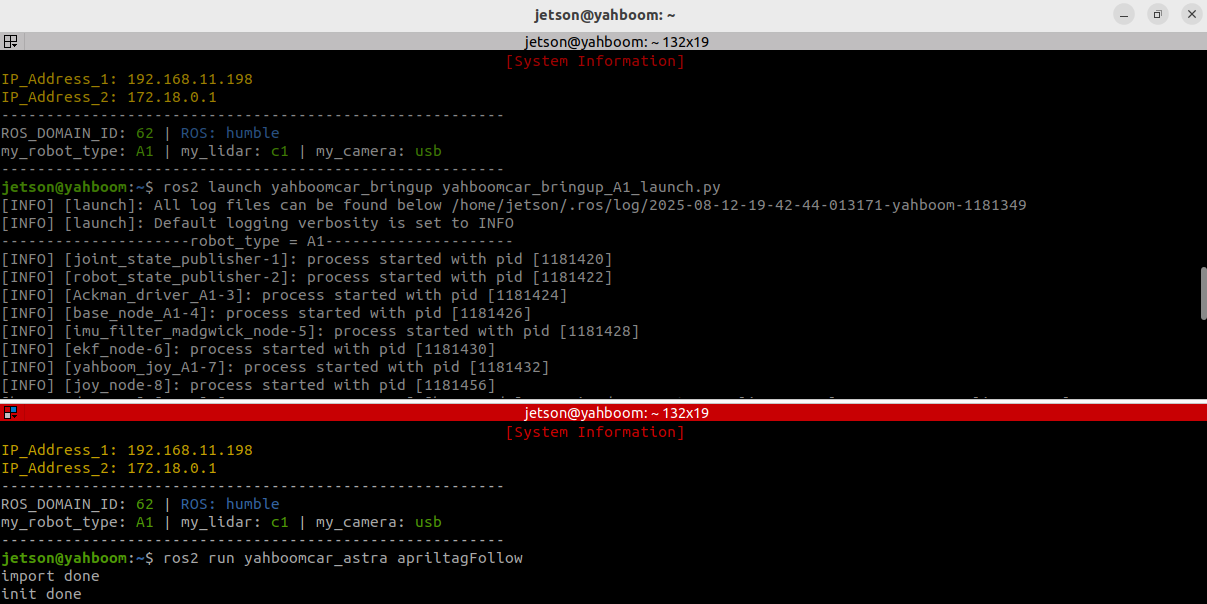
When the machine code is detected, it will automatically outline the machine code and display its center position and area.
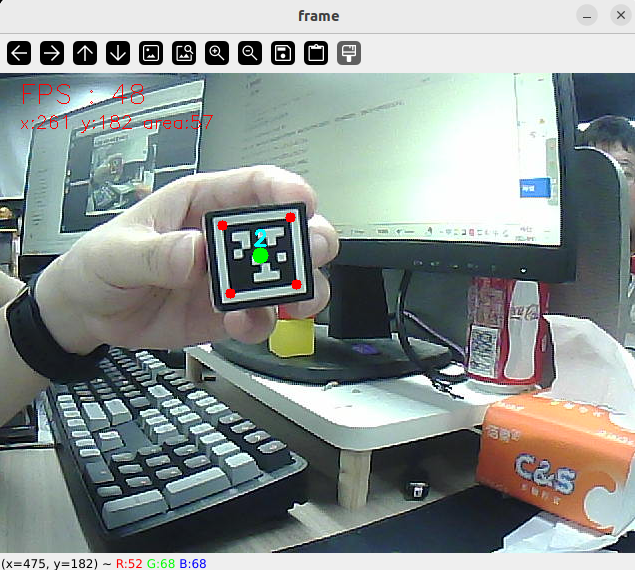
Then, the robot enters follow mode. Slowly move the object, and the robot and servo gimbal will follow.
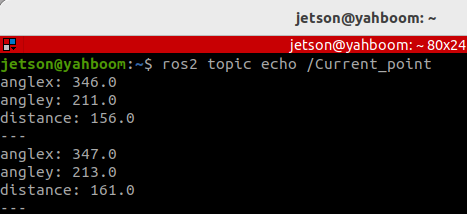
Alternatively, we can enter the following command to print the target center coordinates and area information:
xxxxxxxxxxros2 topic echo /Current_point
3.2 Dynamic Parameter Adjustment
Enter in the terminal:
xxxxxxxxxxros2 run rqt_reconfigure rqt_reconfigure
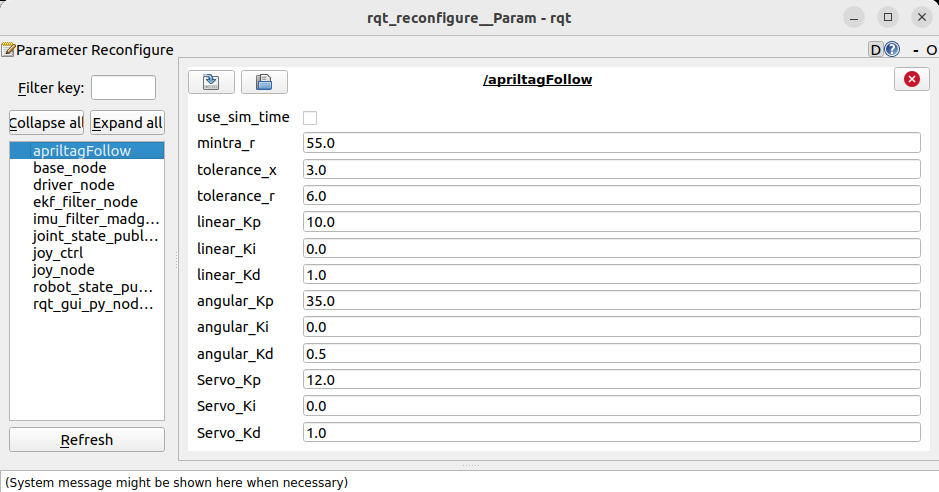
☑️ After modifying the parameters, click a blank area in the GUI to enter the parameter value. Note that this will only take effect for the current boot. To permanently effect the parameter, you need to modify it in the source code.
As shown in the figure above:
- apriltagFollow is primarily responsible for robot motion and can adjust PID-related parameters to optimize robot motion.
🛠 Parameter Explanation:
[mintra_r]: Critical tracking area. When the detected tag area is less than this value, the robot moves forward; when it is greater than this value, the robot moves backward.
[tolerance_x] and [tolerance_r]: X-axis position tolerance. When the deviation between the tag center point's x-coordinate and the screen center (320) is less than this value, alignment is considered complete and no further angle adjustment is performed. Area tolerance: When the deviation between the detected tag area and the critical tracking area (mintra_r) is less than this value, the distance is considered appropriate and no further distance adjustment is performed.
[linear_Kp], [linear_Ki], [linear_Kd]: PID control of linear velocity during robot following.
[angular_Kp], [angular_Ki], [angular_Kd]: Angular velocity PID control during the car's following process.
[Servo_Kp], [Servo_Ki], [Servo_Kd]: Speed PID control during the servo gimbal following process.
4. Core Code
4.1. apriltagFollow.py
This program has the following main functions:
- Opens the camera and acquires an image;
- Uses the Apriltag detector to detect tags;
- Processes the detection results and publishes the tag's center coordinates and area;
- Calculates the car's velocity and servo angle, and issues control commands.
Some core code is as follows:
xxxxxxxxxx# Create a publisher to publish the center coordinates and area of ••the tagself.pub_position = self.create_publisher(Position, "/Current_point", 10)# Define the servo data publisherself.pub_Servo = self.create_publisher(ServoControl, 'Servo', 10)# Define the vehicle velocity publisherself.pub_cmdVel = self.create_publisher(Twist, '/cmd_vel', 10)# Define the controller node data subscriberself.sub_JoyState = self.create_subscription(Bool,"/JoyState", self.JoyStateCallback, 1)...# Create an April tag detectorself.at_detector = Detector(searchpath=['apriltags'], families='tag36h11', nthreads=8, quad_decimate=2.0, quad_sigma=0.0, refine_edges=1, decode_sharpening=0.25, debug=0)...# Detecting Apriltagstags = self.at_detector.detect(cv.cvtColor(frame, cv.COLOR_BGR2GRAY), False, None, 0.025)tags = sorted(tags, key=lambda tag: tag.tag_id)frame = draw_tags(frame, tags, corners_color=(0, 0, 255), center_color=(0, 255, 0))...if len(tags) > 0: tag = tags[0] self.Center_x, self.Center_y = tag.center corners = tag.corners.reshape((-1, 2)) x, y, w, h = cv.boundingRect(corners.astype(np.int32)) self.Center_r = w * h //100 # Calculate label area self.execute(self.Center_x, self.Center_y, self.Center_r)...# According to the x value, y value and area, use the PID algorithm to calculate the car speed and servo angledef execute(self, x, y, z=None): position = Position() position.anglex = x * 1.0 position.angley = y * 1.0 position.distance = z * 1.0 self.pub_position.publish(position) ... # Calculate PID control quantity [linear_Pid, Servox_Pid, Servoy_Pid] = self.PID_controller.update([z - self.mintra_r, x - 320, y - 240]) angular_Pid = self.angular_PID_controller.update([self.PWMServo_X - self.init_servos1])[0] ... # Limit the linear velocity and angular velocity PID output range linear_Pid = max(-1.0, min(linear_Pid, 1.0)) angular_Pid = max(-3.0, min(angular_Pid, 3.0)) # Limit the servo PID polarity and maximum value Servox_Pid = Servox_Pid * (abs(Servox_Pid) <=self.Servo_Kp/2.4) Servoy_Pid = Servoy_Pid * (abs(Servoy_Pid) <=self.Servo_Kp/2.4) ... # Set the car speed and servo angle self.twist.linear.x = -linear_Pid self.twist.angular.z = -angular_Pid if self.img_flip else angular_Pid self.PWMServo_X += Servox_Pid if not self.img_flip else -Servox_Pid self.PWMServo_Y += Servoy_Pid if not self.img_flip else -Servoy_Pid ... # Issue control instructions self.pub_Servo.publish(self.servo_angle) self.pub_cmdVel.publish(self.twist)