Welcome to Jetson CUBE case repository
1. Install CubeNano driver library
CubeNano driver library
CubeNano driver libraryI. IntroductionII. Installation of dependent libraries1. smbus library2. Adafruit_SSD1306 libraryIII. Python driver library filesTransferring files to the motherboard systemV. Driver Library InstallationVI. Importing Library FilesVII. Querying the firmware version number1. Query the version number2. bot = CubeNano(i2c_bus=1)VIII. API Introduction
I. Introduction
With the CubeNano driver library installed, you can implement RGB light and fan peripheral control by calling the corresponding API functions.
Driver library update can also follow the steps below!
Please refer to the following steps to install the driver library, and here we take the V1.0.1 version installation as an example.
Note: CubeNano chassis power on the switch will automatically turn on the RGB lighting effects and fans.
II. Installation of dependent libraries
1. smbus library
CubeNano driver library installation needs to import time library and smbus library, which time library is python comes with, do not need to install their own, terminal input the following command to install smbus library.
xxxxxxxxxxpip3 install smbus
python smbus library functions to access serial I2C devices, using smbus library functions can be used to read and write I2C device information.
2. Adafruit_SSD1306 library
Since the OLED display also needs to use the relevant dependency libraries, we can install the required dependency libraries together, terminal input the following command to install the Adafruit_SSD1306 library.
xxxxxxxxxxpip3 install Adafruit_SSD1306
The python Adafruit_SSD1306 library is used to control the data display of our OLED display.
Note: If you are prompted for a missing PIL library in the OLED display tutorial, the following solution can be taken.
xxxxxxxxxxsudo apt-get install libjpeg-dev zlib1g-devpip3 install setuptoolspip3 install Pillow
III. Python driver library files
The latest version of the CubeNano Python driver library is provided inside this course material, named CubeNanoLib_V1.0.1.

Transferring files to the motherboard system
The following is only a brief introduction to several methods of transferring files, specific how to operate choose your own familiar way can be.
- VNC remote login to transfer files
- WinSCP file transfer
- Online file transfer: e.g. WeChat File Transfer Assistant web version, etc.
Choose one of these methods to transfer the CubeNanoLib_V1.0.1.zip file to the motherboard system.
V. Driver Library Installation
Open a terminal in the directory of the folder where the zip file is located and enter the following command:
The purpose of this command is to unzip and enter the file setup.py directory to run the installation command, no need to dwell on whether the version number is the same or not.
xxxxxxxxxxunzip CubeNanoLib_V1.0.1.zipcd CubeNanoLibsudo python3 setup.py install
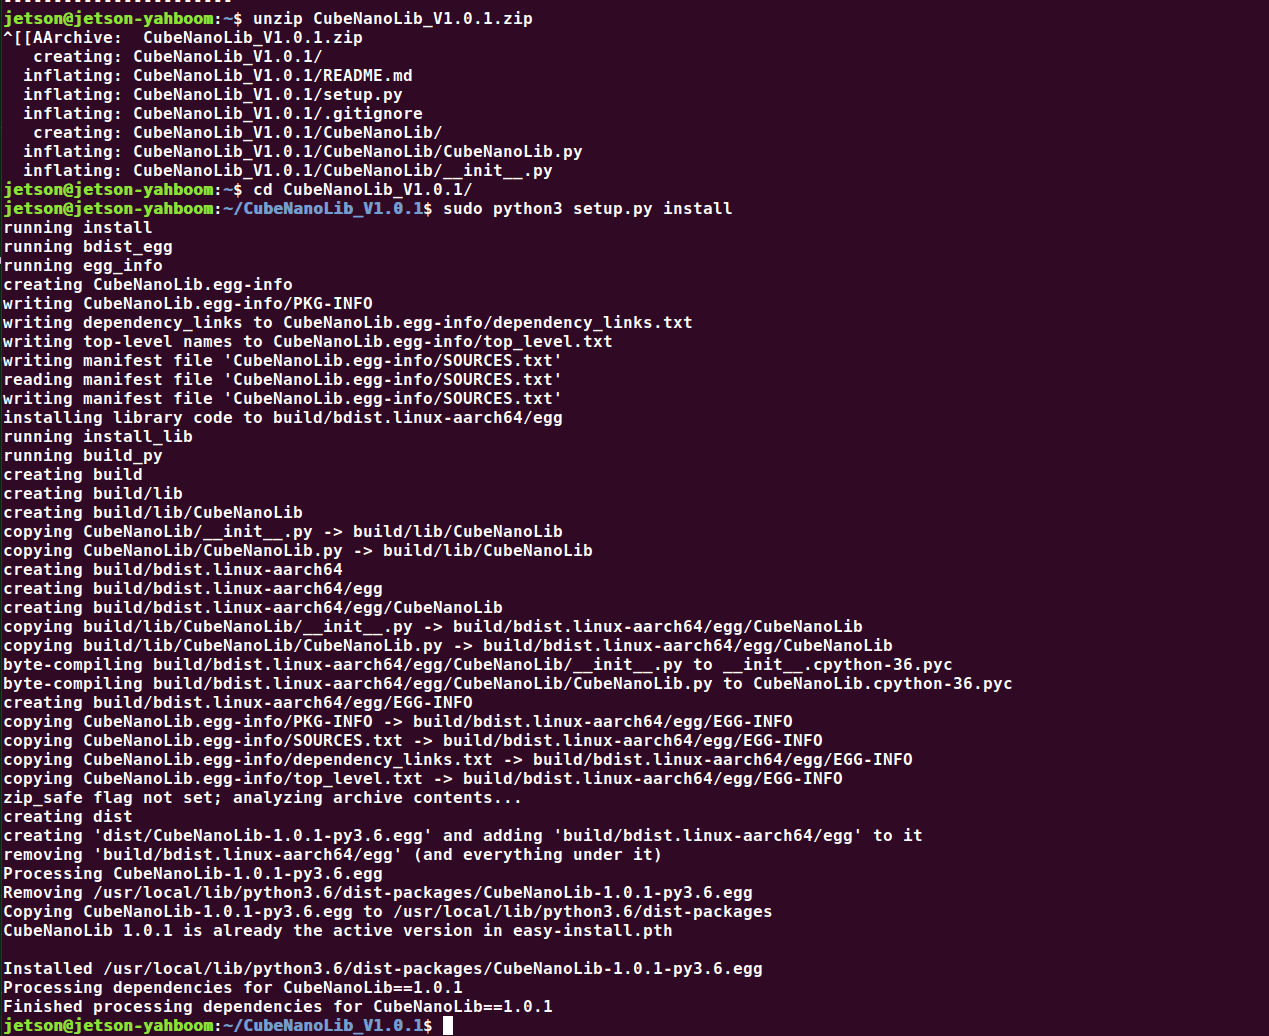
If you see the installation version number at the end, it means the installation is successful. This command will overwrite the CubeNanoLib driver library that has been installed before.
VI. Importing Library Files
The name of the CubeNano driver library is CubeNanoLib, use CubeNanoLib to import the library in the programme.
xxxxxxxxxxfrom CubeNanoLib import CubeNano # 导入CubeNano驱动库 # Import the CubeNano driver library
VII. Querying the firmware version number
1. Query the version number
(python interactive interface: each statement needs to be run separately)
Enter python in the terminal to enter the interactive interface.
xxxxxxxxxxfrom CubeNanoLib import CubeNano # 导入CubeNano驱动库 # Import the CubeNano driver librarybot = CubeNano(i2c_bus=1) # 创建对象,其中1代表 /dev/i2c-1# Create the object, where 1 stands for /dev/i2c-1version = bot.get_Version() # 获取版本号# Get version numberprint("version:",version) # 打印版本号# Print the version numberdel bot # 删除对象# Delete objects
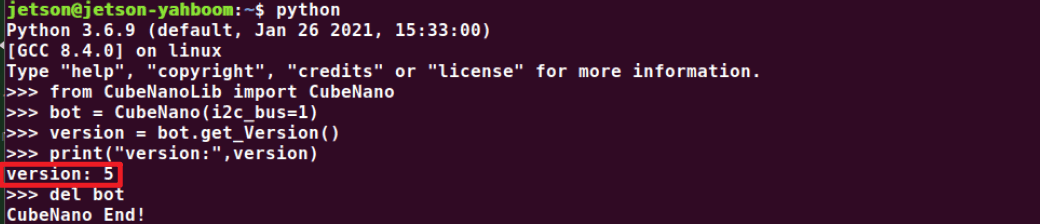
2. bot = CubeNano(i2c_bus=1)
Using the smbus library function, we need to create an object, where i2c_bus = 1 in the 1 represents i2c - 1, we are currently using the I2C device is mounted under this device bus.
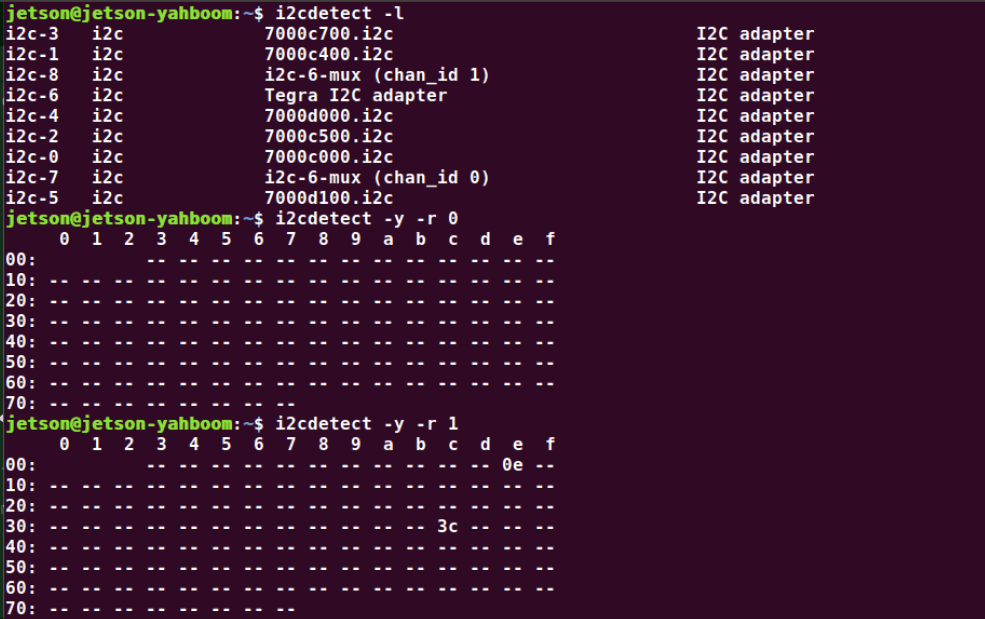
We can query the bus and address of the specific device through the following steps.
Query I2C bus
xxxxxxxxxxi2cdetect -l
The list displayed by the system needs to be queried all over again, we need to find the bus on which the two devices are mounted.
Query I2C devices
xxxxxxxxxxi2cdetect -l -r 1
Find the device bus with I2C addresses 0e and 3c, this bus is the device bus object we need to create
VIII. API Introduction
The following is a brief introduction to the API of the CubeNano driver library. Functional usage and parameter contents are introduced later in the control course.
xHelp on CubeNano in module CubeNanoLib.CubeNanoLib object:class CubeNano(builtins.object)| # V1.0.1|| Methods defined here:|| __del__(self)|| __init__(self, i2c_bus=7, delay=0.002, debug=False)| Initialize self. See help(type(self)) for accurate signature.|| get_Version(self)| # 获取固件版本号| # Obtain the firmware version number|| set_Fan(self, state)| # 控制风扇 start=0 关闭风扇 start=1 打开风扇| # control Fan start=0 close start=1 open|| set_RGB_Color(self, color)| # 设置RGB灯特效颜色 0-6:| # 0红色,1绿色,2蓝色,3黄色,4紫色,5青色,6白色| # Set RGB light effect color 0-6:| # 0 red, 1 green, 2 blue, 3 yellow, 4 purple, 5 cyan, 6 white|| set_RGB_Effect(self, effect)| # 控制RGB灯特效: 0关闭特效,1呼吸灯,2跑马灯,3彩虹灯,4炫彩灯,5流水灯,6循环呼吸灯| # Control RGB light effect:| # 0 off effect, 1 breathing light, 2 marquee light,3 rainbow light| # 4 dazzling lights, 5 running water lights,6 Circulation breathing lights|| set_RGB_Speed(self, speed)| # 设置RGB灯特效速度 1-3:1低速,2中速,3高速| # Set RGB light effect speed 1-3:1 low speed, 2 medium speed, 3 high speed|| set_Single_Color(self, index, r, g, b)| # 设置单个RGB灯颜色| # Set the individual RGB light color| # index表示灯珠序号0-13,index=255表示控制所有灯;| # r代表红色,g代表绿色,b代表蓝色| # index indicates the serial number of the lamp bead 0-13, index=255 means to control all lamps;| # r stands for red, g stands for green, and b stands for blue|| ----------------------------------------------------------------------| Data descriptors defined here:|| __dict__| dictionary for instance variables (if defined)|| __weakref__| list of weak references to the object (if defined)(END)