Welcome to RDK Official Binocular Camera repository
2. Stereo Depth Algorithm
2.Stereo Depth Algorithm
2.Stereo Depth AlgorithmFunction IntroductionSupported PlatformsAlgorithm Version InformationRDK Platform1.Confirm that the camera is correctly connected to the RDK board.RDK X5 access methodS100(P) access method2.The RDK has already burned the Ubuntu 22.04 system image.3.RDK has successfully installed tros.b4.Confirm that the PC can access RDK via the network.System and Package VersionsUsage InstructionsConfirm camera connectionRDK X5 connectionS100(P) connectionStart the stereo algorithmRDK X5View the depth mapView the point cloud
Function Introduction
The Digua stereo depth estimation algorithm takes stereo image data as input and outputs a disparity map and a depth map corresponding to the left view. The algorithm draws inspiration from the IGEV network and employs a GRU architecture, offering good data generalization and high inference efficiency.
RDK Official Stereo Depth Algorithm Tutorial:Stereo Depth Algorithm | RDK DOC
Stereo algorithm repository:https://github.com/D-Robotics/hobot_stereonet
MIPI camera repository:https://github.com/D-Robotics/hobot_mipi_cam
Supported Platforms
| Platform | OS Support | Example Function |
|---|---|---|
| RDK X5, RDK X5 Module | Ubuntu 22.04 (Humble) | Start stereo camera, infer depth results, and display on the web |
| RDK S100, RDK S100P | Ubuntu 22.04 (Humble) | Start stereo camera, infer depth results, and display on the web |
Algorithm Version Information
The following versions of the stereo algorithm are currently available:
| Algorithm Version | Features |
|---|---|
| X5 V2.0 | int16 quantization, high precision, low frame rate, max 15FPS depth map at 640*352 resolution |
| X5 V2.1 | int16 quantization, with confidence output, max 15FPS depth map at 640*352 resolution |
| X5 V2.2 | int8 quantization, lower precision, higher frame rate, max 23FPS depth map at 640*352 resolution |
| X5 V2.3 | int8 quantization, further improved frame rate, max 27FPS depth map at 640*352 resolution |
| X5 V2.4 int16 | int16 quantization, trained with more data, max 15FPS depth map at 640*352 resolution |
| X5 V2.4 int8 | V2.4 int8 quantization version, max 23FPS depth map at 640*352 resolution |
| S100 V2.1 | int16 quantization, with confidence output, max 53FPS depth map at 640*352 resolution |
| S100 V2.4 | int16 quantization, with confidence output, trained with more data, max 53FPS depth map at 640*352 resolution |
RDK Platform
1.Confirm that the camera is correctly connected to the RDK board.
The installation method is shown in the figure. Do not reverse the wiring, otherwise the left and right diagrams will be swapped, and the binocular algorithm will malfunction.

RDK X5 access method

S100(P) access method
With the power off, the camera expansion board switches are set to LPWM and 3.3V respectively.

Camera wiring


2.The RDK has already burned the Ubuntu 22.04 system image.
3.RDK has successfully installed tros.b
4.Confirm that the PC can access RDK via the network.
System and Package Versions
| Version | Query Method | |
|---|---|---|
| RDK X5 System Image Version | 3.3.1 or higher | cat /etc/version |
| RDK S100 System Image Version | 4.0.2-Beta or higher | cat /etc/version |
| tros-humble-hobot-stereonet Package Version | 2.4.4 or higher | apt list | grep tros-humble-hobot-stereonet/ |
| 2.3.11 or higher | apt list | grep tros-humble-mipi-cam/ |
- If the system version does not meet the requirements, please refer to the corresponding documentation section for image flashing.
- If the package version does not meet the requirements, please execute the following commands to update:
sudo apt updatesudo apt upgradeUsage Instructions
NOTE:Please execute the commands in this document as the root user. Other users may encounter permission issues, leading to unnecessary errors.
Confirm camera connection
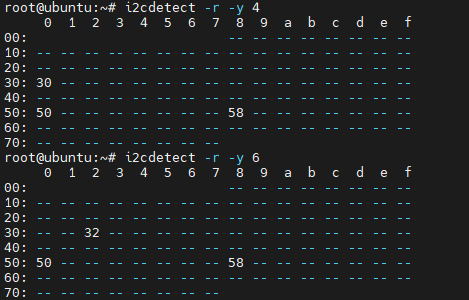
- To verify a proper camera connection, connect to RDK via SSH and execute the following command. If addresses such as 0x30, 0x32, or 0x50 are output, the camera connection is successful:
RDK X5 connection
xxxxxxxxxx# RDK X5i2cdetect -r -y 4i2cdetect -r -y 6
S100(P) connection
xxxxxxxxxx# RDK S100i2cdetect -r -y 1i2cdetect -r -y 2

Start the stereo algorithm
- To launch the corresponding version of the stereo algorithm using different launch files, connect to the RDK via SSH and execute the following commands:
RDK X5
The following commands only require selecting one version to run; after running them, continue reading.
x# Only supports RDK X5# Configure the tros.b humble environmentsource /opt/tros/humble/setup.bash# The launch file for the stereo model contains the startup instructions for the algorithm and the stereo camera nodes.ros2 launch hobot_stereonet stereonet_model_web_visual_v2.0.launch.py \mipi_image_width:=640 mipi_image_height:=352 mipi_lpwm_enable:=True mipi_image_framerate:=30.0 mipi_rotation:=90.0 \need_rectify:=False height_min:=-10.0 height_max:=10.0 pc_max_depth:=5.0xxxxxxxxxx# Supports RDK X5 and RDK s100(p)# Configure the tros.b humble environmentsource /opt/tros/humble/setup.bash# The launch file for the stereo model contains the startup instructions for the algorithm and the stereo camera nodes.ros2 launch hobot_stereonet stereonet_model_web_visual_v2.1.launch.py \mipi_image_width:=640 mipi_image_height:=352 mipi_lpwm_enable:=True mipi_image_framerate:=30.0 mipi_rotation:=90.0 \need_rectify:=False height_min:=-10.0 height_max:=10.0 pc_max_depth:=5.0 \uncertainty_th:=0.1xxxxxxxxxx# Only supports RDK X5# Configure the tros.b humble environmentsource /opt/tros/humble/setup.bash# The launch file for the stereo model contains the startup instructions for the algorithm and the stereo camera nodes.ros2 launch hobot_stereonet stereonet_model_web_visual_v2.2.launch.py \mipi_image_width:=640 mipi_image_height:=352 mipi_lpwm_enable:=True mipi_image_framerate:=30.0 mipi_rotation:=90.0 \need_rectify:=False height_min:=-10.0 height_max:=10.0 pc_max_depth:=5.0xxxxxxxxxx# Only supports RDK X5# Configure the tros.b humble environmentsource /opt/tros/humble/setup.bash# The launch file for the stereo model contains the startup instructions for the algorithm and the stereo camera nodes.ros2 launch hobot_stereonet stereonet_model_web_visual_v2.3.launch.py \mipi_image_width:=640 mipi_image_height:=352 mipi_lpwm_enable:=True mipi_image_framerate:=30.0 mipi_rotation:=90.0 \need_rectify:=False height_min:=-10.0 height_max:=10.0 pc_max_depth:=5.0xxxxxxxxxx# RDK X5 executes the following commands:# Select either int16 or int8 version# Configure the tros.b humble environmentsource /opt/tros/humble/setup.bash# The int16 version is the launch file for starting the stereo model, which contains the startup instructions for the algorithm and stereo camera nodes.ros2 launch hobot_stereonet stereonet_model_web_visual_v2.4_int16.launch.py \mipi_image_width:=640 mipi_image_height:=352 mipi_lpwm_enable:=True mipi_image_framerate:=30.0 mipi_rotation:=90.0 \need_rectify:=False height_min:=-10.0 height_max:=10.0 pc_max_depth:=5.0# This is an int8 version launcher file for the stereo model, containing the startup instructions for the algorithm and stereo camera nodes.ros2 launch hobot_stereonet stereonet_model_web_visual_v2.4_int8.launch.py \mipi_image_width:=640 mipi_image_height:=352 mipi_lpwm_enable:=True mipi_image_framerate:=30.0 mipi_rotation:=90.0 \need_rectify:=False height_min:=-10.0 height_max:=10.0 pc_max_depth:=5.0# The RDK S100 executes the following command:# Configure the tros.b humble environmentsource /opt/tros/humble/setup.bash# The launch file for the stereo model contains the startup instructions for the algorithm and the stereo camera nodes.ros2 launch hobot_stereonet stereonet_model_web_visual_v2.4.launch.py \mipi_image_width:=640 mipi_image_height:=352 mipi_lpwm_enable:=True mipi_image_framerate:=30.0 mipi_rotation:=90.0 \need_rectify:=False height_min:=-10.0 height_max:=10.0 pc_max_depth:=5.0 \uncertainty_th:=0.1Parameter descriptions:
| Name | Value | Description |
|---|---|---|
| mipi_image_width | Set to 640 | MIPI camera output resolution is 640*352 |
| mipi_image_height | Set to 352 | MIPI camera output resolution is 640*352 |
| mipi_lpwm_enable | Set to True | MIPI camera enables hardware synchronization |
| mipi_image_framerate | Set to 30.0 | MIPI camera output frame rate is 30.0FPS |
| need_rectify | Set to False | Since the official camera comes with factory calibration parameters and automatically rectifies, there is no need to load custom calibration files for rectification |
| height_min | Set to -10.0 | Minimum point cloud height is -10.0m |
| height_max | Set to 10.0 | Maximum point cloud height is 10.0m |
| pc_max_depth | Set to 5.0 | Maximum point cloud distance is 5.0m |
| uncertainty_th | Set to 0.1 | Confidence threshold, used to filter noise points. It is recommended to set it to 0.1. A lower confidence threshold results in stricter filtering. |
- The following log indicates that the stereo algorithm has started successfully.
fx/fy/cx/cy/base_lineare the camera intrinsic parameters. If the depth map is normal but the estimated distance is incorrect, there may be an issue with the camera intrinsic parameters:

View the depth map
- View the depth map via the web interface by entering http://ip:8000 in the browser (the RDK IP in the image is 192.168.1.100):

View the point cloud
- View the point cloud via rviz2. RDK can directly install rviz2 for viewing. Note the following configurations in rviz2:
xxxxxxxxxx# Install rviz2sudo apt install ros-humble-rviz2# Start rviz2source /opt/tros/humble/setup.bashrviz2
- If the user wants to save the depth estimation results, the following parameters can be added to enable saving.
save_image_allenables saving,save_freqcontrols the saving frequency,save_dirspecifies the save directory (automatically created if it does not exist), andsave_totalcontrols the total number of saves. The program will save camera intrinsic parameters, left and right images, disparity map, depth map, and visualization map:
xxxxxxxxxx# Configure tros.b humble environmentsource /opt/tros/humble/setup.bash# Here, the V2.0 version of the algorithm is used as an example. Similar parameters can be added to other versions of the algorithm.ros2 launch hobot_stereonet stereonet_model_web_visual_v2.0.launch.py \mipi_image_width:=640 mipi_image_height:=352 mipi_lpwm_enable:=True mipi_image_framerate:=30.0 \need_rectify:=False height_min:=-10.0 height_max:=10.0 pc_max_depth:=5.0 \save_image_all:=True save_freq:=4 save_dir:=./online_result save_total:=10
Parameter descriptions:
| Name | Value | Description |
|---|---|---|
| save_image_all | Set to True | Enable image saving |
| save_freq | Set to 4 | Save every 4 frames. Can be modified to any positive number. |
| save_dir | Set to the image save directory | Can be set to the desired save location. |
| save_total | Set to 10 | Save a total of 10 images. Set to -1 to save continuously. |

