yahboom
HomeLearn
Solution
Blog
Online Store
About Us
EN/中文
DOFBOT-Pi📖
00.Must Read Before Use!!
  • 00.Must Read Before Use!!
01.First Trial
  • 1.First Trial
  • 2.Analysis of common problems
  • 3.Calibration offset
  • 4.Precautions for DIY Robotic Arm
  • 5.Jetson Nano Version – Must Read
  • 6.Robotic arm gripping anomaly solutions
02.Assemble Course
  • 1.Installation video
  • 2.Calibrate the Robotic Arm
  • 3.Install the map
03.Remote control course
  • 1.Mobile APP control
  • 2.USB handle control
  • 3.PC web page programming
04.Preparation
  • 1.Manage APP control service
  • 2.Manage JupyterLab service
  • 3.Manage OLED service
  • 4.Modifying ROS_DOMAIN_ID for Multi-Machine
  • 5.Jetpack old system upgraded to SUPER system
05.Basic control course
  • 1.Control RGB light
  • 2.Control buzzer
  • 3.Control single servo
  • 4.Read servo angle
  • 5.Control all servo
  • 6.DOFBOT up down left right
  • 7.DOFBOT dancing
  • 8.DOFBOT memory action
  • 9.DOFBOT grab block
  • 10.Porter
  • 11.Stacked Arhat
  • 12.Synchronous action
  • 13.USB camera display
06.AI vision basic course
  • 1.Gesture Recognition
  • 2.Color threshold adjustment&Color calibration
  • 3.Color recognition
  • 4.Face recognition
  • 5.YOLOv11 garbage recognition
  • 6.YOLOv11 object recognition
07.2D Visual Tracking Course
  • 1.PID algorithm basics
  • 2.Color block positioning
  • 3.Color block tracking
  • 4.Face positioning
  • 5.Face tracking
  • 6.Gesture recognition fixed action
08.2D Visual Grasping Course
  • 1.Gesture recognition stack blocks
  • 2.Color recognition grab blocks
  • 3.Catch game
  • 4.Color sorting and stacking
  • 5.Garbage sorting
  • 6.Color interaction
09.Mediapipe course
  • 1.Hand detection
  • 02.Posture detection
  • 3.Overall detection
  • 4.Facial Detection
  • 5.Face Detection
  • 6.Face effects
  • 7.3D object recognition
  • 8.Paintbrush
  • 9.Finger control
  • 10.Gesture Recognition
  • 11.Gesture control robotic arm action group
  • 12.Arm posture control robotic arm
  • 13.Palm Targeting
  • 14.Robotic arm tracks the palm
  • 15.Fingertip trajectory recognition
  • 16.Fingertip trajectory control robotic arm
  • 17.Gesture Grasp and Release Objects
  • 18.Finger Control Robot Arm
10.AI Large Model Voice Module (Must Read)new
  • 1. Introduction to AI Large Model Voice Module
  • 2. Flash the firmware (Must read)
  • 3. Modify the wake-up word and command word
11.2D Voice Control Coursenew
  • 01.Simple Voice Control
  • 02.Smart Voice Control
  • 03.Voice Action Control
  • 04.Memory Learning Mode
  • 05.Color Recognition with Voice Broadcast
  • 06.Color Recognition and Grasping with Voice Broadcast
  • 07.Color Recognition and Sorting with Voice Broadcast
  • 08.Voice Recognition Target Tracking
  • 09.Voice Control Stacking
  • 10.Voice Control Color Sorting and Stacking
  • 11.Garbage Recognition with Voice Broadcast
  • 12.Garbage Sorting with Voice Broadcast
12.Robotic Arm Control and Inverse Kinematics
  • 1. Robotic arm ROS control
  • 2. Inverse solution
13.3D Sorting and Grasping Coursenew
  • 1.AprilTag ID sorting
  • 2.MediaPipe Gesture-AprilTag ID sorting
  • 3.MediaPipe Gesture-AprilTag distance sorting
  • 4.Block color sorting
  • 5.Block different shape sorting
  • 6.Yolov11 garbage sorting
14.3D Tracking Coursenew
  • 1.AprilTag Tracking
  • 2.Color Block Tracking
  • 3.KCF Object Tracking
15.3D Voice Control for Sorting & Tracking Coursenew
  • 1.Voice Control AprilTag ID Sorting
  • 2.Voice Control Color Block Sorting
  • 3.Voice Control Yolov11 Garbage Recognition Sorting
  • 4.Voice Control AprilTag Tracking
  • 5.Voice Control Color Block Tracking
  • 6.Voice Control Object Tracking
16.AI Model Basicsnew
  • 1.AI large model types and principles
  • 2.RAG retrieval enhancement and model training samples
  • 3.Embodied intelligent robot system architecture
  • 4.Embodied intelligent functions core source code
17.AI Model Developmentnew
  • 1.Register a model service provider account
  • 2. Configure API-KEY
  • 3. Introduction to Dify
  • 4. Basic Dify Features
  • 5. Deploy the RAG knowledge base
  • 6. AI Large Model Development - chatbot
  • 7. RAG knowledge base + chatbot
  • 8. AI agent workflow
18.AI Model – Text Versionnew
  • 1. Semantic understand instruction following
  • 2. Multimodal visual understand
  • 3. Text Large Model + robotic arm control
  • 4. Multimodal Large Model+video understanding
  • 5. Multimodal Large Model+robotic arm gripping
  • 6. Multimodal Large Model+robotic arm tracking
  • 7. Multimodal Large Model+robotic arm sorting
  • 8. Multimodal Large Model+robotic arm handling
  • 9. Multimodal Large Model+Color Blocks Back In Place
  • 10. Multimodal Large Model + Intent Prediction + Robotic Arm Gripping
  • 11. Text Large Model + YOLOv11 + Intelligent Garbage Classification
19.AI Model – Voice Versionnew
  • 1. Semantic understand instruction following
  • 2. Multimodal visual understand
  • 3. Text Large Model + robotic arm control
  • 4. Multimodal Large Model+video understanding
  • 5. Multimodal Large Model+robotic arm gripping
  • 6. Multimodal Large Model+robotic arm tracking
  • 7. Multimodal Large Model+robotic arm sorting
  • 8. Multimodal Large Model+robotic arm handling
  • 9. Multimodal Large Model+Color Blocks Back In Place
  • 10. Multimodal Large Model + Intent Prediction + Robotic Arm Gripping
  • 11. Text Large Model + YOLOv11 + Intelligent Garbage Classification
20.AI Model – Fun Applicationsnew
  • 1.AI Butler-Intent Inference
  • 2.AI Encyclopedia-Arithmetic Master
  • 3.AI Encyclopedia-You asked I Pointed
  • 4.AI Encyclopedia-Nutritional Analysis
  • 5.AI Encyclopedia-Problem Solving Expert
  • 6.AI Encyclopedia-English Spelling
  • 7.AI Butler-Garbage Sorting
  • 8.AI Top Chef
21.MoveIt2 Course
  • 1.MoveIt configuration
  • 2. MoveIt Usage
  • 3. MoveIt Drive Real Robot
  • 4. MoveIt Random Movement
  • 5. MoveIt Forward Kinematics Design
  • 6. MoveIt Inverse Kinematics Design
  • 7. MoveIt Cartesian Path
  • 8. MoveIt Scene Design
  • 9. MoveIt Trajectory Planning
  • 10. MoveIt Collision Detection
22.YOLOv11 Development Course
  • 1. YOLO Environment Setup
  • 2. CLI Usage
  • 3. Object Detection
  • 4. Instance Segmentation
  • 5. Pose Estimation
  • 6. Image Classification
  • 7. Oriented Bounding Boxes Object Detection
  • 8. Model Conversion
  • 9. Model Prediction
23.Linux Operating System
  • 1.Introduction to Linux system
  • 2.Ubuntu file system
  • 3.Ubuntu common commands
  • 4.Ubuntu common editors
  • 5.Ubuntu software operation commands
  • 6.Virtual machine installation
  • 7.SSH remote control
  • 8.VNC remote control
  • 9.Transfer files remotely
  • 10.Driver library and communication
  • 11.Capacity expansion and resource allocation
  • 12.Bind device ID
  • 13.Capacity expansion and resource allocation
  • 14.Update system software sources
  • 15.Set root user password
  • 16.sudo free password
  • 17.Connect to WiFi network
  • 18.View system version
  • 19.Customized service management
  • 20.Back up system image
24.GPIO Hardware Control Course
  • 1.GPIO description
  • 2.GPIO library installation
  • 3.GPIO reading
  • 4.GPIO output
  • 5.Serial communication
  • 6.I2C communication
25.OpenCV course
  • 0. Must Read!
  • 1. Introduction to Open Source CV
  • 2. Image reading and display
  • 3. Image writing
  • 4. Image quality
  • 5. Pixel Operation
  • 6.Image zoom
  • 7.Picture cut
  • 8.Picture pan
  • 9.Picture mirroring
  • 10.Affine transformation
  • 11.Picture rotation
  • 12.perspective transformation
  • 13.Grayscale processing
  • 14.Binary image
  • 15.Edge green detection
  • 16.Line segment drawing
  • 17.Rectangular circle drawing
  • 18.Text and picture drawing
26.ROS2 Basic Course
  • 1.Introduction to ROS2
  • 2.ROS2 install Humble
  • 3.ROS2 development environment
  • 4.ROS2 workspace
  • 5.ROS2 function package
  • 6.ROS2 node
  • 7.ROS2 topic communication
  • 8.ROS2 service communication
  • 9.ROS2 action communication
  • 10.ROS2 custom interface message
  • 11.ROS2 parameter service case
  • 12.ROS2 meta-function package
  • 13.ROS2 distributed communication
  • 14.ROS2 DDS
  • 15.ROS2 time related API
  • 16.ROS2 common command tools
  • 17.ROS2 rviz2 use
  • 18.ROS2 rqt toolbox
  • 19.ROS2 Launch startup file configuration
  • 20.ROS2 recording and playback tool
  • 21.ROS2 URDF model
  • 22.ROS2 Gazebo simulation platform
  • 23.ROS2 TF2 coordinate transformation
27. Advanced Visuals Course
  • 0. Must Read! Porting and Compilation
  • 1. QR Code
  • 2. Human Pose Estimation
  • 3. Object Detection
  • 4. AR Vision
  • 5. ROS + OpenCV Basics
28.Jupyter Lab Usage Course
  • 0.Read the document before operation
  • 1.Jupyter Lab environment construction
  • 2.Basic use of Jupyter Lab
  • 3.Jupyter Lab plug-in installation
  • 4.Basic use of Jupyter Widgets
29.Docker Course
  • 1.Docker overview and docker installation
  • 2.Common commands for docker image containers
  • 3.Docker images deeply understand and publish images
  • 4.Docker hardware interaction and data processing
  • 5.Start the Dofbot container
30.Python Programming Basics
  • 1.Python usage
  • 2.Use APT to install Python packages
  • 3.Python virtual environment
  • 4.GPIO Zero
  • 5.Pin output high and low levels
  • 6.Pin reads high and low levels
  • 7.Pin output PWM
Download
  • APP(iOS/Android)
  • Code
  • System Image
  • VM File
  • PC software
  • Instruction manual
  • More Annex
  • Tools
Download ZIP
FAQ
  • 1、Precautions for DIY Robotic Arm
  • 2、Where i can to check Raspberry Pi 4 Version tutorials?
  • 3、When you control the No.1 servo, all servos will turn.
  • 4、Dofbot start up process video
  • 5、Gesture recognition cannot work normally
  • 6、How to write image file into SD card
  • 7、How open VNC service on DOFBOT system
  • 8、Where can I get the URDF file?

Welcome to DOFBOT-Pi repository

2.Calibrate the Robotic Arm

Calibrate the Robotic Arm

This case requires starting the corresponding Docker for Dofbot to run!

I. API Introduction

  1. The API for turning on or off bus servo torque is: Arm_serial_set_torque(enable)

Parameter explanation:

enable: enable=0 turns off torque, the robotic arm can manually adjust the servo angle and does not receive level signals; enable=1 turns on torque, the servo receives level signals to maintain the current angle, and commands can be sent to change the angle. Return value: None.

  1. Arm_serial_servo_write_offset_switch(id)

Parameter explanation:

id: When id=0, clear all servo neutral position adjustments and restore defaults; id=1~6 corresponds to the six servo IDs. After receiving this command, the underlying microcontroller will read the angle data of the corresponding ID servo. If it's within a reasonable range, it will be saved; if it exceeds the range or the servo ID cannot be found, it will not be saved. Return value: None.

  1. Arm_serial_servo_write_offset_state()

Parameter explanation:

Return value: Returns the state of setting neutral position deviation, state=0 means the servo was not detected; state=1 means neutral position set successfully; state=2 means the neutral position setting exceeds the range value.

II. Code Content

Code path: /root/Dofbot/2.sys_settings/2.Offset/offset.ipynb

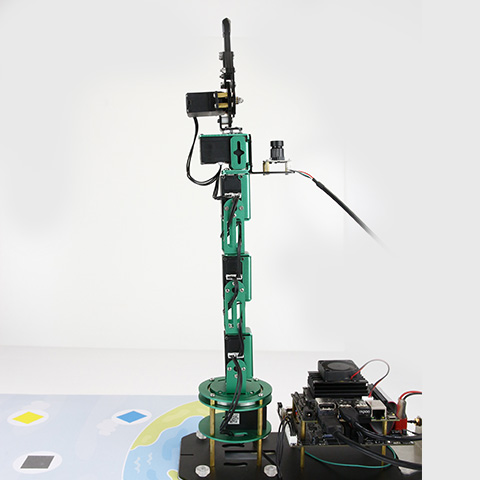
This code cannot be executed all at once in sequence; it must be executed step by step to ensure correct adjustment. The result of the adjustment is to keep the robotic arm in an upright position.

Note: This program should only be used when adjusting the neutral position. Do not use it arbitrarily, otherwise it will cause inaccurate neutral position and affect grasping performance.

​x
#!/usr/bin/env   python3
#coding=utf-8
import   time
from   Arm_Lib import Arm_Device
​
# Create robotic arm object
Arm = Arm_Device()
time.sleep(.1)
# Make servos return to center upright position
Arm.Arm_serial_servo_write6(90, 90, 90, 90, 90, 180, 1000)
time.sleep(2)
# Turn off torque, now you can manually adjust servo angles by hand
Arm.Arm_serial_set_torque(0)
# After adjusting the angle of a certain servo, you can individually set the neutral position deviation of that servo
id = 6
Arm.Arm_serial_servo_write_offset_switch(id)
time.sleep(.1)
state   = Arm.Arm_serial_servo_write_offset_state()
if   state == 1:
    print("set offset ok!")
elif state == 2:
    print("error! set offset overrun !")
elif state == 0:
    print("error! set offset error !")
# You can also set all servos (1-6) neutral position deviation at once
for i in range(6):
    id = i + 1
    Arm.Arm_serial_servo_write_offset_switch(id)
    time.sleep(.1)
    state =   Arm.Arm_serial_servo_write_offset_state()
    if state == 1:
        print("id:%d set offset   ok!" % id)
    elif state == 2:
        print("error!id:%d set offset   overrun !" % id)
    elif state == 0:
        print("error!id:%d set offset error !" % id)
# After adjustment is complete, turn on torque
Arm.Arm_serial_set_torque(1)
# Clear all servo neutral position deviation settings, restore default state.
# If you need to clear all servo neutral position deviations, remove the # below and run this cell
#Arm.Arm_serial_servo_write_offset_switch(0)
del Arm  # Release the Arm object
​

img

Installation video
Install the map

COMPANY

  • About us
  • Team Style
  • Blog

LEARNING & EXPLORATION

  • Tutorials
  • Edge AI hardware
  • Educational robots
  • Embedded intelligent hardware

WHERE TO BUY

  • Yahboom Online Store
  • Amazon
  • Alibaba
  • AliExpress
  • Mercado

TECHNOLOGY SUPPORT

  • Email: support@yahboom.com

BE A DISTRIBUTOR

  • Email: sales@yahboom.com
QR Code

Copyright © 2017-2026 Yahboom. All Rights Reserved.

EN/中文