Welcome to Game Handle repository
Introduction to the Handle
Gamepad Introduction
Note
The gamepad supports wired/wireless connections. The 2.4G wireless transmission distance is approximately 16 meters, and Bluetooth transmission is based on the 5.3 protocol with a transmission distance of approximately 5 meters. The gamepad has a total of sixteen buttons (including the power switch).
The product test source code and examples we provide are only applicable to DINPUT mode. Press and hold the FN key (O key) + SELECT key for three seconds to switch. Some source code requires a car for use!
The gamepad supports rapid-fire functionality. If you experience button jitter when pressing a button, please disable the rapid-fire function for the corresponding button according to the instruction manual.
The testing tutorial uses 2.4G as an example. Before testing, ensure the 2.4G gamepad receiver is connected to the motherboard or PC.
The cable provided by the manufacturer is for charging only and cannot be used to operate the gamepad. For wired mode, a separate data cable is required!
I. Key Position Description
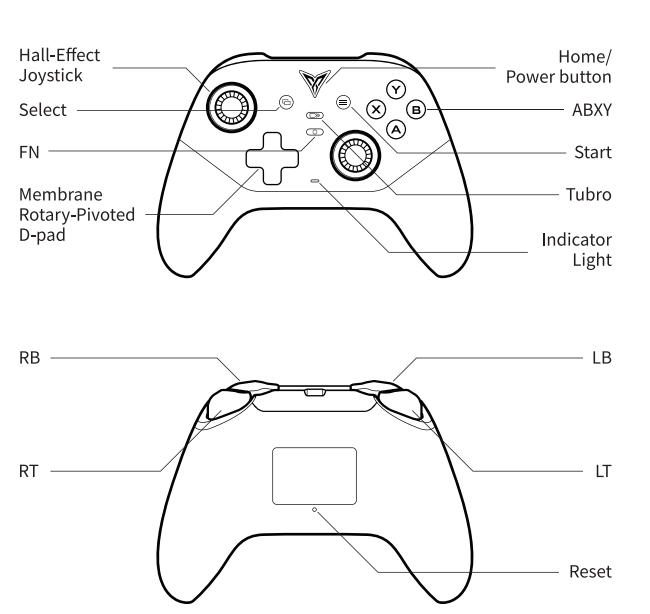
II. Controller Mode Introduction
The controller offers three connection modes: Bluetooth, Wired, and 2.4G.
| Mode | Shortcut Key | Indicator Light (when not connected and awaiting pairing) |
|---|---|---|
| Bluetooth | FN (O) + Y for 3 seconds | White flashing |
| Wired | FN (O) + B for 3 seconds | Blue flashing |
| 2.4G | FN (O) + A for 3 seconds | Yellow flashing |
Each mode follows two transmission protocols: XINPUT and DINPUT. These are two protocol standards used for handling game controller input.
DInput (DirectInput) DInput is part of the Microsoft DirectX API, providing support for input devices such as keyboards, mice, and game controllers. It is an older protocol that allows applications to directly read device status, but it lacks standardized key mapping, resulting in inconsistent button definitions across different manufacturers' controllers, requiring manual configuration for proper use. XInput (Xbox Input) XInput is an interface standard designed by Microsoft for Xbox controllers and is also a set of APIs for DirectX. It was developed specifically to simplify game porting, supporting vibration feedback, automatic recognition, and plug-and-play functionality. Compared to DInput, XInput focuses more on versatility and ease of use, especially for Xbox 360 and later devices, and provides a more stable experience on PC.
III. Common Functions and Operation Introduction
| Function Introduction | Operation Instructions |
|---|---|
| Receiver XInput Mode | Press FN (O) + A for 3 seconds to enter 2.4G mode. Long-press FN (O) + START to switch back to Receiver XInput Mode. When the controller successfully connects to the host in this protocol, the controller status indicator stays solid yellow. |
| Wired XInput Mode | Press FN (O) + B for 3 seconds to enter Wired Mode. Long-press FN (O) + START to switch to Wired XInput Mode. When the controller successfully connects to the host in this protocol, the controller status indicator stays solid blue. |
| Switch to Receiver/Wired DInput Mode | In Receiver/Wired Mode, long-press FN (O) + SELECT. When the controller successfully connects to the host in this protocol, the controller status indicator stays solid cyan. |
| Switch to Bluetooth XInput Mode | First press FN (O) + Y for 3 seconds to enter Bluetooth Pairing Mode. Then long-press FN (O) + START to switch to Bluetooth XInput Mode. When the controller successfully connects to the host in this protocol, the controller status indicator stays solid white. The Bluetooth name in this mode is Xbox Wireless Controller. |
| Switch to Bluetooth DInput Mode | First press FN (O) + Y for 3 seconds to enter Bluetooth Pairing Mode. Then long-press FN (O) + SELECT to switch to Bluetooth DInput Mode. When the controller successfully connects to the host in this protocol, the controller status indicator stays solid purple. The Bluetooth name in this mode is Flydigi Dune Fox. |
| Clear All Pairing Information | Long-press FN (O) + HOME for 3 seconds, and the indicator will flash rapidly. |
| Enable Turbo Fire | To enable: Press the Turbo key + the key you want to set for turbo fire, e.g., >>> key + A key. |
| Disable Turbo Fire | To disable: Press the Turbo key + the corresponding turbo-enabled key again to exit turbo fire status, e.g., >>> key + A key. |
| Turbo Fire Frequency Settings | Hold down the Turbo key + move the right joystick up/down (up to increase, down to decrease). There are 3 gears available: 5 times/sec, 15 times/sec, 30 times/sec. |
| Vibration Intensity Settings | Hold down FN (O) + move the right joystick up/down (up to increase, down to decrease). Vibration intensity levels include 0--30%--100%--150%. |
| Restore Controller to Factory Settings | In power-on state, long-press LB + RB + SELECT. The controller will vibrate once when the reset is successful. |
IV. Controller Testing
Test Method 1
Testing via host computer software
https://www.flydigi.com/index/down?nav_id=2
Test Method 2
Testing via the following website: