Welcome to ROS USB Handle repository
1. Install JupyterLab
1. Introduction to JupyterLab
JupyterLab is an interactive development environment and the next generation product of Jupyter Notebook. It integrates more functions, supports plug-in extensions, and can be run and operated through web pages. It is simple, convenient, and powerful, making it a very worthwhile code editing tool.
2. Switch to root user
The installation of jupyterab requires the use of a root user, while the root user of the official Jetson Nano system needs to set a password before using the root account.
Note: The password set for root here must be remembered, preferably consistent with the user's password, so that it is not easy to forget. Once forgotten, the consequences can be serious.
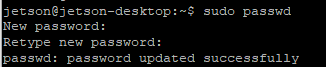
2.1 Enter the following command to set the password for root, and then enter the same password twice to confirm.
sudo passwd
2.2 Switch to root user
sudo su

From the above figure, it can be seen that the user has been switched to root. And the $symbol before the editing command has changed to a # symbol.
3. Installing JupyterLab
3.1 Install ffi library
apt-get install libffi-dev

3.2 Install jupyter (the installation process may be interrupted due to network issues and an error message may appear. Please run again)
pip3 install -i https://pypi.tuna.tsinghua.edu.cn/simple jupyter

3.3 Install jupyter lab
pip3 install -i https://pypi.tuna.tsinghua.edu.cn/simple jupyterlab

4.Switch back to regular users after installation is complete.
su jetson

4. Set up LAN to access Jupyter Lab
4.1 If you want it to run on other devices in the same LAN, you need to follow the following process
4.2 Create a configuration file, and after creation, the detailed location of the file will be output. Please remember this location.
jupyter notebook --generate-config

4.3 Modify the configuration file
nano ~/.jupyter/jupyter_notebook_config.py
Just paste the following code in and place it at the top.
c.NotebookApp.ip = '0.0.0.0'
c.NotebookApp.allow_remote_access=True
c.NotebookApp.open_browser = False
c.NotebookApp.port = 8888
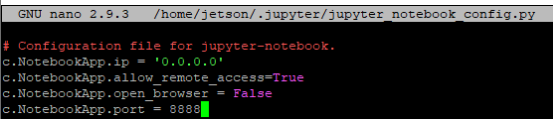
After writing, press the shortcut key to exit
Save: Ctrl+S
Exit: Ctrl+X
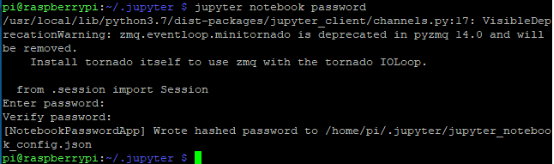
4.4 Change the password, the system will require you to enter the password twice (note: when entering the password, pressing the character on the keyboard will not display anything, which is a normal phenomenon. Continue to enter and press Enter)
jupyter notebook password
4.Test
jupyter lab
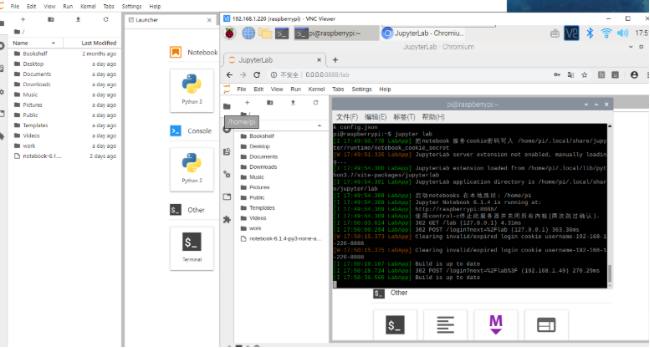
Can be accessed locally on Raspberry Pi http://127.0.0.1:8888 Alternatively, by accessing http://
Exit jupyterab: Press Ctrl+C twice on the terminal where jupyterab was just opened to exit jupyterab.
For example:
If the address of Raspberry Pi is 192.168.1.91, then machines in the local area network should access it http://192.168.1.91:8888
As shown below.
5. Solution for running code to automatically close Kext
If there is a situation where any code running after installing JupyterLab becomes invalid and Kext automatically closes. And there is Import Error: cannot import name 'create'_ Prompt_ The error in 'application' is due to the high version of the prompt toolkit, which requires reinstalling the lower version.
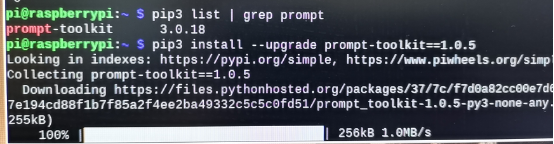
Let's take a look at the current version, the target version is 1.0.5:
pip3 list | grep prompt
It was found that the installed version is 3.0.18, so it needs to be reinstalled.
pip3 install --upgrade prompt-toolkit==1.0.5
6. Configuring the Jupyter Lab for startup and self startup
After the installation is completed, under normal circumstances, every time you use JupyterLab, you need to enter the command to start JupyterLab. For convenience, we have configured a bootstrap program.
The operation is as follows:
6.1 Create a startup service
cd .jupyter/
touch yb-jupyterlab.service

6.2 Copy the code to this file, save and exit.
nano yb-jupyterlab.service
[Unit] Description=jupyter lab start service After=multi-user.target [Service] Type=idle User=jetson ExecStart=/bin/sh -c "jupyter lab" WorkingDirectory=/home/jetson [Install] WantedBy=multi-user.target |
After writing, press the shortcut key to exit
Save: Ctrl+S
Exit: Ctrl + X
6.3 Copy the file to the startup service
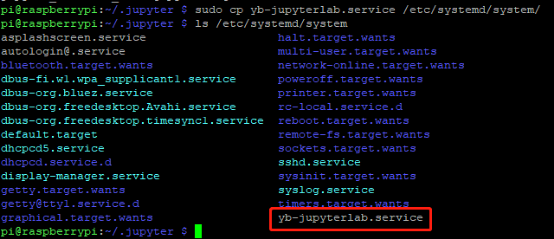
sudo cp yb-jupyterlab.service /etc/systemd/system/
Check if the file was successfully copied.
ls /etc/systemd/system
6.4 Update startup service
sudo systemctl daemon-reload
6.5 Enable startup of jupyterab
sudo systemctl enable yb-jupyterlab.service

6.6 Restart Raspberry Pi
sudo reboot
Attempting to access locally http://127.0.0.1:888
perhaps
Machine access in the local area network http://"your IP address": 8888, such as: http://192.168.1.220:8888
If the access is normal, then the Jupyter Lab environment has been successfully built!