yahboom
HomeLearn
Solution
Blog
Online Store
About Us
EN/中文
SLAM LiDAR📖
01.Version differences
  • 1.About SLAM Lidar
02.SLAM Lidar (A1, A2, S1, S2, S3, C1)
  • 1.How to use lidar
03.Linux basic course
  • 1.Introduction to Linux system
  • 2.Ubuntu file system
  • 3.Ubuntu common commands
  • 4.Ubuntu common editors
  • 5.Ubuntu software operation commands
  • 6.Virtual machine installation
  • 7.SSH remote control
  • 8.VNC remote control
  • 9.Transfer files remotely
  • 10.Driver library and communication
  • 11.Static IP and hotspot mode
  • 12.Bind device ID
  • 13.Capacity expansion and resource allocation
  • 14.Update system software sources
  • 15.Set root user password
  • 16.sudo free password
  • 17.Connect to WiFi network
  • 18.View system version
  • 19.Customized service management
  • 20.Back up system image
04.ROS1 basic course
  • 1.ROS introduction
  • 2.ROS installation
  • 3.ROS common command tools
  • 4.ROS workspace
  • 5.ROS function package
  • 6.ROS node
  • 7.ROS topic publisher
  • 8.ROS topic subscribers
  • 9.ROS service client
  • 10.ROS service server
  • 11.ROS action client
  • 12.ROS action server
  • 13.ROS custom message reception
  • 14.ROS-launch file
  • 15.ROS-TF transformation
  • 16.ROS parameter service
  • 17.ROS-rviz use
  • 18.ROS-rqt tool usage
  • 19.Topic message recording and playback
  • 20.urdf model introduction
  • 21.gazebo introduction
  • 22.ROS distributed communication
05.ROS1 lidar course
  • 0.ReadMe
  • 1.Preparation
  • 2.Handheld lidar mapping
  • 3.Lidar avoiding
  • 4.Lidar guard
  • 5.Lidar follow
  • 6.Lidar mapping
  • 7.rrt_exploration mapping algorithm
  • 8.Navigation and avoiding
  • 9.APP Mapping and Navigation
  • 10.RTAB 3D mapping and navigation
06.ROS2 basic course
  • 1.Introduction to ROS2
  • 2.ROS2 install Humble
  • 3.ROS2 development environment
  • 4.ROS2 workspace
  • 5.ROS2 function package
  • 6.ROS2 node
  • 7.ROS2 topic communication
  • 8.ROS2 service communication
  • 9.ROS2 action communication
  • 10.ROS2 custom interface message
  • 11.ROS2 parameter service case
  • 12.ROS2 meta-function package
  • 13.ROS2 distributed communication
  • 14.ROS2 DDS
  • 15.ROS2 time related API
  • 16.ROS2 common command tools
  • 17.ROS2 rviz2 use
  • 18.ROS2 rqt toolbox
  • 19.ROS2 Launch startup file configuration
  • 20.ROS2 recording and playback tool
  • 21.ROS2 URDF model
  • 22.ROS2 Gazebo simulation platform
  • 23.ROS2 TF2 coordinate transformation
07.ROS2 lidar course
  • 0.ReadMe
  • 1.Preparation
  • 2.Handheld lidar mapping
  • 3.Lidar avoiding
  • 4.Lidar follow
  • 5.Lidar guard
  • 6.gmapping mapping
  • 7.cartographer mapping
  • 8.Navigation and avoiding
  • 9.APP Mapping and Navigation
  • 10.RTAB 3D mapping and navigation
  • 11.Lidar patrol
08.Mapper M2 lidar course
  • 1.How to use M2M2lidar
09.High-speed version A1 lidar usage tutorial
  • 1.Preparation before using the high-speed version of A1 lidar
10.RaspberryPi5 Docker course
  • 1.Overview and installation
  • 2.Common commands
  • 3.Understand and publish images
  • 4.Hardware interaction data processing
  • 5.Enter docker container
  • 6.Update docker images
  • 7.Docker container to install ROS using accessories
Download
  • Code
  • VM File
  • Data Sheet
  • Just for Mapper M2 Lidar
  • Model File
  • PC_Software
  • ROS2_Basic_VM
Download ZIP

Welcome to SLAM LiDAR repository

10.RTAB 3D mapping and navigation

RTAB 3D mapping and navigation

This chapter needs to be used with a car chassis and other sensors to operate. This is just an explanation of the implementation method. In fact, it cannot be run. It needs to be used with the company's rosmaster-X3 car to achieve this function.

If you need to transplant it to your own motherboard, you need to install other dependency files.

1. Function description

After the program is started, control the car through the handle or keyboard The car will use the radar scanning data and the depth data of the depth camera to build a map using the RTAB-MAP algorithm during the movement, and save the map after the construction is completed.

After the navigation program is started, you can give the car a target point in rviz and let it navigate and run.

2. Install RTAB-MAP

Taking ros2-foxy as an example.

Input the following command to install.

xxxxxxxxxx
sudo apt install ros-foxy-rtabmap* -y

3. Mapping

Input the following command:

x
#Satrt Astra camera
ros2 launch astra_camera astro_pro_plus.launch.xml
#Start chassis camera
ros2 launch yahboomcar_nav map_rtabmap_launch.py
#Start rviz to display the map
ros2 launch yahboomcar_nav display_rtabmap_map_launch.py

Note: This mapping algorithm has relatively high hardware performance requirements, and some development boards may get stuck.

It is recommended to configure a virtual machine and run the RTAB-MAP algorithm on the virtual machine.
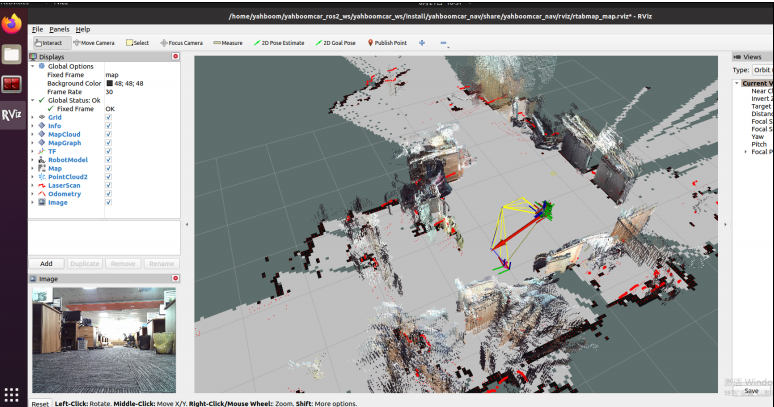
image-20231109181958488

4. Save map

When the map construction is completed, directly [ctrl+c] exit the map construction node, and the system will automatically save the map. The default saving path of the map is [~/.ros/rtabmap.db].

5. Navigation

Input the following command:

x
#Satrt Astra camera
ros2 launch astra_camera astro_pro_plus.launch.xml
#Start rviz display
ros2 launch yahboomcar_nav display_rtabmap_nav_launch.py
#Satrt Navigation
ros2 launch yahboomcar_nav navigation_rtabmap_launch.py

Navigation is divided into single-point navigation and multi-point navigation.

Click [2D Pose Estimate] on rviz, then compare the pose of the car and mark an initial pose for the car on the map.
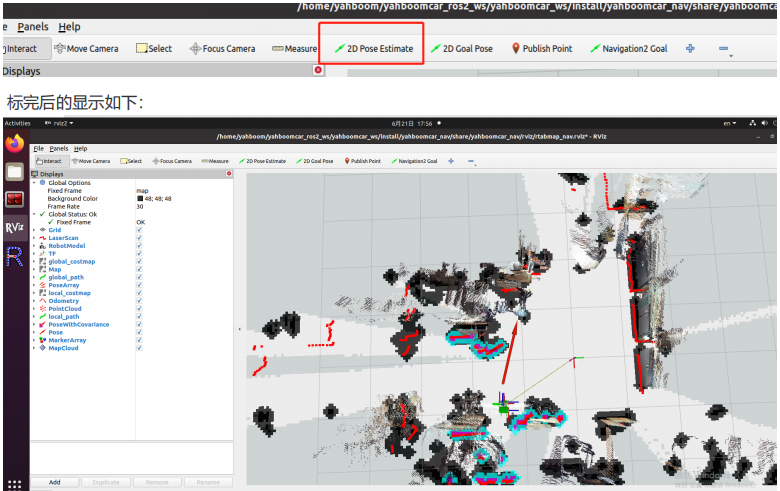
image-20231109181958488

Comparing the overlap between the radar scanning point and the obstacle, you can set the initial pose of the car multiple times until the radar scanning point and the obstacle roughly coincide.

After the initial pose is set, you can click [2D Goal Pose] to set a navigation target point, and the car will start single-point navigation.
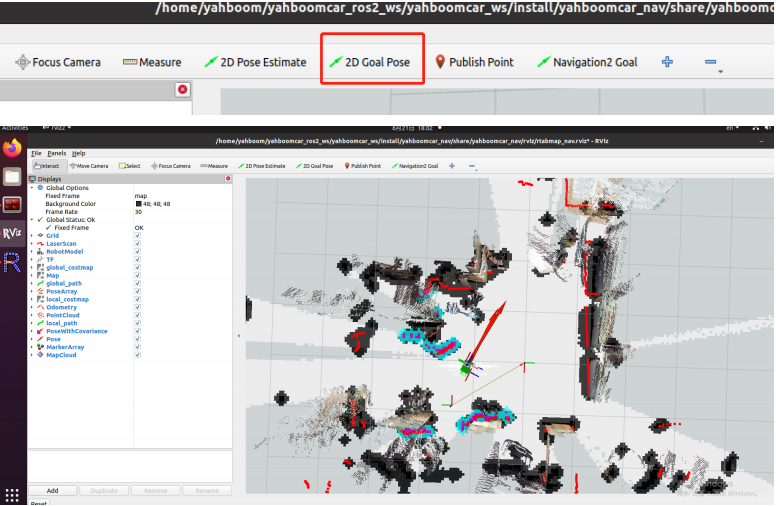
image-20231109182053989

After the initial pose is set, you can click [Panels] in the upper left corner of rviz, select [Navigation 2], and the [Navigation 2] will be displayed.
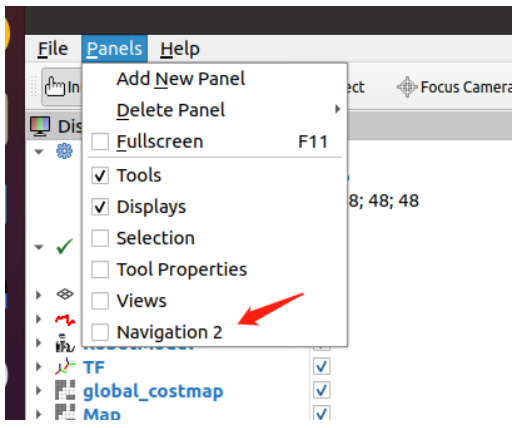
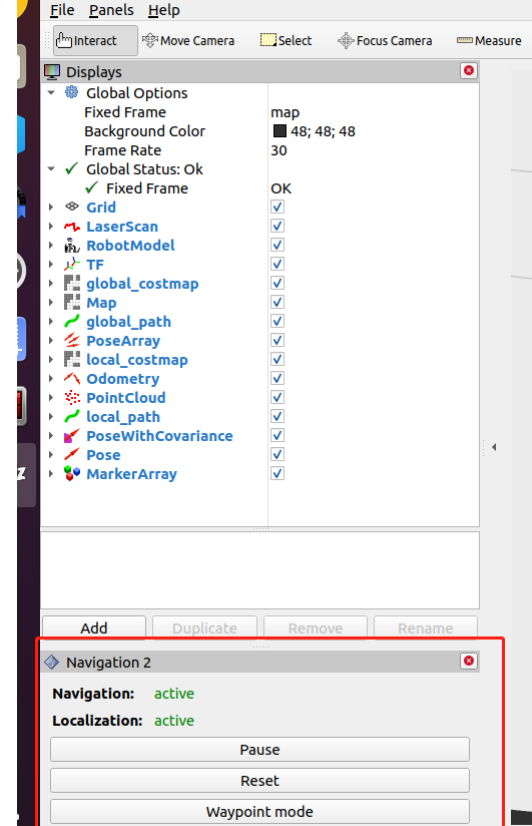
image-20231109182231866

image-20231109182251468

Click [Waypoint mode] in the picture above, and then click [Navigation2 Goal] on rviz to mark a target point on the map.

Click [Navigation2 Goal] again to mark the second target point on the map.

If you continue the cycle, you can mark multiple target points at once.
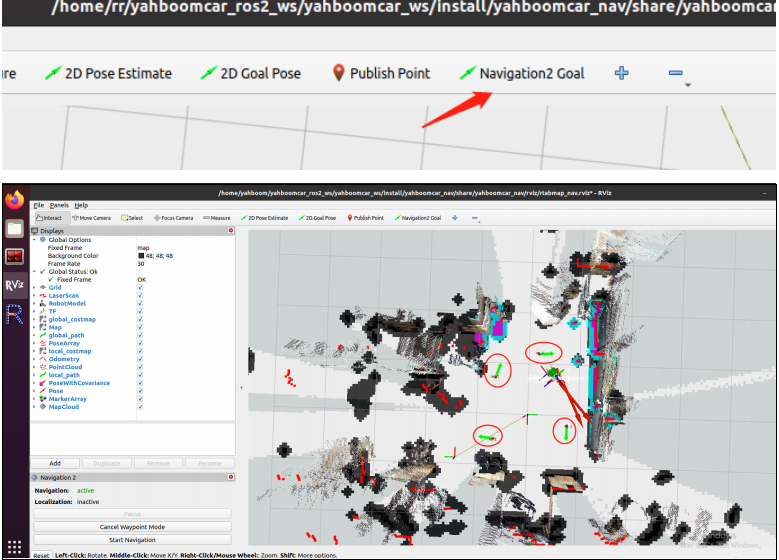
image-20231109182332025

After marking multiple target points, click [Start Navigation] to start multi-point navigation.

After the multi-point navigation is completed, the car will stay at the position of the last target point.
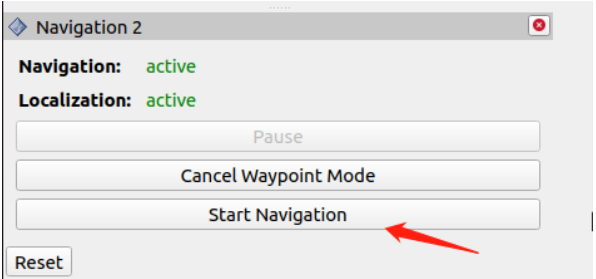
image-20231109182358052


APP Mapping and Navigation
Lidar patrol

COMPANY

  • About us
  • Team Style
  • Blog

LEARNING & EXPLORATION

  • Tutorials
  • Edge AI hardware
  • Educational robots
  • Embedded intelligent hardware

WHERE TO BUY

  • Yahboom Online Store
  • Amazon
  • Alibaba
  • AliExpress
  • Mercado

TECHNOLOGY SUPPORT

  • Email: support@yahboom.com

BE A DISTRIBUTOR

  • Email: sales@yahboom.com
QR Code

Copyright © 2017-2026 Yahboom. All Rights Reserved.

EN/中文