Welcome to Raspberry Pi Pico 2 repository
2. Onboard temperature sensor reading
2. Reading the onboard temperature sensor
1. Learning objectives
- Learn the basic use of the ADC pins of the Raspberry Pi Pico 2 motherboard.
- Learn how to read the temperature of the onboard temperature sensor.
2. Hardware construction
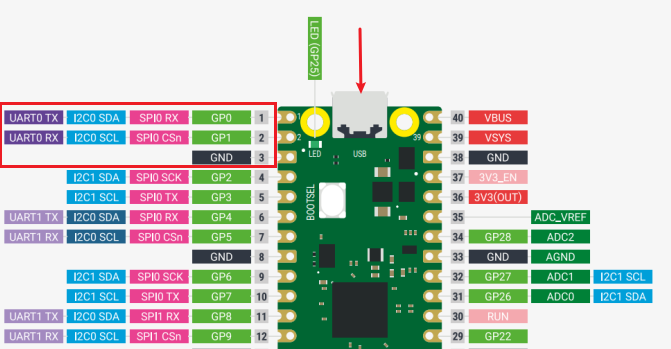
This course does not require additional hardware equipment to directly use the temperature sensor on the Raspberry Pi Pico 2/Pico motherboard, but if you want to view the printed numbers, you need to connect an external USB to TTL to view the data through the serial port.
3. Program Analysis
xxxxxxxxxx#include <stdio.h>#include "pico/stdlib.h"#include "hardware/gpio.h"#include "hardware/adc.h"int main() {stdio_init_all();printf("ADC Example, measuring GPIO29\n");adc_init();// Make sure GPIO is high-impedance, no pullups etcadc_gpio_init(29);// Select ADC input 4 (GPIO29)adc_select_input(4);while (1) {// 12-bit conversion, assume max value == ADC_VREF == 3.3 Vconst float conversion_factor = 3.3f / (1 << 12);uint16_t result = adc_read();float voltage = result * conversion_factor;float temperature = (voltage - 0.5) / 0.01 + 14;printf("Raw value: 0x%03x, voltage: %f V, temperature: %f n", result, voltage, temperature);sleep_ms(2000);}}
#include "hardware/adc.h"
This library contains the relevant functions for the hardware use of the adc.
stdio_init_all()
Initializes all current standard stdio types linked to the binary. Once you have set the clock, call this method to enable stdio support for UART, USB, and semi-hosting based on the presence of the respective librariess in the binary.
adc_init()
Initializes the ADC.
adc_gpio_init(29)
Initialize GPIO29 as ADC input.
adc_select_input(4);
ADC input selection is 4, parameter 0…3GPIO are 26…29 respectively. Input 4 is the onboard temperature sensor.
const float conversion_factor = 3.3f /(1 << 12)
The resolution is 12 bits, and the highest IO voltage is 3.3V. The ratio can be used to obtain the voltage corresponding to the unit value, so as to calculate the voltage read by the IO.
adc_read()
Perform ADC conversion, wait for the result, and then return the result.
float reading = adc_read()* conversion_factor
Calculate the conversion voltage value.
float temperature = (voltage - 0.5) / 0.01 + 14
Convert to temperature value.
printf("reslut: 0x%x, reading: %f V, temperature: %f n", result, reading,temperature)
Print the relevant variable values, which can be viewed through the serial port.
4. Program creation and burning
Please refer to the previous tutorial on creating a project to create a project. I will not repeat it here.
After writing the program, you need to add the standard library to the build according to the program you wrote before compiling. Open the CMakeLists.txt in the project and check target_link_libraries(temptutre pico_stdlib hardware_adc). You can see that the pico_stdlib and hardware_adc libraries are used in the previous program. If the function used adds other libraries, you need to add the corresponding libraries. If you are not sure where to add the library, you can check the official pico-examples case downloaded earlier. There are cases of various functions and corresponding CMakeLists.txt files for reference.
After the modification is completed, save and exit, and enter the bulid path of the project.
Enter the following command to compile
xxxxxxxxxxcmake .. -G "NMake Makefiles"nmake
After the compilation is completed, files in formats such as .bin .hex .elf .uf2 can be generated in the build directory.
Drag u2f in the above file into the disk recognized by Pico 2 to burn it. (Note: When burning for the first time, the USB is connected to Pico to directly recognize the disk. When there is an executable program in it, you need to press and hold the BOOTSEL button and then connect the USB)
5. Experimental phenomenon
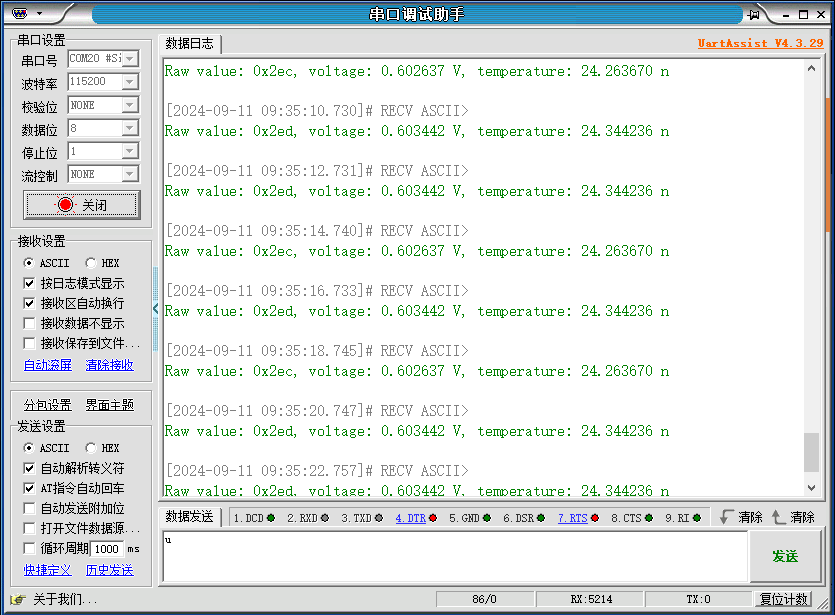
After the program is downloaded, if there is an external USB to TTL, it can be viewed through the serial port debugging assistant through the recognized port number.