Welcome to Raspberry Pi Pico 2 repository
3. Button control LED light
3. Button control LED light
1. Learning objectives
- Learn the basic use of the pins of the Raspberry Pi Pico 2 motherboard.
- Understand how to control the LED light with buttons.
2. Hardware construction
This course
LED light*1
Button*1
220Ω resistor*1
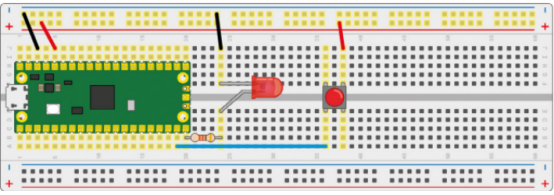
The circuit wiring diagram is shown below:
3. Program analysis
xxxxxxxxxx#include <stdio.h>#include "pico/stdlib.h"int main(){const uint LED_PIN = 15;const uint KEY_PIN = 14;gpio_init(LED_PIN);gpio_init(KEY_PIN);gpio_set_dir(LED_PIN, GPIO_OUT);gpio_set_dir(KEY_PIN, GPIO_IN);while (true){if(gpio_get(KEY_PIN) == 1){gpio_put(LED_PIN, 1);sleep_ms(2000);}gpio_put(LED_PIN, 0);}}
#include "pico/stdlib.h"
This library includes common hardware and high-level libraries like hardware_gpio and pico_time, and also introduces components like pico_standard_link.
gpio_init(LED_PIN)
gpio_init(KEY_PIN)
Initializes the LED and key pins, clears their output enable, and clears any output value.
gpio_set_dir(LED_PIN, GPIO_OUT)
gpio_set_dir(KEY_PIN, GPIO_IN)
Sets the LED pin to output mode and the key pin to input mode.
gpio_get(KEY_PIN)
Gets the state of a single specified key pin, 0 represents low, non-0 represents high, that is, the key is pressed.
gpio_put(LED_PIN, 1)
Set a GPIO high/low, the first parameter is the GPIO number, and the second parameter input value is 0 or 1.
4. Program creation and burning
Please refer to the previous tutorial on creating a project to create a project, which will not be repeated here.
After writing the program, you need to add the standard library to the build according to the program you wrote before compiling. Open the CMakeLists.txt in the project and check target_link_libraries(key_control pico_stdlib). You can see that since the previous program only uses the pico_stdlib library, only pico_stdlib is added here. If the function used adds other libraries, you need to add the corresponding libraries. If you are not sure where to add the library, you can check the official pico-examples case downloaded earlier, which contains examples of various functions and corresponding CMakeLists.txt files for reference.
After the modification is completed, save and exit, and enter the bulid path of the project.
Enter the following command to compile
xxxxxxxxxxcmake .. -G "NMake Makefiles"nmake
After the compilation is completed, files in formats such as .bin .hex .elf .uf2 can be generated in the build directory.
Drag u2f in the above file into the disk recognized by Pico 2 to burn it. (Note: When burning for the first time, the USB connection to Pico 2 is empty code and the disk can be directly recognized. When there is an executable program in it, you need to press and hold the BOOTSEL button and then connect the USB)
5. Experimental phenomenon
After the program is downloaded, press the button and the LED light will light up for 2S.