yahboom
HomeLearn
Solution
Blog
Online Store
About Us
EN/中文
Pico Robot Car📖
0.Introduction
  • 0.1 Description of Pico Robot
  • 0.2 Interface Description
1.Assembly steps
  • Assembly video
2.Development environment construction
  • 2.1 Update firmware
  • 2.2 Build environment
  • 2.3 Download code Startup automatically
  • 2.4 Import library file
3.Basic course
  • 3.1 Control LED light
  • 3.2 Onboard temperature sensor
  • 3.3 Passive buzzer
  • 3.4 Breathing light
  • 3.5 Marquee light
  • 3.6 OLED display
  • 3.7 Battery power display
  • 3.8 Servo control
4.Advanced course
  • 4.1 Light sensor
  • 4.2 Sound sensor
  • 4.3 Tracking sensor
  • 4.4 Ultrasonic sensor
  • 4.5 IR control display
5.Robot course
  • 5.1 Car forward
  • 5.2 Car movement
  • 5.3 Singing dancing
  • 5.4 Car tracking
  • 5.5 Edge detection
  • 5.6 Ultrasonic avoiding
  • 5.7 Ultrasounic following
  • 5.8 Light follow
  • 5.9 Voice control car
  • 5.10 Infrared control
  • 5.11 Bluetooth control
6.Battery and charge
  • Battery and charge
Download
  • APP(iOS/Android)
  • Code
  • Instructions Manual
  • Appendix
Download ZIP

Welcome to Pico Robot Car repository

2.1 Update firmware

2.1 Update firmware

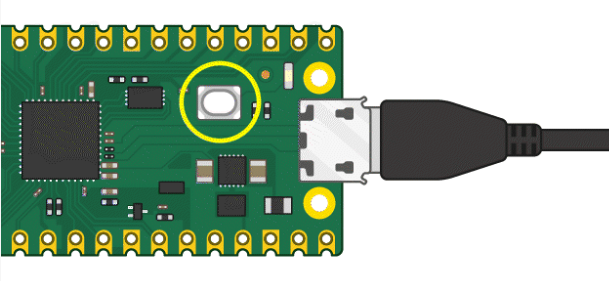
  1. Press and hold the button on the Pico 2 board, connect the Pico to the USB port of the computer via the Micro USB cable, and then release the button. After connecting, the computer will automatically recognize it as a removable disk (RP2350).

The same operation is performed on Pico. After connecting, the computer recognizes it as (RPI-RP2).

image-20240906122517289

image-20220207182035975

image-20220207181907517

  1. Pico Robot supporting information -> accessories -> firmware -> RPI_PICO2-20240809-v1.24.0-preview.201.g269a0e0e1.uf2 Firmware file, copy and drag it to the RP2350 mobile disk.

If it is Pico, copy and drag the pico_micropython_20210121.uf2 firmware file to the RPI-RP2 mobile disk.

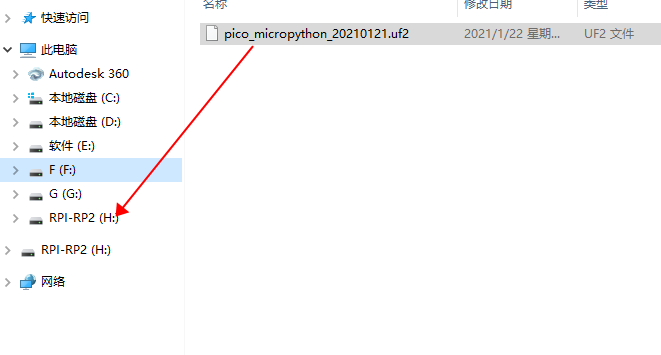
image-20240906120756008

image-20220207182137762

  1. After the copy is completed, Pico 2/Pico will automatically restart. After the automatic restart, it will be recognized as a serial port, and the firmware is successfully flashed.

image-20220207182256637

Notes:

  • What if the removable disk is not automatically recognized after connecting to Pico 2/Pico?
  • Check whether the BOOTSEL button is not pressed or released in the middle.
  • The Micro USB cable used must be a data cable, and the USB cable that can only provide power cannot be used.
Assembly video
Build environment

COMPANY

  • About us
  • Team Style
  • Blog

LEARNING & EXPLORATION

  • Tutorials
  • Edge AI hardware
  • Educational robots
  • Embedded intelligent hardware

WHERE TO BUY

  • Yahboom Online Store
  • Amazon
  • Alibaba
  • AliExpress
  • Mercado

TECHNOLOGY SUPPORT

  • Email: support@yahboom.com

BE A DISTRIBUTOR

  • Email: sales@yahboom.com
QR Code

Copyright © 2017-2026 Yahboom. All Rights Reserved.

EN/中文