Welcome to ROSMASTER X3 repository
9.2 Geometric transformation
2. Open Source CV geometric transformation
2. Open Source CV geometric transformation 2.1. OpenCV image scaling 2.1.1. In OpenCV, the function to achieve image scaling is: cv2.resize(InputArray src, OutputArray dst, Size, fx, fy, interpolation) 2.1.2. Code and actual effect display 2.2. OpenCV image cropping 2.2.1. picture cutting 2.2.2. Code and actual effect display 2.3. OpenCV image translation 2.3.1. In OpenCV, image translation is achieved through affine transformation. The method used is cv2.warpAffine(src, M, dsize[,dst[, flags[, borderMode[, borderValue]]]]) 2.3.2. How to get the transformation matrix M? An example is given below, 2.3.3. Code and actual effect display 2.4. OpenCV image mirroring 2.4.1 The principle of image mirroring 2.4.2. Taking vertical transformation as an example, let's see how Python is written
2.1. OpenCV image scaling
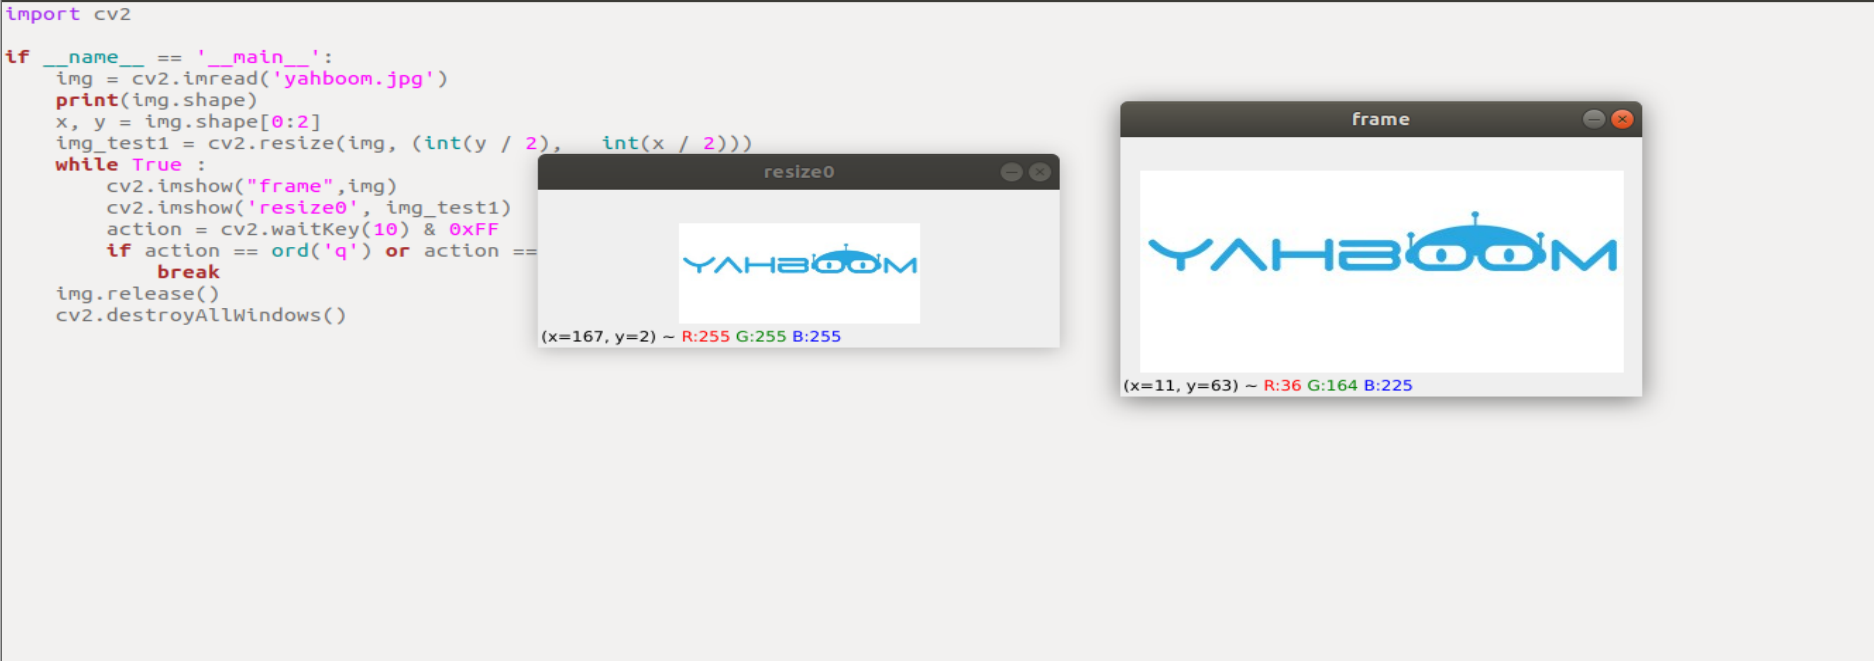
2.1.1. In OpenCV, the function to achieve image scaling is: cv2.resize(InputArray src, OutputArray dst, Size, fx, fy, interpolation)
Parameter meaning:
InputArray src: input image
OutputArray ds: output image
Size: output image size
fx,fy: scaling factors along the x-axis, y-axis
interpolation: interpolation method, you can choose INTER_NEAREST (nearest neighbor interpolation), INTER_LINEAR (bilinear interpolation (default setting)), INTER_AREA (resampling using pixel area relationship), INTER_CUBIC (bicubic interpolation of 4x4 pixel neighborhood), INTER_LANCZOS4 (Lanczos interpolation of 8x8 pixel neighborhood)
requires attention:
- The output size format is (width, height)
- The default interpolation method is: bilinear interpolation
2.1.2. Code and actual effect display
run the program
xxxxxxxxxxpython ~/yahboomcar_ws/src/yahboomcar_astra/scripts/opencv/2_1.py
ximport cv2if __name__ == '__main__':img = cv2.imread('yahboom.jpg')print(img.shape)x, y = img.shape[0:2]img_test1 = cv2.resize(img, (int(y / 2), int(x / 2)))while True :cv2.imshow("frame",img)cv2.imshow('resize0', img_test1)action = cv2.waitKey(10) & 0xFFif action == ord('q') or action == 113:breakimg.release()cv2.destroyAllWindows()
2.2. OpenCV image cropping
2.2.1. picture cutting
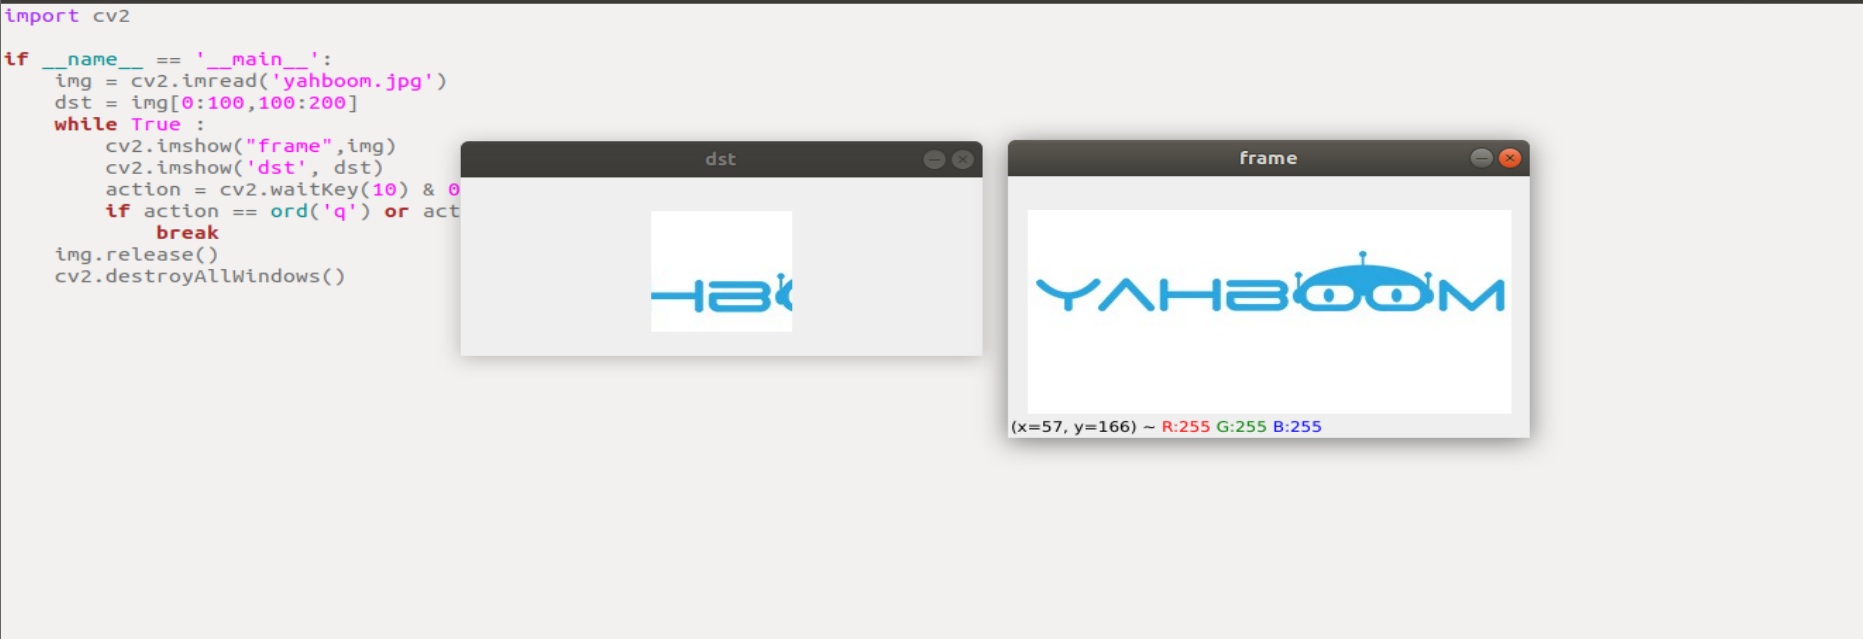
First read the image, and then get the pixel area from the array. In the following code, select the shape area X: 300-500 Y: 500-700, note that the image size is 800*800, so the selected area should not exceed this resolution.
2.2.2. Code and actual effect display
run the program
xxxxxxxxxxpython ~/yahboomcar_ws/src/yahboomcar_astra/scripts/opencv/2_2.py
ximport cv2if __name__ == '__main__':img = cv2.imread('yahboom.jpg')dst = img[0:100,100:200]while True :cv2.imshow("frame",img)cv2.imshow('dst', dst)action = cv2.waitKey(10) & 0xFFif action == ord('q') or action == 113:breakimg.release()cv2.destroyAllWindows()
2.3. OpenCV image translation
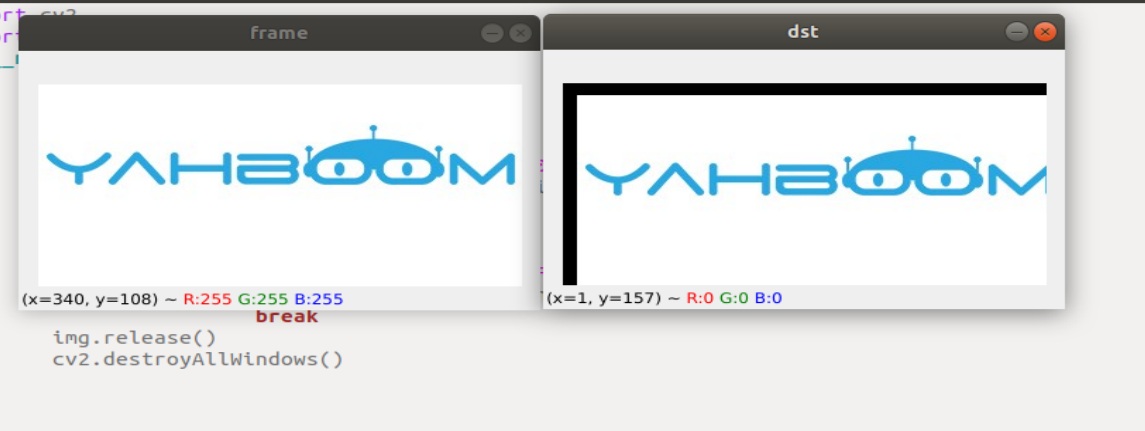
2.3.1. In OpenCV, image translation is achieved through affine transformation. The method used is cv2.warpAffine(src, M, dsize[,dst[, flags[, borderMode[, borderValue]]]])
Parameter meaning:
src - the input image. M - Transformation matrix. dsize - the size of the output image. flags - combination of interpolation methods (int type!) borderMode - border pixel mode (int type!) borderValue - (emphasis!) border padding value; by default it is 0.
Among the above parameters: M is used as an affine transformation matrix, which generally reflects the relationship of translation or rotation, and is a 2×3 transformation matrix of InputArray type. In daily affine transformation, only the first three parameters are set, such as cv2.warpAffine(img,M,(rows,cols)), the basic affine transformation effect can be achieved.
2.3.2. How to get the transformation matrix M? An example is given below,
Convert the original image src to the target image dst through the transformation matrix M:
dst(x, y) = src(M11x + M12y+M13, M21x+M22y+M23)
Move the original image src to the right by 200 pixels and down by 100 pixels, then the corresponding relationship is:
dst(x, y) = src(x+200, y+100)
Complete the above expression, namely:
dst(x, y) = src(1·x + 0·y + 200, 0·x + 1·y + 100)
According to the above expression, the value of each element in the corresponding transformation matrix M can be determined as:
M11 = 1
M12=0
M13=200
M21=0
M22=1
M23=100
Substituting the above values into the transformation matrix M, we get:
M = [ ]
2.3.3. Code and actual effect display
run the program
xxxxxxxxxxpython ~/yahboomcar_ws/src/yahboomcar_astra/scripts/opencv/2_3.py
ximport cv2import numpy as npif __name__ == '__main__':img = cv2.imread('yahboom.jpg')imgInfo = img.shapeheight = imgInfo[0]width = imgInfo[1]matShift = np.float32([[1,0,10],[0,1,10]])# 2*3dst = cv2.warpAffine(img, matShift, (width,height))while True :cv2.imshow("frame",img)cv2.imshow('dst', dst)action = cv2.waitKey(10) & 0xFFif action == ord('q') or action == 113:breakimg.release()cv2.destroyAllWindows()
2.4. OpenCV image mirroring
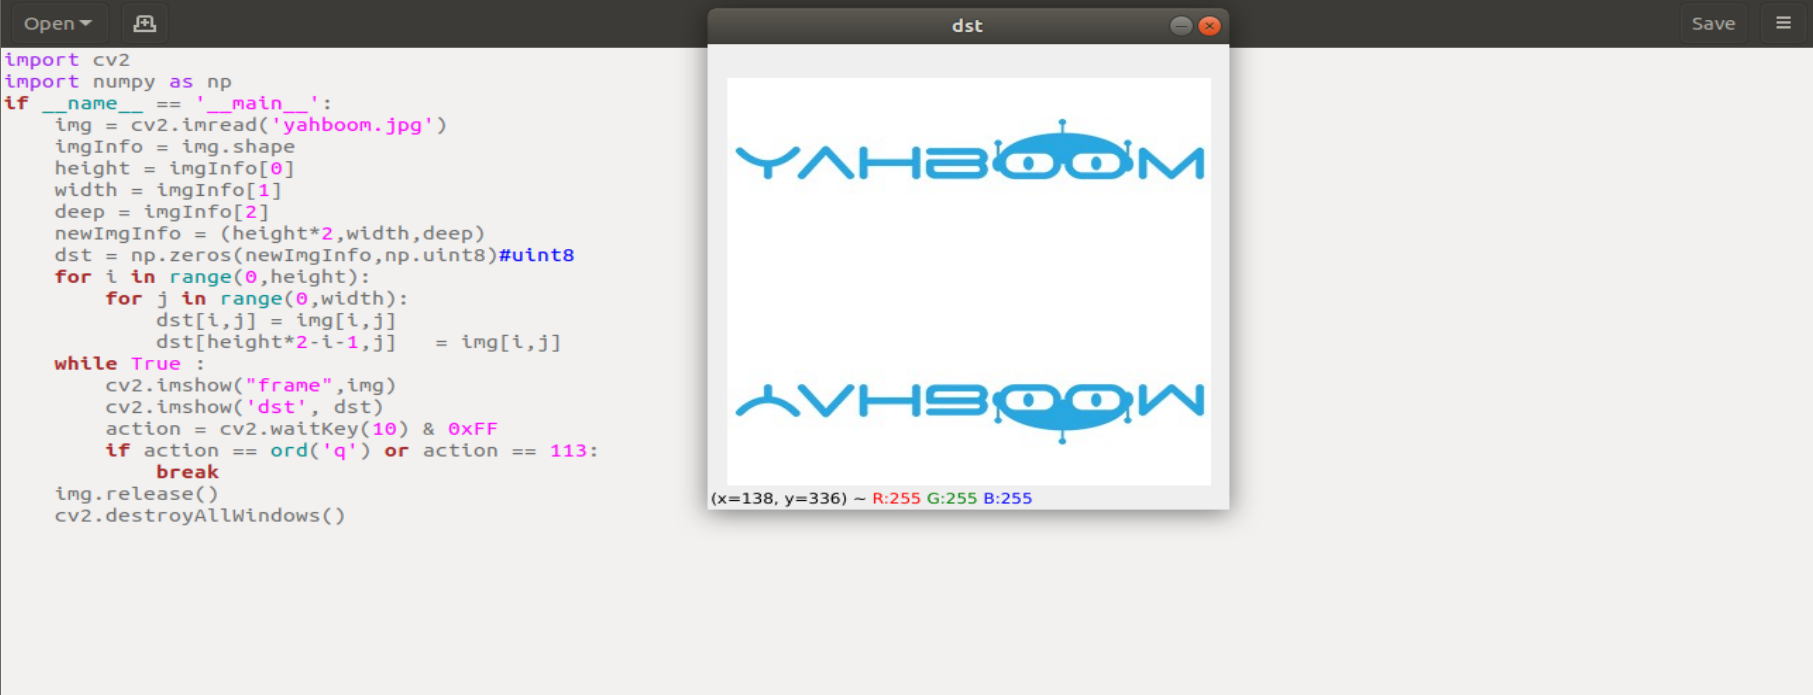
2.4.1 The principle of image mirroring
There are two types of image mirroring transformations: horizontal mirroring and vertical mirroring. Horizontal mirroring takes the vertical center line of the image as the axis, and swaps the pixels of the image, that is, swaps the left and right halves of the image. Vertical mirroring takes the horizontal midline of the image as the axis and reverses the upper and lower parts of the image.
Transformation principle:
Let the width of the image be width and the length be height. (x, y) are the transformed coordinates, (x0, y0) are the coordinates of the original image
Horizontal mirror transformation
Forward mapping: x=width-x0-1, y=y0
Backward mapping: x0=width-x-1,y0=y
Vertical Mirror Transformation
Mapping up: x=x0,y=height-y0-1
Mapping down: x0=x, y0=height-y-1
Summarize:
In the horizontal mirror transformation, the entire image is traversed, and then each pixel is processed according to the mapping relationship. In fact, the horizontal mirror transformation is to change the column of image coordinates to the right, and the column on the right to the left, which can be transformed in units of columns. The same is true for vertical mirror transformations, which can be transformed in units of rows.
2.4.2. Taking vertical transformation as an example, let's see how Python is written
run the program
xxxxxxxxxxpython ~/yahboomcar_ws/src/yahboomcar_astra/scripts/opencv/2_4.py
ximport cv2import numpy as npif __name__ == '__main__':img = cv2.imread('yahboom.jpg')imgInfo = img.shapeheight = imgInfo[0]width = imgInfo[1]deep = imgInfo[2]newImgInfo = (height*2,width,deep)dst = np.zeros(newImgInfo,np.uint8)#uint8for i in range(0,height):for j in range(0,width):dst[i,j] = img[i,j]dst[height*2-i-1,j] = img[i,j]while True :cv2.imshow("frame",img)cv2.imshow('dst', dst)action = cv2.waitKey(10) & 0xFFif action == ord('q') or action == 113:breakimg.release()cv2.destroyAllWindows()