yahboom
HomeLearn
Solution
Blog
Online Store
About Us
EN/中文
ROSMASTER X3📖
1.About ROSMASTER X3
  • 1.1 Wiring Introduction
  • 1.2 Precautions for battery
  • 1.3 First Trial
2.Assembly steps
  • Installation Video(1-10)
  • Installation Video(11-18)
  • Installation Video(20-28)
  • Installation Video(29-30)
3.ROS1-Remote control course
  • 3.1 APP remote control
  • 3.2 Model aircraft remote control
  • 3.3 Handle remote control
4.ROS1-Hardware course
  • 4.1 About expansion board_V3.0
  • 4.1 About expansion board_V1.0
  • 4.2 STM32 Development environment
  • 4.3 Button to control the buzzer to whistle
  • 4.4 FreeRTOS application
  • 4.5 Serial communication
  • 4.6 SBUS model aircraft remote control
  • 4.7 CAN bus communication
  • 4.8 RGB colorful light bar
  • 4.9 Timer interrupt to control PWM servo
  • 4.10 Control serial port servos
  • 4.11 Nine-axis attitude sensor to obtain data
  • 4.12 Control motor
  • 4.13 Timer captures the encoder data
  • 4.14.1 Kinematic Analysis of Mecanum Wheel
  • 4.14.2 Kinematics Analysis of Ackermann Car
  • 4.15 PID control robot movement
5.ROS1-Basic course
  • 5.1 Update the firmware
  • 5.2 Turn off the self-starting process at startup
  • 5.3 Install the Rosmaster driver library
  • 5.4 Buzzer whistle
  • 5.5 Control PWM servo
  • 5.6 RGB colorful light bar special effects display
  • 5.7 Control motor
  • 5.8 Control robot movement
  • 5.9 Control Serial Servo
6.ROS1-Linux operating system
  • 6.1 Virtual machine installation and use
  • 6.2 Linux basics
  • 6.3 Remote control
  • 6.4 Multi-machine communication configuration
  • 6.5 Static IP and hotspot mode
  • 6.6 Bind the device ID
  • 6.7 Web page real-time monitoring
  • 6.8 Expansion tutorial
  • 6.9.1 Jetson Nano write sytem
  • 6.9.2 Jetson Xavier NX write system
  • 6.9.3 Jetson TX2 NX write system
  • 6.9.4 Raspberry Pi write system
7.ROS1-Docker-pi5
  • 1、Docker overview and docker installation
  • 2、Common commands for docker image containers
  • 3、Docker images deeply understand and publish images
  • 4、Docker hardware interaction and data processing
  • 5、Enter the bot's docker container
  • 6、Robot development environment construction in Docker
  • 7、How customers can update docker images in the future
8.ROS1-ROS basic course
  • 1.ROS introduction
  • 2.ROS installation
  • 3.ROS common command tools
  • 4.ROS workspace
  • 5.ROS function package
  • 6.ROS node
  • 7.ROS topic publisher
  • 8.ROS topic subscribers
  • 9.ROS service client
  • 10.ROS service server
  • 11.ROS action client
  • 12.ROS action server
  • 13.ROS custom message reception
  • 14.ROS-launch file
  • 15.ROS-TF transformation
  • 16.ROS parameter service
  • 17.ROS-rviz use
  • 18.ROS-rqt tool usage
  • 19.Topic message recording and playback
  • 20.urdf model introduction
  • 21.gazebo introduction
  • 22.ROS distributed communication
9.ROS1-OpenCV courses
  • 9.1 Getting started with Open Source CV
  • 9.2 Geometric transformation
  • 9.3 Image processing and drawing text line segments
  • 9.4 Image beautification
  • 9.5 Opencv application
  • 9.6 AR vision
  • 9.7 AR QR code
  • 9.8 ROS+Opencv foundation
  • 9.9 ROS+Opencv application
  • 9.10 Data transformation and point cloud
  • 9.11 MediaPipe development
10.ROS1-Robot control course
  • 10.1 PID algorithm theory
  • 10.2 Robot PID debugging
  • 10.3 Robot information release
  • 10.4 Robot keyboard control
  • 10.5 Robot handle control
  • 10.6 Robot state estimation
  • 10.7 Robot calibration
  • 10.8 Robot URDF model
11.ROS1-Depth camera course
  • 11.1 How to use the Astra camera
  • 11.2 Astra camera calibration
  • 11.3 Astra Color Tracking
  • 11.4 Astra Object Tracking
  • 11.5 Visual tracking autopilot
  • 11.6 Pure visual 2D mapping and navigation
  • 11.7 RTAB-Map 3D mapping navigation
  • 11.8 ORB_SLAM2 basics
  • 11.9 ORB_SLAM2_Octomap
12.ROS1-Lidar course
  • 12.1 Lidar basic-SLAM
  • 12.1 Lidar basic-4ROS
  • 12.2 Lidar avoiding
  • 12.3 Lidar guard
  • 12.4 Lidar follow
  • 12.5 Patrol game
  • 12.6 gmapping mapping algorithm
  • 12.7 hector mapping algorithm
  • 12.8 karto mapping algorithm
  • 12.9 cartographer mapping algorithm
  • 12.10 rrt_exploration mapping algorithm
  • 12.11 AMCL
  • 12.12 Navigation and avoiding
  • 12.13 APP mapping and navigation
13.ROS1-Multi-robot control course
  • 13.1 Multi-machine handle control
  • 13.2 Multi-machine navigation
  • 13.3 Multi-machine formation
  • 13.4 Multi-machine surround
14.ROS1-Deep learning courses
  • 14.1 KNN recognizes handwritten digits
  • 14.2 Basic use of TensorFlow
  • 14.3 Basic use of PyTorch(jetson)
  • 14.4 yolov5 model training(jetson)
  • 14.5 yolov5+tensorrt acceleration(jetson)
  • 14.6 yolov4-tiny
15.ROS1-Voice control courses
  • 15.0 How to use old voice module in new image
  • 15.1 Introduction of voice control module-NEW
  • 15.2 Voice control module port binding-NEW
  • 15.1 Introduction of voice control module-Old
  • 15.2 Voice control module port binding-Old
  • 15.3 Voice control car movement
  • 15.4 Voice control Autopilot
  • 14.5 Voice control color recognition
  • 15.6 Voice control color tracking
  • 15.7 Voice control multi-point navigation
16.ROS1-Model training Autopilot
  • 16.0 ReadMe
  • 16.1 yolov5 to train traffic signs
  • 16.2 TensorRt acceleration identification mark
  • 16.3 Road sign indication function description
  • 16.4 Collect data
  • 16.5 Training model
  • 16.6 Model transformation and application
  • 16.7 AI Autopilot
17.ROS2- Remote control course
  • 1. APP control
  • 2. Model aircraft control
  • 3. Wireless Handle Control Tutorial
18.ROS2- Hardware course
  • 1. About expansion board_V1.0
  • 1. About expansion board_V3.0
  • 2. STM32 Development environment
  • 3. Button control
  • 4. FreeRTOS application
  • 5. Serial communication
  • 6. SBUS model aircraft remote control
  • 7. CAN bus communication
  • 8. RGB colorful light bar
  • 9. Timer interrupt to control PWM servo
  • 10. Control serial port servos
  • 11. Nine-axis attitude sensor to obtain data
  • 12. Control motor
  • 13. Timer captures the encoder data
  • 14. Robot kinematics analysis theory
  • 15. PID control robot movement
19.ROS2- ROSMASTER basic course
  • 1. Update the firmware
  • 2. Turn off the self-starting process at startup
  • 3. Install the Rosmaster driver library
  • 4. Buzzer whistle
  • 5. Control PWM servo
  • 6. RGB colorful light bar special effects display
  • 7. Control motor
  • 8. Control robot movement
  • 9. Control Serial Servo
20.ROS2- Linux operating systemnew
  • 1. Virtual machine installation and use
  • 2. Linux basics
  • 3. Remote control
  • 4. Multi-machine communication configuration
  • 5. Static IP and hotspot mode
  • 6. Bind the device ID
  • 7. Web page real-time monitoring
  • 8. Expansion tutorial
  • 9.1 Jetson Nano write sytem
  • 9.2 Raspberry Pi write system
  • 9.3 Orin series write system
  • 10.Jetpack old system upgraded to SUPER systemnew
21.ROS2- Docker(Nano Pi)
  • 1. Docker Overview and Docker Installation
  • 2.Common commands for docker image containers
  • 3.Docker images deeply understand and publish images
  • 4. Docker hardware interaction and data processing
  • 5. Entering the Docker Container of the Robot
  • 6. Building a Robot Development Environment in Docker
  • 7. Method for customers to update Docker images in the future
22.ROS2- ROS2 Basic Tutorial
  • 1.Introduction to ROS2
  • 2.ROS2 install Humble
  • 3.ROS2 development environment
  • 4.ROS2 workspace
  • 5.ROS2 function package
  • 6.ROS2 node
  • 7.ROS2 topic communication
  • 8.ROS2 service communication
  • 9.ROS2 action communication
  • 10.ROS2 custom interface message
  • 11.ROS2 parameter service case
  • 12.ROS2 meta-function package
  • 13.ROS2 distributed communication
  • 14.ROS2 DDS
  • 15.ROS2 time related API
  • 16.ROS2 common command tools
  • 17.ROS2 rviz2 use
  • 18.ROS2 Rqt Toolbox
  • 19.ROS2 Launch startup file configuration
  • 20.ROS2 recording and playback tool
  • 21.ROS2 URDF model
  • 22.ROS2 Gazebo simulation platform
  • 23.ROS2 TF2 coordinate transformation
23.ROS2- Robot control course
  • 1. PID Algorithm Theory
  • 2. Robot information release
  • 3. Robot control
  • 4. Robot state estimation
  • 5. Robot calibration
  • 6. URDF model
24.ROS2- Depth camera course
  • 1.Depth camera usage
  • 2. Camera internal reference calibration
  • 3. color tracking
  • 4. KCF object tracking
  • 5. ORB_SLAM2 basics
  • 6. ORB_ SLAM2 PCL mapping
  • 7. ORB_ SLAM2 Octomap mapping
  • 8. RTAB-Map 3D mapping navigation
25.ROS2- Lidar course
  • 1. Introduction and Use of Lidar
  • 2. Lidar avoiding
  • 3. Lidar follow
  • 4. Lidar guard
  • 5. Patrol game
  • 6. Gmapping mapping algorithm
  • 7. Cartographer mapping algorithm
  • 8. Navigation and obstacle avoidance
  • 9. Rosmaster_ X3 conducts mapping through the APP
  • 10. Rosmaster_ X3 Navigation through APP
26.ROS2- OpenCV courses
  • 1. OpenCV Basic Course
  • 2. ROS+opencv application
  • 3. QR code creation and recognition
  • 4. AR Vision
  • 5. Mediapipe fun gameplay
  • 6、line patrol automatic driving
27.ROS2- Voice control courses
  • 0.How to use old voice module in new image
  • 1. Introduction of voice module-new
  • 2. Voice control module port binding-new
  • 1. Introduction of voice module and port binding-old
  • 3. Voice control car movement
  • 4. Voice control Autopilot
  • 5. Voice control color recognition
  • 6. Voice control color tracking
  • 7. Voice control multi-point navigation
28.Deep learning courses(SUPER)
  • 1.KNN recognizes handwritten digitsnew
  • 2.Basic use of TensorFlownew
  • 3.Basic use of PyTorch(jetson)new
  • 4.YOLOv11Model conversion(SUPER)new
  • 5.YOLOv11Dataset annotation(SUPER)new
  • 6.YOLOv11Model conversion + tensorrt acceleration(SUPER)new
  • 7.YOLOv11Object recognition(SUPER)new
29.ROS2-Multi-robot control
  • 1. Multi-robot control
  • 2. Multi-robot navigation
LLM tutorial
1.Development environment
  • 0. Model usage instructions
  • 1.Environments deployment
  • 2.Dialogue platform installation
2.Jetson Nano B01
  • 1.Qwen2 model
  • 2.TinyLlama model
  • 3.Phi-3 model
  • 4.Gemma model
  • 5.Orca Mini model
  • 6.StarCoder2 model
  • 7.DeepSeek-R1 model
  • 8.Expand LLaVA-Phi3
3.Jetson Orin NXNANO
  • 1.Llama3 model
  • 2.Qwen2 model
  • 3.Phi-3 model
  • 4.Gemma model
  • 5.WizardLM2 model
  • 6.Codellama model
  • 7.DeepSeek-R1 model
  • 8.Orca Mini model
  • 9.StarCoder2 model
  • 10.TinyLlama model
  • 11.Expand LLaVA
  • 12.Expand LLaVA-Phi3
4.Raspberry Pi 5B
  • 1.Meta AI Llama3 model
  • 2.Qwen2 model
  • 3.Phi-3 model
  • 4.Gemma model
  • 5.WizardLM2 model
  • 6.Meta AI Codellama model
  • 7.DeepSeek-R1 model
  • 8.Expand LLaVA
FAQ
  • 1.Using your own Jetson board, ROSMASTER X3 cannot start normally
Download
  • RemoteCtrl_APP(Android/iOS)
  • Mapping_APP(iOS_Android)
  • Instruction Manual
  • SystemFile_ROS2
  • SystemFile_ROS1
  • SystemFile_ROS2_OrinNANOSUPER
  • SystemFile_ROS2_OrinNXSUPER
  • Code
  • Jetson_Boot_USB.tar.gz
  • VM software
  • Autopilot Annex
  • Other_Annex_File
  • LLM_SystemFile
  • ROS2_Basic_VM
Download ZIP
FAQ
  • 1、How to connect OLED?

Welcome to ROSMASTER X3 repository

16.6 Model transformation and application

Model transformation and application

Model transformation and application 1. Development environment2. Code analysis3. Conversion mode4. Handle control car5. End the kernel

Note: This course is only applicable to the R2L car and Yahboom's autopilot map.

If you use other models or other maps, you need to develop and debug the code yourself, and the code provided in this chapter cannot be used directly.

1. Development environment

This training model needs to use TensorFlow and other related tools. Due to the use of many tools and complex deployment, the ROSMASTER car factory image has deployed the development environment of the training model, which can be used directly without repeated construction.

2. Code analysis

Please check the specific code: Rosmaster/auto_drive/road_following.ipynb
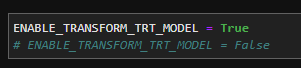
image-20221104163932225

The ENABLE_TRANSFORM_TRT_MODEL parameter is the flag of the conversion model. If it is True, it will be converted to a trt model. If it is False, the model will not be converted (it is considered that there is already a trt model), and the trt model will be loaded directly.

3. Conversion mode

Open jupyter lab with a browser, find the road_following.ipynb file and open it, click the button to run all cells, wait for all the cells to run, and the buzzer will sound a 'beep'.

image-20221104162945232

At this time, put the car on the track, move the position of the car, and you can see that the front wheel servo will change. Since the speed of the car is 0 at this time, it will not run on the track. We need to pass the speed to the car to make the car move.

As for why the speed is not directly set for the car, the reason is that it takes a certain amount of time to start the model transformation, and if the car starts to move after starting, sometimes the position is not on the track, or there is a problem with the trained model, the car will run around. Therefore, it is recommended to use the handle to control the speed of the trolley, which is convenient for debugging.
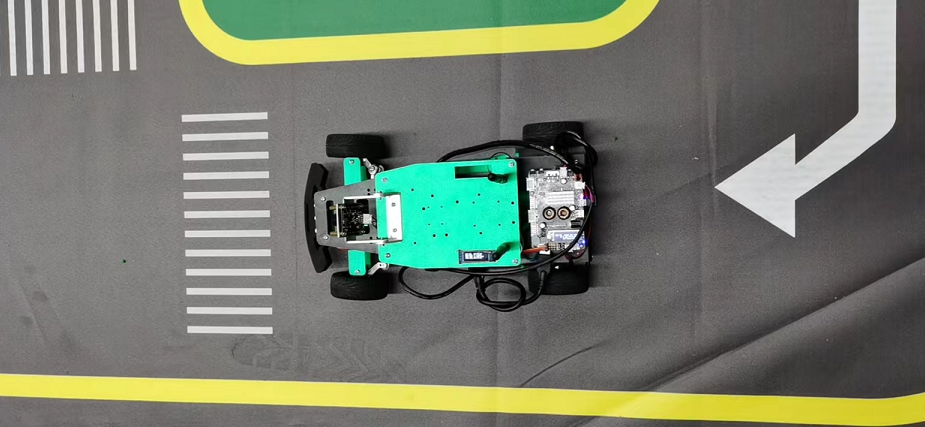
image-20221104175752822

4. Handle control car

The code path of the car handle control: Rosmaster/auto_drive/joystick_R2L.py

Insert the handle receiver into the USB port of the main control board, and then turn on the power of the wireless handle.

Open the terminal and run the following command to open the handle control program

cd ~/Rosmaster/auto_drive/
python3 joystick_R2L.py

At this time, press the START button of the wireless handle, and you can hear the buzzer to indicate that the connection is successful. Release the START button and the buzzer will turn off.

The functions of the wireless handle are as follows:

HandleEffect
left stick up/downCar forward, backward
Right stick up/downThe front wheel of the car turns left and right
Arrow key forwardThe car moves forward (release without stopping)
Arrow key backwardThe car backs up (release to stop)
L1 keyAdjust speed to 0.5
R1 keyAdjust speed to 0.3
L2/R2 keyStop the car
"START" keyControl buzzer/end sleep
X keyFront wheel fine adjustment to the left
B keyFront wheel fine adjustment to the right

The default handle speed is 0.3, you can press the L1 key or R1 key to modify the speed. Different speed values may require re-collecting the data set and training the model to achieve the optimal effect. Then press the forward key of the direction key, and the car starts to move. If the car runs out of the track, you can press L2 or R2 to stop, or you can press the direction keys to go back, and release the direction keys to go back and stop automatically.

5. End the kernel

Since the camera is used for this training, the kernel needs to be shut down after the program runs.

Click on the kernel management bar, find road_following.ipynb and click the X on the right to end.
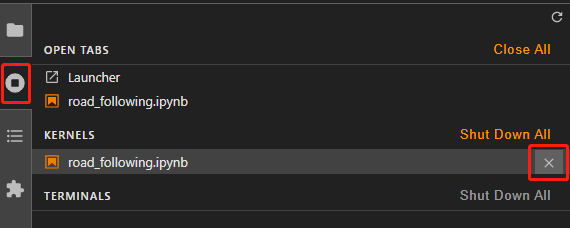
image-20221104165052919

Training model
AI Autopilot

COMPANY

  • About us
  • Team Style
  • Blog

LEARNING & EXPLORATION

  • Tutorials
  • Edge AI hardware
  • Educational robots
  • Embedded intelligent hardware

WHERE TO BUY

  • Yahboom Online Store
  • Amazon
  • Alibaba
  • AliExpress
  • Mercado

TECHNOLOGY SUPPORT

  • Email: support@yahboom.com

BE A DISTRIBUTOR

  • Email: sales@yahboom.com
QR Code
QR Code

Copyright © 2017-2026 Yahboom. All Rights Reserved.

EN/中文