Welcome to ROSMASTER X3 repository
5. Entering the Docker Container of the Robot
5、Enter the bot's docker container
5、Enter the bot's docker container5.1、related concepts5.2、How to query the docker image version used by the robot5.3、Binding peripherals5.4、Check peripheral connections5.5、Edit scripts5.6、Execute scripts5.7、Switch models, radar, and camera5.8、multiple terminals enter the same docker container5.8、How to open a container that is already in the [Exited] closed state5.8.1、Camera required 5.8.2、No need to use a camera5.8.3、enter the [Exited] closed container again
The operating environment and software and hardware reference configurations are as follows:
REFERENCE MODEL: ROSMASTER X3
Robot hardware configuration: Arm series main control, Silan A1 lidar, AstraPro Plus depth camera
Robot system: Ubuntu (version not required) + docker (version 20.10.21 and above)
PC Virtual Machine: Ubuntu (20.04) + ROS2 (Foxy)
Usage scenario: Use on a relatively clean 2D plane
5.1、related concepts
What is the host of Docker?
xxxxxxxxxxThe host is the server where we call the command to create a container using the image. This refers to the main control on our car (jetson or raspberry pi, etc.), and the host machine mentioned below refers to this.
What is GUI?
xxxxxxxxxxGUI is the graphical user interface, which mainly refers to: the image window displayed by opencv, rviz interface, rqt interface, etc.
What is a docker container for robots
xxxxxxxxxxThe robot here is the Rosmaster car, that is, the Rosmaster trolley container that has been configured with various development dependent environments
Before operating this chapter tutorial, please make sure that you have mastered the knowledge of the following chapters, otherwise you may feel more difficult to learn. In this case, please check the following pre-knowledge content repeatedly, you will feel very relaxed after mastering, Come on, you are the best!
5.2、How to query the docker image version used by the robot
The docker image version used by the robot is also the mirror version used on the trolley, and the user executes after the system image of the burned trolley is started:
xxxxxxxxxxjetson@jetson-desktop:~$ docker imagesREPOSITORY TAG IMAGE ID CREATED SIZEyahboomtechnology/ros-foxy 3.5.4 d307ad9f2cda About a minute ago 14.2GB192.168.2.51:5000/ros-foxy 1.0.0 31e97028c1c0 3 days ago 14.2GByahboomtechnology/ros-foxy 3.5.3 31e97028c1c0 3 days ago 14.2GB
You will see that there are multiple docker image versions, please select the name [yahboomtechnology/ros-foxy], the highest tag version is the latest image version of the robot. If you can find it here, use the [yahboomtechnology/ros-foxy:3.5.4] version, and the mirror image with the name [192.168.2.51:5000/ros-foxy] will not be bothered.
Why can't you just put a docker image in the car system?
If you have read the tutorial in the chapter [07, Docker ------ 3, docker images to deeply understand and release images], you should know that docker images are layered mechanisms, that is, the image of the latter tag depends on the image of the previous tag. Therefore, there may be multiple versions of docker images in the host, and the tags of these images will be updated incrementally.
In the future, we will update the new course, and we will also update the function by releasing a new docker image
5.3、Binding peripherals
First make sure that the car has connected various peripherals, and has made port binding for peripherals, and port binding is handled on docker's host (car).
Common external features: serial port device, lidar, RGBD camera, voice control module, handle remote control, etc
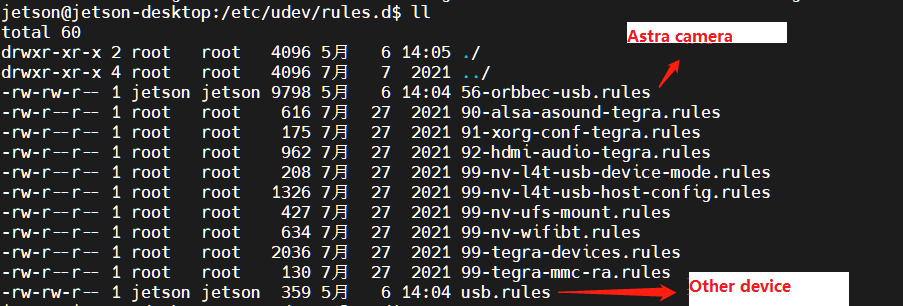
By default, the car has been bound to Astra camera, lidar and serial device , if you need to bind other devices, please refer to the port binding tutorial
For the steps of port binding, see the tutorial chapter of [6. Linux Operating System ------ 06.Binding Device ID].
Port binding has been configured in the host, and you can view the content modification if you need to modify it:
5.4、Check peripheral connections
This step operates on the host:
Here is to view peripherals other than the camera, there is no voice control module connected here, and the connected [myspeech] device will be displayed
xxxxxxxxxxll /dev | grep ttyUSB*

Check the ports of the AstraPro Plus camera as follows:
xxxxxxxxxxjetson@ubuntu:~$ ll /dev/astra*lrwxrwxrwx 1 root root 15 May 5 17:42 /dev/astradepth -> bus/usb/001/007lrwxrwxrwx 1 root root 15 May 5 17:42 /dev/astrauvc -> bus/usb/001/009
5.5、Edit scripts
Since the port number will change many times after the AstraPro Plus camera is plugged and unplugged, you need to re-edit the script to configure the port of the AstraPro Plus camera.
Edit the script running docker, this step is performed on the host:
The script [run_docker.sh] that runs docker is generally placed in the root directory of the car owner directory, and I am here in the following path. If not, you can create the file yourself, remember to give the script executable permissions after creation.
xchmod +x run_docker.sh #Give the script executable permissions

【run_docker.sh】The contents of the script are as follows:
Without comments, you can copy it directly and modify it as needed
Note: When adding a host device to a container below, if the host does not have the device connected, you need to remove the corresponding add operation to open the container
x#!/bin/bashxhost +
docker run -it \--net=host \--env="DISPLAY" \--env="QT_X11_NO_MITSHM=1" \-v /tmp/.X11-unix:/tmp/.X11-unix \-v /home/jetson/temp:/root/yahboomcar_ros2_ws/temp \-v /home/jetson/rosboard:/root/rosboard \-v /home/jetson/maps:/root/maps \-v /dev/bus/usb/001/010:/dev/bus/usb/001/010 \ -v /dev/bus/usb/001/011:/dev/bus/usb/001/011 \ --device=/dev/astradepth \--device=/dev/astrauvc \--device=/dev/video0 \--device=/dev/myserial \--device=/dev/rplidar \--device=/dev/input \-p 9090:9090 \-p 8888:8888 \yahboomtechnology/ros-foxy:3.5.4 /bin/bashAnnotated script description:
Note: When adding a host device to a container below, if the host does not have the device connected, you need to remove the corresponding add operation to open the container
xxxxxxxxxx#!/bin/bashxhost + # xhost is used to support displaying GUIs in docker
docker run -it  # Run docker images interactively--net=host# The container network is set to host mode--env="DISPLAY"  # Open the display GUI interface--env="QT_X11_NO_MITSHM=1"  # Port 1 of X11 is used for display-v /tmp/. X11-unix:/tmp/. The X11-UNIX# map shows the service node directory-v /home/jetson/temp:/root/yahboomcar_ros2_ws/temp  # As a directory for the host and container to temporarily transfer files, you can use this directory if you need to transfer files-v /home/jetson/rosboard:/root/rosboard  # Directories used for app mapping and navigation-v /home/jetson/maps:/root/maps  # directories used for app mapping and navigation-v /dev/bus/usb/001/010:/dev/bus/usb/001/010  # Add the host device to the container, here is the astrpro plus device port, how the car is not connected to the camera, please remove this line-v /dev/bus/usb/001/011:/dev/bus/usb/001/011  # Add the host device to the container, here is the astrpro plus device port, how the car is not connected to the camera, please remove this line--device=/dev/astradepth  # Add the host device to the container, here is the astrpro plus device port, how the car is not connected to the camera, please remove this line--device=/dev/astrauvc  # Add the host device to the container, here is the astrpro plus device port, how the car is not connected to the camera, please remove this line--device=/dev/video0  # Add the host device to the container, here is the astrpro plus device port, how the car is not connected to the camera, please remove this line--device=/dev/myserial  # Add the host device to the container, here is the serial device port, how the car is not connected to the serial port, please remove this line--device=/dev/rplidar  # Add the host device to the container, here is the radar device port, how the car is not connected to the radar, please remove this line--device=/dev/myspeech  # Add the host device to the container, here is the voice control device port, how the car is not connected to the voice control device, please remove this line--device=/dev/input  # Add the host device to the container, here is the handle device port, how the trolley is not connected to the handle, please remove this line-p 9090:9090# Open port-p 8888:8888 yahboomtechnology/ros-foxy:3.3.9 /bin/bash # The name of the image to be started, according to the modification queried in step 5.2; execute the /bin/bash command inside the container
#Note: When adding a host device to a container above, if the host does not connect to the device, you need to remove the corresponding add operation to open the container
Modify the above script, these two lines are the port number of the AstraPro Plus camera, because the port number will change after the camera is plugged and unplugged, you need to reconfigure the port of the camera
xxxxxxxxxx-v /dev/bus/usb/001/010:/dev/bus/usb/001/010 # Mount the storage volume to the container, mount it to a directory in the container, where the RGB and depth ports of the camera are mounted-v /dev/bus/usb/001/011:/dev/bus/usb/001/011
For the camera port queried in step 5.4 2, this port may change after the camera is plugged and unplugged, so each person is different and needs to be equipped by yourself.
xxxxxxxxxx-v /dev/bus/usb/001/007:/dev/bus/usb/001/007 # Mount the storage volume to the container and mount it to a directory in the container, where the RGB and depth ports of the camera are mounted-v /dev/bus/usb/001/009:/dev/bus/usb/001/009
5.6、Execute scripts
After the 5.5 step is completed, open the terminal on the host of docker [that is, the car, which can be on VNC or on the screen of the car].
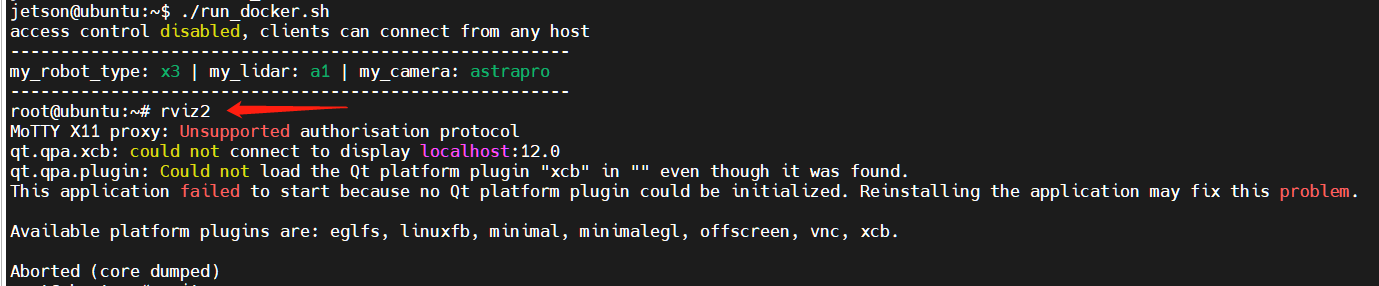
Note: Here must be executed on the VNC of the trolley or on the trolley screen, not in the trolley terminal entered remotely through ssh (such as the trolley terminal entered through MobaXterm), otherwise the GUI image may not be displayed in the container, as follows in MobaXterm into the trolley terminal execution run_docker.sh after entering the container, rviz cannot be displayed
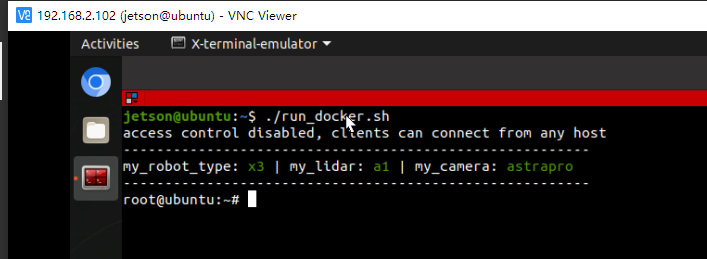
Execute on the VNC interface of the trolley or on the trolley screen:
x./run_docker.sh
The container can be entered correctly, and the GUI screen can be displayed, and the rviz2 command test can be executed again.
If the GUI cannot be displayed after executing the rviz2 command, the following error is displayed: (Generally, it may appear in the Raspberry Pi master)
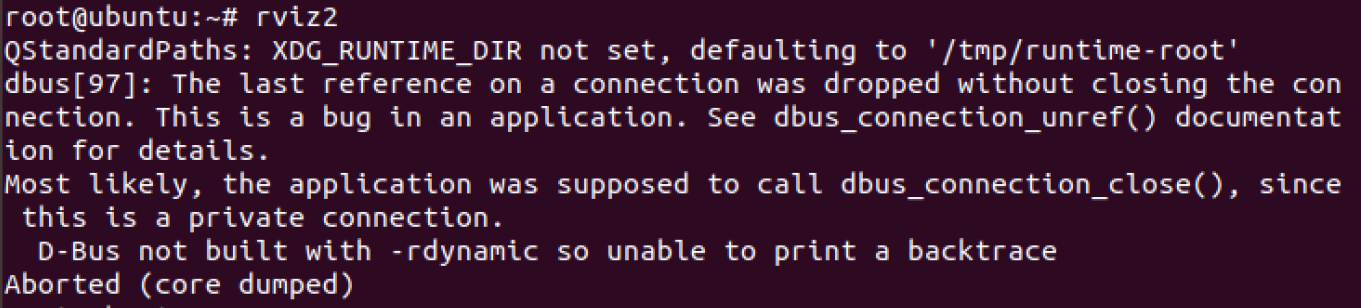
You need to add another parameter to the startup script:
xxxxxxxxxx--security-opt apparmor:unconfined
namely:
xxxxxxxxxx#!/bin/bashxhost +
docker run -it \--net=host \--env="DISPLAY" \--env="QT_X11_NO_MITSHM=1" \-v /tmp/.X11-unix:/tmp/.X11-unix \--security-opt apparmor:unconfined \                        # Added this parameter-v /home/jetson/temp:/root/yahboomcar_ros2_ws/temp \-v /home/jetson/rosboard:/root/rosboard \-v /home/jetson/maps:/root/maps \-v /dev/bus/usb/001/010:/dev/bus/usb/001/010 \          -v /dev/bus/usb/001/011:/dev/bus/usb/001/011 \  --device=/dev/astradepth \--device=/dev/astrauvc \--device=/dev/myserial \--device=/dev/rplidar \--device=/dev/myspeech \--device=/dev/input \-p 9090:9090 \-p 8888:8888 \yahboomtechnology/ros-foxy:3.3.9 /bin/bash
Then run the script again to enter the container and display the GUI screen.
5.7、Switch models, radar, and camera
Note: Since ROSMASTER series robots are divided into multiple robots and multiple devices, the factory system has been configured with routines for multiple devices, but because the product cannot be automatically identified, it is necessary to manually set the machine type and radar model.
After entering the container: according to the model of the car, the type of radar and the type of camera, make the following modifications:
xxxxxxxxxxroot@ubuntu:/# cdroot@ubuntu:~# vim .bashrc
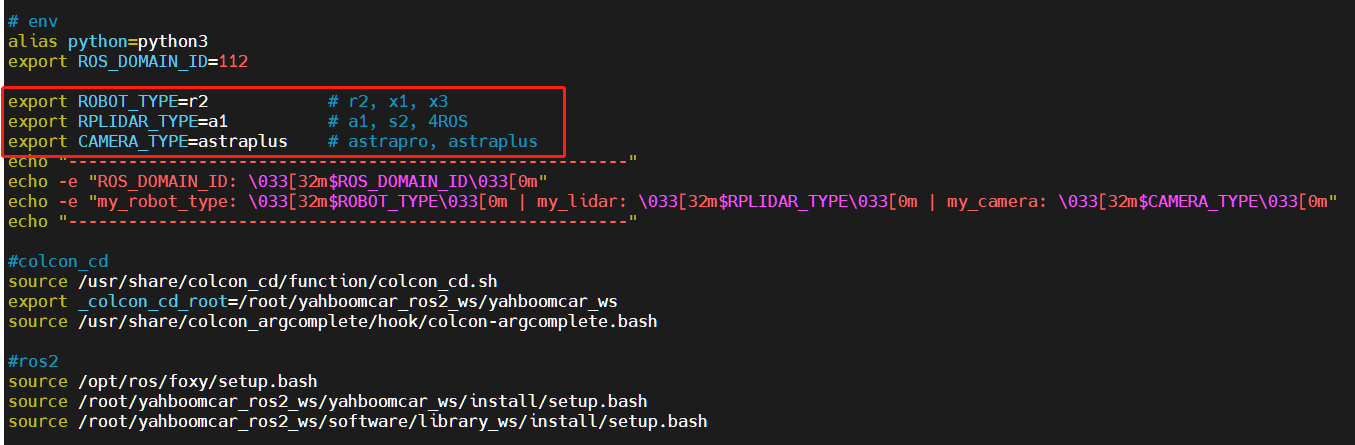
After the modification is complete, save and exit vim, and then execute:
xxxxxxxxxxroot@ubuntu:~# source .bashrc--------------------------------------------------------ROS_DOMAIN_ID: 12my_robot_type: x3 | my_lidar: a1 | my_camera: astraplus--------------------------------------------------------root@ubuntu:~#
You can see the model of the currently modified car, the type of radar and the type of camera
The robot project files are stored in the following directory:
xxxxxxxxxx/root/yahboomcar_ros2_ws
5.8、multiple terminals enter the same docker container
In the above steps, a docker container has been opened, and another terminal can be opened on the host (car) to view:
xxxxxxxxxxdocker ps -a

Now enter the docker container in this newly opened terminal:
xxxxxxxxxxdocker exec -it 5b698ea10535 /bin/bash

Successfully entering the container, you can also open an unlimited number of terminals to enter the container.
The robot project files are stored in the following directory:
xxxxxxxxxx/root/yahboomcar_ros2_ws
Note:
(1) When executing the command in step 2, make sure that the container is in the [UP] state

(2) If the container is in the Exited shutdown state, see Step 5.8 below

5.8、How to open a container that is already in the [Exited] closed state
There are two cases here: you still need to use a camera and you no longer need to use a camera
5.8.1、Camera required
First of all, you need to check whether the port of the AstraPro Plus camera has changed according to the guidance in the [5.4, Check peripheral connection] step above.
If the port of the Astra Pro camera changes, it cannot enter the container again.
(1) If there are some modifications in the container that need to be retained, you can refer to the following command to generate a new image:
xxxxxxxxxxCommit an image from the container:docker commit container ID Target image name to be created: [tag name]For example: docker commit 66c40ede8c68 yahboomtechnology/ros-foxy:1.1 # tag names increment according to your own situationThen run this new image into the container: see steps 5.2 to 5.6 in this section
(2) If there are no modifications that need to be retained, then directly refer to the [5.2 to 5.6] steps in this section to enter the container.
If the port of the AstraPro Plus camera has not changed, then directly refer to the [5.8.3, enter the [Exited] closed container again] step to execute.
5.8.2、No need to use a camera
Directly refer to the [5.8.3, enter the [Exited] closed container again] step execution.
5.8.3、enter the [Exited] closed container again
Open the terminal on the docker's host [that is, the car, which can be on VNC or on the screen of the car].
Note: Here must be executed on the VNC of the car or on the screen of the car, not in the car terminal entered remotely through ssh (such as the car terminal entered through MobaXterm), otherwise the GUI image may not be displayed in the container, of course, how you do not need to display the GUI image, then you can.
First, check the status of the container
xxxxxxxxxxdocker ps -a
Enable GUI access permissions
xxhost +
Open the container [the ID of the container here can be abbreviated, as long as it can uniquely identify the container that currently exists]
xxxxxxxxxxdocker start 5b
Enter the container again
xxxxxxxxxxdocker exec -it 5b /bin/bash
Open rviz to see if the GUI screen can be opened
xxxxxxxxxxrviz2
The specific implementation is as follows:
jetson@ubuntu:~$ docker ps -aCONTAINER ID IMAGE COMMAND CREATED STATUS PORTS NAMES5b698ea10535 yahboomtechnology/ros-foxy:3.3.9 "/bin/bash" 3 days ago Exited (0) 8 seconds ago ecstatic_lewinjetson@ubuntu:~$ xhost +access control disabled, clients can connect from any hostjetson@ubuntu:~$ docker start 5b5bjetson@ubuntu:~$ docker exec -it 5b /bin/bash--------------------------------------------------------my_robot_type: x3 | my_lidar: a1 | my_camera: astrapro--------------------------------------------------------root@ubuntu:/# rviz2QStandardPaths: XDG_RUNTIME_DIR not set, defaulting to '/tmp/runtime-root'[INFO] [1682298616.634096279] [rviz2]: Stereo is NOT SUPPORTED[INFO] [1682298616.634576375] [rviz2]: OpenGl version: 3.1 (GLSL 1.4)[INFO] [1682298617.959654036] [rviz2]: Stereo is NOT SUPPORTED