Welcome to ROS-WiFi Camera Module repository
1. Computer configuration esp32 instruction
Computer serial port configuration module instructions (ROS version)
Computer serial port configuration module instructions (ROS version)The module needs to be connected to the usbttl moduleSerial port configuration1. Configure the wifi command in STA mode (mode for connecting to LAN)2. Configure the wifi command in AP mode (module self-heating point mode)3. Configure wifi mode4. Other commands5. Command to configure ROS ip6. Configure domain id: command
The module needs to be connected to the usbttl module
| usbttl | wifi camera |
|---|---|
| RX | TX |
| TX | RX |
| GND | GND |
| VCC | VCC |
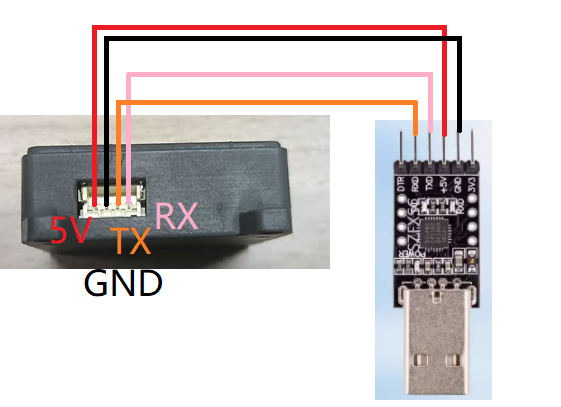
Serial port configuration
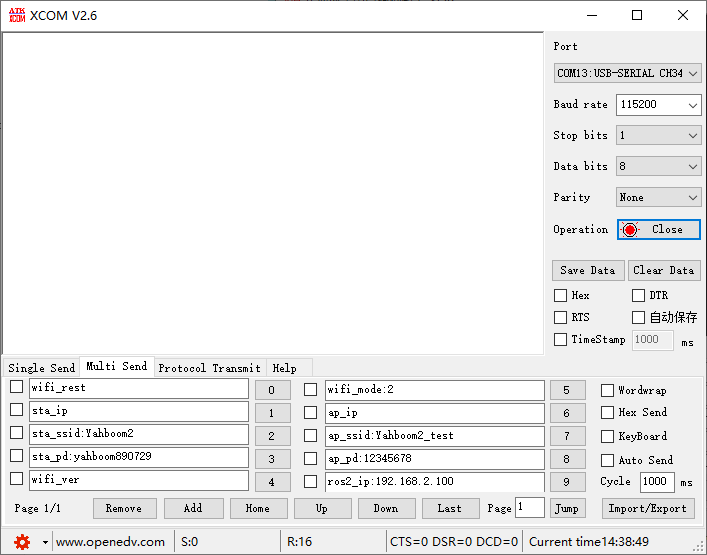
Baud rate 115200, no parity, no hardware flow control, 1 stop bit
If you use the serial port assistant configuration, when sending commands, you need to remove the automatic sending of new lines (additional bits)
As shown in the figure:
1. Configure the wifi command in STA mode (mode for connecting to LAN)
| Command | Description | Example | Remarks |
|---|---|---|---|
| sta_ssid: | Name of the wifi to connect to | sta_ssid:yahboom | yahboom: is the wifi to connect to |
| sta_pd: | Password of the wifi to connect to | sta_pd:12345678 | 12345678: is the password of the wifi to connect to |
Notes
- Whether it is sta_ssid or sta_pd, it must be followed by an English character such as comma (,), colon (:), period (.), etc.
- When the wifi to be connected does not have a password, just send sta_pd: once.
- The above command will return OK if it is successful. If it does not return any information, check the serial port connection.
- When sending the sta_ssid: command, it will return fail,ssid is null!, indicating that the connected wifi name cannot be empty.
- The command can be sent in all uppercase or lowercase.
- The wifi name and password cannot exceed 30 characters in length, otherwise the configuration will fail.
- The wifi name and password cannot contain Chinese characters.
- The wifi password will be automatically reset every time it is changed. If you only change the wifi name, you need to manually power off and reset it
2. Configure the wifi command in AP mode (module self-heating point mode)
| Command | Description | Example | Remarks |
|---|---|---|---|
| ap_ssid: | The wifi name to be set | ap_ssid:my_wifi | my_wifi: is the wifi to be set |
| ap_pd: | The wifi password to be set | sta_pd:12345678 | 12345678: is the wifi password to be set |
Notes
- Whether it is ap_ssid or ap_pd, it must be followed by an English character such as comma (,), colon (:), period (.), etc.
- When the wifi to be set has no password, just send ap_pd: once.
- The above command will return OK if it is successful. If it does not return any information, check the serial port connection.
- When sending the ap_ssid: command, it will return fail,AP_Name is null!, indicating that the wifi name cannot be empty.
- The command can be sent in all uppercase or lowercase.
- The wifi name and password cannot exceed 30 characters in length, otherwise the configuration will fail.
- The wifi name and password cannot contain Chinese characters.
- The wifi password will be automatically reset every time it is changed. If you only change the wifi name, you need to manually power off and reset
3. Configure wifi mode
| Command | Description | Example | Note |
|---|---|---|---|
| wifi_mode: | Configure wifi mode | wifi_mode:2 | 0: AP mode 1: STA mode 2: AP+STA mode |
Notes
- wifi_mode It must be followed by a dot symbol such as comma (,), colon (:), period (.), etc
- wifi_mode can only set 3 modes in total. If a negative number is passed in, the default is AP mode. If the number is greater than 2, the default is AP+STA mode
4. Other commands
| Command | Description | Example | Return value |
|---|---|---|---|
| sta_ip | Query the ip address of sta mode | sta_ip | Return the ip address connected to the LAN (such as sta_ip:192.168.2.199) |
| ap_ip | Query the ip address of ap mode | ap_ip | Return the ip address of the wifi mode itself (such as ap_ip:192.168.4.1) |
| wifi_reset | Restore wifi configuration to factory settings | wifi_reset | Reset_OK |
| wifi_ver | Check the version of wifi firmware | wifi_ver | YAHBOOM VerSion:1.8.3 |
Notes
- The command can be sent in all uppercase or all lowercase
- If the above command is successful, there will be corresponding information of the return value. If there is no information returned, check the serial port connection
- wifi_reset is to configure the wifi mode to AP+STA mode. The wifi name of the ap is Yahboom_ESP32_WIFI, no password, and it will reset automatically without manual reset
5. Command to configure ROS ip
| Command | Description | Example | Notes |
|---|---|---|---|
| ros2_ip: | Host agent to connect to | ros2_ip:192.168.2.105 | 192.168.2.105: is the IP address of the proxy host |
Notes
- The proxy host is a system with ROS2 (humble) environment unbutu
- The command can be sent in all uppercase or all lowercase
- ros2_ip must be followed by an English character such as comma (,), colon (:), period (.), etc.
- The connected host IP must be in the same network segment as the wifi connected to esp32
- ROS2 can only be started in STA mode/or dual mode coexistence mode, not only AP hotspot mode, otherwise the ROS system will not be implemented
- The proxy port is 9999, the command to start in the host terminal is as follows:
docker run -it --rm -v /dev:/dev -v /dev/shm:/dev/shm --privileged --net=host microros/micro-ros-agent:humble udp4 --port 9999 -v4
6. Configure domain id: command
| command | description | example | notes |
|---|---|---|---|
| domain_id: | Host agent to connect to | domain_id:20 | 20: is the domainid of ROS |
Notes
- The agent host is a system with ROS2 (humble) environment unbutu
- The command can be sent in all uppercase or all lowercase
- The domain_id must be followed by an English character such as comma (,), colon (:), period (.) and so on
- The default domain_id firmware is 20