yahboom
HomeLearn
Solution
Blog
Online Store
About Us
EN/中文
ROS Robot Expansion Board📖
1.Expansion board STM32 driver
  • 0. Precautions
  • 1.1 Expansion Board Introduction_V3.0
  • 1.1 Expansion Board Introduction_V1.0
  • 1.2 STM32 Development environment
  • 1.3 Button to control the buzzer to whistle
  • 1.4 FreeRTOS application
  • 1.5 Serial communication
  • 1.6 SBUS model aircraft remote control
  • 1.7 CAN bus communication
  • 1.8 RGB colorful light bar
  • 1.9 Timer interrupt to control PWM servo
  • 1.10 Control serial port servos
  • 1.11 Nine-axis attitude sensor to obtain data
  • 1.12 Control the forward and reverse rotation of the motor
  • 1.13 The timer captures the encoder data
  • 1.14.1 Robot kinematics analysis theory
  • 1.14.2 Mecanum wheel kinematics analysis
  • 1.15 PID control robot movement
  • 1.16 OLED character display
2.Python basic control
  • 2.0 Bind PCB port devices
  • 2.1 Update the firmware of the expansion board
  • 2.2 Turn off the self-starting large program at startup
  • 2.3 Install the Rosmaster driver library
  • 2.4 Buzzer whistle
  • 2.5 Control PWM servo
  • 2.6 RGB colorful light bar special effects display
  • 2.7 Control the forward and reverse rotation of the motor
  • 2.8 Control the movement of the robot
  • 2.9 Control Serial Servo
3.ROS1 Basic Course
  • 1.ROS introduction
  • 2.ROS installation
  • 3.ROS common command tools
  • 4.ROS workspace
  • 5.ROS function package
  • 6.ROS node
  • 7.ROS topic publisher
  • 8.ROS topic subscribers
  • 9.ROS service client
  • 10.ROS service server
  • 11.ROS action client
  • 12.ROS action server
  • 13.ROS custom message reception
  • 14.ROS-launch file
  • 15.ROS-TF transformation
  • 16.ROS parameter service
  • 17.ROS-rviz use
  • 18.ROS-rqt tool usage
  • 19.Topic message recording and playback
  • 20.urdf model introduction
  • 21.gazebo introduction
  • 22.ROS distributed communication
4.ROS1 robot control
  • 0. Bind PCB port devices
  • 1. Package Use the tutorial
  • 2. Package Description
  • 3. Robot keyboard control
  • 4. Robot state estimation
  • 5. Robot imu calibration
  • 6. Robot URDF Model
5.ROS2 Basic Course
  • 1.Introduction to ROS2
  • 2.ROS2 install Humble
  • 3.ROS2 development environment
  • 4.ROS2 workspace
  • 5.ROS2 function package
  • 6.ROS2 node
  • 7.ROS2 topic communication
  • 8.ROS2 service communication
  • 9.ROS2 action communication
  • 10.ROS2 custom interface message
  • 11.ROS2 parameter service case
  • 12.ROS2 meta-function package
  • 13.ROS2 distributed communication
  • 14.ROS2 DDS
  • 15.ROS2 time related API
  • 16.ROS2 common command tools
  • 17.ROS2 rviz2 use
  • 18.ROS2 rqt toolbox
  • 19.ROS2 Launch startup file configuration
  • 20.ROS2 recording and playback tool
  • 21.ROS2 URDF model
  • 22.ROS2 Gazebo simulation platform
  • 23.ROS2 TF2 coordinate transformation
6.ROS2 robot control
  • 0. Bind PCB port devices
  • 1. Package Use the tutorial
  • 2. Robot information release
  • 3. Robot keyboard control
  • 4. Robot state estimation
  • 5. Robot calibration
  • 6. URDF model
7.RDK X3 course
  • 1. Update the firmware of the expansion board
  • 2. Turn off the self-starting large program at startup
  • 3. Install the Rosmaster driver library
  • 4. Buzzer whistle
  • 5. Control PWM servo
  • 6. RGB colorful light bar special effects
  • 7. Control motor forward reverse
  • 8. Control robot movement
  • 9. Control Serial Servo
Download
  • Rules_File
  • Hardware Info
  • Code
  • 3D Model File
  • RDK Code
  • ROS2_Basic_VM
Download ZIP

Welcome to ROS Robot Expansion Board repository

4.ROS2 workspace

4. ROS2 Workspace

1. Workspace Introduction

In ROS robot development, when developing specific robot functions, various code, parameters, scripts, and other files need to be stored and managed in a folder. This folder is called a workspace in the ROS system. A workspace is a folder that stores project-related files and serves as the central repository for all data during the development process.

2. Create a Workspace

  • Create a folder to store the project files. yahboomcar_ws is the folder name; you can name it anything.
xxxxxxxxxx
mkdir -p yahboomcar_ws/src
  • Switch to the workspace folder
xxxxxxxxxx
cd ~/yahboomcar_ws

3. Compile the Workspace

xxxxxxxxxx
colcon build

After the build is complete, you should see the build, install, and log directories:
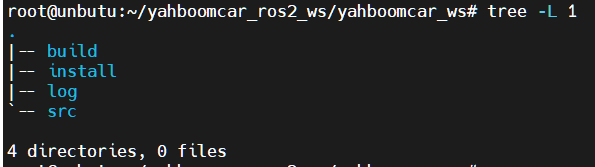
image-20231023151712427

A typical workspace structure in the ROS system is shown above. yahboomcar_ws is the root directory of the workspace, which contains four subdirectories, or subspaces.

  • src, the code space, where all future code and scripts will need to be placed manually;
  • build, the compilation space, stores intermediate files generated during the compilation process;
  • install, the installation space, stores compiled executable files and scripts;
  • log, the log space, stores various warnings, errors, and information logs during the compilation and execution process.

Generally speaking, the vast majority of operations within these four workspaces are performed in the src folder. After a successful compilation, the results in the install folder are executed. The build and log folders are rarely used.

It's also important to emphasize that you can define your own workspace names**, and the number of workspaces is not unique. For example:

xxxxxxxxxx
Workspace 1: ros2_ws_a, for robot A development
Workspace 1: ros2_ws_b, for robot B development
Workspace 1: ros2_ws_c, for robot C development

The above scenarios are completely permitted, just like creating multiple new projects in an integrated development environment; they all exist in parallel.

4. Setting Environment Variables

After successfully compiling, we need to set environment variables to ensure the system can find our package and executable files:

xxxxxxxxxx
# Valid only in the current terminal
source install/setup.bash
# Valid in all terminals
echo "source ~/yahboomcar_ws/install/setup.bash" >> ~/.bashrc

This completes the creation, compilation, and configuration of the workspace.

ROS2 development environment
ROS2 function package

COMPANY

  • About us
  • Team Style
  • Blog

LEARNING & EXPLORATION

  • Tutorials
  • Edge AI hardware
  • Educational robots
  • Embedded intelligent hardware

WHERE TO BUY

  • Yahboom Online Store
  • Amazon
  • Alibaba
  • AliExpress
  • Mercado

TECHNOLOGY SUPPORT

  • Email: support@yahboom.com

BE A DISTRIBUTOR

  • Email: sales@yahboom.com
QR Code

Copyright © 2017-2026 Yahboom. All Rights Reserved.

EN/中文